Xcode4.4.1安装SBjson以及使用的相关方法
2013-05-16 01:49
411 查看
初学ios,现在涉及到json数据的问题,朋友说用SBjson比较方便和快捷,但是网上搜了好多写的都不全面和具体,今天记录下来折腾的这一下午,希望对新手有所帮助。
一:SBJSON
1,由于SBjson属于第三方类库,所以需要我们下载后导入到项目中。
官方下载地址:https://github.com/stig/json-framework/downloads
官方文档(必看) http://stig.github.com/json-framework/api/3.0/index.html
介绍 http://stig.github.com/json-framework/
2,将下载好的文件解压缩,然后在Xcode中File-Add File to "demo"....,将解压后的Classes文件夹添加到项目中来
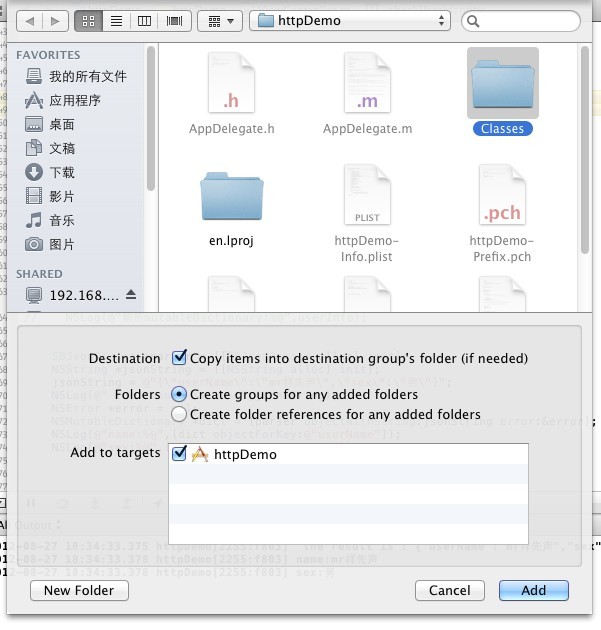
(注意勾选上copy items..Folders选择第一个)
3,这个时候,项目下会多出一个Classes文件夹,点开后里面全是头文件。不管这些,在你的代码里(如ViewControler.h)#import "SBJSON.h" 注意名字不要错了。这个时候,就可以使用啦。
4,项目中不用覆盖任何方法,相关的类直接拿来就可以使用。JSON类型数据解析成NSMutableDictionary

5,把基本数据类型封装成Json类型。
[java] view
plaincopy
NSString *username = nameField.text;
NSString *password = passwordField.text;
NSMutableDictionary *userInfo = [[NSMutableDictionary alloc] initWithObjectsAndKeys:username,@"username",password,@"password",nil];
--------SBJsonWriter----------------------------------
SBJsonWriter *writer = [[SBJsonWriter alloc] init];
NSLog(@"封装mutableDictionary:%@",[writer stringWithObject:userInfo]);
输出结果:封装mutableDictionary:{"username":"wda345","password":"132213"}
6,记得多看一下官方的API哈。
SBJSon解析的类型有:
Null -> NSNull
String -> NSMutableString
Array -> NSMutableArray
Object -> NSMutableDictionary
Boolean -> NSNumber
Number -> NSDecimalNumber
如果是其他类型,如,NSDate,那么需要把此转为NSString来处理;NSDictionary,NSArray集合类的基项类型是NSString、NSNumber、NSNull。
传送门:
/article/7745715.html
http://kevin1366204484.blog.163.com/blog/static/17196620820121304511302/
http://www.devdiv.com/forum.php?mod=viewthread&tid=122618
/article/5078511.html
二,网络请求:NSURLConnection
待续....
太麻烦了,有空再研究:
http://hi.baidu.com/jt_one/item/8abdbcfe06d8e65dc9f337eb
三,ASIHTTPRequest 的使用方法
这是一个很火的第三方类库,实用,简单,方便,所以我也放弃了使用官方的 NSURLConnection,改用这个。
此类库下载地址: http://allseeing-i.com/ASIHTTPRequest/ 详细功能方法请登录网站查询文档。
1,首先创建一个single View Applicaiton的项目模版,然后 File----add file to project...弹出的对话框选择解压出来的ASIHTTPRequest文件夹(打开全是.h文件),记得勾选destination选项。
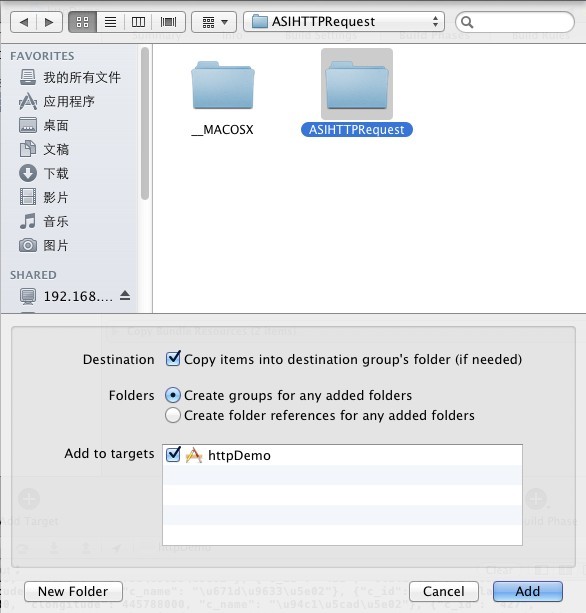
成功添加后,在你的项目下会有一个以ASIHTTPRequest命名的文件夹,打开后全是.h类库
2,此时虽然在项目中导入"ASIHTTPRequest.h" 就能使用它,但是编译的时候会出错误,因为我们的项目还没有手机网络设置,手机服务等类库,这需要我们导入ios自带的类库。
一共需要:SystemConfiguration.framework, MobileCoreServices.framework,和libz.1.2.3.dylib这几个类库。
1. 选中项目
2. 选中目标
3. 跳转到“Build Phases”标签
4. 展开“Link Binary With Libraries”分组
5. 点击“+”添加类库如下图所示:


3,好了,大功告成,开始在你的.h文件下#import导入吧!
4,同步请求(httpPost)
这是ASIHTTPRequest最简单的一种使用模式,发送startSynchronous消息后即开始在同一线程中执行HTTP请求,线程将一直等待直到请求结束(请求成功或者失败)。通过检查error属性可以判断请求是否成功或者有错误发生。
要获取返回的文本信息,调用responseString方法。如果下载的是二进制文件,例如图片、MP3,则调用responseData方法,可以得到一个NSData对象。
这是我的一个点击button,校验密码的例子,大家注意:NSURL中的http:// 不要忘记了,否则即便没有错误,不会有任何提示。(ASIFormDataRequest类需要导入)
[java] view
plaincopy
//检查用户密码,服务器请求
- (IBAction)checkUserIdentity:(id)sender {
NSString *username = nameField.text;
NSString *password = passwordField.text;
//ASIHTTPRequest
NSURL *url = [NSURL URLWithString:@"http://192.168.1.4:6401/wap"];
// ASIHTTPRequest *request =[ASIHTTPRequest requestWithURL:url];//Httpget
ASIFormDataRequest *request = [ASIFormDataRequest requestWithURL:url];//实例化一个Http Post类
[request setPostValue:username forKey:@"username"]; //发送数据
[request setPostValue:password forKey:@"password"]; //发送数据
[request startSynchronous]; //执行同步请求
NSError *error = [request error];
//如果不错误,输出这些内容
if(!error){
NSString *res = [request responseString];
NSLog(@"res:%@",res);
SBJsonParser *parser = [[SBJsonParser alloc] init];
NSError *errorNil = nil;
NSMutableDictionary *dict = [parser objectWithString:res error:&errorNil];
NSNumber *status = [dict objectForKey:@"status"];
NSLog(@"status:%@",[dict objectForKey:@"status"]);
NSLog(@"message:%@",[dict objectForKey:@"message"]);
if([status intValue] == 0){
NSLog(@"此用户没有订购爱贝通业务!");
}
else{
NSLog(@"info:%@",[dict objectForKey:@"message"]);
NSLog(@"%d",NUMBER);
NSURL *targetlist = [NSURL URLWithString:tartgetlistUrl];
ASIHTTPRequest *get = [ASIHTTPRequest requestWithURL:targetlist];
[get startSynchronous];
NSError *tagetlistError= [get error];
if(!tagetlistError){
NSLog(@"tagetList`s res:%@",[get responseString]);
[self performSegueWithIdentifier:@"second" sender:self];
// [self.navigationController.navigationController]
}
}
}
}
5,关于异步请求:
一般情况下,应该优先使用异步请求代替同步请求,当在主线程中使用ASIHTTPRequest同步请求,应用程序的界面会锁定,无法进行任何操作,直到请求完成。
[java] view
plaincopy
- (IBAction)grabURLInBackground:(id)sender
{
NSURL *url = [NSURL URLWithString:@"http://allseeing-i.com"];
ASIHTTPRequest *request = [ASIHTTPRequest requestWithURL:url];
[request setDelegate:self];
[request startAsynchronous];
}
- (void)requestFinished:(ASIHTTPRequest *)request
{
// 当以文本形式读取返回内容时用这个方法
NSString *responseString = [request responseString];
// 当以二进制形式读取返回内容时用这个方法
NSData *responseData = [request responseData];
}
- (void)requestFailed:(ASIHTTPRequest *)request
{
NSError *error = [request error];
}
传送门:
官方文档:http://allseeing-i.com/ASIHTTPRequest/How-to-use
http://www.dreamingwish.com/dream-2011/powerful-asihttprequest-library-c.html
http://www.cocoachina.com/bbs/read.php?tid-9455-keyword-ASIHttpRequest.html
http://hi.baidu.com/xiezuan/item/dc595338f21e9a89f4e4ad42
http://www.cocoachina.com/iphonedev/sdk/2010/1011/2159.html
原文来自:http://blog.csdn.net/mad1989/article/details/7913359
一:SBJSON
1,由于SBjson属于第三方类库,所以需要我们下载后导入到项目中。
官方下载地址:https://github.com/stig/json-framework/downloads
官方文档(必看) http://stig.github.com/json-framework/api/3.0/index.html
介绍 http://stig.github.com/json-framework/
2,将下载好的文件解压缩,然后在Xcode中File-Add File to "demo"....,将解压后的Classes文件夹添加到项目中来
(注意勾选上copy items..Folders选择第一个)
3,这个时候,项目下会多出一个Classes文件夹,点开后里面全是头文件。不管这些,在你的代码里(如ViewControler.h)#import "SBJSON.h" 注意名字不要错了。这个时候,就可以使用啦。
4,项目中不用覆盖任何方法,相关的类直接拿来就可以使用。JSON类型数据解析成NSMutableDictionary
5,把基本数据类型封装成Json类型。
[java] view
plaincopy
NSString *username = nameField.text;
NSString *password = passwordField.text;
NSMutableDictionary *userInfo = [[NSMutableDictionary alloc] initWithObjectsAndKeys:username,@"username",password,@"password",nil];
--------SBJsonWriter----------------------------------
SBJsonWriter *writer = [[SBJsonWriter alloc] init];
NSLog(@"封装mutableDictionary:%@",[writer stringWithObject:userInfo]);
输出结果:封装mutableDictionary:{"username":"wda345","password":"132213"}
6,记得多看一下官方的API哈。
SBJSon解析的类型有:
Null -> NSNull
String -> NSMutableString
Array -> NSMutableArray
Object -> NSMutableDictionary
Boolean -> NSNumber
Number -> NSDecimalNumber
如果是其他类型,如,NSDate,那么需要把此转为NSString来处理;NSDictionary,NSArray集合类的基项类型是NSString、NSNumber、NSNull。
传送门:
/article/7745715.html
http://kevin1366204484.blog.163.com/blog/static/17196620820121304511302/
http://www.devdiv.com/forum.php?mod=viewthread&tid=122618
/article/5078511.html
二,网络请求:NSURLConnection
待续....
太麻烦了,有空再研究:
http://hi.baidu.com/jt_one/item/8abdbcfe06d8e65dc9f337eb
三,ASIHTTPRequest 的使用方法
这是一个很火的第三方类库,实用,简单,方便,所以我也放弃了使用官方的 NSURLConnection,改用这个。
此类库下载地址: http://allseeing-i.com/ASIHTTPRequest/ 详细功能方法请登录网站查询文档。
1,首先创建一个single View Applicaiton的项目模版,然后 File----add file to project...弹出的对话框选择解压出来的ASIHTTPRequest文件夹(打开全是.h文件),记得勾选destination选项。
成功添加后,在你的项目下会有一个以ASIHTTPRequest命名的文件夹,打开后全是.h类库
2,此时虽然在项目中导入"ASIHTTPRequest.h" 就能使用它,但是编译的时候会出错误,因为我们的项目还没有手机网络设置,手机服务等类库,这需要我们导入ios自带的类库。
一共需要:SystemConfiguration.framework, MobileCoreServices.framework,和libz.1.2.3.dylib这几个类库。
1. 选中项目
2. 选中目标
3. 跳转到“Build Phases”标签
4. 展开“Link Binary With Libraries”分组
5. 点击“+”添加类库如下图所示:

3,好了,大功告成,开始在你的.h文件下#import导入吧!
4,同步请求(httpPost)
这是ASIHTTPRequest最简单的一种使用模式,发送startSynchronous消息后即开始在同一线程中执行HTTP请求,线程将一直等待直到请求结束(请求成功或者失败)。通过检查error属性可以判断请求是否成功或者有错误发生。
要获取返回的文本信息,调用responseString方法。如果下载的是二进制文件,例如图片、MP3,则调用responseData方法,可以得到一个NSData对象。
这是我的一个点击button,校验密码的例子,大家注意:NSURL中的http:// 不要忘记了,否则即便没有错误,不会有任何提示。(ASIFormDataRequest类需要导入)
[java] view
plaincopy
//检查用户密码,服务器请求
- (IBAction)checkUserIdentity:(id)sender {
NSString *username = nameField.text;
NSString *password = passwordField.text;
//ASIHTTPRequest
NSURL *url = [NSURL URLWithString:@"http://192.168.1.4:6401/wap"];
// ASIHTTPRequest *request =[ASIHTTPRequest requestWithURL:url];//Httpget
ASIFormDataRequest *request = [ASIFormDataRequest requestWithURL:url];//实例化一个Http Post类
[request setPostValue:username forKey:@"username"]; //发送数据
[request setPostValue:password forKey:@"password"]; //发送数据
[request startSynchronous]; //执行同步请求
NSError *error = [request error];
//如果不错误,输出这些内容
if(!error){
NSString *res = [request responseString];
NSLog(@"res:%@",res);
SBJsonParser *parser = [[SBJsonParser alloc] init];
NSError *errorNil = nil;
NSMutableDictionary *dict = [parser objectWithString:res error:&errorNil];
NSNumber *status = [dict objectForKey:@"status"];
NSLog(@"status:%@",[dict objectForKey:@"status"]);
NSLog(@"message:%@",[dict objectForKey:@"message"]);
if([status intValue] == 0){
NSLog(@"此用户没有订购爱贝通业务!");
}
else{
NSLog(@"info:%@",[dict objectForKey:@"message"]);
NSLog(@"%d",NUMBER);
NSURL *targetlist = [NSURL URLWithString:tartgetlistUrl];
ASIHTTPRequest *get = [ASIHTTPRequest requestWithURL:targetlist];
[get startSynchronous];
NSError *tagetlistError= [get error];
if(!tagetlistError){
NSLog(@"tagetList`s res:%@",[get responseString]);
[self performSegueWithIdentifier:@"second" sender:self];
// [self.navigationController.navigationController]
}
}
}
}
5,关于异步请求:
一般情况下,应该优先使用异步请求代替同步请求,当在主线程中使用ASIHTTPRequest同步请求,应用程序的界面会锁定,无法进行任何操作,直到请求完成。
[java] view
plaincopy
- (IBAction)grabURLInBackground:(id)sender
{
NSURL *url = [NSURL URLWithString:@"http://allseeing-i.com"];
ASIHTTPRequest *request = [ASIHTTPRequest requestWithURL:url];
[request setDelegate:self];
[request startAsynchronous];
}
- (void)requestFinished:(ASIHTTPRequest *)request
{
// 当以文本形式读取返回内容时用这个方法
NSString *responseString = [request responseString];
// 当以二进制形式读取返回内容时用这个方法
NSData *responseData = [request responseData];
}
- (void)requestFailed:(ASIHTTPRequest *)request
{
NSError *error = [request error];
}
传送门:
官方文档:http://allseeing-i.com/ASIHTTPRequest/How-to-use
http://www.dreamingwish.com/dream-2011/powerful-asihttprequest-library-c.html
http://www.cocoachina.com/bbs/read.php?tid-9455-keyword-ASIHttpRequest.html
http://hi.baidu.com/xiezuan/item/dc595338f21e9a89f4e4ad42
http://www.cocoachina.com/iphonedev/sdk/2010/1011/2159.html
原文来自:http://blog.csdn.net/mad1989/article/details/7913359

相关文章推荐
- Xcode4.4.1安装SBjson以及使用的相关方法
- Xcode升级后插件失效的解决方法Xcode8注释快捷键以及相关插件使用无效解决方法
- RHEL 6 上安装 yum 以及 epel源的使用方法
- linux 软件安装的两种方法,以及使用镜像的两种路径(unit13)
- sublime 插件使用和安装方法以及一些小技巧
- 安装phantomjs、使用phantomjs以及时遇到问题时的解决方法
- MyBatis_Generator插件的安装以及简单使用方法(图解)
- iReport4.5.1字体的安装使用以及pdf字体相关的处理
- pychecker以及pylint的安装以及使用方法
- f2c / f77 安装指导手册以及使用方法,无瑕纯洁版
- XCode安装插件以及手误选择了「Skip Bundle」后需要重新允许「Load Bundle」的解决方法
- Boost的某些库还是需要生成二进制的库的,必须安装才行,以及使用库的方法
- vlc 嵌入到 MFC 使用步骤以及相关问题解决方法
- CocoaPods 的详细安装步骤,使用方法以及安装过程中出现的各种错误总结
- 哈希长度扩展攻击的简介以及HashPump安装使用方法
- KextWizard 的使用方法;以及Kext安装的几种工具下载
- 编程小技巧:使用GDI32函数安装字体,以及.NET中的方法
- Weblogic 10安装部署以及使用方法
- ArcGIS 10.0简单安装方法及ArcGIS其他组件使用相关问题
- Windows下为PHP安装redis扩展以及使用方法