获得Android系统所有已安装的应用并联网自动检测升级更新
2013-05-09 15:40
776 查看
一、 说明:
本示例是在上一个示例(Android应用自身升级)的基础上完成的。环境配置也同上一个demo一样。只是增加了一些功能用来检测Android系统中所有需要升级的应用程序,并从服务器上下载更新。
二、 功能需求说明:
a) 检测出Android系统中所有已安装的应用(区别与Android系统自带的应用),并获得每个应用的信息。
b) 根据上一步获得的系统中已安装的应用信息,通过http连接tomcat7服务器,检测每个应用的代码版本并与当前应用的代码版本进行比较,然后将需要更新的应用显示 在ListView中。
c) 在ListView的onItemClick事件中提示是否下载并更新当前的应用。
d) 监听系统的程序安装和替换广播,当收到系统中有程序安装或替换时,刷新当前的ListView视图以及Activity的标题(Activity的标题用于提示当前需要更新的应用程序数量)。
三、 应用需求的前提假设:
a) 服务器端的配置:
在tomcat7服务器的根目录下新建AppUpdate目录,作为更新程序访问的根目录。
b) Apk文件的下载路径的标准假设:
在搜寻到系统所有用户安装的应用后,需要访问服务器中对应的每一个应用的version.json配置文件,进行代码版本的比较。该搜寻路径的标准规则我们假定为:
系统当前安装的每一个应用对应的新版本所在的路径为:
http://10.0.2.2:8080/AppUpdate/应用程序名/version.json,其中的应用程序名与当前安装的应用程序名相对应,鉴于应用程序名中可能包含‘.’和空格(目前只发现这两 种情况),我们将应用程序名中所有的‘.’和空格都以下划线代替。例如:
我们搜到系统中当前已安装的应用名为Sample Soft Keyboard的应用(包含空格),服务器中对应的version.json文件的远程路径为:
http://10.0.2.2:8080/AppUpdate/Sample_Soft_Keyboard/version.json,(Sample,Soft,Keyboard之间有下划线),对应的新的Apk文件的远程路径为:
http://10.0.2.2:8080/AppUpdate/Sample_Soft_Keyboard/Sample_Soft_Keyboard.apk
四、 流程以及关键技术说明:
1) 首先要扫描出系统所有的应用信息,并过滤掉系统自带的应用,只保存用户安装的应用。代码示例:
[java] view
plaincopy
public void scanNeedUpdateApp(){
List<PackageInfo> appPackage = getPackageManager().getInstalledPackages(0);//获得系统所有应用的安装包信息
for(int i=0; i<appPackage.size(); i++){
PackageInfo packageInfo = appPackage.get(i);
ApplicationInfo tmpAppInfo = new ApplicationInfo();
tmpAppInfo.appName = packageInfo.applicationInfo.loadLabel(getPackageManager()).toString();
tmpAppInfo.packageName = packageInfo.packageName;
tmpAppInfo.versionName = packageInfo.versionName;
tmpAppInfo.versionCode = packageInfo.versionCode;
tmpAppInfo.appIcon = packageInfo.applicationInfo.loadIcon(getPackageManager());
//只添加非系统应用
if((packageInfo.applicationInfo.flags & android.content.pm.ApplicationInfo.FLAG_SYSTEM) == 0){
String appName = tmpAppInfo.appName.toString().replace('.', ' ');
String VerJSONPath =webServicePath + appName +"/" +"version.json";
VerJSONPath = VerJSONPath.replaceAll(" ", "_");//拼接对应的version.json的访问路径
System.out.println(VerJSONPath);
try {
JSONObject jsonObj = GetNewVersionCode.getVersionJSON(VerJSONPath);
if(jsonObj != null){
Log.i("JSONnotNull","json 不为空!");
int newVersionCode = Integer.parseInt(jsonObj.getString("versionCode"));
System.out.print("旧代码版本");
System.out.println(tmpAppInfo.versionCode);
System.out.print("新代码版本");
System.out.println(newVersionCode);
if(tmpAppInfo.versionCode < newVersionCode){
tmpAppInfo.newVersionCode = newVersionCode;
tmpAppInfo.newVersionName = jsonObj.getString("versionName");
needUpdateList.add(tmpAppInfo);//将第三方的应用添加到列表中
}
}
} catch (Exception e) {
// TODO Auto-generated catch block
e.printStackTrace();
}
}
}
}
说明: 获得已安装的应用程序信息 可以通过getPackageManager()方法获得
Public abstract PackageManager getPackageManager(), 然后将所有已安装的包信息放入List<PackageInfo>泛型中。方法如下
Public abstract List<PackageInfo> getInstalledPackages(int flags)
过滤第三方应用,所有的系统应用的flag标志为FALG_SYSTEM(值为1),第三方的应用为flag标志的值为0
2) 填充ListView的adapter数据集,并刷新ListView,代码示例如下:
[java] view
plaincopy
//填充ListView
public void fillListView(){
ListView newUpdateListView = (ListView)findViewById(R.id.listview);
appAdapter =new NeedUpdateListAdapter(this,needUpdateList);//填充adapter数据集
newUpdateListView.setDividerHeight(5);
if(!appAdapter.isEmpty()){
int needUpdateCount = appAdapter.getCount();
setTitle("当前发现"+needUpdateCount + "款应用需要升级!");
newUpdateListView.setAdapter(appAdapter);//填充ListView
newUpdateListView.setOnItemClickListener(this);//设置ListView中Item的单击事件
}else{
setTitle("未发现需要升级的应用!");
}
}
3) 注册一个Handler用于在ListView刷新之后,刷新ListView所在的Activity的标题(用于显示当前剩余的需要更新的应用数量)代码示例:
[java] view
plaincopy
//注册refreshTitleHandler,用于在广播接收中更新Activity的标题
public void registerRefreshTitleHandler(){
refreshTitleHandler = new Handler(){
public void handleMessage(Message msg){
switch(msg.what){
case 0:setTitle("当前发现"+appAdapter.getCount()+"款应用需要升级");break;
}
super.handleMessage(msg);
}
};
}
4) 监听系统中应用程序的安装和替换广播,并在广播接收中刷新ListView
说明:因为在新版本的应用下载更新时会进入系统自带的安装程序,所以我们要监听系统发送的有应用程序安装或者替换的广播
(”android.intent.action.PACKAGE_REPLACED”),并在广播接收函数onReceiver()中处理刷新ListView视图,这就涉及到不同的类中更新UI界面的问题。在这里我们的 解决方案是在接收到广播刷新ListView后向Activity的Handle发送一个消息,用于更新Activity的标题。(Handle我们设置成全局静态的方便引用)。代码示例如下:
[java] view
plaincopy
public class RefreshListViewBroadcastReceiver extends BroadcastReceiver {
@Override
public void onReceive(Context context, Intent intent) {
// TODO Auto-generated method stub
Log.i("Broadcast", "我是广播");
if(intent.getAction().equals("android.intent.action.PACKAGE_REPLACED")){
//获取被替换的包名,因为getDataString()返回的值包含了“package:“,所以要从第八的位置开始截取
String replacedPackageName =intent.getDataString().substring(8);
if(!context.getPackageName().equals(replacedPackageName)){
Log.i("curPackName",context.getPackageName());
System.out.print(replacedPackageName);
Log.i("replacedPack",replacedPackageName);
if(CheckUpdateAllActivity.appAdapter.remove(replacedPackageName)){
//刷新主Activity的Titlt
Message message = new Message();
message.what = 0;
CheckUpdateAllActivity.refreshTitleHandler.sendMessage(message);
}
}
}
}
}
进一步说明:广播接收的注册方式有两种,一种是静态注册(在xml文件中),另一种是动态注册(在代码中),二者的区别在于:生命周期不一样。若以静态方式注册 的广播,在第一次注册之后就与其所在的应用程序无关了,即在应用程序退出后,系统仍然能接受到该广播(若在应用程序退出后有该广播发出)。以动态方式注册的广 播与程序有关,即程序退出后,就无法处理对应的广播了。示例中接受系统程序是否被替换的广播会监听自身的替换(重新RunAs),所以我们要屏蔽掉自身的替换,如
果不屏蔽的话在开始RunAs自己后(监听了自己)会找不到程序中的appAdapter(因为程序还没开始运行)而报出空指针异常的现象。所以我们根据上下文(context)来 获得当前应用的包名,并与此时被替换的包名(通过intent来获得)作比较来过滤掉自身的监听。
5) ListView的Item单击事件。ListView中显示的Item代表可升级的应用程序,若用户单击Item项后,弹出是否更新的对话框。
[java] view
plaincopy
//ListView中Item的单击事件
public void onItemClick(AdapterView<?> parent, View view, int position, long id) {
// TODO Auto-generated method stub
ApplicationInfo clickedItemInfo = (ApplicationInfo) appAdapter.getItem(position);
curClickItemAppName = clickedItemInfo.appName;
StringBuffer sb = new StringBuffer();
Log.i("adapterVerName",clickedItemInfo.versionName);
sb.append("当前版本:" + "\n");
sb.append("版本名称:" + clickedItemInfo.versionName);
sb.append("版本代码:" + clickedItemInfo.versionCode + "\n");
sb.append("发现新版本:" + "\n");
sb.append("版本名称:" + clickedItemInfo.newVersionName);
sb.append("版本代码:" + clickedItemInfo.newVersionCode + "\n");
sb.append("是否更新?");
Dialog dialog = new AlertDialog.Builder(CheckUpdateAllActivity.this)
.setTitle("软件更新")
.setMessage(sb.toString())
.setPositiveButton("立即更新", new DialogInterface.OnClickListener() {
@Override
public void onClick(DialogInterface dialog, int which) {
// TODO Auto-generated method stub
if(curClickItemAppName != ""){
String appName = curClickItemAppName.replace('.', ' ');
String loadUrl = webServicePath + appName +"/" +appName +".apk";
loadUrl = loadUrl.replaceAll(" ", "_");
Log.i("LoadUrl", loadUrl);
downLoadApkFile(loadUrl, appName);
}else{
curClickItemAppName = "";
}
}
})
.setNegativeButton("暂不更新", new DialogInterface.OnClickListener() {
@Override
public void onClick(DialogInterface dialog, int which) {
// TODO Auto-generated method stub
curClickItemAppName = "";
}
}).create();
dialog.show();
}
说明:被单击的Item对应的应用程序信息的获取通过getItem(position)来完成,该函数返回的对象类型即Adapter中保存的数据类型,强转一下就可以了。之后就是按照 我们事先约定的新版本Apk的远程访问路径规则来拼接Apk的下载路径了。
6) 下载新版本的apk文件。这一步没什么好说的了,上一篇已经很详细了(Android单个应用自身的升级)示例如下:
[java] view
plaincopy
//下载新的apk应用文件
protected void downLoadApkFile(final String url, final String appName) {
// TODO Auto-generated method stub
pBar = new ProgressDialog(CheckUpdateAllActivity.this);
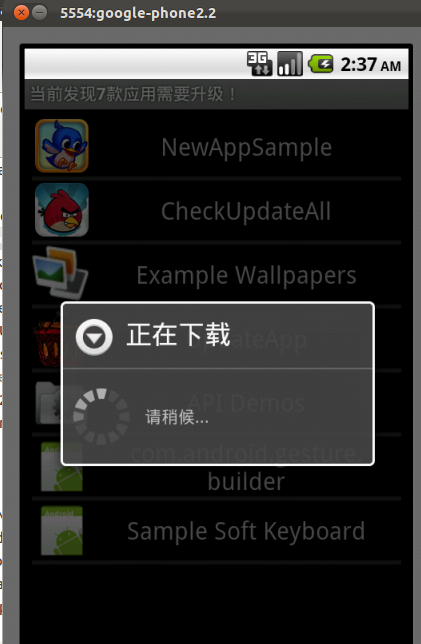
pBar.setTitle("正在下载");
pBar.setMessage("请稍候...");
pBar.setProgressStyle(ProgressDialog.STYLE_SPINNER);
pBar.show();
new Thread(){
public void run(){
HttpClient httpClient = new DefaultHttpClient();
HttpGet httpGet = new HttpGet(url);
HttpResponse httpResponse;
try {
httpResponse = httpClient.execute(httpGet);
if(httpResponse.getStatusLine().getStatusCode() == HttpStatus.SC_OK){
HttpEntity httpEntity = httpResponse.getEntity();
InputStream is = httpEntity.getContent();
FileOutputStream fos = null;
if(is !=null){
File file = new File(Environment.getExternalStorageDirectory(),appName+".apk");
fos = new FileOutputStream(file);
byte[] buf = new byte[1024];
int ch = -1;
do{
ch = is.read(buf);
if(ch <= 0)break;
fos.write(buf, 0, ch);
}while(true);
is.close();
fos.close();
haveDownLoad(appName + ".apk");
}else{
throw new RuntimeException("isStream is null");
}
}else if(httpResponse.getStatusLine().getStatusCode() == HttpStatus.SC_NOT_FOUND){
//404未找到相应的文件
Looper.prepare();
Toast toast = Toast.makeText(CheckUpdateAllActivity.this, "未找到对应的Apk文件!", 1);
pBar.cancel();
toast.show();
Looper.loop();
}
} catch (ClientProtocolException e) {
// TODO Auto-generated catch block
e.printStackTrace();
} catch (IOException e) {
// TODO Auto-generated catch block
e.printStackTrace();
}
}
}.start();
}
说明:简单的http通信的步骤:1.建立HttpClient客户端。2.创建访问路径HttpGet3.请求连接HttpResponse。通过http请求下载远端的文件时,有可能在所给的访问路径下 没有需要的文件,在这里请求状态通过HttpResponse.getStatusLine().getStatusCode()来获得。常见的请求回应码为200(请求成功),404(未找到对应的文件)。另
外我们在下载子线程中去取消了下载进度条(下载完成后),涉及了在子线程中去更新UI,这样违反了Android系统中UI单线程模型的原则,是不被允许的。所以要用 Looper或者Handle来处理。此处用了Looper。
7) 下载完成后提示是否安装,当选择取消后删除sdcard中下载的Apk文件。
[java] view
plaincopy
//下载完成 关闭进度条,并提示是否安装
protected void haveDownLoad(final String fileName) {
// TODO Auto-generated method stub
pBar.cancel();//下载完成取消进度条
haveDownHandler.post(new Runnable(){
@Override
public void run() {
// TODO Auto-generated method stub
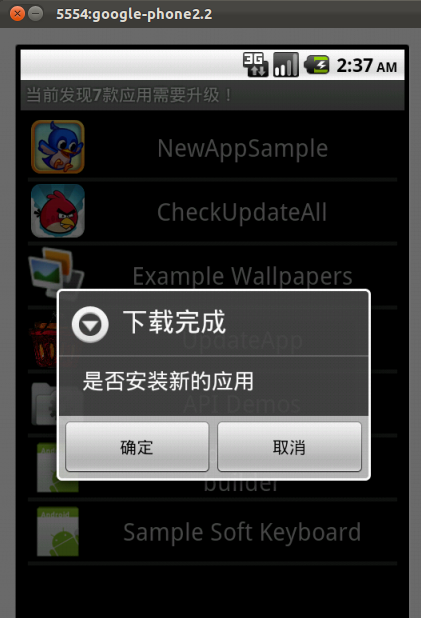
Dialog installDialog = new AlertDialog.Builder(CheckUpdateAllActivity.this)
.setTitle("下载完成")
.setMessage("是否安装新的应用")
.setPositiveButton("确定", new DialogInterface.OnClickListener() {
@Override
public void onClick(DialogInterface dialog, int which) {
// TODO Auto-generated method stub
installNewApk(fileName);
}
})
.setNegativeButton("取消", new DialogInterface.OnClickListener() {
@Override
public void onClick(DialogInterface dialog, int which) {
// TODO Auto-generated method stub
File downLoadApk = new File(Environment.getExternalStorageDirectory(),
fileName);
if(downLoadApk.exists()){
downLoadApk.delete();
}
}
}).create();
installDialog.show();
}
});
}
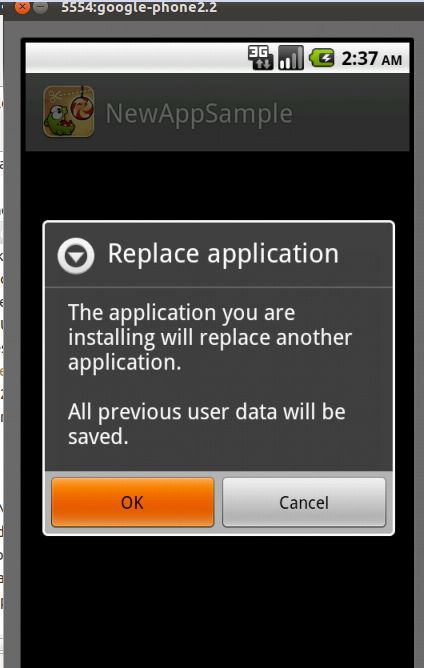
8) 调用系统自带的安装程序进行安装。如果想采用静默安装,网上大侠们说要修改源码才可以。
[java] view
plaincopy
//安装下载后的应用程序
private void installNewApk(final String fileName) {
// TODO Auto-generated method stub
Intent intent = new Intent(Intent.ACTION_VIEW);
intent.setDataAndType(Uri.fromFile(new File(Environment.getExternalStorageDirectory(),fileName)),
"application/vnd.android.package-archive");
startActivity(intent);
}
9) JSON文件解析类。该类中封装了一个静态方法getVersionJSON()用于获得远程的version.json文件信息,返回对象类型为JSONObject,便于解析出每一个应用对应的 versionCode信息。示例如下:
[java] view
plaincopy
public class GetNewVersionCode {
public static JSONObject getVersionJSON(String VerJSONPath) throws ClientProtocolException, IOException, JSONException{
StringBuilder VerJSON = new StringBuilder();
HttpClient client = new DefaultHttpClient();
HttpParams httpParams = client.getParams();
HttpConnectionParams.setConnectionTimeout(httpParams, 3000);
HttpConnectionParams.setSoTimeout(httpParams, 5000);
HttpResponse response;
response = client.execute(new HttpGet(VerJSONPath));
//请求成功
System.out.print("链接请求码:");
System.out.println(response.getStatusLine().getStatusCode());
if(response.getStatusLine().getStatusCode() == HttpStatus.SC_OK){
Log.i("ConOK","链接成功");
HttpEntity entity = response.getEntity();
if(entity != null){
BufferedReader reader = new BufferedReader(new InputStreamReader(entity.getContent(),"UTF-8"), 8192);
String line = null;
while((line = reader.readLine()) != null){
VerJSON.append(line+"\n");
}
reader.close();
JSONArray verJSONArray = new JSONArray(VerJSON.toString());
if(verJSONArray.length() > 0){
JSONObject obj = verJSONArray.getJSONObject(0);
return obj;
}
}
Log.i("ContFail","获取JSONObject失败!");
return null;
}
Log.i("ConFail","链接失败!");
return null;
}
}
10) 与ListView绑定的Adapter类,该类中最主要的方法是getCount()和getView()用于绘制ListView。在这里重写该类的构造方法,以便于在Adapter中保存我们需要的类型 (ApplicationInfo)。示例如下:
[java] view
plaincopy
public class NeedUpdateListAdapter extends BaseAdapter {
Context context;
ArrayList<ApplicationInfo> needUpdateList = new ArrayList<ApplicationInfo>();
public NeedUpdateListAdapter(Context context, ArrayList<ApplicationInfo> newNeedUpdateList){
this.context = context;
needUpdateList.clear();
for(int i = 0; i<newNeedUpdateList.size(); i++){
needUpdateList.add(newNeedUpdateList.get(i));
}
}
@Override
public int getCount() {
// TODO Auto-generated method stub
return needUpdateList.size();
}
@Override
public Object getItem(int position) {
// TODO Auto-generated method stub
return needUpdateList.get(position);
}
@Override
public long getItemId(int position) {
// TODO Auto-generated method stub
return position;
}
@Override
public View getView(int position, View convertView, ViewGroup parent) {
// TODO Auto-generated method stub
View newView = convertView;
final ApplicationInfo appItem = needUpdateList.get(position);
if(newView == null){
LayoutInflater vi = (LayoutInflater)context.getSystemService(Context.LAYOUT_INFLATER_SERVICE);
newView = vi.inflate(R.layout.check_update_list_item, null);
//newView.setClickable(true);加上此句ListViewi点击无响应,不知道是为什么
}
TextView appName = (TextView)newView.findViewById(R.id.appName);
ImageView appIcon=(ImageView)newView.findViewById(R.id.icon);
if(appName != null)
appName.setText(appItem.appName);
if(appIcon != null)
appIcon.setImageDrawable(appItem.appIcon);
return newView;
}
public boolean remove(String packageName){
boolean flag = false;
for(int i = 0; i < needUpdateList.size(); i++){
if(needUpdateList.get(i).packageName.equals(packageName)){
needUpdateList.remove(i);
flag = true;
Log.i("RemovePack", packageName);
notifyDataSetChanged();
}
}
if(flag){
flag = false;
return true;
}
return false;
}
public void removeAll(){
needUpdateList.clear();
notifyDataSetChanged();
}
}
说明:当每绘制一项时就会调用一次getView()方法,就会装载一次我们建立的布局文件一次(check_update_list_item.xml),在getView方法中设置布局文件中的组件 (TextView和ImageView)就能得到我们想要的视图。另外添加两个方法remove()和removeAll()用于ListView的刷新(当我们下载安装新版本后)。其中 NotifyDataSetChanged()用于自动刷新ListView。
11) 应用程序信息类,主要用于保存应用程序的一些信息,如当前应用的程序名,包名,版本名称,版本代码,图标,所搜寻到的新版本的版本名称,新的版本代码。
[java] view
plaincopy
public class ApplicationInfo {
public String appName = "";
public String packageName = "";
public String versionName = "";
public String newVersionName = "";
public int versionCode = 0;
public int newVersionCode = 0;
public Drawable appIcon = null;
}
源码下载连接:本篇源码下载
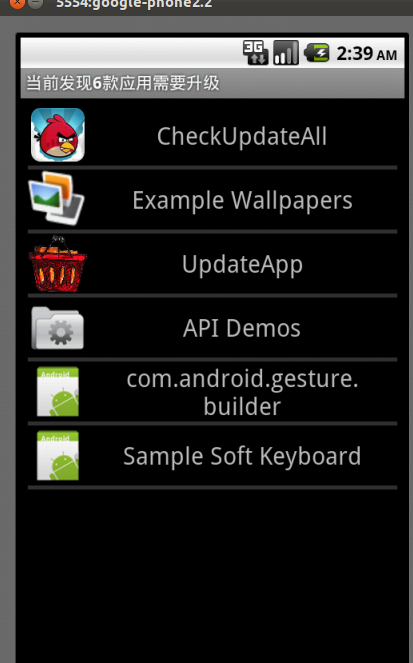
下面是一些效果图:
将系统所有已安装的应用添加到ListView中

点击更新某一个应用

下载新应用
下载完成提示安装
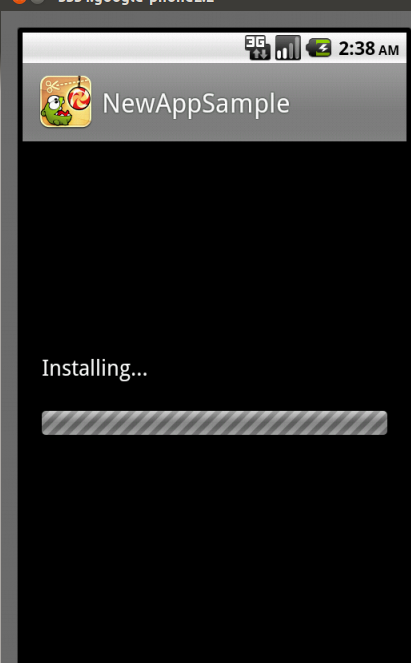
进入系统安装

更新完成后刷新ListView和Activity标题
当在远程服务器中没有找到对应的apk文件则提示错误。

本示例是在上一个示例(Android应用自身升级)的基础上完成的。环境配置也同上一个demo一样。只是增加了一些功能用来检测Android系统中所有需要升级的应用程序,并从服务器上下载更新。
二、 功能需求说明:
a) 检测出Android系统中所有已安装的应用(区别与Android系统自带的应用),并获得每个应用的信息。
b) 根据上一步获得的系统中已安装的应用信息,通过http连接tomcat7服务器,检测每个应用的代码版本并与当前应用的代码版本进行比较,然后将需要更新的应用显示 在ListView中。
c) 在ListView的onItemClick事件中提示是否下载并更新当前的应用。
d) 监听系统的程序安装和替换广播,当收到系统中有程序安装或替换时,刷新当前的ListView视图以及Activity的标题(Activity的标题用于提示当前需要更新的应用程序数量)。
三、 应用需求的前提假设:
a) 服务器端的配置:
在tomcat7服务器的根目录下新建AppUpdate目录,作为更新程序访问的根目录。
b) Apk文件的下载路径的标准假设:
在搜寻到系统所有用户安装的应用后,需要访问服务器中对应的每一个应用的version.json配置文件,进行代码版本的比较。该搜寻路径的标准规则我们假定为:
系统当前安装的每一个应用对应的新版本所在的路径为:
http://10.0.2.2:8080/AppUpdate/应用程序名/version.json,其中的应用程序名与当前安装的应用程序名相对应,鉴于应用程序名中可能包含‘.’和空格(目前只发现这两 种情况),我们将应用程序名中所有的‘.’和空格都以下划线代替。例如:
我们搜到系统中当前已安装的应用名为Sample Soft Keyboard的应用(包含空格),服务器中对应的version.json文件的远程路径为:
http://10.0.2.2:8080/AppUpdate/Sample_Soft_Keyboard/version.json,(Sample,Soft,Keyboard之间有下划线),对应的新的Apk文件的远程路径为:
http://10.0.2.2:8080/AppUpdate/Sample_Soft_Keyboard/Sample_Soft_Keyboard.apk
四、 流程以及关键技术说明:
1) 首先要扫描出系统所有的应用信息,并过滤掉系统自带的应用,只保存用户安装的应用。代码示例:
[java] view
plaincopy
public void scanNeedUpdateApp(){
List<PackageInfo> appPackage = getPackageManager().getInstalledPackages(0);//获得系统所有应用的安装包信息
for(int i=0; i<appPackage.size(); i++){
PackageInfo packageInfo = appPackage.get(i);
ApplicationInfo tmpAppInfo = new ApplicationInfo();
tmpAppInfo.appName = packageInfo.applicationInfo.loadLabel(getPackageManager()).toString();
tmpAppInfo.packageName = packageInfo.packageName;
tmpAppInfo.versionName = packageInfo.versionName;
tmpAppInfo.versionCode = packageInfo.versionCode;
tmpAppInfo.appIcon = packageInfo.applicationInfo.loadIcon(getPackageManager());
//只添加非系统应用
if((packageInfo.applicationInfo.flags & android.content.pm.ApplicationInfo.FLAG_SYSTEM) == 0){
String appName = tmpAppInfo.appName.toString().replace('.', ' ');
String VerJSONPath =webServicePath + appName +"/" +"version.json";
VerJSONPath = VerJSONPath.replaceAll(" ", "_");//拼接对应的version.json的访问路径
System.out.println(VerJSONPath);
try {
JSONObject jsonObj = GetNewVersionCode.getVersionJSON(VerJSONPath);
if(jsonObj != null){
Log.i("JSONnotNull","json 不为空!");
int newVersionCode = Integer.parseInt(jsonObj.getString("versionCode"));
System.out.print("旧代码版本");
System.out.println(tmpAppInfo.versionCode);
System.out.print("新代码版本");
System.out.println(newVersionCode);
if(tmpAppInfo.versionCode < newVersionCode){
tmpAppInfo.newVersionCode = newVersionCode;
tmpAppInfo.newVersionName = jsonObj.getString("versionName");
needUpdateList.add(tmpAppInfo);//将第三方的应用添加到列表中
}
}
} catch (Exception e) {
// TODO Auto-generated catch block
e.printStackTrace();
}
}
}
}
说明: 获得已安装的应用程序信息 可以通过getPackageManager()方法获得
Public abstract PackageManager getPackageManager(), 然后将所有已安装的包信息放入List<PackageInfo>泛型中。方法如下
Public abstract List<PackageInfo> getInstalledPackages(int flags)
过滤第三方应用,所有的系统应用的flag标志为FALG_SYSTEM(值为1),第三方的应用为flag标志的值为0
2) 填充ListView的adapter数据集,并刷新ListView,代码示例如下:
[java] view
plaincopy
//填充ListView
public void fillListView(){
ListView newUpdateListView = (ListView)findViewById(R.id.listview);
appAdapter =new NeedUpdateListAdapter(this,needUpdateList);//填充adapter数据集
newUpdateListView.setDividerHeight(5);
if(!appAdapter.isEmpty()){
int needUpdateCount = appAdapter.getCount();
setTitle("当前发现"+needUpdateCount + "款应用需要升级!");
newUpdateListView.setAdapter(appAdapter);//填充ListView
newUpdateListView.setOnItemClickListener(this);//设置ListView中Item的单击事件
}else{
setTitle("未发现需要升级的应用!");
}
}
3) 注册一个Handler用于在ListView刷新之后,刷新ListView所在的Activity的标题(用于显示当前剩余的需要更新的应用数量)代码示例:
[java] view
plaincopy
//注册refreshTitleHandler,用于在广播接收中更新Activity的标题
public void registerRefreshTitleHandler(){
refreshTitleHandler = new Handler(){
public void handleMessage(Message msg){
switch(msg.what){
case 0:setTitle("当前发现"+appAdapter.getCount()+"款应用需要升级");break;
}
super.handleMessage(msg);
}
};
}
4) 监听系统中应用程序的安装和替换广播,并在广播接收中刷新ListView
说明:因为在新版本的应用下载更新时会进入系统自带的安装程序,所以我们要监听系统发送的有应用程序安装或者替换的广播
(”android.intent.action.PACKAGE_REPLACED”),并在广播接收函数onReceiver()中处理刷新ListView视图,这就涉及到不同的类中更新UI界面的问题。在这里我们的 解决方案是在接收到广播刷新ListView后向Activity的Handle发送一个消息,用于更新Activity的标题。(Handle我们设置成全局静态的方便引用)。代码示例如下:
[java] view
plaincopy
public class RefreshListViewBroadcastReceiver extends BroadcastReceiver {
@Override
public void onReceive(Context context, Intent intent) {
// TODO Auto-generated method stub
Log.i("Broadcast", "我是广播");
if(intent.getAction().equals("android.intent.action.PACKAGE_REPLACED")){
//获取被替换的包名,因为getDataString()返回的值包含了“package:“,所以要从第八的位置开始截取
String replacedPackageName =intent.getDataString().substring(8);
if(!context.getPackageName().equals(replacedPackageName)){
Log.i("curPackName",context.getPackageName());
System.out.print(replacedPackageName);
Log.i("replacedPack",replacedPackageName);
if(CheckUpdateAllActivity.appAdapter.remove(replacedPackageName)){
//刷新主Activity的Titlt
Message message = new Message();
message.what = 0;
CheckUpdateAllActivity.refreshTitleHandler.sendMessage(message);
}
}
}
}
}
进一步说明:广播接收的注册方式有两种,一种是静态注册(在xml文件中),另一种是动态注册(在代码中),二者的区别在于:生命周期不一样。若以静态方式注册 的广播,在第一次注册之后就与其所在的应用程序无关了,即在应用程序退出后,系统仍然能接受到该广播(若在应用程序退出后有该广播发出)。以动态方式注册的广 播与程序有关,即程序退出后,就无法处理对应的广播了。示例中接受系统程序是否被替换的广播会监听自身的替换(重新RunAs),所以我们要屏蔽掉自身的替换,如
果不屏蔽的话在开始RunAs自己后(监听了自己)会找不到程序中的appAdapter(因为程序还没开始运行)而报出空指针异常的现象。所以我们根据上下文(context)来 获得当前应用的包名,并与此时被替换的包名(通过intent来获得)作比较来过滤掉自身的监听。
5) ListView的Item单击事件。ListView中显示的Item代表可升级的应用程序,若用户单击Item项后,弹出是否更新的对话框。
[java] view
plaincopy
//ListView中Item的单击事件
public void onItemClick(AdapterView<?> parent, View view, int position, long id) {
// TODO Auto-generated method stub
ApplicationInfo clickedItemInfo = (ApplicationInfo) appAdapter.getItem(position);
curClickItemAppName = clickedItemInfo.appName;
StringBuffer sb = new StringBuffer();
Log.i("adapterVerName",clickedItemInfo.versionName);
sb.append("当前版本:" + "\n");
sb.append("版本名称:" + clickedItemInfo.versionName);
sb.append("版本代码:" + clickedItemInfo.versionCode + "\n");
sb.append("发现新版本:" + "\n");
sb.append("版本名称:" + clickedItemInfo.newVersionName);
sb.append("版本代码:" + clickedItemInfo.newVersionCode + "\n");
sb.append("是否更新?");
Dialog dialog = new AlertDialog.Builder(CheckUpdateAllActivity.this)
.setTitle("软件更新")
.setMessage(sb.toString())
.setPositiveButton("立即更新", new DialogInterface.OnClickListener() {
@Override
public void onClick(DialogInterface dialog, int which) {
// TODO Auto-generated method stub
if(curClickItemAppName != ""){
String appName = curClickItemAppName.replace('.', ' ');
String loadUrl = webServicePath + appName +"/" +appName +".apk";
loadUrl = loadUrl.replaceAll(" ", "_");
Log.i("LoadUrl", loadUrl);
downLoadApkFile(loadUrl, appName);
}else{
curClickItemAppName = "";
}
}
})
.setNegativeButton("暂不更新", new DialogInterface.OnClickListener() {
@Override
public void onClick(DialogInterface dialog, int which) {
// TODO Auto-generated method stub
curClickItemAppName = "";
}
}).create();
dialog.show();
}
说明:被单击的Item对应的应用程序信息的获取通过getItem(position)来完成,该函数返回的对象类型即Adapter中保存的数据类型,强转一下就可以了。之后就是按照 我们事先约定的新版本Apk的远程访问路径规则来拼接Apk的下载路径了。
6) 下载新版本的apk文件。这一步没什么好说的了,上一篇已经很详细了(Android单个应用自身的升级)示例如下:
[java] view
plaincopy
//下载新的apk应用文件
protected void downLoadApkFile(final String url, final String appName) {
// TODO Auto-generated method stub
pBar = new ProgressDialog(CheckUpdateAllActivity.this);
pBar.setTitle("正在下载");
pBar.setMessage("请稍候...");
pBar.setProgressStyle(ProgressDialog.STYLE_SPINNER);
pBar.show();
new Thread(){
public void run(){
HttpClient httpClient = new DefaultHttpClient();
HttpGet httpGet = new HttpGet(url);
HttpResponse httpResponse;
try {
httpResponse = httpClient.execute(httpGet);
if(httpResponse.getStatusLine().getStatusCode() == HttpStatus.SC_OK){
HttpEntity httpEntity = httpResponse.getEntity();
InputStream is = httpEntity.getContent();
FileOutputStream fos = null;
if(is !=null){
File file = new File(Environment.getExternalStorageDirectory(),appName+".apk");
fos = new FileOutputStream(file);
byte[] buf = new byte[1024];
int ch = -1;
do{
ch = is.read(buf);
if(ch <= 0)break;
fos.write(buf, 0, ch);
}while(true);
is.close();
fos.close();
haveDownLoad(appName + ".apk");
}else{
throw new RuntimeException("isStream is null");
}
}else if(httpResponse.getStatusLine().getStatusCode() == HttpStatus.SC_NOT_FOUND){
//404未找到相应的文件
Looper.prepare();
Toast toast = Toast.makeText(CheckUpdateAllActivity.this, "未找到对应的Apk文件!", 1);
pBar.cancel();
toast.show();
Looper.loop();
}
} catch (ClientProtocolException e) {
// TODO Auto-generated catch block
e.printStackTrace();
} catch (IOException e) {
// TODO Auto-generated catch block
e.printStackTrace();
}
}
}.start();
}
说明:简单的http通信的步骤:1.建立HttpClient客户端。2.创建访问路径HttpGet3.请求连接HttpResponse。通过http请求下载远端的文件时,有可能在所给的访问路径下 没有需要的文件,在这里请求状态通过HttpResponse.getStatusLine().getStatusCode()来获得。常见的请求回应码为200(请求成功),404(未找到对应的文件)。另
外我们在下载子线程中去取消了下载进度条(下载完成后),涉及了在子线程中去更新UI,这样违反了Android系统中UI单线程模型的原则,是不被允许的。所以要用 Looper或者Handle来处理。此处用了Looper。
7) 下载完成后提示是否安装,当选择取消后删除sdcard中下载的Apk文件。
[java] view
plaincopy
//下载完成 关闭进度条,并提示是否安装
protected void haveDownLoad(final String fileName) {
// TODO Auto-generated method stub
pBar.cancel();//下载完成取消进度条
haveDownHandler.post(new Runnable(){
@Override
public void run() {
// TODO Auto-generated method stub
Dialog installDialog = new AlertDialog.Builder(CheckUpdateAllActivity.this)
.setTitle("下载完成")
.setMessage("是否安装新的应用")
.setPositiveButton("确定", new DialogInterface.OnClickListener() {
@Override
public void onClick(DialogInterface dialog, int which) {
// TODO Auto-generated method stub
installNewApk(fileName);
}
})
.setNegativeButton("取消", new DialogInterface.OnClickListener() {
@Override
public void onClick(DialogInterface dialog, int which) {
// TODO Auto-generated method stub
File downLoadApk = new File(Environment.getExternalStorageDirectory(),
fileName);
if(downLoadApk.exists()){
downLoadApk.delete();
}
}
}).create();
installDialog.show();
}
});
}
8) 调用系统自带的安装程序进行安装。如果想采用静默安装,网上大侠们说要修改源码才可以。
[java] view
plaincopy
//安装下载后的应用程序
private void installNewApk(final String fileName) {
// TODO Auto-generated method stub
Intent intent = new Intent(Intent.ACTION_VIEW);
intent.setDataAndType(Uri.fromFile(new File(Environment.getExternalStorageDirectory(),fileName)),
"application/vnd.android.package-archive");
startActivity(intent);
}
9) JSON文件解析类。该类中封装了一个静态方法getVersionJSON()用于获得远程的version.json文件信息,返回对象类型为JSONObject,便于解析出每一个应用对应的 versionCode信息。示例如下:
[java] view
plaincopy
public class GetNewVersionCode {
public static JSONObject getVersionJSON(String VerJSONPath) throws ClientProtocolException, IOException, JSONException{
StringBuilder VerJSON = new StringBuilder();
HttpClient client = new DefaultHttpClient();
HttpParams httpParams = client.getParams();
HttpConnectionParams.setConnectionTimeout(httpParams, 3000);
HttpConnectionParams.setSoTimeout(httpParams, 5000);
HttpResponse response;
response = client.execute(new HttpGet(VerJSONPath));
//请求成功
System.out.print("链接请求码:");
System.out.println(response.getStatusLine().getStatusCode());
if(response.getStatusLine().getStatusCode() == HttpStatus.SC_OK){
Log.i("ConOK","链接成功");
HttpEntity entity = response.getEntity();
if(entity != null){
BufferedReader reader = new BufferedReader(new InputStreamReader(entity.getContent(),"UTF-8"), 8192);
String line = null;
while((line = reader.readLine()) != null){
VerJSON.append(line+"\n");
}
reader.close();
JSONArray verJSONArray = new JSONArray(VerJSON.toString());
if(verJSONArray.length() > 0){
JSONObject obj = verJSONArray.getJSONObject(0);
return obj;
}
}
Log.i("ContFail","获取JSONObject失败!");
return null;
}
Log.i("ConFail","链接失败!");
return null;
}
}
10) 与ListView绑定的Adapter类,该类中最主要的方法是getCount()和getView()用于绘制ListView。在这里重写该类的构造方法,以便于在Adapter中保存我们需要的类型 (ApplicationInfo)。示例如下:
[java] view
plaincopy
public class NeedUpdateListAdapter extends BaseAdapter {
Context context;
ArrayList<ApplicationInfo> needUpdateList = new ArrayList<ApplicationInfo>();
public NeedUpdateListAdapter(Context context, ArrayList<ApplicationInfo> newNeedUpdateList){
this.context = context;
needUpdateList.clear();
for(int i = 0; i<newNeedUpdateList.size(); i++){
needUpdateList.add(newNeedUpdateList.get(i));
}
}
@Override
public int getCount() {
// TODO Auto-generated method stub
return needUpdateList.size();
}
@Override
public Object getItem(int position) {
// TODO Auto-generated method stub
return needUpdateList.get(position);
}
@Override
public long getItemId(int position) {
// TODO Auto-generated method stub
return position;
}
@Override
public View getView(int position, View convertView, ViewGroup parent) {
// TODO Auto-generated method stub
View newView = convertView;
final ApplicationInfo appItem = needUpdateList.get(position);
if(newView == null){
LayoutInflater vi = (LayoutInflater)context.getSystemService(Context.LAYOUT_INFLATER_SERVICE);
newView = vi.inflate(R.layout.check_update_list_item, null);
//newView.setClickable(true);加上此句ListViewi点击无响应,不知道是为什么
}
TextView appName = (TextView)newView.findViewById(R.id.appName);
ImageView appIcon=(ImageView)newView.findViewById(R.id.icon);
if(appName != null)
appName.setText(appItem.appName);
if(appIcon != null)
appIcon.setImageDrawable(appItem.appIcon);
return newView;
}
public boolean remove(String packageName){
boolean flag = false;
for(int i = 0; i < needUpdateList.size(); i++){
if(needUpdateList.get(i).packageName.equals(packageName)){
needUpdateList.remove(i);
flag = true;
Log.i("RemovePack", packageName);
notifyDataSetChanged();
}
}
if(flag){
flag = false;
return true;
}
return false;
}
public void removeAll(){
needUpdateList.clear();
notifyDataSetChanged();
}
}
说明:当每绘制一项时就会调用一次getView()方法,就会装载一次我们建立的布局文件一次(check_update_list_item.xml),在getView方法中设置布局文件中的组件 (TextView和ImageView)就能得到我们想要的视图。另外添加两个方法remove()和removeAll()用于ListView的刷新(当我们下载安装新版本后)。其中 NotifyDataSetChanged()用于自动刷新ListView。
11) 应用程序信息类,主要用于保存应用程序的一些信息,如当前应用的程序名,包名,版本名称,版本代码,图标,所搜寻到的新版本的版本名称,新的版本代码。
[java] view
plaincopy
public class ApplicationInfo {
public String appName = "";
public String packageName = "";
public String versionName = "";
public String newVersionName = "";
public int versionCode = 0;
public int newVersionCode = 0;
public Drawable appIcon = null;
}
源码下载连接:本篇源码下载
下面是一些效果图:
将系统所有已安装的应用添加到ListView中
点击更新某一个应用
下载新应用
下载完成提示安装
进入系统安装
更新完成后刷新ListView和Activity标题
当在远程服务器中没有找到对应的apk文件则提示错误。

相关文章推荐
- 获得Android系统所有已安装的应用并联网自动检测升级更新
- 获得Android系统所有已安装的应用并联网自动检测升级更新
- 获得Android系统所有已安装的应用并联网自动检测升级更新
- 获得Android系统所有已安装的应用并联网自动检测升级更新
- Android应用升级,检测更新,下载,检验,安装
- Android应用更新之自动检测版本及自动升级
- Android应用更新-自动检测版本及自动升级
- Android应用升级,检测更新,下载,检验,安装
- Android应用升级,检测更新,下载,检验,安装
- Android应用的自动升级、更新模块的实现
- Android -- 应用自动检测更新代码
- Android应用的自动升级、更新模块的实现(zz)
- 调用android系统内部的安装apk应用界面进行安装应用程序,例如需要更新应用程序
- 【转】Android应用的自动升级、更新模块的实现 (2)
- Android应用自动更新及安装
- Android应用的自动升级、更新模块的实现(转)
- Android应用自动更新功能的实现!!!软件更新,自动下载,安装
- 用友盟的自动更新组件实现Android应用版本升级
- Android应用更新自动检测下载