Dependency Injection with Autofac
2013-05-07 09:45
239 查看
Contents
IntroductionThe Example Application
Checking for Overdue
Memos
Notifying the User
Data Storage
Wiring Up Components
Dependency Injection
by Hand
Dependency
Injection with a Container
Component Registrations
Registering
a Component Created with an Expression
Registering
a Component Instance
Registering
a Component with its Implementation Type
Completing the Example
Deterministic Disposal
Disabling Disposal
Fine-Grained
Control of Component Lifetimes
Component Lifetime
Instance per Dependency Lifetime
Single Instance Lifetime
Instance per Lifetime Scope
Using Scope
to Control Visibility
Autofac in Applications
Expressive Registrations
Simplified Integration
Where to Next?
Autofac Contrib
Credits
History
Introduction
Autofac is an open-source dependencyinjection (DI) or inversion of control (IoC) container developed on Google Code.
Autofac differs from many related technologies in that it sticks as
close to bare-metal C# programming as possible. It is designed around the premise that it is wasteful to work in such a powerful language as C# but to lose that power to purely reflection-based APIs like those prevalent in the other .NET containers.
The result is that Autofac supports a wide array of application designs with very little additional infrastructure or integration code, and with a lower learning curve.
That is not to say that it is simplistic; it has most of the features offered by other DI containers, and many subtle features that help with the configuration of your application, managing components' life-cycles, and keeping the dependencies under control.
This article uses an example to demonstrate the most basic techniques for creating and wiring together application components, then goes on to discuss the most important features of Autofac.
If you're already using a DI container and want to get a feel for how Autofac is different, you may wish to skip ahead briefly and check out the code in the Autofac
in Applications section.
The Example Application
The application is a console program that checks a list of memos, each with a due date, and notifies the user of the ones that are overdue.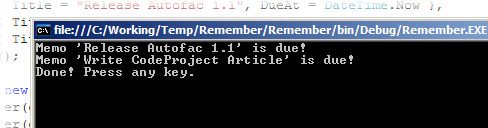
A lot of simplifications have been made in the example code. In the interests of brevity, XML comments, argument checking, and exception handling are elided from all of the code samples.
Checking for Overdue Memos
At the core of the application is theMemoCheckercomponent, which looks like this:

Collapse | Copy
Code
// A MemoChecker ...
class MemoChecker
{
    IQueryable<Memo> _memos;
    IMemoDueNotifier _notifier;

    // Construct a memo checker with the store of memos and the notifier
    // that will be used to display overdue memos.
    public MemoChecker(IQueryable<Memo> memos, IMemoDueNotifier notifier)
    {
        _memos = memos;
        _notifier = notifier;
    }

    // Check for overdue memos and alert the notifier of any that are found.
    public void CheckNow()
    {
        var overdueMemos = _memos.Where(memo => memo.DueAt < DateTime.Now);

        foreach (var memo in overdueMemos)
            _notifier.MemoIsDue(memo);
    }
}
The following aspects of this class come as a direct result of using a dependency-injected style:
It accepts all of its dependencies as parameters, in this case to the constructor
It is independent of persistence – the
IQueryablethat holds the memos
might be backed by a database table, a structured file, or an in-memory collection
It is independent of how the user is notified – the notifier could send an email, write to the event log, or print to the console
These things make the class more easily testable, configurable and maintainable.
Notifying the User
TheIMemoDueNotifierinterface has a single method,
MemoIsDue(),
which is implemented by another dependency-injected component called
PrintingNotifier:
Collapse | Copy
Code
// A memo notifier that prints messages to a text stream.
class PrintingNotifier : IMemoDueNotifier
{
    TextWriter _writer;

    // Construct the notifier with the stream onto which it will
    // print notifications.
    public PrintingNotifier(TextWriter writer)
    {
        _writer = writer;
    }

    // Print the details of an overdue memo onto the text stream.
    public void MemoIsDue(Memo memo)
    {
        _writer.WriteLine("Memo '{0}' is due!", memo.Title);
    }
}
Like
MemoChecker, this class accepts its dependencies through its constructor. The
TextWritertype
is a standard .NET class used throughout the .NET Framework, and is the base class of things like
StringWriterand
System.Console.Out.
Data Storage
TheMemoCheckergets the overdue memos from an
IQueryable<Memo>.
The data store used in the example is an in-memory list:
Collapse | Copy
Code
IQueryable<Memo> memos = new List<Memo>() {
    new Memo { Title = "Release Autofac 1.0", DueAt = new DateTime(2007, 12, 14) },
    new Memo { Title = "Write CodeProject Article", DueAt = DateTime.Now },
    new Memo { Title = "Release Autofac 2.3", DueAt = new DateTime(2010, 07, 01) }
}.AsQueryable();
The
IQueryableinterface introduced in .NET 3.5 is suitable as a source of Memos because it can be used to query
either in-memory objects or rows in a relational database.
Wiring Up Components
The ultimate structure of the application looks like: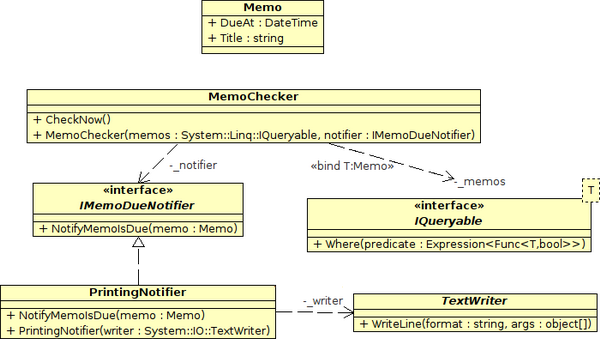
Most of this article is concerned with how a
MemoCheckergets associated with its notifier and memo services, and
how each of these objects in turn get 'wired up' to their own dependencies.
Dependency Injection by Hand
With only a few components, configuring aMemoCheckerby hand isn't hard. In fact, it's trivial and looks like this:
Collapse | Copy
Code
var checker = new MemoChecker(memos, new PrintingNotifier(Console.Out));
checker.CheckNow();
A real application, with several layers and all sorts of components, shouldn't be configured this way. This kind of direct object creation works well locally on a few classes, but doesn't scale up to large numbers of components.
For one thing, the code that did this at startup would get increasingly complex over time, and would potentially need to be reorganized every time the dependencies of a class change.
More importantly, it is hard to switch the implementations of services; e.g., an
EmailNotifiercould be substituted
for the printing notifier, but this itself will have dependencies that may be different from those of the
PrintingNotifier,
yet may intersect with the dependencies of other components. (This is the problem of composability, and is worth an article in itself.)
Autofac and other dependency injection containers circumvent these issues by 'flattening out' the deeply-nested structure of the object graph at configuration-time...
Dependency Injection with a Container
When using Autofac, accessing theMemoCheckeris separate from creating it:
Collapse | Copy
Code
container.Resolve<MemoChecker>().CheckNow();
The
container.Resolve()call requests an instance of
MemoCheckerthat's
set up and ready to use. So, how does the container work out how to create a
MemoChecker?
Component Registrations
A dependency injection container is a collection of registrations that map services to components. A service, in this context, is a way of identifying a particular functional capability – it could be a textual name, but is more often an interface type.A registration captures the dynamic behaviour of the component within the system. The most noticeable aspect of this is the way in which instances of the component are created.
Autofac can accept registrations that create components using expressions, provided instances, or with Reflection based on
System.Type.
Registering a Component Created with an Expression
The following sets up a registration for theMemoCheckercomponent:
Collapse | Copy
Code
builder.Register(c => new MemoChecker(c.Resolve<IQueryable<Memo>>(),
                                      c.Resolve<IMemoDueNotifier>()));
Each
Register()statement deals with only one part of the final object graph and its relationship to its direct
dependencies.
The lambda expression
c => new MemoChecker(...)will be used by the container to create the
MemoCheckercomponent.
Each
MemoCheckerdepends upon two additional services,
IQueryable<Memo>and
IMemoDueNotifier.
These are retrieved inside the lambda expression by calling the
Resolve()method on the container, which is passed
in as the parameter
c.
The registration doesn't say anything about which components will implement
IQueryable<Memo>or
IMemoDueNotifier–
these two services are configured independently in the same way that
MemoCheckeris.
The expression being provided to
Register()has a return type of
MemoChecker,
so Autofac will use this as the default service for this registration unless another is specified with the
As()method.
The
As()call can be included for the sake of being more explicit:
Collapse | Copy
Code
builder.Register(c => new MemoChecker(...)).As<MemoChecker>();
Either way, a request for
MemoCheckerfrom the container will now result in a call to our expression.
Autofac won't execute the expression when the component is registered. Instead, it will wait until
Resolve<MemoChecker>()is
called. This is important, because it eliminates one point of reliance on the order in which components are registered.
Registering a Component Instance
TheIQueryable<Memo>service is provided by the existing
memosinstance,
and the
PrintingMemoNotifierclass is eventually wired up to the
TextWriterinstance
Console.Out:
Collapse | Copy
Code
builder.RegisterInstance(memos);
builder.RegisterInstance(Console.Out).As<TextWriter>().ExternallyOwned();
The
memosand
Console.Outare
provided to the container as instances that are already created. (For an explanation of
ExternallyOwned(), see Deterministic
Disposal.)
Registering a Component with its Implementation Type
Autofac can also create components the way that other containers do, using reflection (many optimise this scenario with MSIL-generation.)This means that you can tell Autofac about the type that provides a service, and it will work out how to call the most appropriate constructor, with parameters chosen according to the other available services.
The
MemoCheckerregistration could have been replaced with:
Collapse | Copy
Code
builder.RegisterType<MemoChecker>();
In general, the most common use of auto-wiring is to register a batch of components, e.g.:
Collapse | Copy
Code
foreach (Type t in Assembly.GetExecutingAssembly().GetTypes())
    if (typeof(IController).IsAssignableFrom(t))
        builder.Register(t);
This makes large numbers of components available without the overhead of registering each one, and you should definitely consider it in these situations. Autofac provides shortcuts for registering batches of components this way:
Collapse | Copy
Code
builder.RegisterAssemblyTypes(Assembly.GetExecutingAssembly())
    .As<IController>();
Auto-wiring is also very useful when components are registered via the application's XML configuration file.
Completing the Example
The process of creating the component registrations before requesting the MemoCheckerservice from the container
is shown below:
Collapse | Copy
Code
var builder = new ContainerBuilder();
builder.Register(c => new
  MemoChecker(c.Resolve<IQueryable<Memo>>(),
              c.Resolve<IMemoDueNotifier>()));
builder.Register(c => new
  PrintingNotifier(c.Resolve<TextWriter>())).As<IMemoDueNotifier>();
builder.RegisterInstance(memos);
builder.RegisterInstance(Console.Out).As<TextWriter>().ExternallyOwned();

using (var container = builder.Build())
{
    container.Resolve<MemoChecker>().CheckNow();
}
The lack of nesting in the configuration code demonstrates the 'flattening out' of the dependency structure that a container provides.
It may be hard to see how this could ever be simpler than the direct object construction in the 'by hand' example, but again remember that this sample application has far fewer components than most useful systems.
The most important difference to note is that each component is now configured independently of all the others.As more components are added to the system, they can be understood purely in terms of
the services they expose and the services they require. This is one effective means of controlling architectural complexity.
Deterministic Disposal
IDisposableis both a blessing and a curse. It's great to have a consistent way of communicating that a component
should be cleaned up. Unfortunately, which component should do this cleanup, and when, is not always easy to determine.
The problem is made worse by designs that allow for multiple implementations of the same service. In the example application, it is feasible that many different implementations of
IMemoDueNotifiermay
be deployed. Some of these will be created in a factory, some will be singletons, some will need disposal, and some will not.
Components that use a notifier have no way of knowing whether they should try to cast it to
IDisposableand call
Dispose()or
not. The kind of bookkeeping that results is both error-prone and tedious.
Autofac solves this problem by tracking all of the disposable objects created by the container. Note the example from above:
Collapse | Copy
Code
using (var container = builder.Build())
{
    container.Resolve<MemoChecker>().CheckNow();
}
The container is in a
usingblock because it takes ownership of all of the components that it creates,
and disposes off them when it is itself disposed.
This is important because true to the spirit of separating usage from configuration concerns, the
MemoCheckerservice
can be used wherever necessary – even created indirectly as a dependency of another component – without worrying as to whether or not it should be cleaned up.
With this comes peace of mind – you don't even need to read back through the example to discover whether any of the classes in it actually implemented
IDisposable(they
don't) because you can rely on the container to do the right thing.
Disabling Disposal
Note theExternallyOwned()clause added to the
Console.Outregistration
in the complete configuration example above. This is desirable because
Console.Outis disposable, yet the container
shouldn't dispose off it.
Fine-Grained Control of Component Lifetimes
The container will normally exist for the duration of an application execution, and disposing it is a good way to free resources held by components with the same application-long life-cycle. Most non-trivial programs should also free resources at other times:on completion of an HTTP request, at the exit of a worker thread, or at the end of a user's session.
Autofac helps you manage these life-cycles using nested lifetime scopes:
Collapse | Copy
Code
using (var appContainer = builder.Build())
{
  using (var request1Lifetime = appContainer.BeginLifetimeScope())
  {
    request1Lifetime.Resolve<MyRequestHandler>().Process();
    // resources associated with request 1 are freed
  }

  using (var request2Lifetime = appContainer.BeginLifetimeScope())
  {
    request2Lifetime.Resolve<MyRequestHandler>().Process();
    // resources associated with request 2 are freed
  }

  // resources at the application level are freed
}
Lifetime management is achieved by configuring how component instances map to lifetime scopes.
Component Lifetime
Autofac allows you to specify how many instances of a component can exist and how they will be shared between other components.Controlling the scope of a component independently of its definition is a very important improvement over traditional methods like defining singletons through a static
Instanceproperty.
This is because of a distinction between what an object is and how it is used.
The most common lifetime settings used with Autofac are:
Single Instance
Instance per Dependency
Instance per Lifetime Scope
Single Instance
With single-instance lifetime, there will be at most one instance of the component in the container, and it will be disposed when the container in which it is registered is disposed (e.g.,appContainerabove).
A component can be configured to have this lifetime using the
SingleInstance()modifier:
Collapse | Copy
Code
builder.Register(c => new MyClass()).SingleInstance();
Each time such a component is requested from the container, the same instance will be returned:
Collapse | Copy
Code
var a = container.Resolve<MyClass>();
var b = container.Resolve<MyClass>();
Assert.AreSame(a, b);
Instance per Dependency
When no lifetime setting is specified in a component registration, an instance-per-dependency is assumed. Each time such a component is requested from the container, a new instance will be created:Collapse | Copy
Code
var a = container.Resolve<MyClass>();
var b = container.Resolve<MyClass>();
Assert.AreNotSame(a, b);
A component resolved this way will be disposed along with the lifetime scope from which it was requested. If a per-dependency component is required in order to construct a single-instance component, for example, then the per-dependency component will live
alongside the single-instance component for the life of the container.
Instance per Lifetime Scope
The final basic lifetime model is per-lifetime-scope, achieved using theInstancePerLifetimeScope()modifier:
Collapse | Copy
Code
builder.Register(c => new MyClass()).InstancePerLifetimeScope();
This provides the flexibility needed to implement per-thread, per-request, or per-transaction component life-cycles. Simply create a lifetime scope that lives for the duration of the required life-cycle. Requests from the same scope object will retrieve
the same instance, while requests in different scopes will result in different instances:
Collapse | Copy
Code
var a = container.Resolve<MyClass>();
var b = container.Resolve<MyClass>();
Assert.AreSame(a, b);

var inner = container.BeginLifetimeScope();
var c = inner.Resolve<MyClass>();
Assert.AreNotSame(a, c);
Using Scope to Control Visibility
A component's dependencies can only be satisfied by other components within the same scope or in an outer (parent) scope. This ensures that a component's dependencies are not disposed before it is. If a nesting of application, session, and request is desired,then the containers would be created as:
Collapse | Copy
Code
var appContainer = builder.Build();
var sessionLifetime = appContainer.BeginLifetimeScope();
var requestLifetime = sessionLifetime.BeginLifetimeScope();
var controller = requestLifetime.Resolve<IController>("home");
Keep in mind with these examples that the
appContainerwould have many
sessionLifetimechildren
created from it (one per session), and each session would, during its lifetime, be the parent of many
requestLifetimes
(one per HTTP request in the session.)
In this scenario, the allowed direction of dependencies is request -> session -> application. Components that are used in processing a user's request can reference any other component, but dependencies in the other direction are not allowed, so, for instance,
an application-level single-instance component won't be wired up to a component specific to a single user's session.
In such a hierarchy, Autofac will always serve component requests in the shortest-lived lifetime. This will generally be the request lifetime. Single-instance components will naturally reside at the application-level. To pin the lifetime of a component to
the session-level, see the tags article on the Autofac Wiki.
Autofac's scope model is flexible and powerful. The relationship between scope and nested lifetime disposal makes a huge number of dependency configurations possible, while enforcing that an object will always live at least as long as the objects that depend
on it.
Autofac in Applications
Dependency injection is an extremely powerful structuring mechanism, but to gain those advantages, a significant proportion of a system's components need to be available to other components through the container.Normally, this presents some challenges. In the real world, existing components, frameworks, and architectures often come with their own unique 'creational' or life-cycle requirements.
The features of Autofac described so far are designed to get existing, 'plain old .NET' components into the container without the need for modifications or adapter code.
Expressive Registrations
Using expressions for component registration makes including Autofac in an application a snap. A few example scenarios illustrate the kinds of things Autofac facilitates:Existing factory methods can be exposed using expressions:
Collapse | Copy
Code
builder.Register(c => MyFactory.CreateProduct()).As<IProduct>();
Existing singletons that need to be loaded on first access can be registered using an expression, and loading will remain 'lazy':
Collapse | Copy
Code
builder.RegisterInstance(c => MySingleton.Instance);
Parameters can be passed to a component from any available source:
Collapse | Copy
Code
builder.RegisterInstance(c => new MyComponent(Settings.SomeSetting));
An implementation type can even be chosen based on a parameter:
Collapse | Copy
Code
builder.Register<CreditCard>((c, p) => {
    var accountId = p.Get<string>("accountId");
    if (accountId.StartsWith("9"))
      return new GoldCard(accountId);
    else
      return new StandardCard(accountId);
  });
Simplified Integration
Integration, in this context, means making the services of existing libraries and application components available through the container.Autofac comes with support for some typical integration scenarios like usage within an ASP.NET application; however, the flexibility of the Autofac model makes a lot of integration tasks so trivial that they're best left to the designer to implement in the
way most suitable for their application.
Expression-based registrations and deterministic disposal, combined with the 'laziness' of component resolution, can be surprisingly handy when integrating technologies:
Collapse | Copy
Code
var builder = new ContainerBuilder();

builder.Register(c => new ChannelFactory<ITrackListing>(new BasicHttpBinding(),
    new EndpointAddress("http://localhost/Tracks")))
  .As<IChannelFactory<ITrackListing>>();

builder.Register(c => c.Resolve<IChannelFactory<ITrackListing>>().CreateChannel())
  .As<ITrackListing>()
  .UseWcfSafeRelease();

using (var container = builder.Build())
{
  var trackService = container.Resolve<ITrackListing>();
  var tracks = trackService.GetTracks("The Shins", "Wincing the Night Away");
  ListTracks(tracks);
}
This is an example of WCF client integration taken from the Autofac website. The two key services
here are
ITrackListingand
IChannelFactory<ITrackListing>-
these common bits of WCF plumbing are easy to fit into expression-based registrations.
Some things to note here:
The channel factory isn't created unless it is required, but once it is created, it will be kept and reused each time
ITrackListingis
requested.
ITrackListingdoesn't derive from
IDisposable,
yet in WCF, the client service proxies created this way need to be cast to
IDisposableand disposed. The code using
ITrackListingcan
remain unaware of this implementation detail.
Endpoint information can come from anywhere – another service, a database, a configuration file (with other pre-built container integrations for WCF, these decisions are made for you).
No additional concepts other than the basic
Register()methods are
used (to do this in any other container would require customised classes/facilities to be implemented).
This section should have given you an idea of how working with Autofac lets you focus on writing your application – not extending or fussing over the intricacies of a DI container.
Where to Next?
I hope this article has illustrated the kinds of rewards that will come from learning how to use Autofac. The next steps might be to:Download the source code for the article
Read some more articles on the Wiki or on
the web
Come and introduce yourself on the discussion forum
Credits
Thanks to Rinat Abdullin, LukeMarshall, Tim Mead, and Mark Monsour for reviewing this article and providing many helpful suggestions. Without your help, I fear it would have been completely unintelligible. If it is still unintelligible, then all of the blame lies with me. :)
History
18th April, 2008: Initial post9th September, 2010: Article updated
License
This article, along with any associated source code and files, is licensed under The MIT License原文URL:http://www.codeproject.com/Articles/25380/Dependency-Injection-with-Autofac

相关文章推荐
- ASP.NET 5 Dependency Injection with Autofac
- 【译】Dependency Injection with Autofac
- Dependency Injection and Inversion of Control with ASP.NET MVC
- Error creating bean with name 'menuController': Injection of autowired dependency……
- Dependency injection with Flex
- Inversion of Control and Dependency Injection with Castle Windsor Container
- Inversion of Control and Dependency Injection with Castle Windsor Container - Part I
- Introduction to dependency injection with unityContainer
- Inversion of Control/Dependency Injection with Repository Pattern, Fluent Nhibernate, and LightCore
- Software Craftsmanship : Implement Inversion of Control with Dependency Injection & Service locator
- Error creating bean with name 'menuController': Injection of autowired dependency……
- Error creating bean with name 'menuController' Injection of autowired dependency…
- [Vue + TS] Use Dependency Injection in Vue Using @Inject and @Provide Decorators with TypeScript
- The service ‘xxx’ configured for WCF is not registered with the Autofac container
- 开发错误12:gradle编译错误:Conflict with dependency com.android.support:support-annotations
- [Study Note] Dependency Injection and Inversion of Control
- Inversion of Control Containers and the Dependency Injection pattern
- Error creating bean with name 'controller':Injection of resource dependencies failed
- Error creating bean with name 'menuController': Injection of autowired dependenc
- Error:Conflict with dependency 'com.google.code.findbugs:jsr305'