Android ImageButton 使用Selector的简单示例
2013-04-13 20:47
656 查看
一般情况下,我们可以用ImageButton来显示一个Button按钮。然而,有些时候我们想按钮的状态发生变化,比如按下前是一个样子,按下后又是另一个样子,Android允许我们改变按钮的形象取决于不同的状态,如按钮是集中或按钮被按下。下***体讲述如何实现:
P.S This project is developed in Eclipse 3.7, and tested with Android 2.3.3
准备三张不同Button状态的图片,然后把它放入 “resource/drawable” 。
button_normal_green.png – 默认的图像Button.
button_focused_orange.png – 当按钮被关注,例如,当电话键盘移动(焦点)在这个按钮时显示。
button_pressed_yellow.png – 当按钮被按下时显示
在“res/drawable/”里面创建一个新的XML布局文件,这里我们取名为“
File : res/drawable/new_button.xml
File : res/layout/main.xml
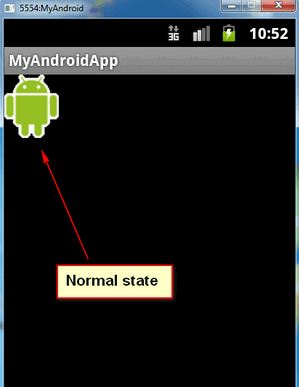
1. 结果如图, 默认的 button. (button_normal_green.png)
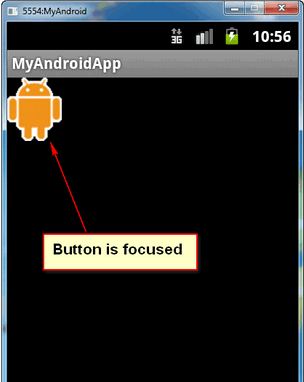
2. Button 聚焦. (button_focused_orange.png)
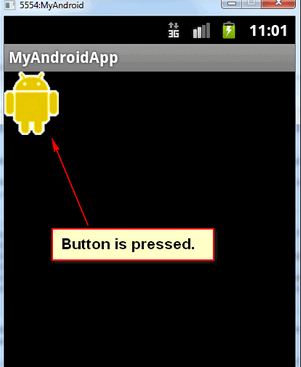
2. Button 被按下. (button_focused_orange.png)
这个应用其实还是很广泛的,比如播放器的控制,游戏的状态等等。
P.S This project is developed in Eclipse 3.7, and tested with Android 2.3.3
[title2]1. 往 Resources里面添加图片[/title2]
准备三张不同Button状态的图片,然后把它放入 “resource/drawable” 。button_normal_green.png – 默认的图像Button.
button_focused_orange.png – 当按钮被关注,例如,当电话键盘移动(焦点)在这个按钮时显示。
button_pressed_yellow.png – 当按钮被按下时显示
[title2]2. 为不同的Button状态添加 Selector [/title2]
在“res/drawable/”里面创建一个新的XML布局文件,这里我们取名为“new_button.xml“。这个XML文件定义按钮的状态是属于哪种Button图像。
File : res/drawable/new_button.xml
<?xml version="1.0" encoding="utf-8"?>
<selector xmlns:android="http://schemas.android.com/apk/res/android">
    <item android:drawable="@drawable/button_pressed_yellow"
          android:state_pressed="true" />
    <item android:drawable="@drawable/button_focused_orange"
          android:state_focused="true" />
    <item android:drawable="@drawable/button_normal_green" />
</selector>
3.添加Button
打开 “res/layout/main.xml”布局文件,添加一个正常的button,然后为这个button添加一个背景图像File : res/layout/main.xml
<?xml version="1.0" encoding="utf-8"?>
<LinearLayout xmlns:android="http://schemas.android.com/apk/res/android"
    android:layout_width="fill_parent"
    android:layout_height="fill_parent"
    android:orientation="vertical" >

    <Button
        android:id="@+id/imageButtonSelector"
        android:layout_width="wrap_content"
        android:layout_height="wrap_content"
        android:background="@drawable/new_button" />//通过这个方式来实现

</LinearLayout>
4.Activity代码如下
一个正常的按钮和一个简单的点击侦听器package com.demo.app;
import android.app.Activity;
import android.os.Bundle;
import android.view.View;
import android.view.View.OnClickListener;
import android.widget.Button;
import android.widget.Toast;
public class AppTestActivity extends Activity
{
Button imageButton;
@Override
protected void onCreate(Bundle savedInstanceState)
{
super.onCreate(savedInstanceState);
setContentView(R.layout.main);
imageButton = (Button) findViewById(R.id.imageButtonSelector);
imageButton.setOnClickListener(new OnClickListener()
{
public void onClick(View v)
{
Toast.makeText(AppTestActivity.this, "eee", Toast.LENGTH_SHORT);
}
});
}
}5.运行
运行该应用程序1. 结果如图, 默认的 button. (button_normal_green.png)
2. Button 聚焦. (button_focused_orange.png)
2. Button 被按下. (button_focused_orange.png)
这个应用其实还是很广泛的,比如播放器的控制,游戏的状态等等。

相关文章推荐
- android中使用selector动态改变imageView或ImageViewButton的背景
- android中使用selector动态改变imageView或ImageViewButton的背景
- android中使用selector动态改变imageView或ImageViewButton的背景
- android中使用selector动态改变imageView或ImageViewButton的背景
- Android深入浅出系列之实例应用—简单的手指拖动图片,图片滑来滑去显示应用Gallery和BaseAdapter以及ImageView的使用
- Android之ImageButton使用
- Android 使用selector设置button字体颜色无效
- android控件Button之简单使用
- android使用selector在 button上无效
- Android客户端使用HttpURLConnection doGet与服务器数据交互简单示例
- Day3.4--Android简单UI控件之ImageView以及ScaleType的使用
- Android开发中button按钮的使用及动态添加组件方法示例
- Android 仿微信的图片选择器ImageSelector的使用
- Android深入浅出系列之实例应用—简单的手指拖动图片,图片滑来滑去显示应用Gallery和BaseAdapter以及ImageView的使用
- android使用ComponentName组件简单示例
- Android中selector的简单使用
- Android:使用selector 在 button上无效的问题
- Android零基础入门第23节:ImageButton和ZoomButton使用大全
- Android-----使用Button特效 selector+shape
- android简单的AIDL使用示例