IOS学习之UITableView表视图控件初步
2013-03-31 13:00
603 查看
表视图这个控件学习的时候,发现是目前我接触到最复杂的组件。
在Android中也提供了类似表视图的控件叫ListView。
原生的ListView,支持的操作其实很有限,数据的条目展示,点击或是长按的操作。
后来慢慢的衍生出来的索引,分区,动态改变指定条目位置等。
到了IOS发现,原来都是这些设计概念全是从IOS的表视图移植过去的吧。
因此,IOS的表视图是个挺丰富的控件
以下文章内容我基本是这么个流程划分
最简单的表视图——》自定义Cell表——》可编辑表——》可动态移动表
以下是配合Navigation导航条控件演示的tableView各种实现。
一:基础表视图
我们看下表视图一个大致的界面模型
首先是navc的顶级视图

这个视图控制器的代码基本很前面提到的导航那章一样,只是多了一个数组容器来保存要显示的三个二级视图控制器
看下m文件
[cpp]
view plaincopyprint?
//
//  NonoFirstLevelViewController.m
//  NavTest
//
//  Created by Nono on 12-4-26.
//  Copyright (c) 2012年 NonoWithLilith. All rights reserved.
//

#import "NonoFirstLevelViewController.h"
#import "NonoSecondLevelViewController.h"
#import "SimpleTableViewController.h"
#import "CustomCellViewController.h"
#import "EditViewController.h"
@interface NonoFirstLevelViewController ()

@end

@implementation NonoFirstLevelViewController
@synthesize controllers = _controllers;
#pragma 实现头文件中自定义方法;
- (void)initAllSecondControllers:(NSMutableArray *)array
{
    SimpleTableViewController *controller1 = [[SimpleTableViewController alloc] init];
    [controller1 setTitle:@"简单表视图"];
    [array addObject:controller1];
    [controller1 release];

    CustomCellViewController *controller2 = [[CustomCellViewController alloc] init];
     [controller2 setTitle:@"自定义cell视图"];
    [array addObject:controller2];
    [controller2 release];


    EditViewController *controller3 = [[EditViewController alloc] init];
    [controller3 setTitle:@"可编辑视图"];
    [array addObject:controller3];
    [controller3 release];
}

- (id)initWithStyle:(UITableViewStyle)style
{
    self = [super initWithStyle:style];
    if (self) {
    }
    return self;
}

- (void)viewDidLoad
{
    [super viewDidLoad];
    self.title = @"表视图Demo";
    //实例化一个可变数组
    NSMutableArray *array = [[NSMutableArray alloc] init ];//
    self.controllers = array;
    [array release];
    [self initAllSecondControllers:self.controllers];
}

- (void)viewDidUnload
{
    [super viewDidUnload];
}

- (BOOL)shouldAutorotateToInterfaceOrientation:(UIInterfaceOrientation)interfaceOrientation
{
    return (interfaceOrientation == UIInterfaceOrientationPortrait);
}

#pragma mark - Table view data source
- (NSInteger)tableView:(UITableView *)tableView numberOfRowsInSection:(NSInteger)section
{
    return [self.controllers count];
}

- (UITableViewCell *)tableView:(UITableView *)tableView cellForRowAtIndexPath:(NSIndexPath *)indexPath
{
    static NSString *CellIdentifier = @"FirstLevelCell";
    UITableViewCell *cell = [tableView dequeueReusableCellWithIdentifier:CellIdentifier];
    if (cell == nil) {
        cell = [[[UITableViewCell alloc] initWithStyle:UITableViewCellStyleDefault reuseIdentifier:CellIdentifier] autorelease];
    }
    NSUInteger row = [indexPath row];
    NonoSecondLevelViewController *controller = [self.controllers objectAtIndex:row];
    cell.textLabel.text = [controller title];
    return cell;
}

#pragma mark - Table view delegate
- (void)tableView:(UITableView *)tableView didSelectRowAtIndexPath:(NSIndexPath *)indexPath
{
    NSUInteger row = [indexPath row];
    NonoSecondLevelViewController  *secondVC = [self.controllers objectAtIndex:row];
     [self.navigationController pushViewController:secondVC animated:YES];

}

@end
线面我么先看最简单的这条目
简单表视图:

[cpp]
view plaincopyprint?
- (UITableViewCell *)tableView:(UITableView *)tableView cellForRowAtIndexPath:(NSIndexPath *)indexPath
{
    //控件复用
    static NSString *CellIdentifier = @"simpleCell";
    UITableViewCell *cell = [tableView dequeueReusableCellWithIdentifier:CellIdentifier];
    if (cell == nil) {
        cell = [[[UITableViewCell alloc] initWithStyle:UITableViewCellStyleDefault reuseIdentifier:CellIdentifier] autorelease];

    }
    NSUInteger row = [indexPath row];
    NSString *string = [self.data objectAtIndex:row];
    cell.textLabel.text = string;

    //这个可以定义item右端小图标显示风格,默认是none;
    //cell.accessoryType = UITableViewCellAccessoryDetailDisclosureButton;
    [string release];
    return cell;
}
这边主要说如下几点:
1》。控件得复用,这个和Android很像,因此我们在获取cell对象时,先从原来得复用队列里查找(更具指定的标记,这点也告诉我们,我们可以设置多个标记),
若没有,那就新建一个
2》。整个tableview的style分两种,一种就是顶级视图界面的那种: self.tableView.style = UITableViewStylePlain,另一种就是这个视图的风格:
self.tableView.style = UITableViewStyleGrouped
3》.对于每个item,单元格样式使用了3个不同的单元格元素。依次左边开始有个图标,中间就是一个label,右侧会有一个详情栏。
4》。同样的对于每个cell也是有样式风格的 cell = [[[UITableViewCell alloc] initWithStyle:UITableViewCellStyleDefault reuseIdentifier:CellIdentifier]
针对3,4设置后得某种效果如下:

左端可以自己敬爱个图标进去,黑体字就是文本label,灰色的是详细文本标签,小箭头图标是accessoryType
以下就是代码
[cpp]
view plaincopyprint?
static NSString *CellIdentifier = @"FirstLevelCell";
    UITableViewCell *cell = [tableView dequeueReusableCellWithIdentifier:CellIdentifier];
    if (cell == nil) {
        cell = [[[UITableViewCell alloc] initWithStyle:UITableViewCellStyleValue1 reuseIdentifier:CellIdentifier] autorelease];
    }
    NSUInteger row = [indexPath row];
    NonoSecondLevelViewController *controller = [self.controllers objectAtIndex:row];
    cell.textLabel.text = [controller title];
    cell.detailTextLabel.text = @"什么情况";
    //这个可以定义item右端小图标显示风格,默认是none;
    cell.accessoryType = UITableViewCellAccessoryDetailDisclosureButton;
    return cell;
其实很多效果,代码都走一边就看出来了,具体就自己改动下代码就ok了
二:自定义的Cell

自定义的cell,xib实现

基本没什么好说的,看下该类额控制器文件
[cpp]
view plaincopyprint?
//
//  CustomCellViewController.m
//  NavTest
//
//  Created by Nono on 12-5-4.
//  Copyright (c) 2012年 NonoWithLilith. All rights reserved.
//

#import "CustomCellViewController.h"

@interface CustomCellViewController ()

@end
@implementation CustomCellViewController
@synthesize customCell = _customCell;
- (id)initWithNibName:(NSString *)nibNameOrNil bundle:(NSBundle *)nibBundleOrNil
{
    self = [super initWithNibName:nibNameOrNil bundle:nibBundleOrNil];
    if (self) {
        // Custom initialization
    }
    return self;
}

- (void)viewDidLoad
{
    [super viewDidLoad];
    NSMutableArray *array = [[NSMutableArray alloc] initWithObjects:@"陈凯",@"Nono",@"Lilith",@"窗前明月光",@"疑是地上霜",@"举头望明月",@"低头思故乡",@"锄禾日当午",@"汗滴禾下土",@"谁知盘中餐",@"粒粒皆幸苦",nil];
    self.data = array;
    [array release];
    // Do any additional setup after loading the view from its nib.
}

- (BOOL)shouldAutorotateToInterfaceOrientation:(UIInterfaceOrientation)interfaceOrientation
{
    return (interfaceOrientation == UIInterfaceOrientationPortrait);
}

#pragma mark_
#pragma 数据源方法
- (NSInteger)tableView:(UITableView *)tableView numberOfRowsInSection:(NSInteger)section
{
    return [self.data count];

}

// Row display. Implementers should *always* try to reuse cells by setting each cell's reuseIdentifier and querying for available reusable cells with dequeueReusableCellWithIdentifier:
// Cell gets various attributes set automatically based on table (separators) and data source (accessory views, editing controls)

- (UITableViewCell *)tableView:(UITableView *)tableView cellForRowAtIndexPath:(NSIndexPath *)indexPath
{

    static NSString *CellIdentifier = @"CustomCell";
    UITableViewCell *cell = [tableView dequeueReusableCellWithIdentifier:CellIdentifier];
    if (cell == nil) {
        NSArray *nib = [[NSBundle mainBundle] loadNibNamed:@"CustomCell" owner:self options:nil];
        if([nib count] > 0){
            cell = self.customCell;
            cell.backgroundColor = [UIColor redColor];
        }else{
            NSLog(@"加载 nib文件失败");
        }

    }
    NSUInteger row = [indexPath row];
    NSString *string = [self.data objectAtIndex:row];
    UILabel *customlabel =(UILabel*) [cell viewWithTag:11];
    customlabel.text = string;
    [string release];
    return cell;
}
@end
1》。cell的xib文件得拥有者设置成该类,在该类得头文件中定义一个输出口。
2》 我们看到cell的xib文件有3个label视图我们能看到,其实还有一个没有title的label视图,也就我们要动态添加数据的那个视图,
在xib文件中需要给他设置一个tag,这样我们在代码里才能根据tag找出该对象(和Android中得id很像)。这边我定义了11,所以
UILabel *customlabel =(UILabel*) [cellviewWithTag:11];
customlabel.text = string;
3》。xib文件加载,我是根据书上得列子方法。根据应用的束来获取。
4》。哦,还有点就是 static NSString *CellIdentifier = @"CustomCell";。这个在xib文件得指定器中定义,因为原本我们新建一个cell是有个传入指定标签,
而现在这个新建一个cell说白了就是直接从xib中加载一个实例化了,那么指定器怎需要在xib中定义下。
对于cell简单的自定义就是这样。
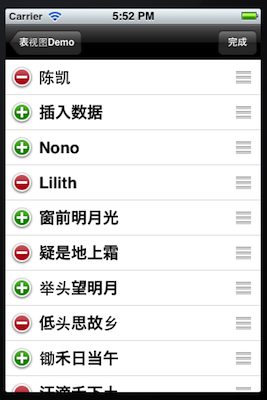
三:可编辑的tableView(删除,添加,移动)
[cpp]
view plaincopyprint?
//
//  EditViewController.m
//  NavTest
//
//  Created by Nono on 12-5-4.
//  Copyright (c) 2012年 NonoWithLilith. All rights reserved.
//

#import "EditViewController.h"

@interface EditViewController ()

@end

@implementation EditViewController
@synthesize edittableView;
- (void)editButtonPressed:(id)sender
{
    [self.edittableView setEditing:!self.edittableView.editing animated:(YES)];
    if (edittableView.editing) {
        [self.navigationItem.rightBarButtonItem setTitle:@"完成"];
    }else {
        [self.navigationItem.rightBarButtonItem setTitle:@"编辑"];
    };
    NSLog(@"点击了按钮");
}
- (id)initWithNibName:(NSString *)nibNameOrNil bundle:(NSBundle *)nibBundleOrNil
{
    self = [super initWithNibName:nibNameOrNil bundle:nibBundleOrNil];
    if (self) {
        // Custom initialization
    }
    return self;
}

- (void)viewDidLoad
{
    [super viewDidLoad];
    NSMutableArray *array = [[NSMutableArray alloc] initWithObjects:@"陈凯",@"Nono",@"Lilith",@"窗前明月光",@"疑是地上霜",@"举头望明月",@"低头思故乡",@"锄禾日当午",@"汗滴禾下土",@"谁知盘中餐",@"粒粒皆幸苦",nil];
    self.data = array;
    [array release];
    UIBarButtonItem *rigthButton = [[UIBarButtonItem alloc]  initWithTitle:@"编辑"  style:UIBarButtonItemStyleBordered  target:self  action:@selector(editButtonPressed:)];
    self.navigationItem.rightBarButtonItem = rigthButton;
    //self.navigationItem.prompt = @"加载";
    [rigthButton release];
    // Do any additional setup after loading the view from its nib.
}

- (void)viewDidUnload
{
    [super viewDidUnload];
    // Release any retained subviews of the main view.
    // e.g. self.myOutlet = nil;
}

- (BOOL)shouldAutorotateToInterfaceOrientation:(UIInterfaceOrientation)interfaceOrientation
{
    return (interfaceOrientation == UIInterfaceOrientationPortrait);
}

#pragma mark - Table view data source

- (NSInteger)tableView:(UITableView *)tableView numberOfRowsInSection:(NSInteger)section
{
    // Return the number of rows in the section.
    return [self.data count];
}

- (UITableViewCell *)tableView:(UITableView *)tableView cellForRowAtIndexPath:(NSIndexPath *)indexPath
{
    static NSString *CellIdentifier = @"editLevelCell";
    UITableViewCell *cell = [tableView dequeueReusableCellWithIdentifier:CellIdentifier];
    if (cell == nil) {
        cell = [[[UITableViewCell alloc] initWithStyle:UITableViewCellStyleDefault reuseIdentifier:CellIdentifier] autorelease];
    }
    NSUInteger row = [indexPath row];
    NSString *string = [self.data objectAtIndex:row];
    cell.textLabel.text = string;
    [string release];
    return cell;
}

#pragma 实现数据源协议中一些关于编辑操作方法
- (BOOL)tableView:(UITableView *)tableView canEditRowAtIndexPath:(NSIndexPath *)indexPath
{
    //是否可以编辑,即是tableView setEditing的前提;默认是yes,实现这个方法估计主要是选择性的编辑条目。
    return YES;
}

- (BOOL)tableView:(UITableView *)tableView canMoveRowAtIndexPath:(NSIndexPath *)indexPath
{
    //同理默认其实就是yes,移动模式(会显示可以触摸得移动button)必须是在实现了下面这个方法才有效,否则及时yes了,移动模式条也是不显示的,简单的说,你不能执行移动操作
    return YES;
}
//移动操作
- (void)tableView:(UITableView *)tableView moveRowAtIndexPath:(NSIndexPath *)sourceIndexPath toIndexPath:(NSIndexPath *)destinationIndexPath
{
    //拖动得思路就是先备份选中行,删除原来那份,将备份的一份插入到目标行
    NSUInteger fromRow = [sourceIndexPath row];
    NSUInteger toRow = [destinationIndexPath row];
    id ob = [[self.data objectAtIndex:fromRow] retain];
    [self.data removeObjectAtIndex:fromRow];
    [self.data insertObject:ob atIndex:toRow];
    [ob release];
}

- (void)tableView:(UITableView *)tableView commitEditingStyle:(UITableViewCellEditingStyle)editingStyle forRowAtIndexPath:(NSIndexPath *)indexPath
{
      NSUInteger row = [indexPath row];
    //提交操作完的编辑
    if (editingStyle == UITableViewCellEditingStyleDelete) {
        [self.data removeObjectAtIndex:row]; //删除操作
        [tableView deleteRowsAtIndexPaths:[NSArray arrayWithObject:indexPath] withRowAnimation:UITableViewRowAnimationFade];
    }

    if (editingStyle == UITableViewCellEditingStyleInsert) {
        [self.data insertObject:@"插入数据" atIndex:row];//插入操作
        [tableView insertRowsAtIndexPaths:[NSArray arrayWithObject:indexPath] withRowAnimation:UITableViewRowAnimationLeft];
    }
}

#pragma 实现tableView委托中一些方法
- (UITableViewCellEditingStyle)tableView:(UITableView *)tableView editingStyleForRowAtIndexPath:(NSIndexPath *)indexPath;
{
    //设置可编辑得样式:系统提供了三种,一种是删除,一种是插入,一种时是none
    NSInteger row = [indexPath row];
    if(row %2 == 0)//这边做了小处理,间隔显示删除和插入
    {
        return UITableViewCellEditingStyleDelete;
    }
    return UITableViewCellEditingStyleInsert;
}
@end
在Android中也提供了类似表视图的控件叫ListView。
原生的ListView,支持的操作其实很有限,数据的条目展示,点击或是长按的操作。
后来慢慢的衍生出来的索引,分区,动态改变指定条目位置等。
到了IOS发现,原来都是这些设计概念全是从IOS的表视图移植过去的吧。
因此,IOS的表视图是个挺丰富的控件
以下文章内容我基本是这么个流程划分
最简单的表视图——》自定义Cell表——》可编辑表——》可动态移动表
以下是配合Navigation导航条控件演示的tableView各种实现。
一:基础表视图
我们看下表视图一个大致的界面模型
首先是navc的顶级视图
这个视图控制器的代码基本很前面提到的导航那章一样,只是多了一个数组容器来保存要显示的三个二级视图控制器
看下m文件
[cpp]
view plaincopyprint?
//
// NonoFirstLevelViewController.m
// NavTest
//
// Created by Nono on 12-4-26.
// Copyright (c) 2012年 NonoWithLilith. All rights reserved.
//
#import "NonoFirstLevelViewController.h"
#import "NonoSecondLevelViewController.h"
#import "SimpleTableViewController.h"
#import "CustomCellViewController.h"
#import "EditViewController.h"
@interface NonoFirstLevelViewController ()
@end
@implementation NonoFirstLevelViewController
@synthesize controllers = _controllers;
#pragma 实现头文件中自定义方法;
- (void)initAllSecondControllers:(NSMutableArray *)array
{
SimpleTableViewController *controller1 = [[SimpleTableViewController alloc] init];
[controller1 setTitle:@"简单表视图"];
[array addObject:controller1];
[controller1 release];
CustomCellViewController *controller2 = [[CustomCellViewController alloc] init];
[controller2 setTitle:@"自定义cell视图"];
[array addObject:controller2];
[controller2 release];
EditViewController *controller3 = [[EditViewController alloc] init];
[controller3 setTitle:@"可编辑视图"];
[array addObject:controller3];
[controller3 release];
}
- (id)initWithStyle:(UITableViewStyle)style
{
self = [super initWithStyle:style];
if (self) {
}
return self;
}
- (void)viewDidLoad
{
[super viewDidLoad];
self.title = @"表视图Demo";
//实例化一个可变数组
NSMutableArray *array = [[NSMutableArray alloc] init ];//
self.controllers = array;
[array release];
[self initAllSecondControllers:self.controllers];
}
- (void)viewDidUnload
{
[super viewDidUnload];
}
- (BOOL)shouldAutorotateToInterfaceOrientation:(UIInterfaceOrientation)interfaceOrientation
{
return (interfaceOrientation == UIInterfaceOrientationPortrait);
}
#pragma mark - Table view data source
- (NSInteger)tableView:(UITableView *)tableView numberOfRowsInSection:(NSInteger)section
{
return [self.controllers count];
}
- (UITableViewCell *)tableView:(UITableView *)tableView cellForRowAtIndexPath:(NSIndexPath *)indexPath
{
static NSString *CellIdentifier = @"FirstLevelCell";
UITableViewCell *cell = [tableView dequeueReusableCellWithIdentifier:CellIdentifier];
if (cell == nil) {
cell = [[[UITableViewCell alloc] initWithStyle:UITableViewCellStyleDefault reuseIdentifier:CellIdentifier] autorelease];
}
NSUInteger row = [indexPath row];
NonoSecondLevelViewController *controller = [self.controllers objectAtIndex:row];
cell.textLabel.text = [controller title];
return cell;
}
#pragma mark - Table view delegate
- (void)tableView:(UITableView *)tableView didSelectRowAtIndexPath:(NSIndexPath *)indexPath
{
NSUInteger row = [indexPath row];
NonoSecondLevelViewController *secondVC = [self.controllers objectAtIndex:row];
[self.navigationController pushViewController:secondVC animated:YES];
}
@end
//
// NonoFirstLevelViewController.m
// NavTest
//
// Created by Nono on 12-4-26.
// Copyright (c) 2012年 NonoWithLilith. All rights reserved.
//
#import "NonoFirstLevelViewController.h"
#import "NonoSecondLevelViewController.h"
#import "SimpleTableViewController.h"
#import "CustomCellViewController.h"
#import "EditViewController.h"
@interface NonoFirstLevelViewController ()
@end
@implementation NonoFirstLevelViewController
@synthesize controllers = _controllers;
#pragma 实现头文件中自定义方法;
- (void)initAllSecondControllers:(NSMutableArray *)array
{
SimpleTableViewController *controller1 = [[SimpleTableViewController alloc] init];
[controller1 setTitle:@"简单表视图"];
[array addObject:controller1];
[controller1 release];
CustomCellViewController *controller2 = [[CustomCellViewController alloc] init];
[controller2 setTitle:@"自定义cell视图"];
[array addObject:controller2];
[controller2 release];
EditViewController *controller3 = [[EditViewController alloc] init];
[controller3 setTitle:@"可编辑视图"];
[array addObject:controller3];
[controller3 release];
}
- (id)initWithStyle:(UITableViewStyle)style
{
self = [super initWithStyle:style];
if (self) {
}
return self;
}
- (void)viewDidLoad
{
[super viewDidLoad];
self.title = @"表视图Demo";
//实例化一个可变数组
NSMutableArray *array = [[NSMutableArray alloc] init ];//
self.controllers = array;
[array release];
[self initAllSecondControllers:self.controllers];
}
- (void)viewDidUnload
{
[super viewDidUnload];
}
- (BOOL)shouldAutorotateToInterfaceOrientation:(UIInterfaceOrientation)interfaceOrientation
{
return (interfaceOrientation == UIInterfaceOrientationPortrait);
}
#pragma mark - Table view data source
- (NSInteger)tableView:(UITableView *)tableView numberOfRowsInSection:(NSInteger)section
{
return [self.controllers count];
}
- (UITableViewCell *)tableView:(UITableView *)tableView cellForRowAtIndexPath:(NSIndexPath *)indexPath
{
static NSString *CellIdentifier = @"FirstLevelCell";
UITableViewCell *cell = [tableView dequeueReusableCellWithIdentifier:CellIdentifier];
if (cell == nil) {
cell = [[[UITableViewCell alloc] initWithStyle:UITableViewCellStyleDefault reuseIdentifier:CellIdentifier] autorelease];
}
NSUInteger row = [indexPath row];
NonoSecondLevelViewController *controller = [self.controllers objectAtIndex:row];
cell.textLabel.text = [controller title];
return cell;
}
#pragma mark - Table view delegate
- (void)tableView:(UITableView *)tableView didSelectRowAtIndexPath:(NSIndexPath *)indexPath
{
NSUInteger row = [indexPath row];
NonoSecondLevelViewController *secondVC = [self.controllers objectAtIndex:row];
[self.navigationController pushViewController:secondVC animated:YES];
}
@end顶视图类基本就是一个导航作用。线面我么先看最简单的这条目
简单表视图:
[cpp]
view plaincopyprint?
- (UITableViewCell *)tableView:(UITableView *)tableView cellForRowAtIndexPath:(NSIndexPath *)indexPath
{
//控件复用
static NSString *CellIdentifier = @"simpleCell";
UITableViewCell *cell = [tableView dequeueReusableCellWithIdentifier:CellIdentifier];
if (cell == nil) {
cell = [[[UITableViewCell alloc] initWithStyle:UITableViewCellStyleDefault reuseIdentifier:CellIdentifier] autorelease];
}
NSUInteger row = [indexPath row];
NSString *string = [self.data objectAtIndex:row];
cell.textLabel.text = string;
//这个可以定义item右端小图标显示风格,默认是none;
//cell.accessoryType = UITableViewCellAccessoryDetailDisclosureButton;
[string release];
return cell;
}
- (UITableViewCell *)tableView:(UITableView *)tableView cellForRowAtIndexPath:(NSIndexPath *)indexPath
{
//控件复用
static NSString *CellIdentifier = @"simpleCell";
UITableViewCell *cell = [tableView dequeueReusableCellWithIdentifier:CellIdentifier];
if (cell == nil) {
cell = [[[UITableViewCell alloc] initWithStyle:UITableViewCellStyleDefault reuseIdentifier:CellIdentifier] autorelease];
}
NSUInteger row = [indexPath row];
NSString *string = [self.data objectAtIndex:row];
cell.textLabel.text = string;
//这个可以定义item右端小图标显示风格,默认是none;
//cell.accessoryType = UITableViewCellAccessoryDetailDisclosureButton;
[string release];
return cell;
}这边主要说如下几点:
1》。控件得复用,这个和Android很像,因此我们在获取cell对象时,先从原来得复用队列里查找(更具指定的标记,这点也告诉我们,我们可以设置多个标记),
若没有,那就新建一个
2》。整个tableview的style分两种,一种就是顶级视图界面的那种: self.tableView.style = UITableViewStylePlain,另一种就是这个视图的风格:
self.tableView.style = UITableViewStyleGrouped
3》.对于每个item,单元格样式使用了3个不同的单元格元素。依次左边开始有个图标,中间就是一个label,右侧会有一个详情栏。
4》。同样的对于每个cell也是有样式风格的 cell = [[[UITableViewCell alloc] initWithStyle:UITableViewCellStyleDefault reuseIdentifier:CellIdentifier]
针对3,4设置后得某种效果如下:
左端可以自己敬爱个图标进去,黑体字就是文本label,灰色的是详细文本标签,小箭头图标是accessoryType
以下就是代码
[cpp]
view plaincopyprint?
static NSString *CellIdentifier = @"FirstLevelCell";
UITableViewCell *cell = [tableView dequeueReusableCellWithIdentifier:CellIdentifier];
if (cell == nil) {
cell = [[[UITableViewCell alloc] initWithStyle:UITableViewCellStyleValue1 reuseIdentifier:CellIdentifier] autorelease];
}
NSUInteger row = [indexPath row];
NonoSecondLevelViewController *controller = [self.controllers objectAtIndex:row];
cell.textLabel.text = [controller title];
cell.detailTextLabel.text = @"什么情况";
//这个可以定义item右端小图标显示风格,默认是none;
cell.accessoryType = UITableViewCellAccessoryDetailDisclosureButton;
return cell;
static NSString *CellIdentifier = @"FirstLevelCell";
UITableViewCell *cell = [tableView dequeueReusableCellWithIdentifier:CellIdentifier];
if (cell == nil) {
cell = [[[UITableViewCell alloc] initWithStyle:UITableViewCellStyleValue1 reuseIdentifier:CellIdentifier] autorelease];
}
NSUInteger row = [indexPath row];
NonoSecondLevelViewController *controller = [self.controllers objectAtIndex:row];
cell.textLabel.text = [controller title];
cell.detailTextLabel.text = @"什么情况";
//这个可以定义item右端小图标显示风格,默认是none;
cell.accessoryType = UITableViewCellAccessoryDetailDisclosureButton;
return cell;默认风格的cell是不能显示详情标签内容的。其实很多效果,代码都走一边就看出来了,具体就自己改动下代码就ok了
二:自定义的Cell
自定义的cell,xib实现
基本没什么好说的,看下该类额控制器文件
[cpp]
view plaincopyprint?
//
// CustomCellViewController.m
// NavTest
//
// Created by Nono on 12-5-4.
// Copyright (c) 2012年 NonoWithLilith. All rights reserved.
//
#import "CustomCellViewController.h"
@interface CustomCellViewController ()
@end
@implementation CustomCellViewController
@synthesize customCell = _customCell;
- (id)initWithNibName:(NSString *)nibNameOrNil bundle:(NSBundle *)nibBundleOrNil
{
self = [super initWithNibName:nibNameOrNil bundle:nibBundleOrNil];
if (self) {
// Custom initialization
}
return self;
}
- (void)viewDidLoad
{
[super viewDidLoad];
NSMutableArray *array = [[NSMutableArray alloc] initWithObjects:@"陈凯",@"Nono",@"Lilith",@"窗前明月光",@"疑是地上霜",@"举头望明月",@"低头思故乡",@"锄禾日当午",@"汗滴禾下土",@"谁知盘中餐",@"粒粒皆幸苦",nil];
self.data = array;
[array release];
// Do any additional setup after loading the view from its nib.
}
- (BOOL)shouldAutorotateToInterfaceOrientation:(UIInterfaceOrientation)interfaceOrientation
{
return (interfaceOrientation == UIInterfaceOrientationPortrait);
}
#pragma mark_
#pragma 数据源方法
- (NSInteger)tableView:(UITableView *)tableView numberOfRowsInSection:(NSInteger)section
{
return [self.data count];
}
// Row display. Implementers should *always* try to reuse cells by setting each cell's reuseIdentifier and querying for available reusable cells with dequeueReusableCellWithIdentifier:
// Cell gets various attributes set automatically based on table (separators) and data source (accessory views, editing controls)
- (UITableViewCell *)tableView:(UITableView *)tableView cellForRowAtIndexPath:(NSIndexPath *)indexPath
{
static NSString *CellIdentifier = @"CustomCell";
UITableViewCell *cell = [tableView dequeueReusableCellWithIdentifier:CellIdentifier];
if (cell == nil) {
NSArray *nib = [[NSBundle mainBundle] loadNibNamed:@"CustomCell" owner:self options:nil];
if([nib count] > 0){
cell = self.customCell;
cell.backgroundColor = [UIColor redColor];
}else{
NSLog(@"加载 nib文件失败");
}
}
NSUInteger row = [indexPath row];
NSString *string = [self.data objectAtIndex:row];
UILabel *customlabel =(UILabel*) [cell viewWithTag:11];
customlabel.text = string;
[string release];
return cell;
}
@end
//
// CustomCellViewController.m
// NavTest
//
// Created by Nono on 12-5-4.
// Copyright (c) 2012年 NonoWithLilith. All rights reserved.
//
#import "CustomCellViewController.h"
@interface CustomCellViewController ()
@end
@implementation CustomCellViewController
@synthesize customCell = _customCell;
- (id)initWithNibName:(NSString *)nibNameOrNil bundle:(NSBundle *)nibBundleOrNil
{
self = [super initWithNibName:nibNameOrNil bundle:nibBundleOrNil];
if (self) {
// Custom initialization
}
return self;
}
- (void)viewDidLoad
{
[super viewDidLoad];
NSMutableArray *array = [[NSMutableArray alloc] initWithObjects:@"陈凯",@"Nono",@"Lilith",@"窗前明月光",@"疑是地上霜",@"举头望明月",@"低头思故乡",@"锄禾日当午",@"汗滴禾下土",@"谁知盘中餐",@"粒粒皆幸苦",nil];
self.data = array;
[array release];
// Do any additional setup after loading the view from its nib.
}
- (BOOL)shouldAutorotateToInterfaceOrientation:(UIInterfaceOrientation)interfaceOrientation
{
return (interfaceOrientation == UIInterfaceOrientationPortrait);
}
#pragma mark_
#pragma 数据源方法
- (NSInteger)tableView:(UITableView *)tableView numberOfRowsInSection:(NSInteger)section
{
return [self.data count];
}
// Row display. Implementers should *always* try to reuse cells by setting each cell's reuseIdentifier and querying for available reusable cells with dequeueReusableCellWithIdentifier:
// Cell gets various attributes set automatically based on table (separators) and data source (accessory views, editing controls)
- (UITableViewCell *)tableView:(UITableView *)tableView cellForRowAtIndexPath:(NSIndexPath *)indexPath
{
static NSString *CellIdentifier = @"CustomCell";
UITableViewCell *cell = [tableView dequeueReusableCellWithIdentifier:CellIdentifier];
if (cell == nil) {
NSArray *nib = [[NSBundle mainBundle] loadNibNamed:@"CustomCell" owner:self options:nil];
if([nib count] > 0){
cell = self.customCell;
cell.backgroundColor = [UIColor redColor];
}else{
NSLog(@"加载 nib文件失败");
}
}
NSUInteger row = [indexPath row];
NSString *string = [self.data objectAtIndex:row];
UILabel *customlabel =(UILabel*) [cell viewWithTag:11];
customlabel.text = string;
[string release];
return cell;
}
@end提几个注意点:1》。cell的xib文件得拥有者设置成该类,在该类得头文件中定义一个输出口。
2》 我们看到cell的xib文件有3个label视图我们能看到,其实还有一个没有title的label视图,也就我们要动态添加数据的那个视图,
在xib文件中需要给他设置一个tag,这样我们在代码里才能根据tag找出该对象(和Android中得id很像)。这边我定义了11,所以
UILabel *customlabel =(UILabel*) [cellviewWithTag:11];
customlabel.text = string;
3》。xib文件加载,我是根据书上得列子方法。根据应用的束来获取。
4》。哦,还有点就是 static NSString *CellIdentifier = @"CustomCell";。这个在xib文件得指定器中定义,因为原本我们新建一个cell是有个传入指定标签,
而现在这个新建一个cell说白了就是直接从xib中加载一个实例化了,那么指定器怎需要在xib中定义下。
对于cell简单的自定义就是这样。
三:可编辑的tableView(删除,添加,移动)
[cpp]
view plaincopyprint?
//
// EditViewController.m
// NavTest
//
// Created by Nono on 12-5-4.
// Copyright (c) 2012年 NonoWithLilith. All rights reserved.
//
#import "EditViewController.h"
@interface EditViewController ()
@end
@implementation EditViewController
@synthesize edittableView;
- (void)editButtonPressed:(id)sender
{
[self.edittableView setEditing:!self.edittableView.editing animated:(YES)];
if (edittableView.editing) {
[self.navigationItem.rightBarButtonItem setTitle:@"完成"];
}else {
[self.navigationItem.rightBarButtonItem setTitle:@"编辑"];
};
NSLog(@"点击了按钮");
}
- (id)initWithNibName:(NSString *)nibNameOrNil bundle:(NSBundle *)nibBundleOrNil
{
self = [super initWithNibName:nibNameOrNil bundle:nibBundleOrNil];
if (self) {
// Custom initialization
}
return self;
}
- (void)viewDidLoad
{
[super viewDidLoad];
NSMutableArray *array = [[NSMutableArray alloc] initWithObjects:@"陈凯",@"Nono",@"Lilith",@"窗前明月光",@"疑是地上霜",@"举头望明月",@"低头思故乡",@"锄禾日当午",@"汗滴禾下土",@"谁知盘中餐",@"粒粒皆幸苦",nil];
self.data = array;
[array release];
UIBarButtonItem *rigthButton = [[UIBarButtonItem alloc] initWithTitle:@"编辑" style:UIBarButtonItemStyleBordered target:self action:@selector(editButtonPressed:)];
self.navigationItem.rightBarButtonItem = rigthButton;
//self.navigationItem.prompt = @"加载";
[rigthButton release];
// Do any additional setup after loading the view from its nib.
}
- (void)viewDidUnload
{
[super viewDidUnload];
// Release any retained subviews of the main view.
// e.g. self.myOutlet = nil;
}
- (BOOL)shouldAutorotateToInterfaceOrientation:(UIInterfaceOrientation)interfaceOrientation
{
return (interfaceOrientation == UIInterfaceOrientationPortrait);
}
#pragma mark - Table view data source
- (NSInteger)tableView:(UITableView *)tableView numberOfRowsInSection:(NSInteger)section
{
// Return the number of rows in the section.
return [self.data count];
}
- (UITableViewCell *)tableView:(UITableView *)tableView cellForRowAtIndexPath:(NSIndexPath *)indexPath
{
static NSString *CellIdentifier = @"editLevelCell";
UITableViewCell *cell = [tableView dequeueReusableCellWithIdentifier:CellIdentifier];
if (cell == nil) {
cell = [[[UITableViewCell alloc] initWithStyle:UITableViewCellStyleDefault reuseIdentifier:CellIdentifier] autorelease];
}
NSUInteger row = [indexPath row];
NSString *string = [self.data objectAtIndex:row];
cell.textLabel.text = string;
[string release];
return cell;
}
#pragma 实现数据源协议中一些关于编辑操作方法
- (BOOL)tableView:(UITableView *)tableView canEditRowAtIndexPath:(NSIndexPath *)indexPath
{
//是否可以编辑,即是tableView setEditing的前提;默认是yes,实现这个方法估计主要是选择性的编辑条目。
return YES;
}
- (BOOL)tableView:(UITableView *)tableView canMoveRowAtIndexPath:(NSIndexPath *)indexPath
{
//同理默认其实就是yes,移动模式(会显示可以触摸得移动button)必须是在实现了下面这个方法才有效,否则及时yes了,移动模式条也是不显示的,简单的说,你不能执行移动操作
return YES;
}
//移动操作
- (void)tableView:(UITableView *)tableView moveRowAtIndexPath:(NSIndexPath *)sourceIndexPath toIndexPath:(NSIndexPath *)destinationIndexPath
{
//拖动得思路就是先备份选中行,删除原来那份,将备份的一份插入到目标行
NSUInteger fromRow = [sourceIndexPath row];
NSUInteger toRow = [destinationIndexPath row];
id ob = [[self.data objectAtIndex:fromRow] retain];
[self.data removeObjectAtIndex:fromRow];
[self.data insertObject:ob atIndex:toRow];
[ob release];
}
- (void)tableView:(UITableView *)tableView commitEditingStyle:(UITableViewCellEditingStyle)editingStyle forRowAtIndexPath:(NSIndexPath *)indexPath
{
NSUInteger row = [indexPath row];
//提交操作完的编辑
if (editingStyle == UITableViewCellEditingStyleDelete) {
[self.data removeObjectAtIndex:row]; //删除操作
[tableView deleteRowsAtIndexPaths:[NSArray arrayWithObject:indexPath] withRowAnimation:UITableViewRowAnimationFade];
}
if (editingStyle == UITableViewCellEditingStyleInsert) {
[self.data insertObject:@"插入数据" atIndex:row];//插入操作
[tableView insertRowsAtIndexPaths:[NSArray arrayWithObject:indexPath] withRowAnimation:UITableViewRowAnimationLeft];
}
}
#pragma 实现tableView委托中一些方法
- (UITableViewCellEditingStyle)tableView:(UITableView *)tableView editingStyleForRowAtIndexPath:(NSIndexPath *)indexPath;
{
//设置可编辑得样式:系统提供了三种,一种是删除,一种是插入,一种时是none
NSInteger row = [indexPath row];
if(row %2 == 0)//这边做了小处理,间隔显示删除和插入
{
return UITableViewCellEditingStyleDelete;
}
return UITableViewCellEditingStyleInsert;
}
@end
//
// EditViewController.m
// NavTest
//
// Created by Nono on 12-5-4.
// Copyright (c) 2012年 NonoWithLilith. All rights reserved.
//
#import "EditViewController.h"
@interface EditViewController ()
@end
@implementation EditViewController
@synthesize edittableView;
- (void)editButtonPressed:(id)sender
{
[self.edittableView setEditing:!self.edittableView.editing animated:(YES)];
if (edittableView.editing) {
[self.navigationItem.rightBarButtonItem setTitle:@"完成"];
}else {
[self.navigationItem.rightBarButtonItem setTitle:@"编辑"];
};
NSLog(@"点击了按钮");
}
- (id)initWithNibName:(NSString *)nibNameOrNil bundle:(NSBundle *)nibBundleOrNil
{
self = [super initWithNibName:nibNameOrNil bundle:nibBundleOrNil];
if (self) {
// Custom initialization
}
return self;
}
- (void)viewDidLoad
{
[super viewDidLoad];
NSMutableArray *array = [[NSMutableArray alloc] initWithObjects:@"陈凯",@"Nono",@"Lilith",@"窗前明月光",@"疑是地上霜",@"举头望明月",@"低头思故乡",@"锄禾日当午",@"汗滴禾下土",@"谁知盘中餐",@"粒粒皆幸苦",nil];
self.data = array;
[array release];
UIBarButtonItem *rigthButton = [[UIBarButtonItem alloc] initWithTitle:@"编辑" style:UIBarButtonItemStyleBordered target:self action:@selector(editButtonPressed:)];
self.navigationItem.rightBarButtonItem = rigthButton;
//self.navigationItem.prompt = @"加载";
[rigthButton release];
// Do any additional setup after loading the view from its nib.
}
- (void)viewDidUnload
{
[super viewDidUnload];
// Release any retained subviews of the main view.
// e.g. self.myOutlet = nil;
}
- (BOOL)shouldAutorotateToInterfaceOrientation:(UIInterfaceOrientation)interfaceOrientation
{
return (interfaceOrientation == UIInterfaceOrientationPortrait);
}
#pragma mark - Table view data source
- (NSInteger)tableView:(UITableView *)tableView numberOfRowsInSection:(NSInteger)section
{
// Return the number of rows in the section.
return [self.data count];
}
- (UITableViewCell *)tableView:(UITableView *)tableView cellForRowAtIndexPath:(NSIndexPath *)indexPath
{
static NSString *CellIdentifier = @"editLevelCell";
UITableViewCell *cell = [tableView dequeueReusableCellWithIdentifier:CellIdentifier];
if (cell == nil) {
cell = [[[UITableViewCell alloc] initWithStyle:UITableViewCellStyleDefault reuseIdentifier:CellIdentifier] autorelease];
}
NSUInteger row = [indexPath row];
NSString *string = [self.data objectAtIndex:row];
cell.textLabel.text = string;
[string release];
return cell;
}
#pragma 实现数据源协议中一些关于编辑操作方法
- (BOOL)tableView:(UITableView *)tableView canEditRowAtIndexPath:(NSIndexPath *)indexPath
{
//是否可以编辑,即是tableView setEditing的前提;默认是yes,实现这个方法估计主要是选择性的编辑条目。
return YES;
}
- (BOOL)tableView:(UITableView *)tableView canMoveRowAtIndexPath:(NSIndexPath *)indexPath
{
//同理默认其实就是yes,移动模式(会显示可以触摸得移动button)必须是在实现了下面这个方法才有效,否则及时yes了,移动模式条也是不显示的,简单的说,你不能执行移动操作
return YES;
}
//移动操作
- (void)tableView:(UITableView *)tableView moveRowAtIndexPath:(NSIndexPath *)sourceIndexPath toIndexPath:(NSIndexPath *)destinationIndexPath
{
//拖动得思路就是先备份选中行,删除原来那份,将备份的一份插入到目标行
NSUInteger fromRow = [sourceIndexPath row];
NSUInteger toRow = [destinationIndexPath row];
id ob = [[self.data objectAtIndex:fromRow] retain];
[self.data removeObjectAtIndex:fromRow];
[self.data insertObject:ob atIndex:toRow];
[ob release];
}
- (void)tableView:(UITableView *)tableView commitEditingStyle:(UITableViewCellEditingStyle)editingStyle forRowAtIndexPath:(NSIndexPath *)indexPath
{
NSUInteger row = [indexPath row];
//提交操作完的编辑
if (editingStyle == UITableViewCellEditingStyleDelete) {
[self.data removeObjectAtIndex:row]; //删除操作
[tableView deleteRowsAtIndexPaths:[NSArray arrayWithObject:indexPath] withRowAnimation:UITableViewRowAnimationFade];
}
if (editingStyle == UITableViewCellEditingStyleInsert) {
[self.data insertObject:@"插入数据" atIndex:row];//插入操作
[tableView insertRowsAtIndexPaths:[NSArray arrayWithObject:indexPath] withRowAnimation:UITableViewRowAnimationLeft];
}
}
#pragma 实现tableView委托中一些方法
- (UITableViewCellEditingStyle)tableView:(UITableView *)tableView editingStyleForRowAtIndexPath:(NSIndexPath *)indexPath;
{
//设置可编辑得样式:系统提供了三种,一种是删除,一种是插入,一种时是none
NSInteger row = [indexPath row];
if(row %2 == 0)//这边做了小处理,间隔显示删除和插入
{
return UITableViewCellEditingStyleDelete;
}
return UITableViewCellEditingStyleInsert;
}
@end基本代码如上。

相关文章推荐
- 黑马程序员——IOS学习八:UITableView表视图控件初步——黑马 ios 技术博客
- IOS学习八:UITableView表视图控件初步
- IOS学习笔记(十一)之IOS开发之表视图(UITableView)的基本介绍(一)
- 黑马程序员——IOS学习六:Date Picker, Picker View选取器控件初步——黑马 ios 技术博客
- iOS学习笔记—— UItableView 控件的简单使用
- IOS学习之UiTableView仿个人中心页面,据说学会这个控件就能装逼了(二)
- IOS学习笔记(一)之UITableView表视图
- IOS学习六:Date Picker, Picker View选取器控件初步
- IOS学习笔记(十二)之IOS开发之表视图(UITableView)的相关类,属性与表视图实现学习(二)
- IOS控件学习之UITableView代码实例详解
- IOS学习:基本控件(UITableView)
- IOS学习笔记(十一)之IOS开发之表视图(UITableView)的基本介绍(一)
- iOS开发学习总结——UITableView使用初步
- IOS学习笔记(十一)之IOS开发之表视图(UITableView)的基本介绍(一)
- IOS学习笔记(十二)之IOS开发之表视图(UITableView)的相关类,属性与表视图实现学习(二)
- 【IOS 开发学习总结-OC-51】★★★ios开发之UI控件——UITableView 与UITableViewCell
- IOS学习之Date Picker, Picker View选取器控件初步
- IOS学习笔记(十一)之IOS开发之表视图(UITableView)的基本介绍(一) 推荐
- IOS学习笔记(十二)之IOS开发之表视图(UITableView)的讲解与使用(二)
- iOS 6编程-UIScrollView滚动视图和UIPageControl分页控件的简单应用