Android System SoftwareWatchdog必要代码粘贴--总是忘--狗咬人
2012-12-27 21:38
351 查看
Android提供了Watchdog类,用来监测Service是否处于正常工作中,是在SystemServer中启动的;
本文将详细介绍.
系统启动过程图: (图好漂亮, 用什么做的?)
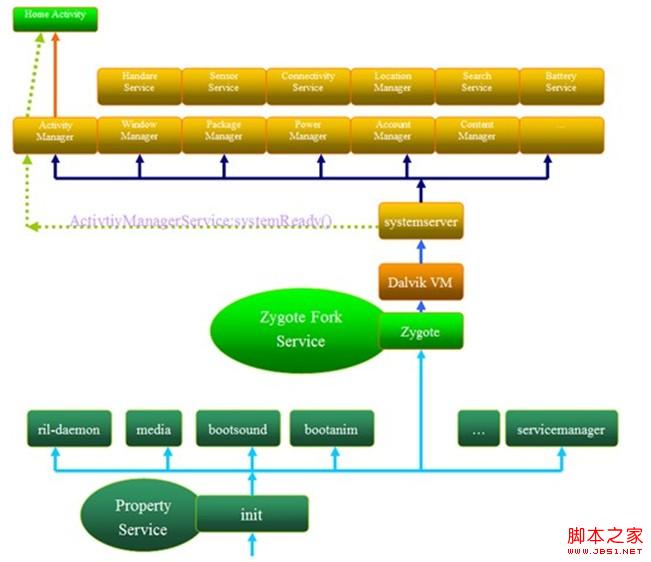
Framework层所有的Service都是运行在SystemServer进程中;SystemServer进程是由Zygote进程创建。
SystemServer进程启动分两个过程init1创建Service和进程状态对象;init2创建Framework层的Service,将其加入到ServiceManager中,最后启动launcher;
Android提供了Watchdog类,用来监测Service是否处于正常工作中,是在SystemServer中启动的。
下面看一下SystemServer中Watchdog这个过程。
SystemServer.java: 复制代码 代码如下:
public void run() {
//初始化Watchdog 传入各个Service作为参数
Watchdog.getInstance().init(context, battery, power, alarm,
ActivityManagerService.self());
//启动Watchdog
Watchdog.getInstance().start();
}
Watchdog类实现
类继承结构:
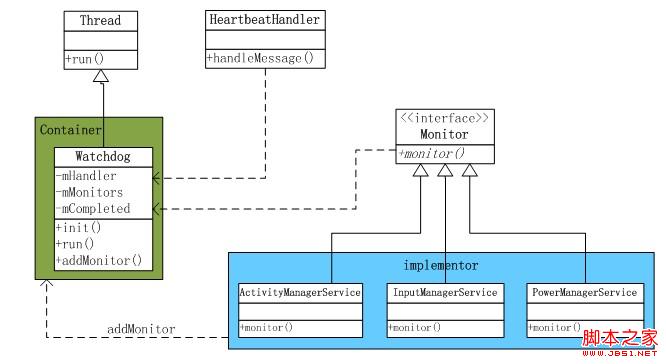
看到Watchdog是一个Thread,运行在SystemServer进程中,单例模式;
HeartbeatHandler处理接受监控的对象(Service),运行在主线程中;
Monitor提供监控接口,接受监控对象实现此接口;
XXXXXXXXService具体实现的检测对象。
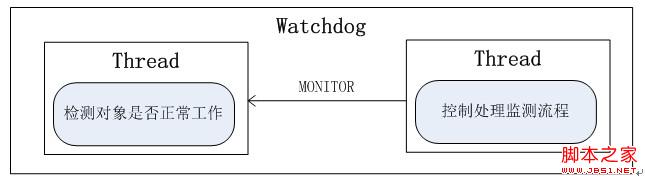
执行流程:
对外接口
初始化: 复制代码 代码如下:
public void init(Context context, BatteryService battery,
PowerManagerService power, AlarmManagerService alarm,
ActivityManagerService activity) {
//存储Service对象,运行在同一个进程中
mResolver = context.getContentResolver();
mBattery = battery; mPower = power;
mAlarm = alarm; mActivity = activity;
//注册广播
context.registerReceiver(new RebootReceiver(),
new IntentFilter(REBOOT_ACTION));
mRebootIntent = PendingIntent.getBroadcast(context,
, new Intent(REBOOT_ACTION), 0);
……
//开机时间
mBootTime = System.currentTimeMillis();
}
注册监控对象: 复制代码 代码如下:
public void addMonitor(Monitor monitor) {
synchronized (this) {
//将监控对象加入到列表中
mMonitors.add(monitor);
}
}
搜索一下此函数的调用,表示被监控;看到在如下Service中实现Watchdog的Monitor接口:
ActivityManagerService
InputManagerService
NetworkManagementService
PowerManagerService
WindowManagerService
都有调用:Watchdog.getInstance().addMonitor(this);
Watchdog线程执行函数: 复制代码 代码如下:
public void run() {
boolean waitedHalf = false;
while (true) {
//监测完成标志
mCompleted = false;
//发送监测消息
mHandler.sendEmptyMessage(MONITOR);
synchronized (this) {
long timeout = TIME_TO_WAIT;
long start = SystemClock.uptimeMillis();
while (timeout > 0 && !mForceKillSystem) {
//休眠等待检查结果
wait(timeout); // notifyAll() is called when mForceKillSystem is set
timeout = TIME_TO_WAIT - (SystemClock.uptimeMillis() - start);
}
if (mCompleted && !mForceKillSystem) {
//检查结果OK
waitedHalf = false;
continue;
}
//在进行检查一次
if (!waitedHalf) {
ActivityManagerService.dumpStackTraces(true, pids, null, null,
NATIVE_STACKS_OF_INTEREST);
waitedHalf = true;
continue;
}
}
//表明监控对象有问题
// If we got here, that means that the system is most likely hung.
// First collect stack traces from all threads of the system process.
// Then kill this process so that the system will restart.
//保存stack信息
……
// Only kill the process if the debugger is not attached.
if(!Debug.isDebuggerConnected()) {
if(SystemProperties.getInt("sys.watchdog.disabled", 0) == 0) {
//kill当前进程SystemServer
Process.killProcess(Process.myPid());
System.exit(10);
}
}
waitedHalf = false;
}
}
在此run函数中循环发送消息,判断标志是否正常,决定检测对象是否正常工作。
若监测对象不正常工作,则收集重要的stack信息保存下来,然后重启SystemServer。
监测消息的处理:
是在HeartbeatHandler中进行,看看消息处理函数。 复制代码 代码如下:
public void handleMessage(Message msg) {
switch (msg.what) {
case MONITOR: {
// See if we should force a reboot.
//监测对象是否正常工作中……
final int size = mMonitors.size();
for (int i = 0 ; i < size ; i++) {
//调用监测对象的monitor接口
mCurrentMonitor = mMonitors.get(i);
mCurrentMonitor.monitor();
}
//走到这里表明监测对象正常
synchronized (Watchdog.this) {
mCompleted = true;
mCurrentMonitor = null;
}
} break;
}
}
判断监测对象是否正常工作,通过调用监测对象实现的接口monitor,看看这个接口该如何执行的。
PowerManagerService中:
public void monitor() {
//判断Service是否发生死锁,如果发生死锁,程序将在此一直等待//主要是线程间同步问题 造成死锁
synchronized (mLocks) { }
}
以上便是Watchdog监测Service是否正常工作的流程;我们也可以使用Watchdog来监测别的资源如内存等使用情况。
这个Watchdog给我们提供了一种思路,一种框架,对程序正常运行或者资源的正常使用情况等的一种监测机制。
---------------------------------------------------------------------------------------------------------------
在Android系统中SWWD用于发现出了问题的Service杀掉SystemServer进程。在启动阶段明显注册的服务有:
ActivityManagerService.java :frameworks\base\services\java\com\android\server\am
PowerManagerService.java :frameworks\base\services\java\com\android\server
WindowManagerService.java :frameworks\base\services\java\com\android\server
下面就依次分析一下其整个处理流程:
1、初始化
run @ SysemServer.java
Slog.i(TAG, "Init Watchdog");
Watchdog.getInstance().init(context, battery, power, alarm,
ActivityManagerService.self());
这里使用单例模式创建:
public static Watchdog getInstance() {
if (sWatchdog == null) {
sWatchdog = new Watchdog();
}
return sWatchdog;
}
public void init(Context context, BatteryService battery,
PowerManagerService power, AlarmManagerService alarm,
ActivityManagerService activity) {
// 上下文环境变量
mResolver = context.getContentResolver();
mBattery = battery;
mPower = power;
mAlarm = alarm;
mActivity = activity;
// 登记 RebootReceiver() 接收,用于reboot广播接收使用
context.registerReceiver(new RebootReceiver(),
new IntentFilter(REBOOT_ACTION));
...
// 系统启动时间
mBootTime = System.currentTimeMillis();
}
ok,调用init函数启动完毕
2、运行中
run @ SysemServer.java
调用 Watchdog.getInstance().start(); 启动看门狗
首先看下 Watchdog 类定义:
/** This class calls its monitor every minute. Killing this process if they don't return **/
public class Watchdog extends Thread {
}
从线程类中继承,即会在一个单独线程中运行,调用thrrad.start()即调用 Watchdog.java 中的 run() 函数
public void run() {
boolean waitedHalf = false;
while (true) {
mCompleted = false;
// 1、给mHandler发送 MONITOR 消息,用于请求检查 Service是否工作正常
mHandler.sendEmptyMessage(MONITOR);
synchronized (this) {
// 2、进行 wait 等待 timeout 时间确认是否退出循环
long timeout = TIME_TO_WAIT;
// NOTE: We use uptimeMillis() here because we do not want to increment the time we
// wait while asleep. If the device is asleep then the thing that we are waiting
// to timeout on is asleep as well and won't have a chance to run, causing a false
// positive on when to kill things.
long start = SystemClock.uptimeMillis();
while (timeout > 0 && !mForceKillSystem) {
try {
wait(timeout); // notifyAll() is called when mForceKillSystem is set
} catch (InterruptedException e) {
Log.wtf(TAG, e);
}
timeout = TIME_TO_WAIT - (SystemClock.uptimeMillis() - start);
}
// 3、如果 mCompleted 为真表示service一切正常,后面会再讲到
if (mCompleted && !mForceKillSystem) {
// The monitors have returned.
waitedHalf = false;
continue;
}
// 4、表明检测到了有 deadlock-detection 条件发生,利用 dumpStackTraces 打印堆栈依信息
if (!waitedHalf) {
// We've waited half the deadlock-detection interval. Pull a stack
// trace and wait another half.
ArrayList<Integer> pids = new ArrayList<Integer>();
pids.add(Process.myPid());
ActivityManagerService.dumpStackTraces(true, pids, null, null);
waitedHalf = true;
continue; // 不过这里会再次检测一次
}
}
SystemClock.sleep(2000);
// 5、打印内核栈调用关系
// Pull our own kernel thread stacks as well if we're configured for that
if (RECORD_KERNEL_THREADS) {
dumpKernelStackTraces();
}
// 6、ok,系统出问题了,检测到某个 Service 出现死锁情况,杀死SystemServer进程
// Only kill the process if the debugger is not attached.
if (!Debug.isDebuggerConnected()) {
Slog.w(TAG, "*** WATCHDOG KILLING SYSTEM PROCESS: " + name);
Process.killProcess(Process.myPid());
System.exit(10);
} else {
Slog.w(TAG, "Debugger connected: Watchdog is *not* killing the system process");
}
waitedHalf = false;
}
}
主要工作逻辑:监控线程每隔一段时间发送一条 MONITOR 线另外一个线程,另个一个线程会检查各个 Service 是否正常运行,看门狗就不停的检查并等待结果,失败则杀死SystemServer.
3、Service 检查线程
/**
* Used for scheduling monitor callbacks and checking memory usage.
*/
final class HeartbeatHandler extends Handler {
@Override
public void handleMessage(Message msg) { // Looper 消息处理函数
switch (msg.what) {
case MONITOR: {
// 依次检测各个服务,即调用 monitor() 函数
final int size = mMonitors.size();
for (int i = 0 ; i < size ; i++) {
mCurrentMonitor = mMonitors.get(i);
mCurrentMonitor.monitor();
}
// 检测成功则设置 mCompleted 变量为 true
synchronized (Watchdog.this) {
mCompleted = true;
mCurrentMonitor = null;
}
下面我们来看一下各个Service如何确定自已运行ok呢?以 ActivityManagerService 为例:
首先加入检查队列:
private ActivityManagerService() {
// Add ourself to the Watchdog monitors.
Watchdog.getInstance().addMonitor(this);
}
然后实现 monitor() 函数:
/** In this method we try to acquire our lock to make sure that we have not deadlocked */
public void monitor() {
synchronized (this) { }
}
明白了吧,其实就是检查这个 Service 是否发生了死锁,对于此情况就只能kill SystemServer系统了。对于死锁的产生原因非常多,但有个情况需要注意:java层死锁可能发生在调用native函数,而native函数可能与硬件交互导致时间过长而没有返回,从而导致长时间占用导致问题。
4、内存使用检测
消息发送
final class GlobalPssCollected implements Runnable {
public void run() {
mHandler.sendEmptyMessage(GLOBAL_PSS);
}
}
检测内存处理函数:
final class HeartbeatHandler extends Handler {
@Override
public void handleMessage(Message msg) {
switch (msg.what) {
case GLOBAL_PSS: {
if (mHaveGlobalPss) {
// During the last pass we collected pss information, so
// now it is time to report it.
mHaveGlobalPss = false;
if (localLOGV) Slog.v(TAG, "Received global pss, logging.");
logGlobalMemory();
}
} break;
其主要功能如下,统计pSS状况及读取相关linux内核中内存信息:
void logGlobalMemory() {
mActivity.collectPss(stats);
Process.readProcLines("/proc/meminfo", mMemInfoFields, mMemInfoSizes);
Process.readProcLines("/proc/vmstat", mVMStatFields, mVMStatSizes);
}
本文将详细介绍.
系统启动过程图: (图好漂亮, 用什么做的?)
Framework层所有的Service都是运行在SystemServer进程中;SystemServer进程是由Zygote进程创建。
SystemServer进程启动分两个过程init1创建Service和进程状态对象;init2创建Framework层的Service,将其加入到ServiceManager中,最后启动launcher;
Android提供了Watchdog类,用来监测Service是否处于正常工作中,是在SystemServer中启动的。
下面看一下SystemServer中Watchdog这个过程。
SystemServer.java: 复制代码 代码如下:
public void run() {
//初始化Watchdog 传入各个Service作为参数
Watchdog.getInstance().init(context, battery, power, alarm,
ActivityManagerService.self());
//启动Watchdog
Watchdog.getInstance().start();
}
Watchdog类实现
类继承结构:
看到Watchdog是一个Thread,运行在SystemServer进程中,单例模式;
HeartbeatHandler处理接受监控的对象(Service),运行在主线程中;
Monitor提供监控接口,接受监控对象实现此接口;
XXXXXXXXService具体实现的检测对象。
执行流程:
对外接口
初始化: 复制代码 代码如下:
public void init(Context context, BatteryService battery,
PowerManagerService power, AlarmManagerService alarm,
ActivityManagerService activity) {
//存储Service对象,运行在同一个进程中
mResolver = context.getContentResolver();
mBattery = battery; mPower = power;
mAlarm = alarm; mActivity = activity;
//注册广播
context.registerReceiver(new RebootReceiver(),
new IntentFilter(REBOOT_ACTION));
mRebootIntent = PendingIntent.getBroadcast(context,
, new Intent(REBOOT_ACTION), 0);
……
//开机时间
mBootTime = System.currentTimeMillis();
}
注册监控对象: 复制代码 代码如下:
public void addMonitor(Monitor monitor) {
synchronized (this) {
//将监控对象加入到列表中
mMonitors.add(monitor);
}
}
搜索一下此函数的调用,表示被监控;看到在如下Service中实现Watchdog的Monitor接口:
ActivityManagerService
InputManagerService
NetworkManagementService
PowerManagerService
WindowManagerService
都有调用:Watchdog.getInstance().addMonitor(this);
Watchdog线程执行函数: 复制代码 代码如下:
public void run() {
boolean waitedHalf = false;
while (true) {
//监测完成标志
mCompleted = false;
//发送监测消息
mHandler.sendEmptyMessage(MONITOR);
synchronized (this) {
long timeout = TIME_TO_WAIT;
long start = SystemClock.uptimeMillis();
while (timeout > 0 && !mForceKillSystem) {
//休眠等待检查结果
wait(timeout); // notifyAll() is called when mForceKillSystem is set
timeout = TIME_TO_WAIT - (SystemClock.uptimeMillis() - start);
}
if (mCompleted && !mForceKillSystem) {
//检查结果OK
waitedHalf = false;
continue;
}
//在进行检查一次
if (!waitedHalf) {
ActivityManagerService.dumpStackTraces(true, pids, null, null,
NATIVE_STACKS_OF_INTEREST);
waitedHalf = true;
continue;
}
}
//表明监控对象有问题
// If we got here, that means that the system is most likely hung.
// First collect stack traces from all threads of the system process.
// Then kill this process so that the system will restart.
//保存stack信息
……
// Only kill the process if the debugger is not attached.
if(!Debug.isDebuggerConnected()) {
if(SystemProperties.getInt("sys.watchdog.disabled", 0) == 0) {
//kill当前进程SystemServer
Process.killProcess(Process.myPid());
System.exit(10);
}
}
waitedHalf = false;
}
}
在此run函数中循环发送消息,判断标志是否正常,决定检测对象是否正常工作。
若监测对象不正常工作,则收集重要的stack信息保存下来,然后重启SystemServer。
监测消息的处理:
是在HeartbeatHandler中进行,看看消息处理函数。 复制代码 代码如下:
public void handleMessage(Message msg) {
switch (msg.what) {
case MONITOR: {
// See if we should force a reboot.
//监测对象是否正常工作中……
final int size = mMonitors.size();
for (int i = 0 ; i < size ; i++) {
//调用监测对象的monitor接口
mCurrentMonitor = mMonitors.get(i);
mCurrentMonitor.monitor();
}
//走到这里表明监测对象正常
synchronized (Watchdog.this) {
mCompleted = true;
mCurrentMonitor = null;
}
} break;
}
}
判断监测对象是否正常工作,通过调用监测对象实现的接口monitor,看看这个接口该如何执行的。
PowerManagerService中:
public void monitor() {
//判断Service是否发生死锁,如果发生死锁,程序将在此一直等待//主要是线程间同步问题 造成死锁
synchronized (mLocks) { }
}
以上便是Watchdog监测Service是否正常工作的流程;我们也可以使用Watchdog来监测别的资源如内存等使用情况。
这个Watchdog给我们提供了一种思路,一种框架,对程序正常运行或者资源的正常使用情况等的一种监测机制。
---------------------------------------------------------------------------------------------------------------
在Android系统中SWWD用于发现出了问题的Service杀掉SystemServer进程。在启动阶段明显注册的服务有:
ActivityManagerService.java :frameworks\base\services\java\com\android\server\am
PowerManagerService.java :frameworks\base\services\java\com\android\server
WindowManagerService.java :frameworks\base\services\java\com\android\server
下面就依次分析一下其整个处理流程:
1、初始化
run @ SysemServer.java
Slog.i(TAG, "Init Watchdog");
Watchdog.getInstance().init(context, battery, power, alarm,
ActivityManagerService.self());
这里使用单例模式创建:
public static Watchdog getInstance() {
if (sWatchdog == null) {
sWatchdog = new Watchdog();
}
return sWatchdog;
}
public void init(Context context, BatteryService battery,
PowerManagerService power, AlarmManagerService alarm,
ActivityManagerService activity) {
// 上下文环境变量
mResolver = context.getContentResolver();
mBattery = battery;
mPower = power;
mAlarm = alarm;
mActivity = activity;
// 登记 RebootReceiver() 接收,用于reboot广播接收使用
context.registerReceiver(new RebootReceiver(),
new IntentFilter(REBOOT_ACTION));
...
// 系统启动时间
mBootTime = System.currentTimeMillis();
}
ok,调用init函数启动完毕
2、运行中
run @ SysemServer.java
调用 Watchdog.getInstance().start(); 启动看门狗
首先看下 Watchdog 类定义:
/** This class calls its monitor every minute. Killing this process if they don't return **/
public class Watchdog extends Thread {
}
从线程类中继承,即会在一个单独线程中运行,调用thrrad.start()即调用 Watchdog.java 中的 run() 函数
public void run() {
boolean waitedHalf = false;
while (true) {
mCompleted = false;
// 1、给mHandler发送 MONITOR 消息,用于请求检查 Service是否工作正常
mHandler.sendEmptyMessage(MONITOR);
synchronized (this) {
// 2、进行 wait 等待 timeout 时间确认是否退出循环
long timeout = TIME_TO_WAIT;
// NOTE: We use uptimeMillis() here because we do not want to increment the time we
// wait while asleep. If the device is asleep then the thing that we are waiting
// to timeout on is asleep as well and won't have a chance to run, causing a false
// positive on when to kill things.
long start = SystemClock.uptimeMillis();
while (timeout > 0 && !mForceKillSystem) {
try {
wait(timeout); // notifyAll() is called when mForceKillSystem is set
} catch (InterruptedException e) {
Log.wtf(TAG, e);
}
timeout = TIME_TO_WAIT - (SystemClock.uptimeMillis() - start);
}
// 3、如果 mCompleted 为真表示service一切正常,后面会再讲到
if (mCompleted && !mForceKillSystem) {
// The monitors have returned.
waitedHalf = false;
continue;
}
// 4、表明检测到了有 deadlock-detection 条件发生,利用 dumpStackTraces 打印堆栈依信息
if (!waitedHalf) {
// We've waited half the deadlock-detection interval. Pull a stack
// trace and wait another half.
ArrayList<Integer> pids = new ArrayList<Integer>();
pids.add(Process.myPid());
ActivityManagerService.dumpStackTraces(true, pids, null, null);
waitedHalf = true;
continue; // 不过这里会再次检测一次
}
}
SystemClock.sleep(2000);
// 5、打印内核栈调用关系
// Pull our own kernel thread stacks as well if we're configured for that
if (RECORD_KERNEL_THREADS) {
dumpKernelStackTraces();
}
// 6、ok,系统出问题了,检测到某个 Service 出现死锁情况,杀死SystemServer进程
// Only kill the process if the debugger is not attached.
if (!Debug.isDebuggerConnected()) {
Slog.w(TAG, "*** WATCHDOG KILLING SYSTEM PROCESS: " + name);
Process.killProcess(Process.myPid());
System.exit(10);
} else {
Slog.w(TAG, "Debugger connected: Watchdog is *not* killing the system process");
}
waitedHalf = false;
}
}
主要工作逻辑:监控线程每隔一段时间发送一条 MONITOR 线另外一个线程,另个一个线程会检查各个 Service 是否正常运行,看门狗就不停的检查并等待结果,失败则杀死SystemServer.
3、Service 检查线程
/**
* Used for scheduling monitor callbacks and checking memory usage.
*/
final class HeartbeatHandler extends Handler {
@Override
public void handleMessage(Message msg) { // Looper 消息处理函数
switch (msg.what) {
case MONITOR: {
// 依次检测各个服务,即调用 monitor() 函数
final int size = mMonitors.size();
for (int i = 0 ; i < size ; i++) {
mCurrentMonitor = mMonitors.get(i);
mCurrentMonitor.monitor();
}
// 检测成功则设置 mCompleted 变量为 true
synchronized (Watchdog.this) {
mCompleted = true;
mCurrentMonitor = null;
}
下面我们来看一下各个Service如何确定自已运行ok呢?以 ActivityManagerService 为例:
首先加入检查队列:
private ActivityManagerService() {
// Add ourself to the Watchdog monitors.
Watchdog.getInstance().addMonitor(this);
}
然后实现 monitor() 函数:
/** In this method we try to acquire our lock to make sure that we have not deadlocked */
public void monitor() {
synchronized (this) { }
}
明白了吧,其实就是检查这个 Service 是否发生了死锁,对于此情况就只能kill SystemServer系统了。对于死锁的产生原因非常多,但有个情况需要注意:java层死锁可能发生在调用native函数,而native函数可能与硬件交互导致时间过长而没有返回,从而导致长时间占用导致问题。
4、内存使用检测
消息发送
final class GlobalPssCollected implements Runnable {
public void run() {
mHandler.sendEmptyMessage(GLOBAL_PSS);
}
}
检测内存处理函数:
final class HeartbeatHandler extends Handler {
@Override
public void handleMessage(Message msg) {
switch (msg.what) {
case GLOBAL_PSS: {
if (mHaveGlobalPss) {
// During the last pass we collected pss information, so
// now it is time to report it.
mHaveGlobalPss = false;
if (localLOGV) Slog.v(TAG, "Received global pss, logging.");
logGlobalMemory();
}
} break;
其主要功能如下,统计pSS状况及读取相关linux内核中内存信息:
void logGlobalMemory() {
mActivity.collectPss(stats);
Process.readProcLines("/proc/meminfo", mMemInfoFields, mMemInfoSizes);
Process.readProcLines("/proc/vmstat", mVMStatFields, mVMStatSizes);
}

相关文章推荐
- android sw watchdog and How to Debug
- Android手机SD卡文件或目录拷贝、复制、粘贴功能实现代码
- Android /system/bin/pm脚本乱码分析 - 记一次脚本代码莫名其妙变动的问题
- Android framework Watchdog的监控过程
- android-3:项目总是出现红色叉,代码却没有错误
- 对原来的模块修改后,最好在解释器里把修改好的代码重新写再粘贴到py文件里,否则F5运行py模块时,总是出错误,如缩进不对 如for语句没写冒号 就导致cmd sdist和install 出错
- Android手机SD卡文件或目录拷贝、复制、粘贴功能实现代码
- Android framework Watchdog的监控过程
- Android WatchDog
- Android Audio代码分析4 - AudioSystem::getOutputSamplingRate
- Android系统剪贴板(ClipboardManager)的使用: 通过代码复制和粘贴数据
- Android Watchdog
- Android系统高通平台Kernel Watchdog
- Watchdog kills system service in system_server *****
- android中代码操作外部SD卡出错:W/System.err(1595): Caused by: libcore.io.ErrnoException: open failed: EACCES (Permission denied)
- 用代码复制Android虚拟机里的文件遇到system/bin/sh: adb: not found&system/bin/sh: pull: not found
- csdn博客粘贴代码的方法+android 资源id转uri
- version control system:git/hg/subversion/cvs/clearcase/vss。software configruation management。代码集成CI:Cruisecontrol/hudson/buildbot
- version control system:git/hg/subversion/cvs/clearcase/vss。software configruation management。代码集成CI:Cruisecontrol/hudson/buildbot
- watchdog in android