Android 自定义标签 Imagebutton实现ImageButton里放置文字
2012-08-16 15:50
501 查看
1 .android的ImageButton标签是没有text属性的,那么我们要在一个ImageButton里放置文字怎么办呢?
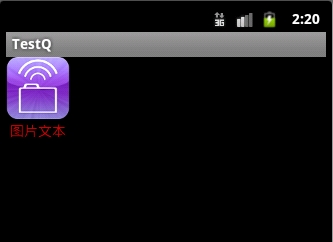
先上效果图如下:

如果我们不设置背景效果如下:但是给人的感觉就行分离的两个组件:
我们可以继承LinearLayout自定义标签:ImageButton_define.java
2。接下来定义布局文件:
这个不就文件使用的标签就是我们上面自定义的标签:如下:text.xml
之后我们定义个activity,引入我们定义的布局文件资源:ImageButton_de.java
方法二:
定义布局文件:
运行效果:

先上效果图如下:
如果我们不设置背景效果如下:但是给人的感觉就行分离的两个组件:
我们可以继承LinearLayout自定义标签:ImageButton_define.java
01 | package com.test; |
02 | import android.content.Context; |
03 | import android.util.AttributeSet; |
04 | import android.widget.ImageView; |
05 | import android.widget.LinearLayout; |
06 | import android.widget.TextView; |
07 |
08 | public class ImageButton_define extends LinearLayout
{ |
09 |
10 | private ImageView imageViewbutton; |
11 |
12 | private TextView textView; |
13 |
14 | public ImageButton_define(Context
context,AttributeSet attrs) { |
15 | super (context,attrs); |
16 | // TODO Auto-generated constructor stub |
17 |
18 | imageViewbutton = new ImageView(context, attrs); |
19 |
20 | imageViewbutton.setPadding( 0 , 0 , 0 , 0 ); |
21 |
22 | textView = new TextView(context, attrs); |
23 | //水平居中 |
24 | textView.setGravity(android.view.Gravity.CENTER_HORIZONTAL); |
25 |
26 | textView.setPadding( 0 , 0 , 0 , 0 ); |
27 |
28 | setClickable( true ); |
29 |
30 | setFocusable( true ); |
31 |
32 | setBackgroundResource(android.R.drawable.btn_default); |
33 |
34 | setOrientation(LinearLayout.VERTICAL); |
35 |
36 | addView(imageViewbutton); |
37 |
38 | addView(textView); |
39 |
40 | } |
41 |
42 | } |
这个不就文件使用的标签就是我们上面自定义的标签:如下:text.xml
01 | <? xml version = "1.0" encoding = "utf-8" ?> |
02 | < LinearLayout xmlns:android = "http://schemas.android.com/apk/res/android" |
03 | android:layout_width = "wrap_content" |
04 | android:layout_height = "wrap_content" > |
05 | < com.test.ImageButton_define |
06 | android:id = "@+id/define_iamgebutton" |
07 | android:layout_width = "fill_parent" |
08 | android:layout_height = "fill_parent" |
09 | android:src = "@drawable/android" |
10 | android:background = "#00000000" |
11 | android:text = "图片文本" |
12 | android:textColor = "#cc0000" |
13 | > |
14 | </ com.test.ImageButton_define > |
15 |
16 | </ LinearLayout > |
01 | package com.test; |
02 |
03 | import android.app.Activity; |
04 | import android.os.Bundle; |
05 |
06 | public class ImageButton_de extends Activity
{ |
07 |
08 | @Override |
09 | protected void onCreate(Bundle
savedInstanceState) { |
10 | // TODO Auto-generated method stub |
11 | super .onCreate(savedInstanceState); |
12 |
13 | setContentView(R.layout.test); |
14 | } |
15 |
16 | } |
定义布局文件:
1 | < Button |
2 | android:id = "@+id/button_text" |
3 | android:layout_width = "wrap_content" |
4 | android:layout_height = "wrap_content" |
5 | android:text = "标题" |
6 | android:drawableLeft = "@drawable/android" |
7 | /> |

相关文章推荐
- Android 自定义标签 Imagebutton实现ImageButton里放置文字
- Android实现自定义带文字和图片的Button
- Android实现自定义带文字和图片的Button
- 转载 :Android中ImageButton自定义按钮的按下效果的代码实现方法,附网上2种经典解决方法。
- Android中ImageButton自定义按钮的按下效果的代码实现方法,附网上2种经典解决方法。
- Android实现自定义带文字和图片的Button
- Android中ImageButton自定义按钮的按下效果的代码实现方法,附网上2种经典解决方法。
- Android实现自定义带文字和图片的Button
- Androidの实现自定义带文字和图片的Button
- Android自定义属性实现显示两行文字的button
- Android ImageButton自定义按钮的按下效果的代码实现方法分享
- Android实现自定义带文字和图片的Button
- Android中ImageButton自定义按钮的按下效果的代码实现方法,附网上2种经典解决方法。
- Android实现自定义带文字和图片Button的方法
- 自定义组件---图片和文字实现ImageButton效果
- android imagebutton 带文字图片的实现方法
- Android中ImageButton自定义按钮的按下效果的代码实现方法
- Android ImageButton自定义按钮的按下效果的代码实现方法
- Android中ImageButton自定义按钮的按下效果的代码实现方法,附网上2种经典解决方法
- Android中ImageButton自定义按钮的按下效果的代码实现方法,附网上2种经典解决方法。 2014-07-04 13:17 78人阅读 评论(0) 收藏