初学Android,使用Drawable资源之使用ShapeDrawable资源(十五)
2012-08-03 14:40
363 查看
ShapeDrawable比较简单,用来定义一个基本几何图形,XML的根元素是<shape.../>
下面定义三个shape资源
my_shape_1.xml
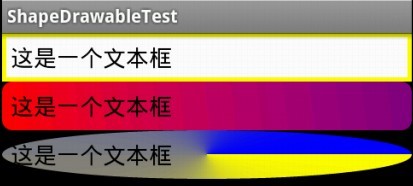
这样的效果看起来怪怪的,文本框的背景被弄的乱七八糟了
下面定义三个shape资源
my_shape_1.xml
<?xml version="1.0" encoding="utf-8"?>
<shape xmlns:android="http://schemas.android.com/apk/res/android"
    android:shape="rectangle" >
    <!-- 设置填充颜色 -->
    <solid android:color="#fff"/>
    <!-- 设置四周的内边距 -->
    <padding android:left="7dp"
        android:top="7dp"
        android:right="7dp"
        android:bottom="7dp"/>
    <!-- 设置边框 -->
    <stroke android:width="3dip" android:color="#ff0"/>
</shape>my_shape_2.xml<?xml version="1.0" encoding="utf-8"?>
<shape xmlns:android="http://schemas.android.com/apk/res/android"
android:shape="rectangle" >
<!-- 定义填充渐变颜色 -->
<gradient
android:startColor="#FFFF0000"
android:endColor="#80FF00FF"
android:angle="45"/>
<!-- 设置内填充 -->
<padding android:left="7dp"
android:top="7dp"
android:right="7dp"
android:bottom="7dp"/>
<!-- 设置圆角矩形 -->
<corners android:radius="8dp"/>
</shape>my_shape_3.xml<?xml version="1.0" encoding="utf-8"?>
<shape xmlns:android="http://schemas.android.com/apk/res/android"
android:shape="oval" >
<!-- 定义填充渐变颜色 -->
<gradient android:startColor="#ff0"
android:endColor="#00f"
android:angle="45"
android:type="sweep"/>
<!-- 设置内填充 -->
<padding android:left="7dp"
android:top="7dp"
android:right="7dp"
android:bottom="7dp"/>
<!-- 设置圆角矩形 -->
<padding android:left="7dp"
android:top="7dp"
android:right="7dp"
android:bottom="7dp"/>
<!-- 设置圆角矩形 -->
<corners android:radius="8dp"/>
</shape>主界面的三个EditBox的背景分别使用上前面定义的三个shape<?xml version="1.0" encoding="utf-8"?>
<LinearLayout xmlns:android="http://schemas.android.com/apk/res/android"
android:layout_width="fill_parent"
android:layout_height="fill_parent"
android:orientation="vertical" >
<EditText
android:id="@+id/editText1"
android:layout_width="fill_parent"
android:layout_height="wrap_content"
android:ems="10"
android:background="@drawable/my_shape_1">
<requestFocus />
</EditText>
<EditText
android:id="@+id/editText2"
android:layout_width="fill_parent"
android:layout_height="wrap_content"
android:ems="10"
android:background="@drawable/my_shape_2"/>
<EditText
android:id="@+id/editText3"
android:layout_width="fill_parent"
android:layout_height="wrap_content"
android:ems="10"
android:background="@drawable/my_shape_3"/>
</LinearLayout>运行效果如下这样的效果看起来怪怪的,文本框的背景被弄的乱七八糟了

相关文章推荐
- 初学Android,使用Drawable资源之使用ClipDrawable资源(十六)
- 初学Android,使用Drawable资源之使用StateListDrawable资源(十三)
- 初学Android,使用Drawable资源之使用LayerDrawable资源(十四)
- 初学Android,使用Drawable资源之使用LayerDrawable资源(十四)
- 初学Android,使用Drawable资源之使用AnimationDrawable资源(十七)
- Android中drawable使用Shape资源
- 使用(Drawable)资源———ShapeDrawable资源
- android中drawable资源文件的使用
- Android中各类drawable资源使用方法
- python初学-----查找Android项目中未使用的string资源
- Android基础学习,使用Drawable资源之ClipDrawable资源,实现图片在特定位置展开。
- 初学Android,使用样式(style)资源(二十)
- Android开发中自定义string、color、style、drawable,title,布局页面(include)的资源使用方法.txt
- 初学Android,使用菜单资源(十九)
- Android学习15--使用(Drawable)资源
- Android资源文件res的使用详解(strings,layout,drawable,arrays等)
- Android 应用资源(三) Shape Drawable使用详解
- Android资源知识(二)之Shape Drawable的使用
- Android使用LayerDrawable资源(附源代码)
- android drawable资源调用使用心得