WPF中Binding的技巧(一)
2012-08-01 15:41
204 查看
在WPF应用的开发过程中Binding是一个非常重要的部分。
在实际开发过程中Binding的不同种写法达到的效果相同但事实是存在很大区别的。
这里将实际中碰到过的问题做下汇总记录和理解。
1. source = {binding} 和source = {binding RelativeSource={RelativeSource self},Path=DataContext}效果相同
理解:{binding} 不设定明确的绑定的source,这样binding就去从本控件类为开始根据可视树的层次结构自下而上查找不为空的Datacontext属性的值。
{binding RelativeSource={RelativeSource self},Path=DataContext}中RelativeSource self的含义为绑定的source为控件自身,这样binding 就绑定了自身控件的Datacontext。
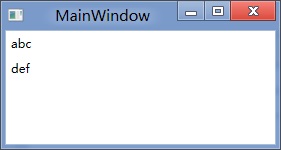
效果:
<StackPanel DataContext="abc">
<Label Content="{Binding}"></Label>
<Label Content="{Binding RelativeSource={RelativeSource Self},Path=DataContext}"></Label>
</StackPanel>

<StackPanel DataContext="abc">
<Label Content="{Binding}"></Label>
<Label DataContext="def" Content="{Binding RelativeSource={RelativeSource Self},Path=DataContext}"></Label>
</StackPanel>
2.在Template的Trigger中改变Template中某个样式控件的属性
<Style TargetType="{x:Type Button}">
<Setter Property="Template">
<Setter.Value>
<ControlTemplate TargetType="{x:Type Button}">
<Border>
<Label x:Name="PART_Label" Content="{TemplateBinding ContentA}" />
</Border>
<ControlTemplate.Triggers>
<Trigger Property="IsChecked" Value="True">
注: <Setter TargetName="PART_Label" Property="Content" Value="{Binding Path=ContentB, RelativeSource={RelativeSource TemplatedParent}}" />
</Trigger>
</ControlTemplate.Triggers>
</ControlTemplate>
</Setter.Value>
</Setter>
</Style>
当然把注:的这句改成<Setter TargetName="PART_Label" Property="Content" Value="{Binding Path=ContentB, RelativeSource={RelativeSource AncestorType={x:Type Button}}}">效果一样。
先写到这,下篇继续关注Binding中ElementName,RelativeSource,Source的相同点和区别。
转载时,请注明本文来源:www.cnblogs.com/tmywu
作者: 淘米部落
mail:tommywu23@126.com
在实际开发过程中Binding的不同种写法达到的效果相同但事实是存在很大区别的。
这里将实际中碰到过的问题做下汇总记录和理解。
1. source = {binding} 和source = {binding RelativeSource={RelativeSource self},Path=DataContext}效果相同
理解:{binding} 不设定明确的绑定的source,这样binding就去从本控件类为开始根据可视树的层次结构自下而上查找不为空的Datacontext属性的值。
{binding RelativeSource={RelativeSource self},Path=DataContext}中RelativeSource self的含义为绑定的source为控件自身,这样binding 就绑定了自身控件的Datacontext。
效果:
<StackPanel DataContext="abc">
<Label Content="{Binding}"></Label>
<Label Content="{Binding RelativeSource={RelativeSource Self},Path=DataContext}"></Label>
</StackPanel>
<StackPanel DataContext="abc">
<Label Content="{Binding}"></Label>
<Label DataContext="def" Content="{Binding RelativeSource={RelativeSource Self},Path=DataContext}"></Label>
</StackPanel>
2.在Template的Trigger中改变Template中某个样式控件的属性
<Style TargetType="{x:Type Button}">
<Setter Property="Template">
<Setter.Value>
<ControlTemplate TargetType="{x:Type Button}">
<Border>
<Label x:Name="PART_Label" Content="{TemplateBinding ContentA}" />
</Border>
<ControlTemplate.Triggers>
<Trigger Property="IsChecked" Value="True">
注: <Setter TargetName="PART_Label" Property="Content" Value="{Binding Path=ContentB, RelativeSource={RelativeSource TemplatedParent}}" />
</Trigger>
</ControlTemplate.Triggers>
</ControlTemplate>
</Setter.Value>
</Setter>
</Style>
当然把注:的这句改成<Setter TargetName="PART_Label" Property="Content" Value="{Binding Path=ContentB, RelativeSource={RelativeSource AncestorType={x:Type Button}}}">效果一样。
先写到这,下篇继续关注Binding中ElementName,RelativeSource,Source的相同点和区别。
转载时,请注明本文来源:www.cnblogs.com/tmywu
作者: 淘米部落
mail:tommywu23@126.com

相关文章推荐
- WPF中Binding的技巧(一)
- WPF中的Binding技巧(二)
- WPF中的Binding技巧(二)
- WPF中的Binding技巧(二)
- 【转】WPF中的Binding技巧(二)
- WPF中Binding的技巧(一)
- 【转】WPF中Binding的技巧(一)
- WPF中Binding的技巧(一)
- WPF中的Binding技巧(二)
- [转]WPF中Binding的技巧
- WPF中Binding的技巧
- [WPF系列-高级TemplateBinding vs RelativeSource TemplatedParent]
- 潜移默化学会WPF(技巧篇)--具有Items元素的控件子项获取(一)
- 【WPF实用技巧】Blend创建模拟(示例)数据
- WPF 常用技巧代码
- csharp: Data binding in WPF DataGrid control
- WPF-Binding对数据的检验
- WPF Style Setter use a TemplateBinding?
- WPF数据绑定(2 绑定列表数据Binding to List Data)
- Tips: Save some typing when binding values to UI in WPF/Silverlight