邮件服务器SASL TLS 反垃圾邮件系统
2012-05-20 15:19
120 查看
首先,在做实验之前,你应当明确
发送给邮件服务器(通过25端口) MTA将邮件存在Mailbox中去。(sasl/TLS)
MUA ------------------------->MTA------------------------>mailbox
| | |
| | |
| | |
dovecot-----------------------mysql--------------------------->
解析: 首先MUA 是客户端。他可以发送邮件,服务器通过25端口接受客户端发送来的邮件,放到mailbox中(邮件服务器,所有用户的邮件都存放在此)在此MUA向服务 其发送邮件的过程中,可以加上sasl验证,就是你发送邮件的时候给你个验证,看你是否被允许往服务器上存邮件,而TLS是指的在发送的过程中对邮件采用 TLS加密。
倘若你客户端接收邮件的时候,你通过dovecot来接收邮件,你通过配置dovecot来接收,dovecot通过110 143 993 995这几个端口来接收,这几个端口中。110 143是加密的,993 995 是不加密的。首先先去myql数据库中查询与你身份符合的邮件,或者可以说目的地是你的邮件,然后可以通过加密去mailbox去取属于自己的邮件。
还有一种接收邮件的方式:
80
webmail------->http---------->extmail
443(加密的https)
webmail可以通过http接收邮件,通过80端口接收的是没有加密的邮件,通过443接收的是加密的方式接收,需要验证身份。
实验一:
smtp是用来发邮件的:
做sasl的时候记得服务器上运行: postconf -a 有显示: cyrus dovecot的时候你才可以做。
(1)yum list cyrus*
yum install cyrus-sasl.x86_64 cyrus-sasl-sql-2.1.23-8.el6.x86_64 -y
yum install cyrus-sasl-plain.x86_64 cyrus-sasl-sql.x86_64 -y
(2) postconf -d | grep smtpd_sasl
postconf -e smtpd_sasl_auth_enable=yes
postconf -e smtpd_sasl_authenticated_header=yes
postconf e smtpd_sasl_type=cyrus
postconf e smtpd_sasl_path=smtpd
postconf -e "smtpd_recipient_restrictions = permit_sasl_authenticated, permit_mynetworks,reject_unauth_destination"
(3)cd ~
cd /pub/docs/postfix
get postfix-2.8.5.tar.gz(或者去www.postfix.org网站去下载,注意你搭建服务器的时候要下稳定版,你做测试的话可以下那种实验的版本)
tar zxf postfix-2.8.5.tar.gz
cd postfix-2.8.5/README_FILES
less SASL_README可以查看帮助文档信息(里面会有如何在/usr/lib64/sasl2中建立的文档及内容)
(4) cp /etc/sasl2/smtpd.conf /usr/lib64/sasl2
vi /usr/lib64/sasl2/smtpd.conf
pwcheck_method: auxprop
auxprop_plugin: sql
mech_list: PLAIN LOGIN (大小写都一样的)
sql_engine: mysql
sql_hostnames: 127.0.0.1
sql_user: extmail
sql_passwd: extmail
sql_database: extmail
sql_statement: SELECT password FROM mailbox WHERE username = '%u@%r'
sql_verbose: yes
(注意@是一个特殊的符号,你或的密码的时候前面要加 \)
( 5) postfix reload /etc/init.d/postfix restart
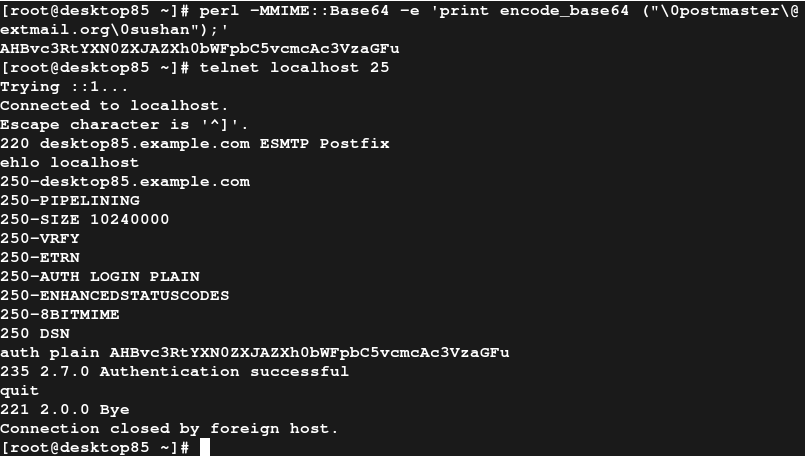
perl -MMIME::Base64 -e 'print encode_base64 ("\0postmaster\@extmail.org\0sushan");'
出现类似: AHd4aEBleHRtYWlsLm9yZwB3ZXBN0BSM=
测试: telnet localhost 25
ehlo localhost(出现250-AUTH PLAIN LOGIN表示明文密码登录)
auth plain AHBvc3RtYXN0ZXJAZXh0bWFpbC5vcmcAc3VzaGFu
若出现 successful 说明你设置的成功了。
这样你用thunderbird做测试: 添加用户: ADD Mail Account
username: postmaster
Email Address: postmaster@extmail.org
password: sushan(你在init.sql中导入的密码) 创建帐号成功。
在 postmaster@extmail.org中点击右键:setting
然后在Server Setting:设置: Server Name:192.168.0.139
User Name : postmaster@extmail.org
Connection security: SSL/TLS OK
在Outgoing Server(SMTP)中设置:
编辑:Server Name: 192.168.0.139
Connection security: None
user name : postmaster@extmail.org
OK (outing是配置的发送邮件的一端,Server Setting中设置的是为接收邮件做准备的)
然后你可以测试 sendmail(在你发送的时候可能需要你输入密码认证)
getmail 实验二:
步骤(1)cd /var/spool/postfix/private
ll auth(没有该文件或目录)
cd /etc/dovecot/conf.d/
vi 10-master.confunix_listener /var/spool/postfix/private/auth{
mode = 0666
user = postfix
group = postfix
}(2)/etc/init.d/dovecot restart ll auth (3) postconf -e smtpd_sasl_path=private/auth postconf -e smtpd_sasl_type=dovecot postconf -e smtpd_tls_received_header=yes postconf -e smtpd_tls_security_level=may postconf -e smtpd_tls_cert_file=/etc/postfix/mail.pem postconf -e "smtpd_recipient_restrictions = permit_sasl_authenticated,permit_tls_clientcerts, permit_mynetworks,reject_unauth_destination" postconf -e smtpd_tls_session_cache_database=btree:/var/lib/postfix/smtpd_scache (4) cd /etc/pki/tls/certs make mail.pem mv mail.pem /etc/postfix/ 测试: telnet localhost 25 ehlo localhost 可以看到 250-STARTTLS说明你设置成功。 然后在Server Setting:设置: Server Name:192.168.0.139 User Name : postmaster@extmail.org Connection security: SSL/TLS OK 在Outgoing Server(SMTP)中设置: 编辑:Server Name: 192.168.0.139 Connection security: STARTTLS user name : postmaster@extmail.org OK 用:sendmail getmail测试 实验三: 反垃圾邮件的处理。 www.ccert.edu.cn 计算机网紧急相应组(犯垃圾邮件系统) 有一个中国反垃圾邮件联盟。在里面有一些黑名单,以及一些白名单。你自己可以申请加入百白名单。 步骤(1) wget -N -P /usr/share/spamassassin www.ccert.edu.cn/spam/sa/Chinese_rules.cf CCERT每周更新一次规则集和相应的分数,更新使用CCERT犯垃圾邮件服务在6个月内处理过的垃圾邮件为样本,Chinese_rules.cf会使过滤效果更好。 service spamassassin start (2)cd ~ lftp 192.168.0.254 cd /pub/docs/postfix get fp-linux-i386-ws.tar.gz tar zxf fp-linux-i386-ws.tar.gz cd f-prot cd .. mv f-prot/ /usr/local/ cd /usr/local/f-prot ll antivir.def du -sh antivir.def 显示:45M cd /mnt lftp 192.168.0.254 cd /pub/docs/postfix get antivir.def mv antivir.def /usr/local/f-prot cd /usr/local/f-prot ll antivir.def du -sh antivir.def 显示:58M /usr/local/f-prot/install-f-prot.pl ./fpupdate (安装过程中有可能出现缺少动态连接库 /lib/ld-linux.so.2 yum install /lib/ld-linux.so.2 -y) (3)cd /var/www/extsuite/extmail fpscan /root/(扫描根文件发现没有病毒) lftp 192.168.0.254 cd /pub/docs/postfix get MailScanner-4.84.3-1.rpm.tar.gz (或者去www.mailscanner.info去下载) tar zxf MailScanner-4.84.3-1.rpm.tar.gz cd MailScanner-4.84.3-1 ls(可以看到该文件下面全市sec源码文件) yum install rpm-build (用于生成rpm包。) ./install.sh(在你安装gcc之后,该脚本很厉害的。可以检测到缺少的问家,并且给你安装上) (4) mkdir /var/spool/MailScanner/spamassassin; chown postfix.postfix /var/spool/MailScanner/* vi /etc/MailScanner/MailScanner.conf
Run As User = postfix Run As Group = postfix Incoming Queue Dir = /var/spool/postfix/hold Outgoing Queue Dir = /var/spool/postfix/incoming MTA = postfix Virus Scanners = fprot Always Include Spamassassin report = yes Use Spamassassin = yes SpamAssassin User State Dir = /var/spool/MailScanner/spamassassin
(5)echo  /^Received:/  HOLD  >>/etc/postfix/header_checks
ll /etc/postfix/header_checks
postmap /etc/postfix/header_checks         (make sure uncomment header_checks in /etc/postfix/main.cf)
(6)         postfix stop
chkconfig postfix off
service MailScanner start(MailScanner启动之后postfix会自动起来的)
chkconfig MailScanner   on
(7) Virus test(病毒测试)         Download “eicar.com” from http://www.eicar.org/anti_virus_ test_file.htm
b) mail test include “eicar.com”.
或者用thunderbild来发送和接收邮件。
发送的时候添加附加病毒。     send
get mail
此时你可以看得到你发送的病毒附件被删除了,然后系统会给你发送2份邮件,
一份是你本身的邮件除去病毒。另一份是发送给你的警告信息,告诉你本来的邮件内含有
病毒。
本文出自 “罗宁的技术生活” 博客,谢绝转载!

相关文章推荐
- 构建Postfix+Mysql+Dovecot邮件系统,实现以Web页面访问的功能、添加SASL认证以及TLS加密传输 推荐
- Jenkins通过局域网邮件服务器配置邮件通知(内置邮件系统)
- dnsmasq+postfix+sasl+tls+dovecot(邮件服务器)
- 搭建自己的邮件服务器(postfix devocot cyrus-sasl) centos7 系统下配置
- 邮件系统服务器搭建记录(四)(Postfix+Cyrus-sasl+Courier-authlib+Dovecot+ExtMail+MySQL)
- 邮件系统服务器搭建记录(五)(Postfix+Cyrus-sasl+Courier-authlib+Dovecot+ExtMail+MySQL)
- 金笛JDMAIL邮件系统(邮件服务器)EAL2评估技术报告
- Linux 邮件服务器 之跟我一步一步来实现一个邮件系统【转】
- Postfix邮件系统安装与配置:Postfix,Cyrus-IMAP,Cyrus-sasl,Dovecot和SPF
- 邮件服务器SASL TLS 反垃圾邮件系统
- 邮件服务器搭建之:邮件系统简介
- 构建postfix邮件服务器(五)extmail和extman的安装,实现web使用和管理邮件系统
- 邮件系统搭建---邮件服务器Apache James Server 安装、将数据库改变为MySql
- 金笛JDMAIL邮件系统(邮件服务器)EAL2评估技术报告
- 在Lamp平台上基于postfix+mysql+dovecot+sasl+courier-authlib+extmail+extman搭建企业级邮件系统
- linux 下 搭建邮件邮件服务器(Postfix+Dovecot)(一)-系统账户登陆收发邮件
- 邮件服务器(邮件系统)最新反垃圾技术分享
- 编译安装postfix+sasl+mysql+dovecot+extmail构建完成的邮件系统(一)
- 邮件服务器-邮件系统-邮件技术论坛(BBS)
- 邮件服务器(邮件系统)最新反垃圾技术分享