Ubuntu Server12.04下Zabbix安装
2012-05-10 16:11
351 查看
之前自己常在CentOS上做zabbix,这回是应用户要求在Ubuntu下做这个,真是第一次用Ubuntu来架,这些都是一步步架设过来的,所以做个记录
在Ubunt下安装zabbix还是很简单的,在装Ubuntu系统时我己选择安装lamp,下来直接安装zabbix就可以了
第一步:安装zabbix
apt-cache showpkg zabbix-server-mysql
Versions:
1:1.8.11-1 (/var/lib/apt/lists/us.archive.ubuntu.com_ubuntu_dists_precise_universe_binary-i386_Packages)
Description Language:
File: /var/lib/apt/lists/us.archive.ubuntu.com_ubuntu_dists_precise_universe_binary-i386_Packages
MD5: 47873543449b5d6688721f179370dff6
Description Language: en
File: /var/lib/apt/lists/us.archive.ubuntu.com_ubuntu_dists_precise_universe_i18n_Translation-en
MD5: 47873543449b5d6688721f179370dff6
Reverse Depends:
zabbix-server-pgsql,zabbix-server-mysql
zabbix-proxy-sqlite3,zabbix-server-mysql
zabbix-proxy-pgsql,zabbix-server-mysql
zabbix-proxy-mysql,zabbix-server-mysql
Dependencies:
1:1.8.11-1 - libc6 (2 2.15) libcurl3-gnutls (2 7.16.2-1) libiksemel3 (0 (null)) libldap-2.4-2 (2 2.4.7) libmysqlclient18 (2 5.5.13-1) libopenipmi0 (0 (null)) libsnmp15 (2 5.4.3~dfsg) libssh2-1 (2 1.0) debconf (18 0.5) debconf-2.0 (0 (null)) fping (0 (null)) adduser (0 (null)) dbconfig-common (2 1.8.19) lsb-base (0 (null)) debconf (0 (null)) zabbix-frontend-php (0 (null)) logrotate (0 (null)) mysql-server (2 5.0) snmpd (0 (null)) zabbix-proxy-mysql (0 (null)) zabbix-proxy-pgsql (0 (null)) zabbix-proxy-sqlite3 (0 (null)) zabbix-server-pgsql (0 (null))
Provides:
1:1.8.11-1 -
Reverse Provides:
apt-cache showpkg zabbix-frontend-php
Package: zabbix-frontend-php
Versions:
1:1.8.11-1 (/var/lib/apt/lists/us.archive.ubuntu.com_ubuntu_dists_precise_universe_binary-i386_Packages)
Description Language:
File: /var/lib/apt/lists/us.archive.ubuntu.com_ubuntu_dists_precise_universe_binary-i386_Packages
MD5: 36c43ced4bb30be0a5c7f387cab96480
Description Language: en
File: /var/lib/apt/lists/us.archive.ubuntu.com_ubuntu_dists_precise_universe_i18n_Translation-en
MD5: 36c43ced4bb30be0a5c7f387cab96480
Reverse Depends:
zabbix-server-pgsql,zabbix-frontend-php
zabbix-server-mysql,zabbix-frontend-php
Dependencies:
1:1.8.11-1 - debconf (18 0.5) debconf-2.0 (0 (null)) apache2 (16 (null)) httpd (0 (null)) php5 (0 (null)) php5-mysql (16 (null)) php5-pgsql (0 (null)) php5-gd (0 (null)) ucf (0 (null)) dbconfig-common (2 1.8.19) libjs-prototype (2 1.6.0.3) libjs-scriptaculous (2 1.8.2) ttf-dejavu-core (0 (null))
Provides:
1:1.8.11-1 -
Reverse Provides:
sudo apt-get install zabbix-server-mysql zabbix-frontend-php
安装过程中系统有几处提示要设置
1、数据库的配置,这里系统会要求你使用 dbconfig-common 来为 zabbix-server-mysql 配置数据库

The zabbix-server-mysql package must have a database installed and configured before it can be used. This can be optionally handled with dbconfig-common.
If you are an advanced database administrator and know that you want to perform this configuration manually, or if your database has already been installed and configured, you should refuse this option. Details on what needs to be done should most likely be provided in /usr/share/doc/zabbix-server-mysql.
Otherwise, you should probably choose this option.
Configure database for zabbix-server-mysql with dbconfig-common?
选择“YES”进入下一步,这时系统会要求你提供数据库管理员的密码

Please provide the password for the administrative account with which this package should create its MySQL database and user.
Password of the database's administrative user:
输入密码完后按TAB键选“OK”这时系统会再提示再输入zabbix-server-mysql所用数据库的密码,如果不输入留空的话将会随机生成一个

Please provide a password for zabbix-server-mysql to register with the database server. If left blank, a random password will be generated.
MySQL application password for zabbix-server-mysql:
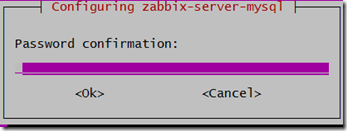
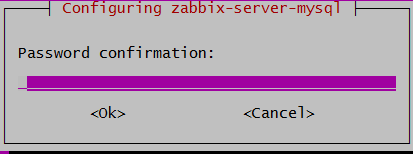
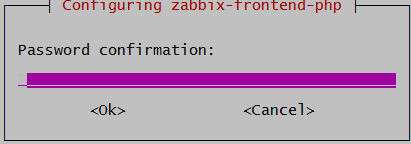
输入完后选择“OK”系统会要求你再输入一次(zabbix-server-mysql)密码
系统安装一段时间后会再提示为zabbix-frontend-php所使用的数据库,我安装的是mysql就选择“mysql”

确认选择后系统提示为zabbix-frontend-php数据库设置密码,如不设置留空的话系统将随机生成一个密码

输入后系统要求再次确认

至此zabbix安装完毕
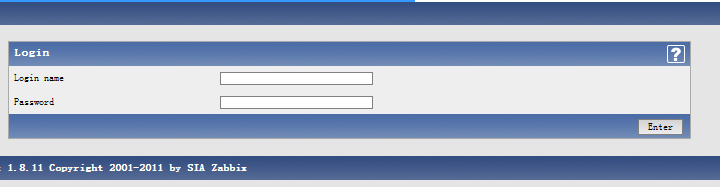
第二步:通过网页设置zabbix
打开浏览器输入http://serverIP/zabbix/回车既可看到登录界面
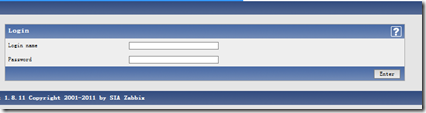
用户名:admin
密码:zabbix
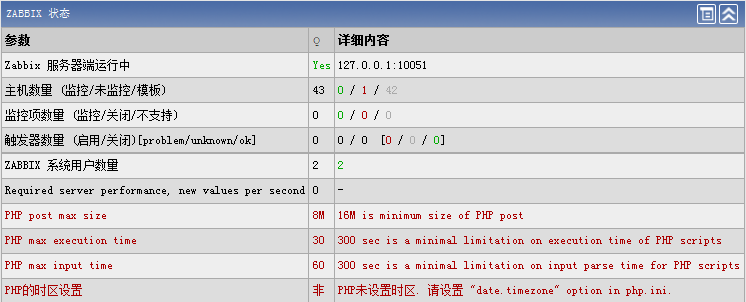
登录后是英文界面,如果想用中文的就点击zabbix 首页右上角“porfile”language 中选择Chinese(CN)保存即可。
在zabbix状态里会有几项问题要到ubuntu里解决
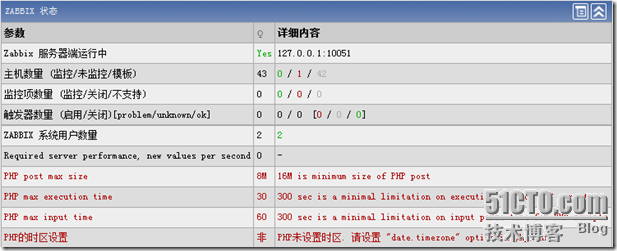
sudo vim /etc/php5/cli/php.ini
第740行
post_max_size = 8M 改为 16M
第444行
max_execution_time = 30 改为 300
第454行
max_input_time = 60 改为 300
第960行
;date.timezone = 改为 date.timezone = Asia/Chongqing (注意去掉注释)
保存,然后重启apache
sudo /etc/init.d/apache2 restart
本文出自 “青瞳” 博客,请务必保留此出处http://icedot.blog.51cto.com/61369/859981
在Ubunt下安装zabbix还是很简单的,在装Ubuntu系统时我己选择安装lamp,下来直接安装zabbix就可以了
第一步:安装zabbix
apt-cache showpkg zabbix-server-mysql
Versions:
1:1.8.11-1 (/var/lib/apt/lists/us.archive.ubuntu.com_ubuntu_dists_precise_universe_binary-i386_Packages)
Description Language:
File: /var/lib/apt/lists/us.archive.ubuntu.com_ubuntu_dists_precise_universe_binary-i386_Packages
MD5: 47873543449b5d6688721f179370dff6
Description Language: en
File: /var/lib/apt/lists/us.archive.ubuntu.com_ubuntu_dists_precise_universe_i18n_Translation-en
MD5: 47873543449b5d6688721f179370dff6
Reverse Depends:
zabbix-server-pgsql,zabbix-server-mysql
zabbix-proxy-sqlite3,zabbix-server-mysql
zabbix-proxy-pgsql,zabbix-server-mysql
zabbix-proxy-mysql,zabbix-server-mysql
Dependencies:
1:1.8.11-1 - libc6 (2 2.15) libcurl3-gnutls (2 7.16.2-1) libiksemel3 (0 (null)) libldap-2.4-2 (2 2.4.7) libmysqlclient18 (2 5.5.13-1) libopenipmi0 (0 (null)) libsnmp15 (2 5.4.3~dfsg) libssh2-1 (2 1.0) debconf (18 0.5) debconf-2.0 (0 (null)) fping (0 (null)) adduser (0 (null)) dbconfig-common (2 1.8.19) lsb-base (0 (null)) debconf (0 (null)) zabbix-frontend-php (0 (null)) logrotate (0 (null)) mysql-server (2 5.0) snmpd (0 (null)) zabbix-proxy-mysql (0 (null)) zabbix-proxy-pgsql (0 (null)) zabbix-proxy-sqlite3 (0 (null)) zabbix-server-pgsql (0 (null))
Provides:
1:1.8.11-1 -
Reverse Provides:
apt-cache showpkg zabbix-frontend-php
Package: zabbix-frontend-php
Versions:
1:1.8.11-1 (/var/lib/apt/lists/us.archive.ubuntu.com_ubuntu_dists_precise_universe_binary-i386_Packages)
Description Language:
File: /var/lib/apt/lists/us.archive.ubuntu.com_ubuntu_dists_precise_universe_binary-i386_Packages
MD5: 36c43ced4bb30be0a5c7f387cab96480
Description Language: en
File: /var/lib/apt/lists/us.archive.ubuntu.com_ubuntu_dists_precise_universe_i18n_Translation-en
MD5: 36c43ced4bb30be0a5c7f387cab96480
Reverse Depends:
zabbix-server-pgsql,zabbix-frontend-php
zabbix-server-mysql,zabbix-frontend-php
Dependencies:
1:1.8.11-1 - debconf (18 0.5) debconf-2.0 (0 (null)) apache2 (16 (null)) httpd (0 (null)) php5 (0 (null)) php5-mysql (16 (null)) php5-pgsql (0 (null)) php5-gd (0 (null)) ucf (0 (null)) dbconfig-common (2 1.8.19) libjs-prototype (2 1.6.0.3) libjs-scriptaculous (2 1.8.2) ttf-dejavu-core (0 (null))
Provides:
1:1.8.11-1 -
Reverse Provides:
sudo apt-get install zabbix-server-mysql zabbix-frontend-php
安装过程中系统有几处提示要设置
1、数据库的配置,这里系统会要求你使用 dbconfig-common 来为 zabbix-server-mysql 配置数据库

The zabbix-server-mysql package must have a database installed and configured before it can be used. This can be optionally handled with dbconfig-common.
If you are an advanced database administrator and know that you want to perform this configuration manually, or if your database has already been installed and configured, you should refuse this option. Details on what needs to be done should most likely be provided in /usr/share/doc/zabbix-server-mysql.
Otherwise, you should probably choose this option.
Configure database for zabbix-server-mysql with dbconfig-common?
选择“YES”进入下一步,这时系统会要求你提供数据库管理员的密码

Please provide the password for the administrative account with which this package should create its MySQL database and user.
Password of the database's administrative user:
输入密码完后按TAB键选“OK”这时系统会再提示再输入zabbix-server-mysql所用数据库的密码,如果不输入留空的话将会随机生成一个

Please provide a password for zabbix-server-mysql to register with the database server. If left blank, a random password will be generated.
MySQL application password for zabbix-server-mysql:
输入完后选择“OK”系统会要求你再输入一次(zabbix-server-mysql)密码
系统安装一段时间后会再提示为zabbix-frontend-php所使用的数据库,我安装的是mysql就选择“mysql”

确认选择后系统提示为zabbix-frontend-php数据库设置密码,如不设置留空的话系统将随机生成一个密码

输入后系统要求再次确认
至此zabbix安装完毕
第二步:通过网页设置zabbix
打开浏览器输入http://serverIP/zabbix/回车既可看到登录界面
用户名:admin
密码:zabbix
登录后是英文界面,如果想用中文的就点击zabbix 首页右上角“porfile”language 中选择Chinese(CN)保存即可。
在zabbix状态里会有几项问题要到ubuntu里解决
sudo vim /etc/php5/cli/php.ini
第740行
post_max_size = 8M 改为 16M
第444行
max_execution_time = 30 改为 300
第454行
max_input_time = 60 改为 300
第960行
;date.timezone = 改为 date.timezone = Asia/Chongqing (注意去掉注释)
保存,然后重启apache
sudo /etc/init.d/apache2 restart
本文出自 “青瞳” 博客,请务必保留此出处http://icedot.blog.51cto.com/61369/859981

相关文章推荐
- ubuntu 14.04 server 下安装ZABBIX 及增加客户机配置过程
- ubuntu server 14.04 安装 zabbix with Postgresql
- ubuntu安装zabbix后,启动报错,zabbix_server is disabled in /etc/default/zabbix-server.
- Windows 10的Linux子系统Ubuntu安装Zabbix Server(2)
- Ubuntu Server 12.04下cobbler + dnsmasq +tftpd-hpa的安装配置(一)
- Zabbix Server安装(Ubuntu16.04)
- 在 Ubuntu 16.04 Server 上安装 Zabbix
- Ubuntu Server 12.04下cobbler + dnsmasq +tftpd-hpa的安装配置(二)
- 在 Ubuntu 16.04 Server 上安装 Zabbix
- Ubuntu Server 12.04下cobbler + dnsmasq +tftpd-hpa的安装配置(三)
- Ubuntu Server 12.04下cobbler + dnsmasq +tftpd-hpa的安装配置(四)
- Ubuntu Server 12.04下cobbler + dnsmasq +tftpd-hpa的安装配置(参考资料)
- ubuntu14.04 安装 zabbix-agent zabbix-server
- ubuntu安装zabbix server和agent的一些问题
- 基于Ubuntu14.04 Zabbix2.2.15(版本) Server端 安装
- 在Ubuntu 16.04 Server上安装Zabbix
- 在Ubuntu 16.04 Server上安装Zabbix的方法
- ubuntu16.04上安装zabbix server
- Ubuntu 12.04 server 安装 Apache2+PHP5+MySQL
- zabbix 布署实践【1 server安装】