Sharepoint学习笔记—Ribbon系列-- 5. 在Ribbon中添加新控件(针对用户自定义Tab)
2012-03-19 08:06
615 查看
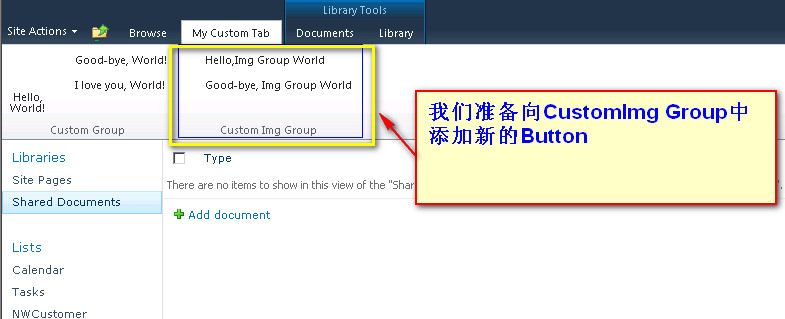
前面我们实现了向用户自定义的Tab中添加新的Group,并向其中创建了两个Button按钮。这里我们看看如何向这个已经创建好的Group中再另外添加新的Button控件(当然,你可以添加其它控件,实现思路是一样的)。
下面 直接进入操作步骤
一、创建新的SharePoint 项目
要添加新的控件到Ribbon中,应首先创建一个空白 SharePoint 项目。如下:

把此方案设置成Farm解决方案
然后在此项目中分别加入新的Feature与新的空白Element如下图
二、使用自定义操作中的功能区 XML 定义功能区自定义Button项
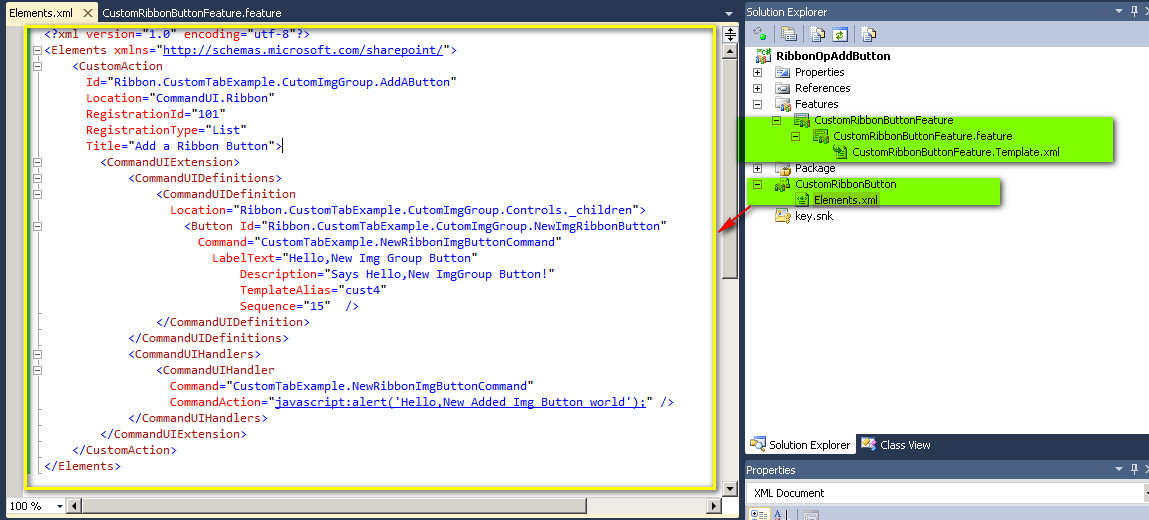
方法是 打开 CustomRibbonButton下的Elements.xml 文件,其内容如下:
<?xml version="1.0" encoding="utf-8"?>
<Elements xmlns="http://schemas.microsoft.com/sharepoint/">
<CustomAction
Id="Ribbon.CustomTabExample.CutomImgGroup.AddButton"
Location="CommandUI.Ribbon"
RegistrationId="101"
RegistrationType="List"
Title="Add a Ribbon Button">
<CommandUIExtension>
<CommandUIDefinitions>
<CommandUIDefinition
Location="Ribbon.CustomTabExample.CutomImgGroup.Controls._children">
<Button Id="Ribbon.CustomTabExample.CutomImgGroup.NewImgRibbonButton"
Command="CustomTabExample.NewRibbonImgButtonCommand"
LabelText="Hello,New Img Group Button"
Description="Says Hello,New ImgGroup Button!"
TemplateAlias="cust4"
Sequence="15" />
</CommandUIDefinition>
</CommandUIDefinitions>
<CommandUIHandlers>
<CommandUIHandler
Command="CustomTabExample.NewRibbonImgButtonCommand"
CommandAction="javascript:alert('Hello,New Added Img Button world');" />
</CommandUIHandlers>
</CommandUIExtension>
</CustomAction>
</Elements>
下面对其内容作如下说明:
首先我们要用上一篇介绍的确定Location的方法找到我们需要添加的Button应该添加在Ribbon的哪个位置。
本例我们确定的位置就是Ribbon.CustomTabExample.CutomImgGroup (格式是: [Ribbon].[Tab].[目标Group的名字].Controls._children),所以此处,Location就是:Location="Ribbon.CustomTabExample.CutomImgGroup.Controls._children"
新的Button的ID就成了Ribbon.CustomTabExample.CutomImgGroup.NewImgRibbonButton。
三、部署自定义Group项
按 F5。Visual Studio 2010 中的 SharePoint 开发工具将自动构建和部署功能。
转到网站或子网站中的文档库。
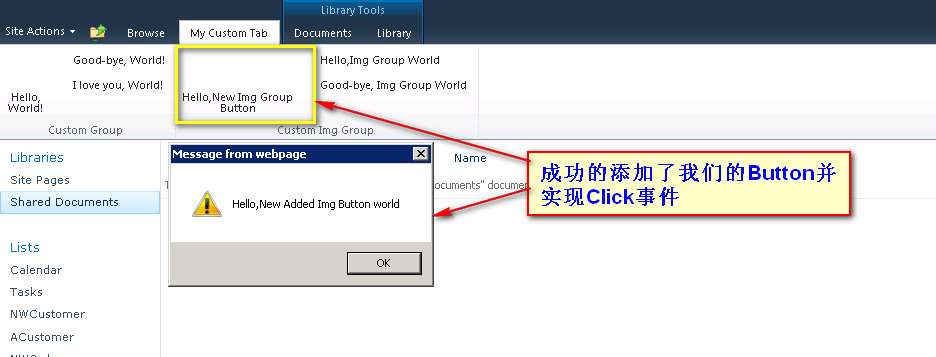
单击“My Custom Tab”选项卡,查看“自定义组”,然后单击新添加的那个Buttonr按钮Hello,New Img Group Button,效果如下图
下面 直接进入操作步骤
一、创建新的SharePoint 项目
要添加新的控件到Ribbon中,应首先创建一个空白 SharePoint 项目。如下:
把此方案设置成Farm解决方案
然后在此项目中分别加入新的Feature与新的空白Element如下图
二、使用自定义操作中的功能区 XML 定义功能区自定义Button项
方法是 打开 CustomRibbonButton下的Elements.xml 文件,其内容如下:
<?xml version="1.0" encoding="utf-8"?>
<Elements xmlns="http://schemas.microsoft.com/sharepoint/">
<CustomAction
Id="Ribbon.CustomTabExample.CutomImgGroup.AddButton"
Location="CommandUI.Ribbon"
RegistrationId="101"
RegistrationType="List"
Title="Add a Ribbon Button">
<CommandUIExtension>
<CommandUIDefinitions>
<CommandUIDefinition
Location="Ribbon.CustomTabExample.CutomImgGroup.Controls._children">
<Button Id="Ribbon.CustomTabExample.CutomImgGroup.NewImgRibbonButton"
Command="CustomTabExample.NewRibbonImgButtonCommand"
LabelText="Hello,New Img Group Button"
Description="Says Hello,New ImgGroup Button!"
TemplateAlias="cust4"
Sequence="15" />
</CommandUIDefinition>
</CommandUIDefinitions>
<CommandUIHandlers>
<CommandUIHandler
Command="CustomTabExample.NewRibbonImgButtonCommand"
CommandAction="javascript:alert('Hello,New Added Img Button world');" />
</CommandUIHandlers>
</CommandUIExtension>
</CustomAction>
</Elements>
下面对其内容作如下说明:
首先我们要用上一篇介绍的确定Location的方法找到我们需要添加的Button应该添加在Ribbon的哪个位置。
本例我们确定的位置就是Ribbon.CustomTabExample.CutomImgGroup (格式是: [Ribbon].[Tab].[目标Group的名字].Controls._children),所以此处,Location就是:Location="Ribbon.CustomTabExample.CutomImgGroup.Controls._children"
新的Button的ID就成了Ribbon.CustomTabExample.CutomImgGroup.NewImgRibbonButton。
三、部署自定义Group项
按 F5。Visual Studio 2010 中的 SharePoint 开发工具将自动构建和部署功能。
转到网站或子网站中的文档库。
单击“My Custom Tab”选项卡,查看“自定义组”,然后单击新添加的那个Buttonr按钮Hello,New Img Group Button,效果如下图
| -- |

相关文章推荐
- Sharepoint学习笔记—Ribbon系列-- 7. 在Ribbon中替换指定控件(针对用户自定义Tab)
- SharePoint【Ribbon系列】-- 05.在Ribbon中添加新控件(针对用户自定义Tab)
- Sharepoint进修笔记—Ribbon系列-- 4. 在Ribbon中添加新Group(针对用户自定义Tab)
- SharePoint【Ribbon系列】-- 06.在Ribbon中删除指定控件(针对用户自定义Tab)
- SharePoint【Ribbon系列】-- 07.在Ribbon中替换指定控件(针对用户自定义Tab)
- SharePoint【Ribbon系列】-- 04.在Ribbon中添加新Group(针对用户自定义Tab)
- Sharepoint学习笔记—Ribbon系列-- 6. 在Ribbon中删除指定控件(针对用户自定义Tab)
- Sharepoint学习笔记—Ribbon系列-- 4. 在Ribbon中添加新Group(针对用户自定义Tab)
- 【WPF学习笔记】之如何点击“新建”按钮,在面板中加载一条条的“用户控件”的信息:动画系列之(四)
- sharepoint 2016 学习系列篇(13)-自定义列表应用篇-(2)添加字段栏
- Sharepoint学习笔记—Ribbon系列-- 在Site上创建(或隐藏)Ribbon Tabs
- android 开发零起步学习笔记(十七):自定义android用户控件,使用回调函数实现自定义事件
- C#开发学习笔记:向Dev控件库中的GridControl添加自定义复选框
- SharePoint【Ribbon系列】-- 02.在Ribbon中添加新Tab
- 用户自定义控件学习笔记
- IssueVision 学习笔记(二)-----为控件添加自定义属性和事件
- 在SharePoint 2010 母版页里添加自定义用户控件
- Sharepoint学习笔记—习题系列--70-576习题解析 -(Q131-Q134)
- 步步为营 SharePoint 开发学习笔记系列 十、SharePoint web service 开发(下)
- JavaWeb学习笔记-mybatis-05-添加用户