Hello,Qt——Linux下编写Qt程序的详细步骤
2012-03-18 10:57
357 查看
转http://www.cnblogs.com/feisky/archive/2009/11/08/1598397.html
前一段时间做过一个在Linux下编写的Qt程序,没来得及总结,现在总结一下Linux下开发的详细步骤。不过现在发现使用Eclipse或者Qt Creator要比直接用VIM编程快捷多了,以后在学习Qt的过程中可能就不直接在Linux下编了,先在Winxp下编了再移植吧。
任务:在Redhat系统下创建和显示一个简单的窗口,使用标签显示字符串“Hello, Qt!”,在Redhat上调试通过后交叉编译下载至MagicARM2410上运行。
主要思想:标签是设计图形界面不可或缺的基本组件,利用标签我们可以显示各种信息。Qt为标签提供了一系列API函数,通过调用这些函数,可以很容易设计各种标签。调用Qt中标签的API函数,必须包含标签的头文件qlabel.h。如果需要显示的字符串信息很长,建议不要使用QLabel,改用其它部件如MultiLineedit(多行编辑区)。
详细步骤
(1)进入/zylinux/x86-qtopia目录(Qt x86安装目录),运行set-env脚本,为本实验设置环境变量,然后创建文件夹hello。
(2)进入hello目录,新建文件hello.cpp,并编写程序,然后用progen工具生成工程文件hello.pro。
(3)使用tmake工具,生成hello工程的Makefile文件。
(4)修改Makefile文件,在LIBS变量中增加需要用到的库,然后输入make命令编译。
$ make
(5)启动虚拟控制台,运行hello程序(主机须启动帧缓冲,必须能够访问/dev/fb0)。
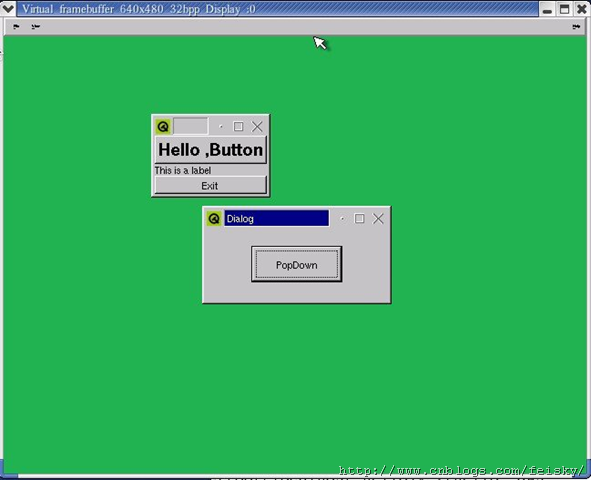
或者在终端,启动虚拟缓冲区和QPE,启动Qtopia的终端,输入./hello运行程序,亦可得到和图 6.1一样的结果。
$ cd /zylinux/x86-qtopia
$ . set-env
$ cd hello
$ qvfb&
$ ./hello
$ qpe
如果要将Hello程序发布到MagicARM2410上运行,还需进行以下工作:
(6)进入/zylinux/arm-qtopia目录(安装目录),并将hello工程复制到当前目录下。
$ cd /zylinux/arm-qtopia
$ cp –av /zylinux/x86-qtopia/hello .
(7)运行当前目录下的set-env文件,重新设置环境变量,进入hello目录,使用tmake工具,重新生成Makefile文件。
$ . set-env
$ cd hello
$ tmake -o Makefile hello.pro
(8)按照步骤(4)的方法修改包含库,编译,得到可执行文件hello,将hello文件添加到文件系统中,更新文件系统。
(9)插入USB鼠标和USB键盘,启动MagicARM2410。启动Qtopia的终端,运行hello程序。
注意事项:
(1)如果在PC中运行hello程序,出现某些库找不到,该如何处理?
提示:将所缺的库从/zylinux/x86-qtopia/qt/lib目录下复制到主机系统/usr/lib目录下即可。
(2)在ARM上运行时如果也出现类似问题,又该如何解决?
提示:将所缺的库从/zylinux/arm-qtopia/qt/lib目录下复制到目标系统/usr/lib目录下即可。
(3)使用自定义插槽:
Q_OBJECT
....
private slots:
void popupDialog();
tmake可以自动处理moc,如果出现undefined vtable,则用moc生成moc_hello.cpp,编译成moc_hello.o,最后一起连接即可。
参考程序:
Makefie:
程序执行结果:

前一段时间做过一个在Linux下编写的Qt程序,没来得及总结,现在总结一下Linux下开发的详细步骤。不过现在发现使用Eclipse或者Qt Creator要比直接用VIM编程快捷多了,以后在学习Qt的过程中可能就不直接在Linux下编了,先在Winxp下编了再移植吧。
任务:在Redhat系统下创建和显示一个简单的窗口,使用标签显示字符串“Hello, Qt!”,在Redhat上调试通过后交叉编译下载至MagicARM2410上运行。
主要思想:标签是设计图形界面不可或缺的基本组件,利用标签我们可以显示各种信息。Qt为标签提供了一系列API函数,通过调用这些函数,可以很容易设计各种标签。调用Qt中标签的API函数,必须包含标签的头文件qlabel.h。如果需要显示的字符串信息很长,建议不要使用QLabel,改用其它部件如MultiLineedit(多行编辑区)。
详细步骤
(1)进入/zylinux/x86-qtopia目录(Qt x86安装目录),运行set-env脚本,为本实验设置环境变量,然后创建文件夹hello。
1: $ cd /zylinux/x86-qtopia
2:
3: $ . set-env
4:
5: $ mkdir hello
(2)进入hello目录,新建文件hello.cpp,并编写程序,然后用progen工具生成工程文件hello.pro。
1: $ cd hello
2:
3: $ vi hello.cpp
4:
5: $ progen –t app.t –o hello.pro
(3)使用tmake工具,生成hello工程的Makefile文件。
$ tmake -o Makefile hello.pro
(4)修改Makefile文件,在LIBS变量中增加需要用到的库,然后输入make命令编译。
1: LIBS = $(SUBLIBS) -L$(QTDIR)/lib -lqte -lm -lstdc++
$ make
(5)启动虚拟控制台,运行hello程序(主机须启动帧缓冲,必须能够访问/dev/fb0)。
1: $ cd /zylinux/x86-qtopia
2: qvfb&
3: $ cd hello
4:
5: $ ./hello –qws
或者在终端,启动虚拟缓冲区和QPE,启动Qtopia的终端,输入./hello运行程序,亦可得到和图 6.1一样的结果。
$ cd /zylinux/x86-qtopia
$ . set-env
$ cd hello
$ qvfb&
$ ./hello
$ qpe
如果要将Hello程序发布到MagicARM2410上运行,还需进行以下工作:
(6)进入/zylinux/arm-qtopia目录(安装目录),并将hello工程复制到当前目录下。
$ cd /zylinux/arm-qtopia
$ cp –av /zylinux/x86-qtopia/hello .
(7)运行当前目录下的set-env文件,重新设置环境变量,进入hello目录,使用tmake工具,重新生成Makefile文件。
$ . set-env
$ cd hello
$ tmake -o Makefile hello.pro
(8)按照步骤(4)的方法修改包含库,编译,得到可执行文件hello,将hello文件添加到文件系统中,更新文件系统。
(9)插入USB鼠标和USB键盘,启动MagicARM2410。启动Qtopia的终端,运行hello程序。
注意事项:
(1)如果在PC中运行hello程序,出现某些库找不到,该如何处理?
提示:将所缺的库从/zylinux/x86-qtopia/qt/lib目录下复制到主机系统/usr/lib目录下即可。
(2)在ARM上运行时如果也出现类似问题,又该如何解决?
提示:将所缺的库从/zylinux/arm-qtopia/qt/lib目录下复制到目标系统/usr/lib目录下即可。
(3)使用自定义插槽:
Q_OBJECT
....
private slots:
void popupDialog();
tmake可以自动处理moc,如果出现undefined vtable,则用moc生成moc_hello.cpp,编译成moc_hello.o,最后一起连接即可。
参考程序:
1: hello.h
2:
3: #ifndef _HELLO_H_
4:
5: #define _HELLO_H_
6:
7: #include <qapplication.h>
8:
9: #include <qlabel.h>
10:
11: #include <qpushbutton.h>
12:
13: #include <qfont.h>
14:
15: #include <qwidget.h>
16:
17: #include <qlayout.h>
18:
19: #include <qdialog.h>
20:
21: class HelloWidget:public QWidget {22:
23: Q_OBJECT
24:
25: public:
26:
27: HelloWidget(QWidget * parent = 0, const char *name = 0);
28:
29: private:
30:
31: QPushButton * quit;
32:
33: QPushButton *hello;
34:
35: private slots:
36:
37: void popupDialog();
38:
39: };
40:
41: #endif
42:
43: hello.cpp
44:
45: #include "hello.h"
46:
47: void HelloWidget::popupDialog()
48:
49: {50:
51: QDialog *dlg = new QDialog(0, "popup", FALSE);
52:
53: dlg->setCaption("Dialog");54:
55: QPushButton *btn = new QPushButton("PopDown", dlg);56:
57: btn->setGeometry(50, 20, 100, 40);
58:
59: connect(btn, SIGNAL(clicked()), dlg, SLOT(accept()));
60:
61: dlg->show();
62:
63: }
64:
65: HelloWidget::HelloWidget(QWidget * parent,
66:
67: const char *name):QWidget(parent, name)
68:
69: {70:
71: QBoxLayout *demo = new QVBoxLayout(this);
72:
73: QLabel *label = new QLabel(this);
74:
75: hello = new QPushButton(this);
76:
77: quit = new QPushButton("Exit", this);78:
79: quit->resize(100, 100);
80:
81: label->setText("This is a label");82:
83: label->resize(150, 30);
84:
85: hello->setText("Hello ,Button");86:
87: hello->resize(250, 30);
88:
89: hello->setFont(QFont("Helvetica", 18, QFont::Bold));90:
91: connect(hello, SIGNAL(clicked()), this, SLOT(popupDialog()));
92:
93: connect(quit, SIGNAL(clicked()), qApp, SLOT(quit()));
94:
95: demo->addWidget(hello);
96:
97: demo->addWidget(label);
98:
99: demo->addWidget(quit);
100:
101: demo->activate();
102:
103: }
104:
105: int main(int argc, char **argv)
106:
107: {108:
109: QApplication app(argc, argv);
110:
111: HelloWidget hello;
112:
113: app.setMainWidget(&hello);
114:
115: hello.show();
116:
117: int result = app.exec();
118:
119: return result;
120:
121: }
122:
Makefie:
#############################################################################
# Makefile for building hello
# Generated by tmake at 10:50, 2006/02/21
# Project: hello
# Template: app
#############################################################################
####### Compiler, tools and options
CC = gcc
CXX = g++
CFLAGS = -pipe -Wall -W -O2 -DNO_DEBUG
CXXFLAGS= -pipe -DQWS -fno-exceptions -fno-rtti -Wall -W -O2 -DNO_DEBUG
INCPATH = -I$(QTDIR)/include
LINK = gcc
LFLAGS =
LIBS = $(SUBLIBS) -L$(QTDIR)/lib -lqte -lm -lstdc++
MOC = $(QTDIR)/bin/moc
UIC = $(QTDIR)/bin/uic
TAR = tar -cf
GZIP = gzip -9f
####### Files
HEADERS =
SOURCES = hello.cpp
OBJECTS = hello.o
INTERFACES =
UICDECLS =
UICIMPLS =
SRCMOC =
OBJMOC =
DIST =
TARGET = hello
INTERFACE_DECL_PATH = .
####### Implicit rules
.SUFFIXES: .cpp .cxx .cc .C .c
.cpp.o:
$(CXX) -c $(CXXFLAGS) $(INCPATH) -o $@ $<
.cxx.o:
$(CXX) -c $(CXXFLAGS) $(INCPATH) -o $@ $<
.cc.o:
$(CXX) -c $(CXXFLAGS) $(INCPATH) -o $@ $<
.C.o:
$(CXX) -c $(CXXFLAGS) $(INCPATH) -o $@ $<
.c.o:
$(CC) -c $(CFLAGS) $(INCPATH) -o $@ $<
####### Build rules
all: $(TARGET)
$(TARGET): $(UICDECLS) $(OBJECTS) $(OBJMOC)
$(LINK) $(LFLAGS) -o $(TARGET) $(OBJECTS) $(OBJMOC) $(LIBS)
moc: $(SRCMOC)
tmake: Makefile
Makefile: hello.pro
tmake hello.pro -o Makefile
dist:
$(TAR) hello.tar hello.pro $(SOURCES) $(HEADERS) $(INTERFACES) $(DIST)
$(GZIP) hello.tar
clean:
-rm -f $(OBJECTS) $(OBJMOC) $(SRCMOC) $(UICIMPLS) $(UICDECLS) $(TARGET)
-rm -f *~ core
####### Sub-libraries
###### Combined headers
####### Compile
hello.o: hello.cpp
程序执行结果:

相关文章推荐
- Hello,Qt——Linux下编写Qt程序的详细步骤
- Hello,Qt——Linux下编写Qt程序的详细步骤
- Hello,Qt——Linux下编写Qt程序的详细步骤
- Linux Makefile文件编写详细步骤与实践
- Windows下qt的环境配置及运行一个c++"hello world"实例详细步骤
- ARM板烧录LinuxQt程序步骤
- Windows下qt的环境配置及运行一个c++"hello world"实例详细步骤
- 编写Linux系统下Daemon程序的方法步骤
- 在Linux下使用自己编写的驱动程序详细步骤
- Windows下qt的环境配置及运行一个c++"hello world"实例详细步骤
- 【Linux开发】【Qt开发】ARM QT移植详细步骤教程
- Linux下QT编程之hello qt程序
- Hello Qt(在Linux下编写运行Qt程序)
- Windows下qt的环境配置及运行一个c++"hello world"实例详细步骤
- 编写Linux系统下Daemon程序的方法步骤
- Ubuntux下QT编写 linux嵌入式开发板的程序
- 用Visual Studio 2010 编写C程序(详细步骤)
- 编写Linux系统下Daemon程序的方法步骤
- FEKO 6.0 电磁仿真软件在 Linux下安装以及破解详细步骤(附下载地址和注册程序)
- Linux Makefile文件编写详细步骤与实践