Build Cloud Storage: Installing an OpenStack Swift cluster on EC2
2012-02-24 09:24
417 查看
Build Cloud Storage: Installing an OpenStack Swift cluster on EC2http://www.buildcloudstorage.com/2011/10/installing-openstack-swift-cluster-on.html
DISCLAIMER: The views expressed here are my own and don't necessarily represent my employer Emulex's positions, strategies or opinions.If you want to build your own Amazon S3 like storage (private or public cloud storage), there’s really only one open-source choice – OpenStack Swift (there are other technologies worth watching e.g. CEPH, but I believe Swift is the only one ready for production environments). I decided to test drive it.I implemented a 6 node Swift cluster on Amazon EC2 (because I don’t own 6 servers). This blog walks through the process. We can discuss the attributes of object stores, the pros & cons of Swift and other advanced topics in subsequent blogs; this one talks about the basic install process. The exercise is quite instructive and gives a really good feel for how Swift is built and how it works. These instructions assume some basic Linux knowledge.Here is a diagram of the cluster created:
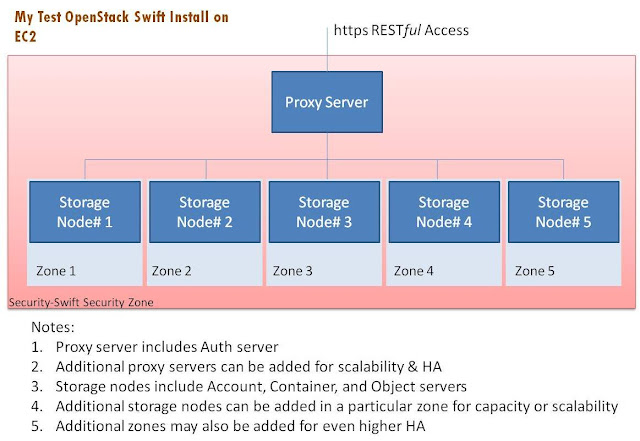
I generally followed instructions from a mix of these two sources:http://swift.openstack.org/howto_installmultinode.htmlhttp://docs.openstack.org/diablo/openstack-object-storage/admin/content/There are five broad sections of this blog:i. Initial EC2 setup (steps 1-15)ii. Auth + proxy server setup (steps 16-19)iii. Storage Node setup (steps 20-27)iv. Start services (steps 28-35)v. Connect to the cluster from external Windows & Linux clients (steps 36-52)By the way, the Amazon costs come up to roughly $3 per day for this experiment.Initial EC2 Setup Get an AWS account (if you don't already have one) and log into EC2
Click on “Launch instance”
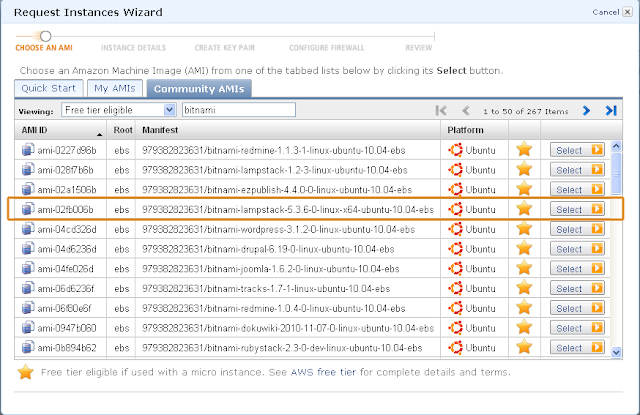
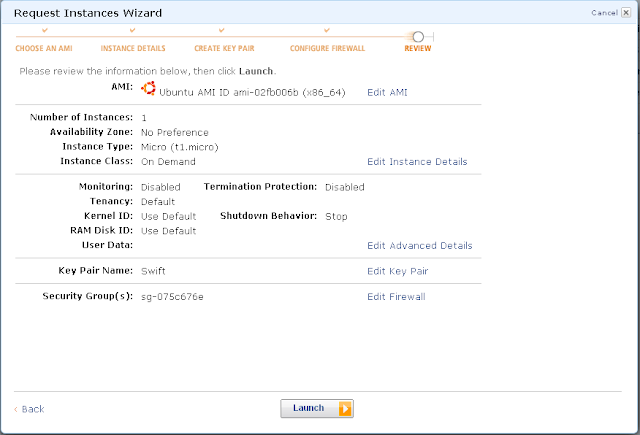
I chose a community AMI “ami-02fb006b” which is Ubuntu 10.04 by bitnami. It is 64-bit which is nice. Also it is eligible for the “free tier”, handy if you want to do this on the cheap.
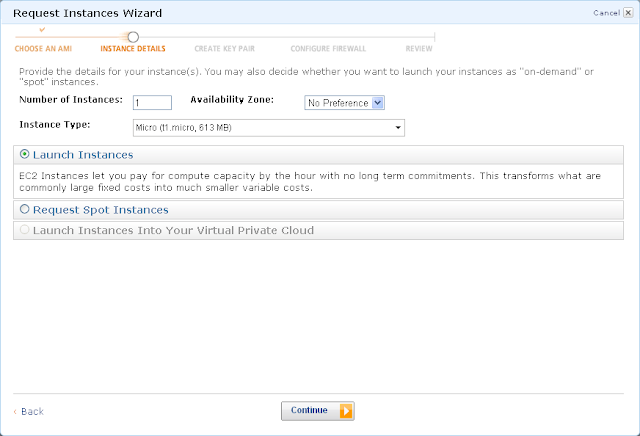
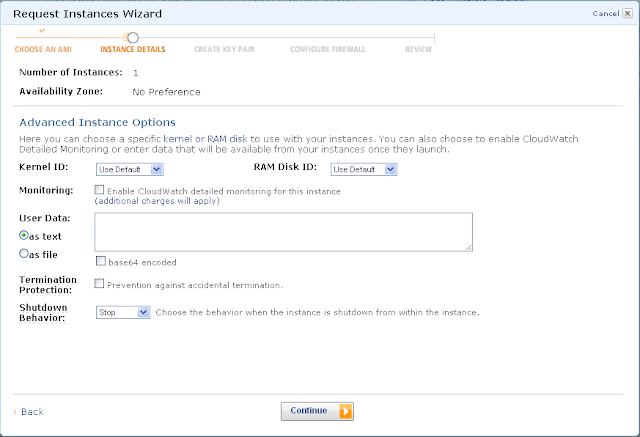
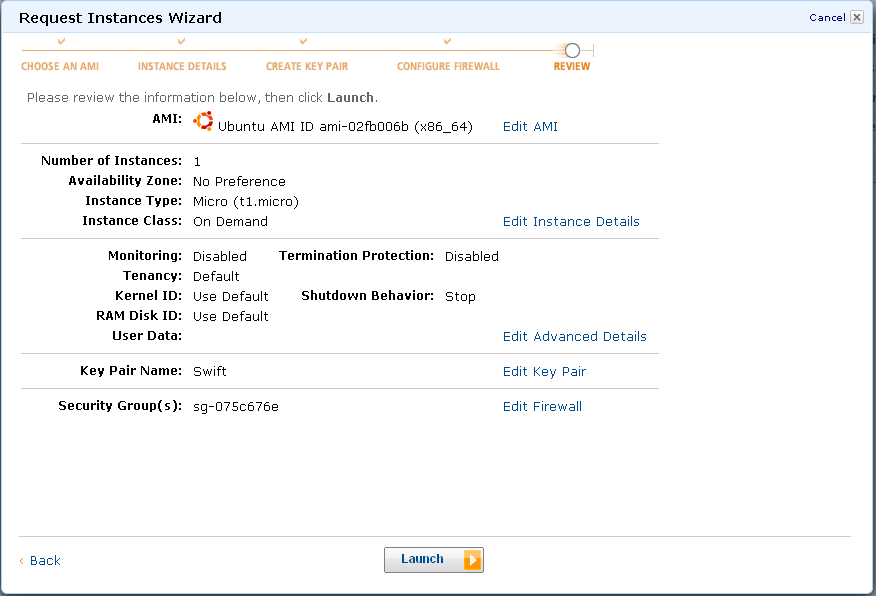
I am showing these steps once in case you are new to EC2. In this step, we basically pick defaults. In this particular step we are saying “No Preference” for the Availability Zone, but later on we will actually specify the zone.
Defaults on the next screen too.
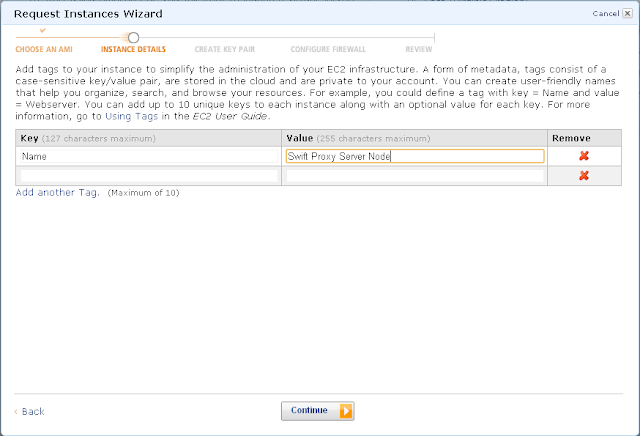
I eventually want this to be the Swift Proxy Server (even though part-way through we will save the image as a base image for the storage nodes). Let’s name it to reflect this.
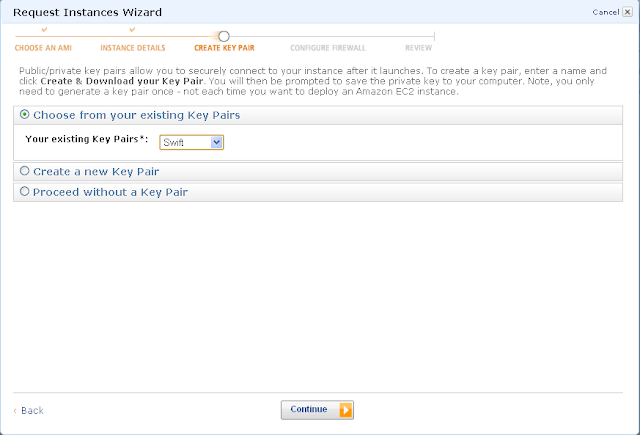
Pick a new key pair or an existing one. This is a private key, don’t share it with anyone. Use this for all the nodes. I created one called Swift.pem and then used it for all my swift nodes.
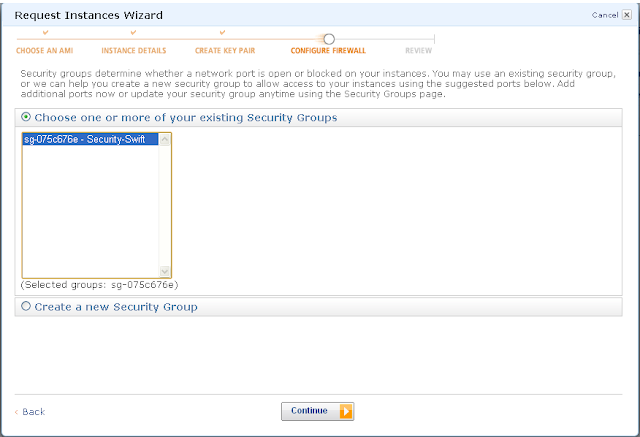
Create a new security group. I already created one, so in this step, I’m choosing the already created security group – “Security-Swift”.
Launch the machine.
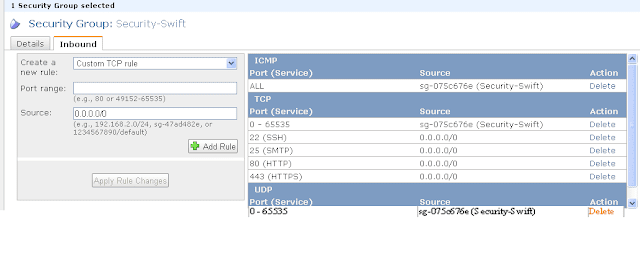
You will need to edit the security group. We want to allow all traffic to flow between machines in this security group without any interference. For the external world, we want SSH, SMTP, HTTP and HTTPS traffic to come in.
Now log into the machine. If you don’t know how to do this, take a look at this article: http://clouddb.info/2009/05/17/a-quick-overview-of-putty-and-ssh-for-aws-newbies/. Make sure you log in as “bitnami” not “ubuntu”. Ignore the putty security alert that shows up the first time you log in.
Let’s now install the common packages required for all swift nodes including the proxy node (the Diablo instructions on OpenStack site ask us to use ppa:swift-core/ppa. That doesn't seem to install the right version):
Here’s the info about my Swift version. If you have a different version, mileage may vary i.e. you may have to modify some instructions. Good luck.
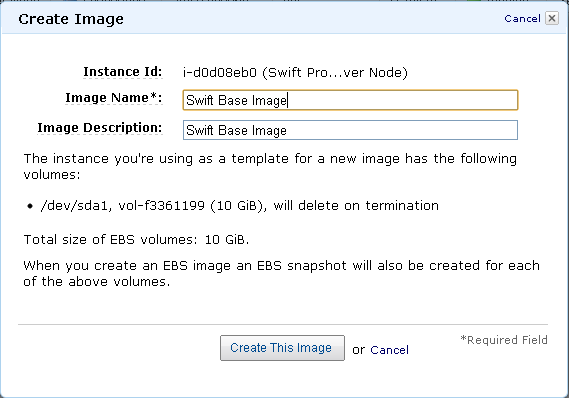
Now let’s save this image – this will be the image we’ll use to create the 5 storage nodes.
Proxy Server Setup
Now we’re ready to create the Proxy Node. We can continue to use the machine we are working on. First we need to install the software. I used swauth for my Auth server. Use instructions from: http://gholt.github.com/swauth/ for
swauth.
Let's create the SSL certificate.
Use ifconfig to get the IP address. Run these steps. Replace my IP address with yours.
Create the rings. We will hold off on the ring building exercise & starting services until after we create storage nodes. Also, in reality we should tune these below parameters, for right now I just want to get swift up & running so we’ll go with the ones
recommended in the OpenStack documentation.
Storage Nodes Setup
Now we’ll create 5 storage nodes.
Launch 5 instances of the Swift Base AMI – they are named as following. Please pick the same availability zone as the proxy node. Not sure if other zones will work, but just to be safe, I picked the same, in my case us-east-1a. Make sure the security
zone is the same also otherwise traffic won’t flow back & forth between the nodes.
Swift Storage Node 1
Swift Storage Node 2
Swift Storage Node 3
Swift Storage Node 4
Swift Storage Node 5
It is useful to write down all the IP addresses. In my case:
Proxy: 10.113.35.108
Storage1: 10.244.219.203
Storage2: 10.87.217.13
Storage3: 10.116.136.4
Storage4: 10.4.119.216
Storage5: 10.55.89.161
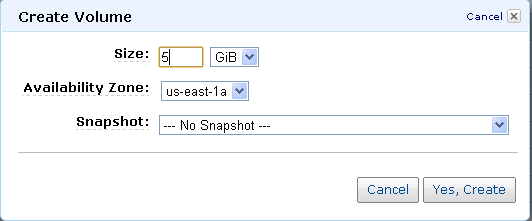
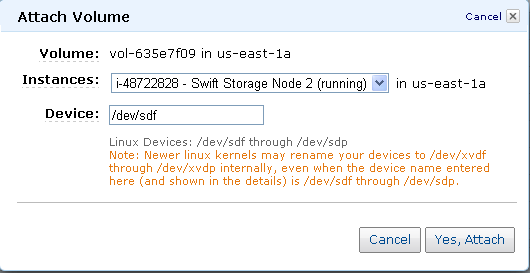
Create 5 EBS volumes (under Elastic Block Store -> Volumes); connect each one to a successive storage server. Here’s how you “Create Volume”. Pay attention to the Availability Zone (needs to be the same as storage node instances). You can pick whatever
size you want. I picked 5GB.
Here’s how you “Attach Volumes”: Right click on the volume -> Attach Volume. Use /dev/sdf.
Set up the first storage node
Follow steps 3-8 of http://docs.openstack.org/diablo/openstack-object-storage/admin/content/installing-and-configuring-storage-nodes.html
Hold off on starting services on storage nodes
Repeat steps 24 & 25 for all the other 4 storage nodes
Start Services
Now go back to proxy node. Create the following shell script buildrings.sh in /etc/swift. Replace IP addresses specific to your storage nodes. You should be able to reuse everything else as is.
Make buildrings.sh executable and run it. Now continue with ring building exercise.
cut & paste swift.pem (or whatever your key is with which you created all the swift storage nodes is) onto the proxy server; change permissions of that file to read-only for you (sudo chmod 600 swift.pem).
Now scp the ring files to all the storage nodes.
Next, log into each storage node one by one and run these commands. The swift-init will give 2 errors as shown below. That's OK. The other services though should start.
Result:
The storage nodes are up & running! Now we go back to the proxy node. Shut down Apache. Otherwise it will interfere with the proxy server. Don’t ask me how long it took me to figure this out. I still don't know how to uninstall apache on this bitnami image.
If anybody knows how to do this, pls. let me know.
Finally start proxy server!
Let’s first create some credentials.
The following steps are performed on clients. These clients are computers other than the 6 swift nodes, and they connect to the swift cluster.
Windows Client connecting to Swift
First we start with a windows client. You may use equivalent instructions for a MAC or skip this section to go directly to the Linux client below.
Install Cyberduck on your Windows client. Go to http://cyberduck.ch/changelog/. Install version 4.0.2 (8601) Mar-25-2011. Apparently later versions do not work with swauth. Took me a while to
figure this out.
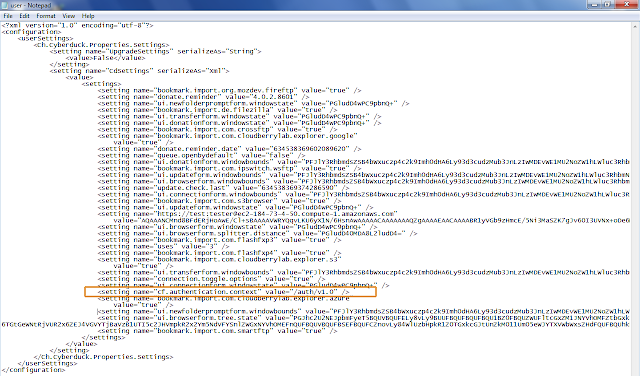
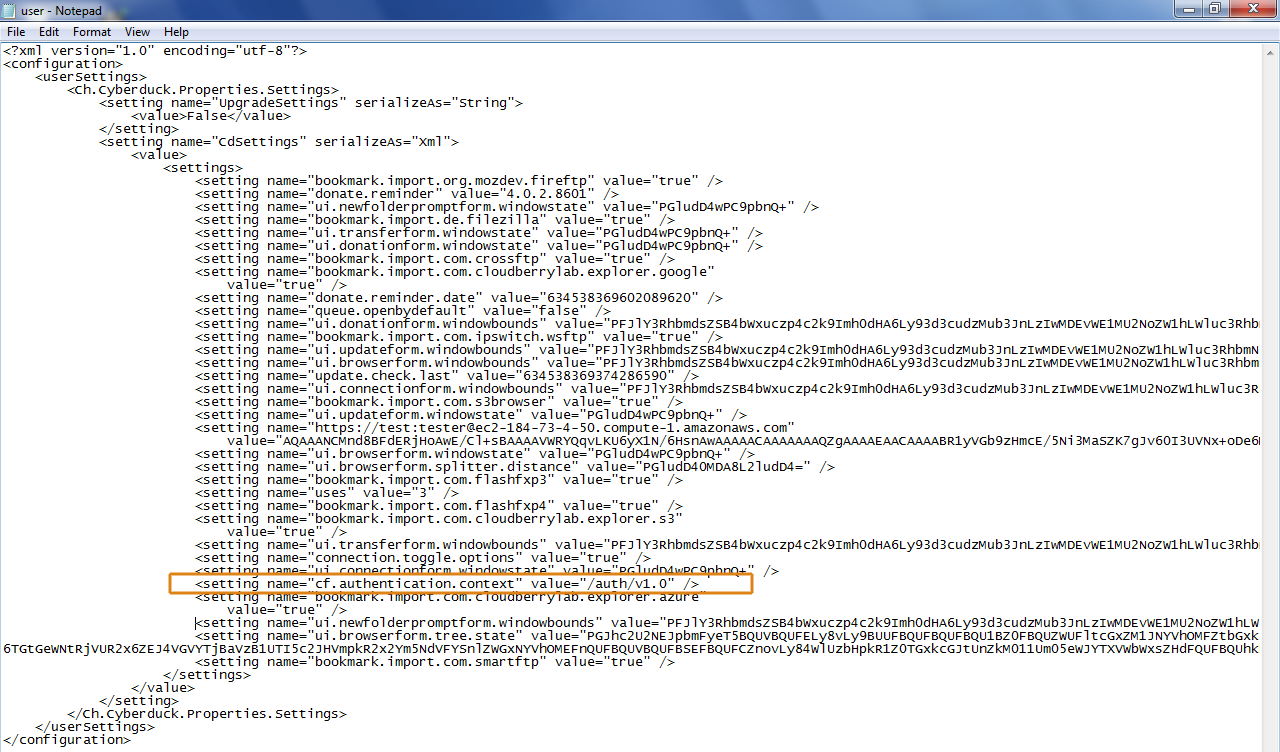
On windows client go to C:\Users\<user>\AppData\Roaming\Cyberduck\Cyberduck.exe_Url_y3p2ebapuyakx1wepw5uc1dcj54dho4b\4.0.2.8601\user.config.
Please note that AppData is a hidden directory. I am not sure if the directories will be named exactly the same but you get the idea.
Insert the line “<setting name="cf.authentication.context" value="/auth/v1.0" />” as you can see below.
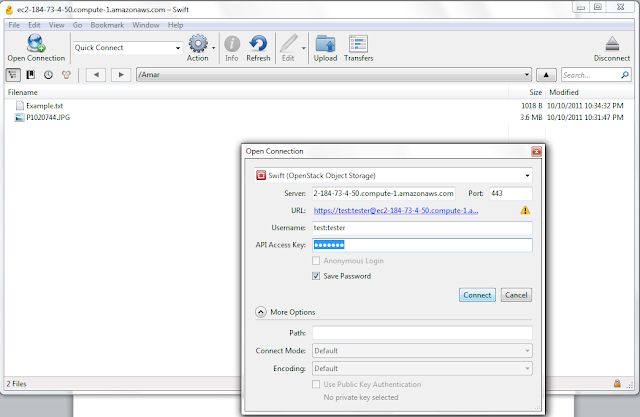
Launch Cyberduck, and then click the New Connection toolbar button or choose File > Open Connection. Select Swift (OpenStack Object Storage). Types in the credentials as follows, please replace the URL with the URL of your proxy server.
[u]
[/u]
In the Action menu, choose New Folder and name the folder. I named it "Amar".
Upload/ Download as you see fit. I uploaded two files as you can see.
Linux Client Connecting to Swift
Go to a Linux client. This is separate from the 6 swift nodes. I hope you have an ubuntu client. I do, so I installed the basic swift packages:
sudo apt-get install python-software-properties
sudo add-apt-repository ppa:swift-core/ppa
sudo apt-get update
sudo apt-get install swift openssh-server
Let’s connect to our swift cluster. Pls. replace the URL with the URL of your proxy server. The email id you see in the certificate is fake. If you send me an email there it will bounce.
akapadia@ubuntu:~$ curl -k -v -H 'X-Storage-User: test:tester' -H 'X-Storage-Pass: testing' https://ec2-184-73-4-50.compute-1.amazonaws.com/auth/v1.0 * About to connect() to ec2-184-73-4-50.compute-1.amazonaws.com port 443 (#0)
* Trying 184.73.4.50... connected
* Connected to ec2-184-73-4-50.compute-1.amazonaws.com (184.73.4.50) port 443 (#0)
* successfully set certificate verify locations:
* CAfile: none
CApath: /etc/ssl/certs
* SSLv3, TLS handshake, Client hello (1):
* SSLv3, TLS handshake, Server hello (2):
* SSLv3, TLS handshake, CERT (11):
* SSLv3, TLS handshake, Server finished (14):
* SSLv3, TLS handshake, Client key exchange (16):
* SSLv3, TLS change cipher, Client hello (1):
* SSLv3, TLS handshake, Finished (20):
* SSLv3, TLS change cipher, Client hello (1):
* SSLv3, TLS handshake, Finished (20):
* SSL connection using AES256-SHA
* Server certificate:
* subject: C=US; ST=CA; L=San Jose; O=Amar Kapadia; OU=Swift; CN=Amar Kapadia; emailAddress=Amar.Kapadia@hotmail.com
* start date: 2011-10-09 01:08:50 GMT
* expire date: 2011-11-08 01:08:50 GMT
* common name: Amar Kapadia (does not match 'ec2-184-73-4-50.compute-1.amazonaws.com')
* issuer: C=US; ST=CA; L=San Jose; O=Amar Kapadia; OU=Swift; CN=Amar Kapadia; emailAddress=Amar.Kapadia@hotmail.com
* SSL certificate verify result: self signed certificate (18), continuing anyway.
> GET /auth/v1.0 HTTP/1.1
> User-Agent: curl/7.19.7 (i486-pc-linux-gnu) libcurl/7.19.7 OpenSSL/0.9.8k zlib/1.2.3.3 libidn/1.15
> Host: ec2-184-73-4-50.compute-1.amazonaws.com
> Accept: */*
> X-Storage-User: test:tester
> X-Storage-Pass: testing
>
< HTTP/1.1 200 OK
< X-Storage-Url: https://ec2-184-73-4-50.compute-1.amazonaws.com:443/v1/AUTH_68d78d77-8977-44d3-94eb-b9f60769e8fb
< X-Storage-Token: AUTH_tk7199880262424eee8983984735f5d627
< X-Auth-Token: AUTH_tk7199880262424eee8983984735f5d627
< Content-Length: 156
< Date: Tue, 11 Oct 2011 06:07:27 GMT
<
* Connection #0 to host ec2-184-73-4-50.compute-1.amazonaws.com left intact
* Closing connection #0
* SSLv3, TLS alert, Client hello (1):
{"storage": {"cluster_name": "https://ec2-184-73-4-50.compute-1.amazonaws.com:443/v1/AUTH_68d78d77-8977-44d3-94eb-b9f60769e8fb", "default": "cluster_name"}}akap
Use the tokens from the result of the previous command for the next step.
akapadia@ubuntu:~$ curl -k -v -H 'X-Auth-Token: AUTH_tk7199880262424eee8983984735f5d627' https://ec2-184-73-4-50.compute-1.amazonaws.com:443/v1/AUTH_68d78d77-8977-44d3-94eb-b9f60769e8fb * About to connect() to ec2-184-73-4-50.compute-1.amazonaws.com port 443 (#0)
* Trying 184.73.4.50... connected
* Connected to ec2-184-73-4-50.compute-1.amazonaws.com (184.73.4.50) port 443 (#0)
* successfully set certificate verify locations:
* CAfile: none
CApath: /etc/ssl/certs
* SSLv3, TLS handshake, Client hello (1):
* SSLv3, TLS handshake, Server hello (2):
* SSLv3, TLS handshake, CERT (11):
* SSLv3, TLS handshake, Server finished (14):
* SSLv3, TLS handshake, Client key exchange (16):
* SSLv3, TLS change cipher, Client hello (1):
* SSLv3, TLS handshake, Finished (20):
* SSLv3, TLS change cipher, Client hello (1):
* SSLv3, TLS handshake, Finished (20):
* SSL connection using AES256-SHA
* Server certificate:
* subject: C=US; ST=CA; L=San Jose; O=Amar Kapadia; OU=Swift; CN=Amar Kapadia; emailAddress=Amar.Kapadia@hotmail.com
* start date: 2011-10-09 01:08:50 GMT
* expire date: 2011-11-08 01:08:50 GMT
* common name: Amar Kapadia (does not match 'ec2-184-73-4-50.compute-1.amazonaws.com')
* issuer: C=US; ST=CA; L=San Jose; O=Amar Kapadia; OU=Swift; CN=Amar Kapadia; emailAddress=Amar.Kapadia@hotmail.com
* SSL certificate verify result: self signed certificate (18), continuing anyway.
> GET /v1/AUTH_68d78d77-8977-44d3-94eb-b9f60769e8fb HTTP/1.1
> User-Agent: curl/7.19.7 (i486-pc-linux-gnu) libcurl/7.19.7 OpenSSL/0.9.8k zlib/1.2.3.3 libidn/1.15
> Host: ec2-184-73-4-50.compute-1.amazonaws.com
> Accept: */*
> X-Auth-Token: AUTH_tk7199880262424eee8983984735f5d627
>
< HTTP/1.1 200 OK
< X-Account-Object-Count: 2
< X-Account-Bytes-Used: 3820214
< X-Account-Container-Count: 1
< Accept-Ranges: bytes
< Content-Length: 5
< Content-Type: text/plain; charset=utf8
< Date: Tue, 11 Oct 2011 06:08:38 GMT
<
Amar
* Connection #0 to host ec2-184-73-4-50.compute-1.amazonaws.com left intact
* Closing connection #0
* SSLv3, TLS alert, Client hello (1):
So far so good. Let’s use the swift utility to interact with our swift cluster. First connect; since we already created some stuff using Cyberduck, we get the following results. Remember to replace the URL with your URL in all these steps.
akapadia@ubuntu:~$ swift -A https://ec2-184-73-4-50.compute-1.amazonaws.com/auth/v1.0 -U test:tester -K testing stat
Account: AUTH_68d78d77-8977-44d3-94eb-b9f60769e8fb
Containers: 1
Objects: 2
Bytes: 3820214
Accept-Ranges: bytes
Get a list of containers
akapadia@ubuntu:~$ swift -A https://ec2-184-73-4-50.compute-1.amazonaws.com/auth/v1.0 -U test:tester -K testing list
Amar
Get a list of objects in the container “Amar”
akapadia@ubuntu:~$ swift -A https://ec2-184-73-4-50.compute-1.amazonaws.com/auth/v1.0 -U test:tester -K testing list Amar
Example.txt
P1020744.JPG
Create a new container "myfiles" and upload a new file "anotherexample.txt"
akapadia@ubuntu:~$ swift -A https://ec2-184-73-4-50.compute-1.amazonaws.com/auth/v1.0 -U test:tester -K testing upload myfiles anotherexample.txt
anotherexample.txt
List objects in the new container "myfiles"
akapadia@ubuntu:~$ swift -A https://ec2-184-73-4-50.compute-1.amazonaws.com/auth/v1.0 -U test:tester -K testing list myfiles
anotherexample.txt
Download files that we uploaded with Cyberduck
akapadia@ubuntu:~$ swift -A https://ec2-184-73-4-50.compute-1.amazonaws.com/auth/v1.0 -U test:tester -K testing download Amar
Example.txt
P1020744.JPG
Mac Client Connecting to Swift
Download Cyberduck
Make the following changes
cd /Applications/Utilities
defaults write ch.sudo.cyberduck "cf.authentication.context" "/auth/v1.0"
DISCLAIMER: The views expressed here are my own and don't necessarily represent my employer Emulex's positions, strategies or opinions.If you want to build your own Amazon S3 like storage (private or public cloud storage), there’s really only one open-source choice – OpenStack Swift (there are other technologies worth watching e.g. CEPH, but I believe Swift is the only one ready for production environments). I decided to test drive it.I implemented a 6 node Swift cluster on Amazon EC2 (because I don’t own 6 servers). This blog walks through the process. We can discuss the attributes of object stores, the pros & cons of Swift and other advanced topics in subsequent blogs; this one talks about the basic install process. The exercise is quite instructive and gives a really good feel for how Swift is built and how it works. These instructions assume some basic Linux knowledge.Here is a diagram of the cluster created:

I generally followed instructions from a mix of these two sources:http://swift.openstack.org/howto_installmultinode.htmlhttp://docs.openstack.org/diablo/openstack-object-storage/admin/content/There are five broad sections of this blog:i. Initial EC2 setup (steps 1-15)ii. Auth + proxy server setup (steps 16-19)iii. Storage Node setup (steps 20-27)iv. Start services (steps 28-35)v. Connect to the cluster from external Windows & Linux clients (steps 36-52)By the way, the Amazon costs come up to roughly $3 per day for this experiment.Initial EC2 Setup Get an AWS account (if you don't already have one) and log into EC2
Click on “Launch instance”

I chose a community AMI “ami-02fb006b” which is Ubuntu 10.04 by bitnami. It is 64-bit which is nice. Also it is eligible for the “free tier”, handy if you want to do this on the cheap.

I am showing these steps once in case you are new to EC2. In this step, we basically pick defaults. In this particular step we are saying “No Preference” for the Availability Zone, but later on we will actually specify the zone.

Defaults on the next screen too.

I eventually want this to be the Swift Proxy Server (even though part-way through we will save the image as a base image for the storage nodes). Let’s name it to reflect this.

Pick a new key pair or an existing one. This is a private key, don’t share it with anyone. Use this for all the nodes. I created one called Swift.pem and then used it for all my swift nodes.

Create a new security group. I already created one, so in this step, I’m choosing the already created security group – “Security-Swift”.

Launch the machine.
You will need to edit the security group. We want to allow all traffic to flow between machines in this security group without any interference. For the external world, we want SSH, SMTP, HTTP and HTTPS traffic to come in.

Now log into the machine. If you don’t know how to do this, take a look at this article: http://clouddb.info/2009/05/17/a-quick-overview-of-putty-and-ssh-for-aws-newbies/. Make sure you log in as “bitnami” not “ubuntu”. Ignore the putty security alert that shows up the first time you log in.
Let’s now install the common packages required for all swift nodes including the proxy node (the Diablo instructions on OpenStack site ask us to use ppa:swift-core/ppa. That doesn't seem to install the right version):
sudo apt-get install python-software-propertiessudo add-apt-repository ppa:swift-core/releasesudo apt-get updatesudo apt-get install swift openssh-server
sudo mkdir -p /etc/swiftsudo chown -R swift:swift /etc/swift/sudo od -t x8 -N 8 -A n </dev/randomCreate /etc/swift/swift.conf (make sure you use sudo)with the following: [swift-hash] # random unique string that can never change (DO NOT LOSE) swift_hash_path_suffix = <RESULTS FROM ABOVE od COMMAND>
Here’s the info about my Swift version. If you have a different version, mileage may vary i.e. you may have to modify some instructions. Good luck.
bitnami@ip-10-113-35-108:/etc/swift$ sudo apt-cache showpkg swiftPackage: swiftVersions: 1.4.3-0ubuntu1~lucid1~ppa1 (/var/lib/apt/lists/ppa.launchpad.net_swift-core_release_ubuntu_dists_lucid_main_binary-amd64_Packages) (/var/lib/dpkg/status) Description Language: File: /var/lib/apt/lists/ppa.launchpad.net_swift-core_release_ubuntu_dists_lucid_main_binary-amd64_Packages MD5: 7de15bde951264e5f9603202d2a74a72 1.2.0-0ubuntu1~lucid0 (/var/lib/apt/lists/ppa.launchpad.net_swift-core_ppa_ubuntu_dists_lucid_main_binary-amd64_Packages) Description Language: File: /var/lib/apt/lists/ppa.launchpad.net_swift-core_ppa_ubuntu_dists_lucid_main_binary-amd64_Packages MD5: e0952832fac69c95c1164bcfbafe5f46 Reverse Depends: Dependencies: 1.4.3-0ubuntu1~lucid1~ppa1 - python-swift (5 1.4.3-0ubuntu1~lucid1~ppa1) python ( (null)) 1.2.0-0ubuntu1~lucid0 - python-swift (5 1.2.0-0ubuntu1~lucid0) python (2 2.6) Provides: 1.4.3-0ubuntu1~lucid1~ppa1 - 1.2.0-0ubuntu1~lucid0 - Reverse Provides:
bitnami@ip-10-113-35-108:/etc/swift$ sudo dpkg -l swiftDesired=Unknown/Install/Remove/Purge/Hold| Status=Not/Inst/Cfg-files/Unpacked/Failed-cfg/Half-inst/trig-aWait/Trig-pend|/ Err?=(none)/Reinst-required (Status,Err: uppercase=bad)||/ Name Version Description+++-=================================-=================================-========================================================================ii swift 1.4.3-0ubuntu1~lucid1~ppa1 distributed virtual object store - common files================
Now let’s save this image – this will be the image we’ll use to create the 5 storage nodes.

Proxy Server Setup
Now we’re ready to create the Proxy Node. We can continue to use the machine we are working on. First we need to install the software. I used swauth for my Auth server. Use instructions from: http://gholt.github.com/swauth/ for
swauth.
sudo apt-get install swift-proxy memcachedCreate /etc/apt/sources.list.d/swauth.list with the following: deb http://gholt.github.com/swauth/lucid lucid mainsudo apt-get updatesudo apt-get install python-swauth swauth-doc
Let's create the SSL certificate.
cd /etc/swiftsudo openssl req -new -x509 -nodes -out cert.crt -keyout cert.key
Use ifconfig to get the IP address. Run these steps. Replace my IP address with yours.
sudo export PROXY_LOCAL_NET_IP=10.113.35.108sudo perl -pi -e "s/-l 127.0.0.1/-l $PROXY_LOCAL_NET_IP/" /etc/memcached.confsudo service memcached restart
Create /etc/swift/proxy-server.conf with the following. Replace the URL & IP address with your specifics. [DEFAULT]bind_port = 443cert_file = /etc/swift/cert.crtkey_file = /etc/swift/cert.keyworkers = 8user = swift [pipeline:main]pipeline = healthcheck cache swauth proxy-server [app:proxy-server]use = egg:swift#proxyallow_account_management = true [filter:swauth]use = egg:swauth#swauthset log_name = swauthsuper_admin_key = swauthkeydefault_swift_cluster = cluster_name#https://ec2-184-73-4-50.compute-1.amazonaws.com:443/v1#https://127.0.0.1:443/v1 [filter:healthcheck]use = egg:swift#healthcheck [filter:cache]use = egg:swift#memcachememcache_servers = 10.113.35.108:11211
Create the rings. We will hold off on the ring building exercise & starting services until after we create storage nodes. Also, in reality we should tune these below parameters, for right now I just want to get swift up & running so we’ll go with the ones
recommended in the OpenStack documentation.
cd /etc/swiftsudo swift-ring-builder account.builder create 18 3 1sudo swift-ring-builder container.builder create 18 3 1sudo swift-ring-builder object.builder create 18 3 1
Storage Nodes Setup
Now we’ll create 5 storage nodes.
Launch 5 instances of the Swift Base AMI – they are named as following. Please pick the same availability zone as the proxy node. Not sure if other zones will work, but just to be safe, I picked the same, in my case us-east-1a. Make sure the security
zone is the same also otherwise traffic won’t flow back & forth between the nodes.
Swift Storage Node 1
Swift Storage Node 2
Swift Storage Node 3
Swift Storage Node 4
Swift Storage Node 5
It is useful to write down all the IP addresses. In my case:
Proxy: 10.113.35.108
Storage1: 10.244.219.203
Storage2: 10.87.217.13
Storage3: 10.116.136.4
Storage4: 10.4.119.216
Storage5: 10.55.89.161
Create 5 EBS volumes (under Elastic Block Store -> Volumes); connect each one to a successive storage server. Here’s how you “Create Volume”. Pay attention to the Availability Zone (needs to be the same as storage node instances). You can pick whatever
size you want. I picked 5GB.

Here’s how you “Attach Volumes”: Right click on the volume -> Attach Volume. Use /dev/sdf.

Set up the first storage node
sudo apt-get install swift-account swift-container swift-object xfsprogssudo fdisk /dev/sdf (set up a single partition by typing the following commands)np1EnterEnterw sudo mkfs.xfs -i size=1024 /dev/sdf1Append /etc/fstab with the following: /dev/sdf1 /srv/node/sdf1 xfs noatime,nodiratime,nobarrier,logbufs=8 0 0 sudo mkdir -p /srv/node/sdf1sudo mount /srv/node/sdf1sudo chown -R swift:swift /srv/node
Follow steps 3-8 of http://docs.openstack.org/diablo/openstack-object-storage/admin/content/installing-and-configuring-storage-nodes.html
Hold off on starting services on storage nodes
Repeat steps 24 & 25 for all the other 4 storage nodes
Start Services
Now go back to proxy node. Create the following shell script buildrings.sh in /etc/swift. Replace IP addresses specific to your storage nodes. You should be able to reuse everything else as is.
#!/bin/shexport ZONE=1 # set the zone number for that storage deviceexport STORAGE_LOCAL_NET_IP=10.244.219.203 # and the IP addressexport WEIGHT=100 # relative weight (higher for bigger/faster disks)export DEVICE=sdf1sudo swift-ring-builder account.builder add z$ZONE-$STORAGE_LOCAL_NET_IP:6002/$DEVICE $WEIGHTsudo swift-ring-builder container.builder add z$ZONE-$STORAGE_LOCAL_NET_IP:6001/$DEVICE $WEIGHTsudo swift-ring-builder object.builder add z$ZONE-$STORAGE_LOCAL_NET_IP:6000/$DEVICE $WEIGHT export ZONE=2 # set the zone number for that storage deviceexport STORAGE_LOCAL_NET_IP=10.87.217.13 # and the IP addressexport WEIGHT=100 # relative weight (higher for bigger/faster disksexport DEVICE=sdf1sudo swift-ring-builder account.builder add z$ZONE-$STORAGE_LOCAL_NET_IP:6002/$DEVICE $WEIGHTsudo swift-ring-builder container.builder add z$ZONE-$STORAGE_LOCAL_NET_IP:6001/$DEVICE $WEIGHTsudo swift-ring-builder object.builder add z$ZONE-$STORAGE_LOCAL_NET_IP:6000/$DEVICE $WEIGHT export ZONE=3 # set the zone number for that storage deviceexport STORAGE_LOCAL_NET_IP=10.116.136.4 # and the IP addressexport WEIGHT=100 # relative weight (higher for bigger/faster disks)export DEVICE=sdf1sudo swift-ring-builder account.builder add z$ZONE-$STORAGE_LOCAL_NET_IP:6002/$DEVICE $WEIGHTsudo swift-ring-builder container.builder add z$ZONE-$STORAGE_LOCAL_NET_IP:6001/$DEVICE $WEIGHTsudo swift-ring-builder object.builder add z$ZONE-$STORAGE_LOCAL_NET_IP:6000/$DEVICE $WEIGHT export ZONE=4 # set the zone number for that storage deviceexport STORAGE_LOCAL_NET_IP=10.4.119.216 # and the IP addressexport WEIGHT=100 # relative weight (higher for bigger/faster disksexport DEVICE=sdf1sudo swift-ring-builder account.builder add z$ZONE-$STORAGE_LOCAL_NET_IP:6002/$DEVICE $WEIGHTsudo swift-ring-builder container.builder add z$ZONE-$STORAGE_LOCAL_NET_IP:6001/$DEVICE $WEIGHTsudo swift-ring-builder object.builder add z$ZONE-$STORAGE_LOCAL_NET_IP:6000/$DEVICE $WEIGHT export ZONE=5 # set the zone number for that storage deviceexport STORAGE_LOCAL_NET_IP=10.55.89.161 # and the IP addressexport WEIGHT=100 # relative weight (higher for bigger/faster disksexport DEVICE=sdf1sudo swift-ring-builder account.builder add z$ZONE-$STORAGE_LOCAL_NET_IP:6002/$DEVICE $WEIGHTsudo swift-ring-builder container.builder add z$ZONE-$STORAGE_LOCAL_NET_IP:6001/$DEVICE $WEIGHTsudo swift-ring-builder object.builder add z$ZONE-$STORAGE_LOCAL_NET_IP:6000/$DEVICE $WEIGHT
Make buildrings.sh executable and run it. Now continue with ring building exercise.
sudo swift-ring-builder account.buildersudo swift-ring-builder container.buildersudo swift-ring-builder object.builder
sudo swift-ring-builder account.builder rebalancesudo swift-ring-builder container.builder rebalancesudo swift-ring-builder object.builder rebalance
cut & paste swift.pem (or whatever your key is with which you created all the swift storage nodes is) onto the proxy server; change permissions of that file to read-only for you (sudo chmod 600 swift.pem).
Now scp the ring files to all the storage nodes.
scp -i swift.pem /etc/swift/*.gz bitnami@10.244.219.203:~scp -i swift.pem /etc/swift/*.gz bitnami@10.87.217.13:~scp -i swift.pem /etc/swift/*.gz bitnami@10.116.136.4:~scp -i swift.pem /etc/swift/*.gz bitnami@10.4.119.216:~scp -i swift.pem /etc/swift/*.gz bitnami@10.55.89.161:~
Next, log into each storage node one by one and run these commands. The swift-init will give 2 errors as shown below. That's OK. The other services though should start.
cdsudo mv *.gz /etc/swiftcd /etc/swiftsudo chown -R swift:swift /etc/swiftsudo swift-init all start
Result:
Starting account-auditorStarting account-serverStarting container-auditorStarting container-replicatorStarting container-serverStarting container-updaterStarting object-auditorStarting object-serverStarting object-replicatorStarting object-updaterUnable to locate config file for proxy-server. /etc/swift/proxy-server.conf does not exist?Starting account-replicatorUnable to locate config file for auth-server. /etc/swift/auth-server.conf does not exist?Starting account-reaper
The storage nodes are up & running! Now we go back to the proxy node. Shut down Apache. Otherwise it will interfere with the proxy server. Don’t ask me how long it took me to figure this out. I still don't know how to uninstall apache on this bitnami image.
If anybody knows how to do this, pls. let me know.
cd /opt/bitnami/apache2/binsudo apachectl stop
Finally start proxy server!
sudo chown -R swift:swift /etc/swiftsudo swift-init proxy start
Let’s first create some credentials.
sudo swauth-prep -K swauthkey -A https://127.0.0.1/auth/ sudo swauth-add-user -K swauthkey -A https://127.0.0.1/auth/ -a test tester testing
The following steps are performed on clients. These clients are computers other than the 6 swift nodes, and they connect to the swift cluster.
Windows Client connecting to Swift
First we start with a windows client. You may use equivalent instructions for a MAC or skip this section to go directly to the Linux client below.
Install Cyberduck on your Windows client. Go to http://cyberduck.ch/changelog/. Install version 4.0.2 (8601) Mar-25-2011. Apparently later versions do not work with swauth. Took me a while to
figure this out.
On windows client go to C:\Users\<user>\AppData\Roaming\Cyberduck\Cyberduck.exe_Url_y3p2ebapuyakx1wepw5uc1dcj54dho4b\4.0.2.8601\user.config.
Please note that AppData is a hidden directory. I am not sure if the directories will be named exactly the same but you get the idea.
Insert the line “<setting name="cf.authentication.context" value="/auth/v1.0" />” as you can see below.
Launch Cyberduck, and then click the New Connection toolbar button or choose File > Open Connection. Select Swift (OpenStack Object Storage). Types in the credentials as follows, please replace the URL with the URL of your proxy server.
[u]

[/u]
In the Action menu, choose New Folder and name the folder. I named it "Amar".
Upload/ Download as you see fit. I uploaded two files as you can see.
Linux Client Connecting to Swift
Go to a Linux client. This is separate from the 6 swift nodes. I hope you have an ubuntu client. I do, so I installed the basic swift packages:
sudo apt-get install python-software-properties
sudo add-apt-repository ppa:swift-core/ppa
sudo apt-get update
sudo apt-get install swift openssh-server
Let’s connect to our swift cluster. Pls. replace the URL with the URL of your proxy server. The email id you see in the certificate is fake. If you send me an email there it will bounce.
akapadia@ubuntu:~$ curl -k -v -H 'X-Storage-User: test:tester' -H 'X-Storage-Pass: testing' https://ec2-184-73-4-50.compute-1.amazonaws.com/auth/v1.0 * About to connect() to ec2-184-73-4-50.compute-1.amazonaws.com port 443 (#0)
* Trying 184.73.4.50... connected
* Connected to ec2-184-73-4-50.compute-1.amazonaws.com (184.73.4.50) port 443 (#0)
* successfully set certificate verify locations:
* CAfile: none
CApath: /etc/ssl/certs
* SSLv3, TLS handshake, Client hello (1):
* SSLv3, TLS handshake, Server hello (2):
* SSLv3, TLS handshake, CERT (11):
* SSLv3, TLS handshake, Server finished (14):
* SSLv3, TLS handshake, Client key exchange (16):
* SSLv3, TLS change cipher, Client hello (1):
* SSLv3, TLS handshake, Finished (20):
* SSLv3, TLS change cipher, Client hello (1):
* SSLv3, TLS handshake, Finished (20):
* SSL connection using AES256-SHA
* Server certificate:
* subject: C=US; ST=CA; L=San Jose; O=Amar Kapadia; OU=Swift; CN=Amar Kapadia; emailAddress=Amar.Kapadia@hotmail.com
* start date: 2011-10-09 01:08:50 GMT
* expire date: 2011-11-08 01:08:50 GMT
* common name: Amar Kapadia (does not match 'ec2-184-73-4-50.compute-1.amazonaws.com')
* issuer: C=US; ST=CA; L=San Jose; O=Amar Kapadia; OU=Swift; CN=Amar Kapadia; emailAddress=Amar.Kapadia@hotmail.com
* SSL certificate verify result: self signed certificate (18), continuing anyway.
> GET /auth/v1.0 HTTP/1.1
> User-Agent: curl/7.19.7 (i486-pc-linux-gnu) libcurl/7.19.7 OpenSSL/0.9.8k zlib/1.2.3.3 libidn/1.15
> Host: ec2-184-73-4-50.compute-1.amazonaws.com
> Accept: */*
> X-Storage-User: test:tester
> X-Storage-Pass: testing
>
< HTTP/1.1 200 OK
< X-Storage-Url: https://ec2-184-73-4-50.compute-1.amazonaws.com:443/v1/AUTH_68d78d77-8977-44d3-94eb-b9f60769e8fb
< X-Storage-Token: AUTH_tk7199880262424eee8983984735f5d627
< X-Auth-Token: AUTH_tk7199880262424eee8983984735f5d627
< Content-Length: 156
< Date: Tue, 11 Oct 2011 06:07:27 GMT
<
* Connection #0 to host ec2-184-73-4-50.compute-1.amazonaws.com left intact
* Closing connection #0
* SSLv3, TLS alert, Client hello (1):
{"storage": {"cluster_name": "https://ec2-184-73-4-50.compute-1.amazonaws.com:443/v1/AUTH_68d78d77-8977-44d3-94eb-b9f60769e8fb", "default": "cluster_name"}}akap
Use the tokens from the result of the previous command for the next step.
akapadia@ubuntu:~$ curl -k -v -H 'X-Auth-Token: AUTH_tk7199880262424eee8983984735f5d627' https://ec2-184-73-4-50.compute-1.amazonaws.com:443/v1/AUTH_68d78d77-8977-44d3-94eb-b9f60769e8fb * About to connect() to ec2-184-73-4-50.compute-1.amazonaws.com port 443 (#0)
* Trying 184.73.4.50... connected
* Connected to ec2-184-73-4-50.compute-1.amazonaws.com (184.73.4.50) port 443 (#0)
* successfully set certificate verify locations:
* CAfile: none
CApath: /etc/ssl/certs
* SSLv3, TLS handshake, Client hello (1):
* SSLv3, TLS handshake, Server hello (2):
* SSLv3, TLS handshake, CERT (11):
* SSLv3, TLS handshake, Server finished (14):
* SSLv3, TLS handshake, Client key exchange (16):
* SSLv3, TLS change cipher, Client hello (1):
* SSLv3, TLS handshake, Finished (20):
* SSLv3, TLS change cipher, Client hello (1):
* SSLv3, TLS handshake, Finished (20):
* SSL connection using AES256-SHA
* Server certificate:
* subject: C=US; ST=CA; L=San Jose; O=Amar Kapadia; OU=Swift; CN=Amar Kapadia; emailAddress=Amar.Kapadia@hotmail.com
* start date: 2011-10-09 01:08:50 GMT
* expire date: 2011-11-08 01:08:50 GMT
* common name: Amar Kapadia (does not match 'ec2-184-73-4-50.compute-1.amazonaws.com')
* issuer: C=US; ST=CA; L=San Jose; O=Amar Kapadia; OU=Swift; CN=Amar Kapadia; emailAddress=Amar.Kapadia@hotmail.com
* SSL certificate verify result: self signed certificate (18), continuing anyway.
> GET /v1/AUTH_68d78d77-8977-44d3-94eb-b9f60769e8fb HTTP/1.1
> User-Agent: curl/7.19.7 (i486-pc-linux-gnu) libcurl/7.19.7 OpenSSL/0.9.8k zlib/1.2.3.3 libidn/1.15
> Host: ec2-184-73-4-50.compute-1.amazonaws.com
> Accept: */*
> X-Auth-Token: AUTH_tk7199880262424eee8983984735f5d627
>
< HTTP/1.1 200 OK
< X-Account-Object-Count: 2
< X-Account-Bytes-Used: 3820214
< X-Account-Container-Count: 1
< Accept-Ranges: bytes
< Content-Length: 5
< Content-Type: text/plain; charset=utf8
< Date: Tue, 11 Oct 2011 06:08:38 GMT
<
Amar
* Connection #0 to host ec2-184-73-4-50.compute-1.amazonaws.com left intact
* Closing connection #0
* SSLv3, TLS alert, Client hello (1):
So far so good. Let’s use the swift utility to interact with our swift cluster. First connect; since we already created some stuff using Cyberduck, we get the following results. Remember to replace the URL with your URL in all these steps.
akapadia@ubuntu:~$ swift -A https://ec2-184-73-4-50.compute-1.amazonaws.com/auth/v1.0 -U test:tester -K testing stat
Account: AUTH_68d78d77-8977-44d3-94eb-b9f60769e8fb
Containers: 1
Objects: 2
Bytes: 3820214
Accept-Ranges: bytes
Get a list of containers
akapadia@ubuntu:~$ swift -A https://ec2-184-73-4-50.compute-1.amazonaws.com/auth/v1.0 -U test:tester -K testing list
Amar
Get a list of objects in the container “Amar”
akapadia@ubuntu:~$ swift -A https://ec2-184-73-4-50.compute-1.amazonaws.com/auth/v1.0 -U test:tester -K testing list Amar
Example.txt
P1020744.JPG
Create a new container "myfiles" and upload a new file "anotherexample.txt"
akapadia@ubuntu:~$ swift -A https://ec2-184-73-4-50.compute-1.amazonaws.com/auth/v1.0 -U test:tester -K testing upload myfiles anotherexample.txt
anotherexample.txt
List objects in the new container "myfiles"
akapadia@ubuntu:~$ swift -A https://ec2-184-73-4-50.compute-1.amazonaws.com/auth/v1.0 -U test:tester -K testing list myfiles
anotherexample.txt
Download files that we uploaded with Cyberduck
akapadia@ubuntu:~$ swift -A https://ec2-184-73-4-50.compute-1.amazonaws.com/auth/v1.0 -U test:tester -K testing download Amar
Example.txt
P1020744.JPG
Mac Client Connecting to Swift
Download Cyberduck
Make the following changes
cd /Applications/Utilities
defaults write ch.sudo.cyberduck "cf.authentication.context" "/auth/v1.0"

相关文章推荐
- Build Cloud Storage: S3 APIs on OpenStack Swift
- 在ubuntu上安装openstack的swift组件-installing openstack object storage
- Experience installing Hbase 0.20.0 Cluster on Ubuntu 9.04 and EC2
- Implementing OpenStack Cinder with NetApp Storage on the Rackspace Private Cloud Software
- Quota Project: An effective way to manage the usage of your Swift-based storage cloud
- Installing OwnCloud 9 on Debian 8
- Installing Kubernetes Cluster with 3 minions on CentOS 7 to manage pods and services
- Swift Compiler Error Arithmetic operation '** ' (on type '**') results in an overflow (溢出运算符'&+')
- OpenStack Object Storage Developer Guide/Swift官方API文档 -- 翻译 (三)
- Installing Xen On An Ubuntu 8.04 (Hardy Heron) Server From The Ubuntu Repositories
- How to Build an High Availability MQTT Cluster for the Internet of Things
- An Information Representation, Storage And Processing System Based on Information Status
- [Ruby on Rails Issue] When Setting Sqlite version on the Gemfile, Show error "An error occurred while installing sqlite3 ",
- [转]How can I install the VS2017 version of msbuild on a build server without installing the IDE?
- openstack object storage(swift)
- OpenStack Object Storage(Swift)架构、原理及特性
- The role of an object storage system in the cloud
- Running an etcd cluster on localhost
- OpenStack Object Storage Developer Guide/Swift官方API文档 -- 翻译 (二)
- OpenStack Object Storage Developer Guide/Swift官方API文档 -- 翻译 (五)