自动生成MVC模式下的POJO类及hbm.xml文件
2012-02-21 17:17
316 查看
自动生成MVC模式下的POJO类及hbm.xml文件
一、引言
这个想法在我上学的时候就已经产生了,但是一直没有动手实现,前两天终于忍不住了,磨刀不误砍柴工嘛。传统的基于MVC模式开发信息系统的流程为:数据库表属性定义-->基于此表的POJO类-->基于此表的持久化层配置文件(如Hibernate需要编写hbm.xml文件);但是,POJO类文件和hbm.xml配置文件的大小依赖于表的属性多少。如果表的属性很多,我们就会非常烦躁(你需要不停地Ctrl+C,Ctrl+V)。这种重复的机械性的劳动不仅浪费时间而且还容易出错。其实,我们只需要简单写个小程序就能帮我们自动搞定POJO和hbm.xml,毕竟我们程序猿就是干这个的。下面我们就来看看一个简单的程序实现。
二、数据库表结构定义表
在前面的博客《数据库设计时的一张表格》中,我向大家介绍了在日常工作中用到的数据库设计时的一张表格,它可以帮助我们很好的定义表属性,又很容易进行后期维护。当我们完成了这样一张表格后,也即意味着我们完成了一张数据库表的设计。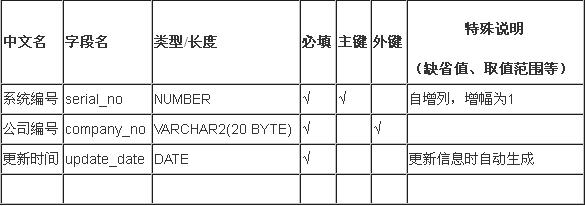
程序的基本思路是:有了上面这张表,我们可以轻松地将其前三列(不包括表头)拷贝到Excel中,然后利用POI读取此Excel中的数据,再利用Java文件操作自动生成POJO类和hbm.xml配置文件。
三、程序实现
0.引用及变量声明
import org.apache.poi.hssf.usermodel.HSSFWorkbook;
import org.apache.poi.poifs.filesystem.POIFSFileSystem;
import org.apache.poi.ss.usermodel.*;
import java.io.*;
import java.util.Date;

public static String classPath = <放置生成的POJO路径>;
public static String hbmPath = <放置生成的hbm路径>;
public static String excelPath = "D:\\test.xls";

public static String tableName = <数据库中对应的表名>;
public static String[] tableAttrs = new String[50]; //属性名数组
public static String[] tableAttrsType = new String[50]; //类型数组
public static String[] tableAttrsNotes = new String[50]; //注释数组
public static int length = 0; //用来存放此表中有多少属性
1.读取Excel文件方法
public void getTableAttr() throws Exception {
int i = 0; //用来记录共有多少属性

//声明一下输入流及Excel的Sheet对象
InputStream inp = new FileInputStream(excelPath);
HSSFWorkbook wb = new HSSFWorkbook(new POIFSFileSystem(inp));

Sheet sheet1 = wb.getSheetAt(0);
for (Row row : sheet1) {
//获取注释信息
Cell note = row.getCell(0);
//获取属性名称
Cell attr = row.getCell(1);
//获取属性对应的类型
Cell type = row.getCell(2);

//需要非空判断,否则会产生空指针异常
if( (note!=null) && (attr!=null) && (type!=null) &&
(!note.getRichStringCellValue().getString().isEmpty())&&
(note.getRichStringCellValue().getString()!=null)) {
tableAttrsNotes[i] = note.getRichStringCellValue().getString();
tableAttrs[i] = attr.getRichStringCellValue().getString();
tableAttrsType[i] = type.getRichStringCellValue().getString();

i++;
}
}
//关闭它,否则会有内存泄露
inp.close();
length = i; //将统计的属性赋给length
}
2.类型转换
由于定义数据库表属性的类型和程序中的类型可能不完全一致,需要我们进行转换,方法如下,大家可以根据自己的需要添加需要转换的类型:private void convertType() {
for(int i=0;i<tableAttrsType.length;i++){
if (tableAttrsType[i]!=null)
if (tableAttrsType[i].equals("NUMBER"))
tableAttrsType[i] = "Integer";
else if (tableAttrsType[i].equals("DATE"))
tableAttrsType[i] = "Date";
else if (tableAttrsType[i].startsWith("VARCHAR"))
tableAttrsType[i] = "String";
}
}3.属性的标准化处理
由于我们输入的属性并不是我们最终想要的属性,例如serial_no是数据库中的属性名,那么在程序中,我们需要的是serialNo这个字段。因此,我们需要提前做一些标准化的处理工作。/**
* 将单词首字母大写
* @param letter
* @return 转换后的单词
*/
private String firstLetterUpper(String letter){
return str.replaceFirst(str.substring(0,1),str.substring(0,1).toUpperCase());
}
/**
* 将属性从下划线拆成单词链接并将除第一个以外的单词首字母大写
* 例如:fund_id=>fundId
* @param str
* @return 转换后的单词
*/
public String standardization(String str){
String newStr = "";
String li[] = str.toLowerCase().split("_");
for(int i=0;i<li.length;i++){
if(i==0)
newStr = newStr.concat(li[i]);
else{
//首字母大写
String b = firstLetterUpper(li[i]);
newStr = newStr.concat(b);
}
}
return newStr;
}4.文件操作
除了属性的标准化处理外,我们还需要文件的操作--创建和写入。方法如下:public boolean createFile(String filePath,String fileName) throws IOException {
boolean result = false;
File file = new File(filePath,fileName);
if(file.exists()){
if(file.isFile()) {
result = true;
System.out.println("文件已存在!");
}else {
System.out.println("对不起,该路径为目录!");
}
} else{
file.createNewFile();
result = true;
System.out.println("文件创建成功!");
}
return result;
}
public void writeFile(String filePath,String fileName,String args) throws IOException {
FileWriter fw = new FileWriter(filePath+fileName,true);
fw.write(args);
fw.close();
}5.POJO生成方法
终于到了POJO生成方法了,其实很简单,我们只需要写入创建的文件即可:public void generatePOJO(){
try{
//创建类文件
String className = standardization(tableName);
String fileName = firstLetterUpper(className) + ".java";
createFile(classPath, fileName);
//head information
writeFile(classPath,fileName," import java.io.Serializable;\n "+
"import java.util.Date;\n\n" +
"public class "+ firstLetterUpper(className) + "implements Serializable"+
" {\n");
//循环声明此表的各个属性
for(int i=0;i<length;i++){
String temp = standardization(tableAttrs[i]);
writeFile(classPath,fileName,"private "+tableAttrsType[i]+ " "+ temp + "; "+
"//"+tableAttrsNotes[i]+"\n");
}
//循环生成各个属性的Setter和Getter方法
for(int i=0;i<length;i++){
String tem = standardization(tableAttrs[i]);
String temCon = "public "+tableAttrsType[i]+ " get"+firstLetterUpper(tem)+
"() {\n" +
" return "+tem+";\n" +
" }\n\n" +
" public void set"+firstLetterUpper(tem)+"("+tableAttrsType[i]+
" "+tem+") {\n" +
" this."+tem+" = "+tem+";\n" +
" }\n";
writeFile(classPath,fileName,temCon);
}
writeFile(classPath,fileName,"}\n");
}catch(Exception e){
System.out.print(e.toString());
}
}6.hbm.xml生成方法
同理我们可以很容易的生成hbm.xml方法public void generateHBM(){
try{
//创建类文件
String hbmName = standardization(tableName);
String standHBM = firstLetterUpper(hbmName);
String fileName = standHBM + ".hbm.xml";
createFile(hbmPath, fileName);
//head information
writeFile(hbmPath,fileName,"<?xml version=\"1.0\" encoding=\"UTF-8\"?>\n" +
"<!DOCTYPE hibernate-mapping PUBLIC\n" +
" \"-//Hibernate/Hibernate Mapping DTD//EN\"\n" +
" \"http://hibernate.sourceforge.net/hibernate-mapping-3.0.dtd\">\n" +
"<hibernate-mapping>\n");
//body information
writeFile(hbmPath,fileName,"<class lazy=\"false\" name=\""+standHBM+"\" +
table=\""+tableName.toUpperCase()+"\">\n" +"<id column=\"OBJID\" +
name=\"id\" type=\"java.lang.Integer\">\n"+"<param name=\"name\">" +
tableName.toUpperCase() + "</param>\n" + "</generator>\n" +
" </id>\n");
//循环写入各个属性的信息
for(int i=1;i<length;i++){
String temp = standardization(tableAttrs[i]);
if(tableAttrsType[i].equals("Date"))
writeFile(hbmPath,fileName,"<property column=\""
+tableAttrs[i].toUpperCase()+
"\" name=\""+temp+"\" type=\"java.util.Date\"/>\n");
else
writeFile(hbmPath,fileName,"<property column=\""
+tableAttrs[i].toUpperCase()+
"\" name=\""+temp+"\" type=\"java.lang."
+tableAttrsType[i]+"\"/>\n");
}
//tail information
writeFile(hbmPath,fileName,"</class>\n" + "</hibernate-mapping>\n");
}catch(Exception e){
System.out.print(e.toString());
}
}四、结语
大家可以根据自己的实际需要定制这些方法,另外也可以将Excel中的每个Sheet当成一张表,然后一次性生成所有表的POJO类和hbm.xml配置文件。
相关文章推荐
- myeclipse中如何自动生成hibernate得POJO和hbm.xml文件
- myeclipse中如何自动生成hibernate得POJO和hbm.xml文件
- Myeclipse 自动生成POJO 类 和 .hbm.xml 文件
- myeclipse中如何自动生成hibernate得POJO和hbm.xml文件
- myeclipse中如何自动生成hibernate得POJO和hbm.xml文件截图版
- 用Middlegen-Hibernate自动生成hbm.xml文件
- HibernateTools工具通过hbm文件自动生成ddl、pojo等代码
- HibernateTools工具通过hbm文件自动生成ddl、pojo等代码
- 用Middlegen-Hibernate自动生成hbm.xml文件
- intellij配置hibernate自动生成hbm.xml文件
- 使用Hibernate-tools中的hbm2java和hbm2ddl根据hbm文件自动生成pojo和数据库脚本
- 使用myeclipse的反向工程生成hibernate映射文件(.hbm.xml)和pojo类
- intellij配置hibernate自动生成hbm.xml文件
- hibernate 的 使用 MyEclipse 工具生成 POJO 类和映射文件*.hbm.xml
- intellij配置hibernate自动生成hbm.xml文件
- 在MyEclipse的web项目/java项目中,使用Hibernate-tools中的hbm2java和hbm2ddl工具,根据hbm文件自动生成pojo和数据库脚本
- 使用 Hibernate Tools 自动生成hbm.xml及model java文件
- intellij配置hibernate自动生成hbm.xml文件
- Myeclipse自动生成java的Bean和BeanName.hbm.xml文件(java项目必须支持Hibernate)
- 使用Hibernate-tools中的hbm2java和hbm2ddl根据hbm文件自动生成pojo和数据库脚本