学生机房虚拟化(五)深入配置宿主系统2
2012-01-15 15:10
232 查看
场景:
本篇中将会配置Grub,Openbox的菜单定制,为后面的图形配置做铺垫。
系统引导界面设置:
这里指的是GRUB的配置,Ubuntu用的Grub2的版本,所以配置与以往的Grub是不同的。
显示系统选择菜单:
默认情况下Grub的系统选择菜单是被隐藏的,这样做的好处是防止出现用户的误操作而损害系统。这里我们让菜单得以显示。
使grub开机显示:
修改Grub菜单显示倒计时:
修改Grub的分辨率:
给grub添加背景图片:
进入目录 /etc/grub.d/查看05_debian_theme文件,如下[红色加粗内容为背景图片]:
修改了图片背景之后就保存退出就可以了。(最后关键的一步,有的网友改了不显示图片就是缺少这一步,还要更新grub)
使Grub的配置生效:
最后一步,使用命令:sudo update-grub,不然的话所有修改不会生效!
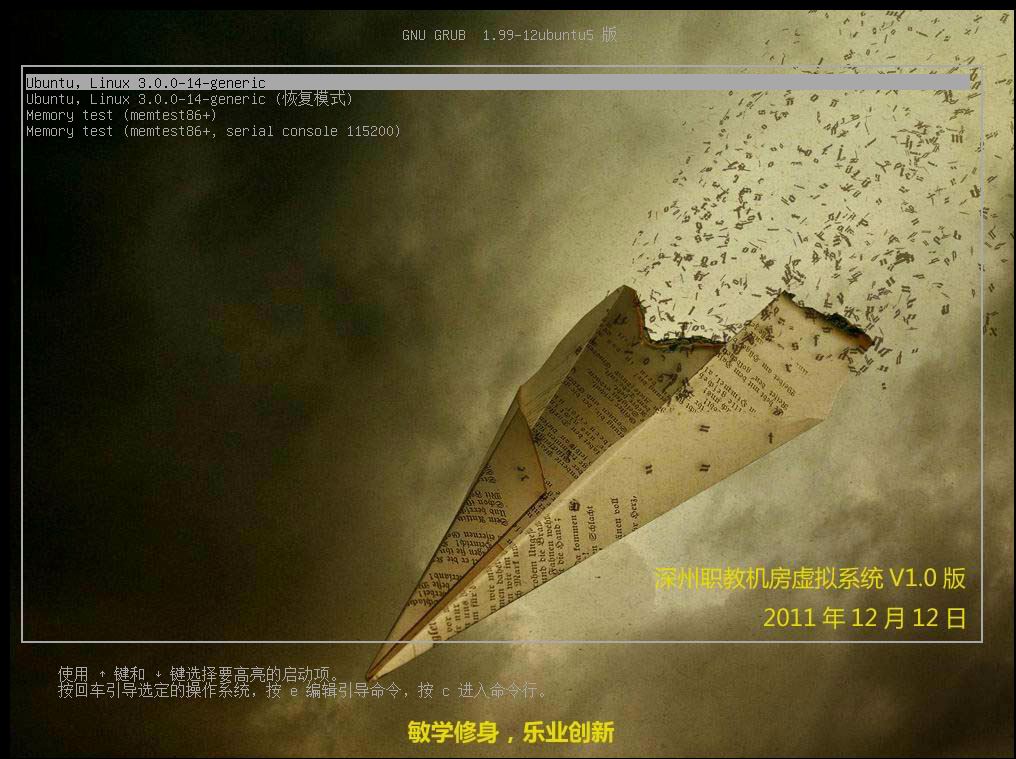
修改之后的效果:
Openbox菜单配置:
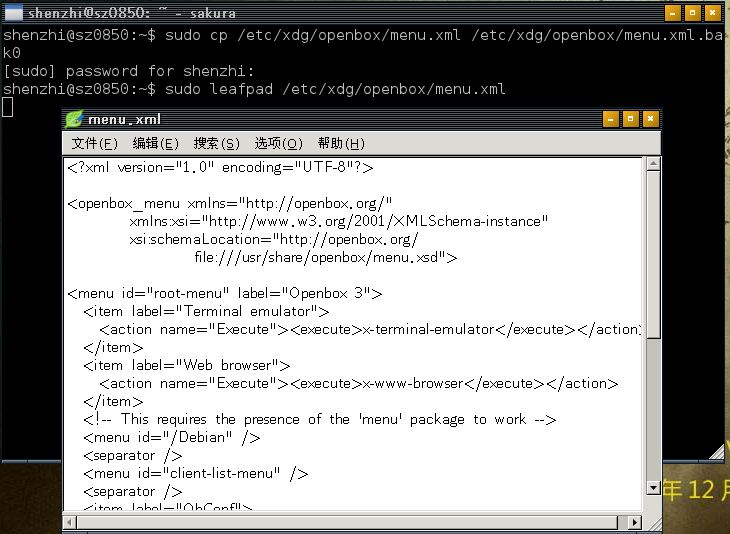
在此设计中,我们要做到管理员老师在克隆完系统后,可以不用输入一条命令,来完成所有的配置。基于此想法,我在思考后决定选用openbox的菜单定制来做为命令执行的图形前台,结合已经安装的轻量记事本程序leafpad程序,可以使其方便的对系统进行配置。
不过使用leafpad编辑menu.xml会更加方便,参照下图:
menu.xml的内容:
语法解释: 参见附件:openbox应用指南
Clonezilla单机硬盘版:
首先,介绍一下Clonezilla是什么。其是一个系统备份与恢复软件,其功能极强大,支持多种系统的备份,可以离线,也支持在线。同时是一个开源软件,由我国台湾的工程师开发。此软件的中文名称叫做“再生龙”,希望你能记住这个名字。在后续博文中会详细介绍此软件的使用。
获得再生龙:
再生龙介绍页面:http://clonezilla.nchc.org.tw/clonezilla-live/
再生龙下载页面:http://clonezilla.nchc.org.tw/clonezilla-live/download/sourceforge/
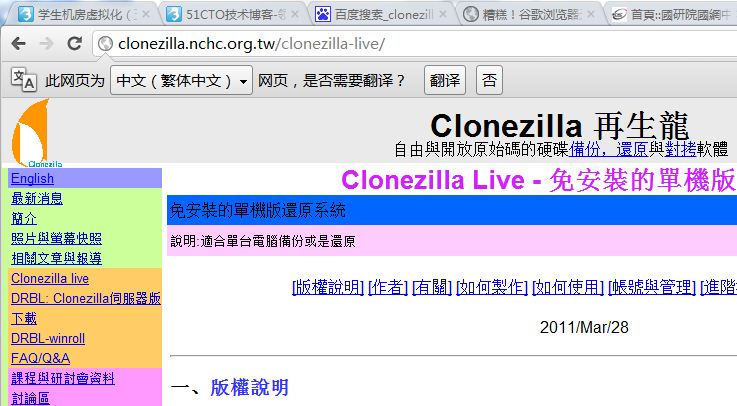
再生龙有多个版本,这里我们选择硬盘版,即“硬碟版”。
安装再生龙:
通过SSH Secure File Transfer Client将文件传输到宿主系统。由于是zip文件,需要解压缩。解压命令为“unzip clonezilla-live-1.2.11-23-i486.zip”,这里我将解压后的文件放入文件夹“clonezilla”中。再将其移动到“/boot”文件夹下。命令如下:
现在很有必要查看一下,当前分区的情况。这样才能正确配置grub.cfg。
向grub.cfg中添加如下内容:
也可以参见Clonezilla网页中的内容。
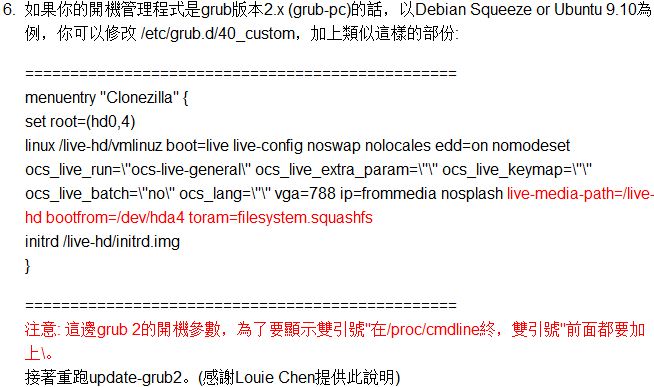
这里需要提醒的是,上面的图片展示的内容,以及我所写的启动项内容,都大同小异,但未必适合你的系统。一定要注意两点:一、clonezilla所在的分区,此信息可通过在系统中输入“df -h”来查看,在菜单中两处存在;二、要注意Clonezilla在系统中所处的目录,在菜单中有三处存在。建议细心学习下。
本文出自 “天匆云汇” 博客,转载请与作者联系!
本篇中将会配置Grub,Openbox的菜单定制,为后面的图形配置做铺垫。
系统引导界面设置:
这里指的是GRUB的配置,Ubuntu用的Grub2的版本,所以配置与以往的Grub是不同的。
显示系统选择菜单:
默认情况下Grub的系统选择菜单是被隐藏的,这样做的好处是防止出现用户的误操作而损害系统。这里我们让菜单得以显示。
sudo cp /etc/default/grub /etc/default/grub.bak0
sudo vi /etc/default/grub
使grub开机显示:
编辑文件:sudo vi /etc/default/grub
将注释掉GRUB_HIDDEN_TIMEOUT=0
修改Grub菜单显示倒计时:
GRUB_TIMEOUT=10
改为:GRUB_TIMEOUT=5
修改Grub的分辨率:
GRUB_GFXMODE=800x640
修改为:GRUB_GFXMODE=1024x768
给grub添加背景图片:
进入目录 /etc/grub.d/查看05_debian_theme文件,如下[红色加粗内容为背景图片]:
# Next search for pictures the user put into /boot/grub/ and use the first one.

for background in *.jpg *.JPG *.jpeg *.JPEG *.png *.PNG *.tga *.TGA; do

if set_background_image "${background}"; then

exit 0

fi

done

# Next try to use the background image and colors specified by desktop-base.

if set_background_image "${WALLPAPER}" "${COLOR_NORMAL}" "${COLOR_HIGHLIGHT}"; t

hen

exit 0

fi

# If we haven't found a background image yet, use the default from desktop-base.

if set_background_image "/boot/kaichuang.jpg"; then

exit 0

fi

# Finally, if all of the above fails, use the default theme.

set_default_theme
修改了图片背景之后就保存退出就可以了。(最后关键的一步,有的网友改了不显示图片就是缺少这一步,还要更新grub)
使Grub的配置生效:
最后一步,使用命令:sudo update-grub,不然的话所有修改不会生效!
修改之后的效果:
Openbox菜单配置:
在此设计中,我们要做到管理员老师在克隆完系统后,可以不用输入一条命令,来完成所有的配置。基于此想法,我在思考后决定选用openbox的菜单定制来做为命令执行的图形前台,结合已经安装的轻量记事本程序leafpad程序,可以使其方便的对系统进行配置。
sudo cp /etc/xdg/openbox/menu.xml /etc/xdg/openbox/menu.xml.bak0
sudo vi /etc/xdg/openbox/menu.xml
不过使用leafpad编辑menu.xml会更加方便,参照下图:
menu.xml的内容:
<?xml version="1.0" encoding="UTF-8"?>

<openbox_menu xmlns="http://openbox.org/"
xmlns:xsi="http://www.w3.org/2001/XMLSchema-instance"
xsi:schemaLocation="http://openbox.org/
file:///usr/share/openbox/menu.xsd">

<menu id="root-menu" label="Openbox 3">
<item label="Terminal emulator">
<action name="Execute"><execute>x-terminal-emulator</execute></action>
</item>
<item label="Web browser">
<action name="Execute"><execute>x-www-browser</execute></action>
</item>
<!-- This requires the presence of the 'menu' package to work -->
<menu id="/Debian" />
<separator />
<menu id="client-list-menu" />
<separator />
<item label="ObConf">
<action name="Execute"><execute>obconf</execute></action>
</item>
<item label="Reconfigure">
<action name="Reconfigure" />
</item>
<item label="Restart">
<action name="Restart" />
</item>
<separator />
<item label="Exit">
<action name="Exit" />
</item>
</menu>

</openbox_menu>
语法解释: 参见附件:openbox应用指南
Clonezilla单机硬盘版:
首先,介绍一下Clonezilla是什么。其是一个系统备份与恢复软件,其功能极强大,支持多种系统的备份,可以离线,也支持在线。同时是一个开源软件,由我国台湾的工程师开发。此软件的中文名称叫做“再生龙”,希望你能记住这个名字。在后续博文中会详细介绍此软件的使用。
获得再生龙:
再生龙介绍页面:http://clonezilla.nchc.org.tw/clonezilla-live/
再生龙下载页面:http://clonezilla.nchc.org.tw/clonezilla-live/download/sourceforge/
再生龙有多个版本,这里我们选择硬盘版,即“硬碟版”。
安装再生龙:
通过SSH Secure File Transfer Client将文件传输到宿主系统。由于是zip文件,需要解压缩。解压命令为“unzip clonezilla-live-1.2.11-23-i486.zip”,这里我将解压后的文件放入文件夹“clonezilla”中。再将其移动到“/boot”文件夹下。命令如下:
mkdir clonezilla
mv clonezilla-live-1.2.11-23-i486.zip clonezilla
cd clonezilla
unzip clonezilla-live-1.2.11-23-i486.zip
rm clonezilla-live-1.2.11-23-i486.zip
cd ..
sudo mv clonezilla /boot
sudo cp /boot/grub/grub.cfg /boot/grub/grub.cfg.bak0
sudo vi /boot/grub/grub.cfg
现在很有必要查看一下,当前分区的情况。这样才能正确配置grub.cfg。
sudo cp /etc/grub.d/40_custom /etc/grub.d/40_custom.bak0
sudo vi /etc/grub.d/40_custom
向grub.cfg中添加如下内容:
menuentry "Clonezilla For Shenzhi" {
set root=(hd0,1)
linux /clonezilla/live/vmlinuz boot=live live-config noswap nolocales edd=on nomodeset ocs_live_run=\"ocs-live-general\" ocs_live_extra_param=\"\" ocs_live_keymap=\"\" ocs_live_batch=\"no\" ocs_lang=\"\" vga=788 ip=frommedia nosplash live-media-path=/clonezilla/live bootfrom=/dev/sda1 toram=filesystem.squashfs
initrd /clonezilla/live/initrd.img
}
也可以参见Clonezilla网页中的内容。
这里需要提醒的是,上面的图片展示的内容,以及我所写的启动项内容,都大同小异,但未必适合你的系统。一定要注意两点:一、clonezilla所在的分区,此信息可通过在系统中输入“df -h”来查看,在菜单中两处存在;二、要注意Clonezilla在系统中所处的目录,在菜单中有三处存在。建议细心学习下。
本文出自 “天匆云汇” 博客,转载请与作者联系!

相关文章推荐
- 学生机房虚拟化(四)深入配置宿主系统1
- 学生机房虚拟化(三)宿主系统配置初步
- 学生机房虚拟化(二)定制安装宿主系统
- 学生机房虚拟化(九)系统操作设计思路
- 学生机房虚拟化(十)系统操作设计实现
- 学生机房虚拟化(六)使用Clonezilla克隆Linux系统
- 学生机房虚拟化(十一)系统标准化
- 学生机房虚拟化(十四)客户系统数据保护
- 学生机房之宿主系统屏保攻略
- 学生机房虚拟化(八)客户系统安装
- 【机房收费系统】第一遍机房之系统的登陆和配置
- 我的第一个Android项目--------机房管理与学生信息系统的Android端开发
- 有关机房收费系统学生下机的思考
- 机房收费系统学生下机结账小结
- 机房收费系统之机房配置
- 【数据库学习】机房收费系统(一)学生上下机
- [置顶] 学生信息管理系统——配置windows防火墙允许访问SQL Server 2008服务器
- ubantu 配置<<深入理解计算机系统>>的 C语言编程环境
- 学生机房虚拟化(十三)虚拟机NAT故障排除
- 使用otter实现MySQL跨机房双向同步 工作流程 环境 目标 名词解释 安装 配置 配置mysql 导入 manager 系统表 导入 node 同步算法依赖的系统表 管理配置 添加zookee