Android QQ空间(Apad)项目总结(三)---应用UI框架的搭建!!!
2012-01-05 18:42
429 查看
大家好,今天是元旦节了,祝大家节日快乐!今天给大家分享的是Apad Qzone的UI框架,我们首先看下交互图如下:

图1:交互效果图.
从上图可以看出,整个应用其实UI框架相对比较简单,可以分为俩部分,左侧导航栏区域,右侧显示内容区域。当我们点击左侧导航栏时,右侧显示相对应内容。
应用的主要内容分为四个模块:好友动态;个人主页;好友列表;应用中心。右侧显示内容则统一由一个管理器管理,管理器管理了右侧的容器以及显示内容面板。
也许用文字不太好说清楚,所以我写了一个简单的Demo以及画了一个UI结构图方便大家理解:
首先是新建一个Android工程,命名为QzoneFrameDemo,结构如下:
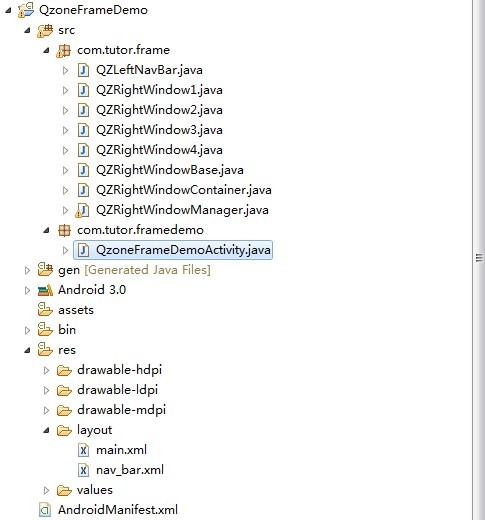
图2:程序代码结构图:
为了更容易理解代码,我画了一个各个类的关系图如下:
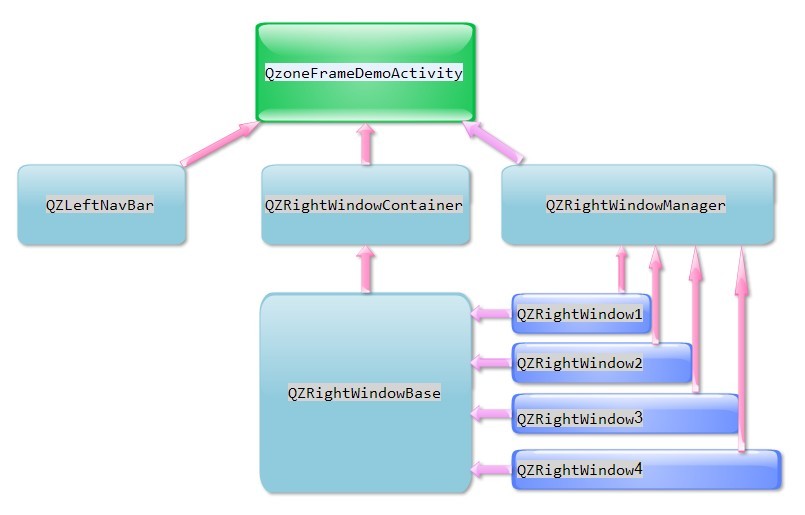
上图可以清晰的看清各个类之间的关系,其中QZRightWindowManger管理了QZRightWindowContainer(剪头忘记加了)和右侧的四个Window,QZRightWindowContainer继承了FrameLayout,四个Window继承了QZRightWindowBase。
其中QZRightWindowContainer代码如下(继承了FrameLayout):
view plaincopy
to clipboardprint?
package com.tutor.frame;
import android.content.Context;
import android.util.AttributeSet;
import android.widget.FrameLayout;
public class QZRightWindowContainer extends FrameLayout {
public QZRightWindowContainer(Context context){
super(context);
}
public QZRightWindowContainer(Context context, AttributeSet attrs) {
super(context, attrs);
}
}
view plaincopy
to clipboardprint?
package com.tutor.frame;
import android.content.Context;
import android.graphics.Color;
import android.util.AttributeSet;
public class QZRightWindow1 extends QZRightWindowBase{
public QZRightWindow1(Context context){
super(context);
setupViews();
}
public QZRightWindow1(Context context, AttributeSet attrs) {
super(context, attrs);
setupViews();
}
private void setupViews(){
mContentTextView.setText("好友动态");
mContentTextView.setBackgroundColor(Color.RED);
addView(mContentTextView);
}
@Override
public void dosomething() {
// TODO Auto-generated method stub
}
@Override
public void dosomething2() {
// TODO Auto-generated method stub
}
}
主程序QzoneFrameDemoActivity代码如下:
view plaincopy
to clipboardprint?
package com.tutor.framedemo;
import com.tutor.frame.QZLeftNavBar;
import com.tutor.frame.QZRightWindow1;
import com.tutor.frame.QZRightWindow2;
import com.tutor.frame.QZRightWindow3;
import com.tutor.frame.QZRightWindow4;
import com.tutor.frame.QZRightWindowBase;
import com.tutor.frame.QZRightWindowContainer;
import com.tutor.frame.QZRightWindowManager;
import android.app.Activity;
import android.os.Bundle;
import android.view.View;
import android.view.View.OnClickListener;
public class QzoneFrameDemoActivity extends Activity implements OnClickListener{
private QZRightWindow1 mQzRightWindow1;
private QZRightWindow2 mQzRightWindow2;
private QZRightWindow3 mQzRightWindow3;
private QZRightWindow4 mQzRightWindow4;
private QZLeftNavBar mQzLeftNavBar;
private QZRightWindowContainer mQzRightWindowContainer;
private QZRightWindowManager mQzRightWindowManager;
@Override
public void onCreate(Bundle savedInstanceState) {
super.onCreate(savedInstanceState);
setContentView(R.layout.main);
setupViews();
}
private void setupViews(){
mQzRightWindowManager = new QZRightWindowManager();
mQzLeftNavBar = (QZLeftNavBar)findViewById(R.id.navbar);
mQzLeftNavBar.findViewById(R.id.rw1).setOnClickListener(this);
mQzLeftNavBar.findViewById(R.id.rw2).setOnClickListener(this);
mQzLeftNavBar.findViewById(R.id.rw3).setOnClickListener(this);
mQzLeftNavBar.findViewById(R.id.rw4).setOnClickListener(this);
mQzRightWindow1 = (QZRightWindow1)findViewById(R.id.qzrw1);
mQzRightWindowContainer = (QZRightWindowContainer)findViewById(R.id.container);
mQzRightWindowManager.setmContainer(mQzRightWindowContainer);
}
private void showRightWindow(int num,QZRightWindowBase mQzRightWindowBase){
mQzRightWindowManager.showRightWindow(num, mQzRightWindowBase);
}
@Override
public void onClick(View v) {
int id = v.getId();
switch (id) {
case R.id.rw1:
showRightWindow(QZRightWindowManager.FRIEND_TRENDS_WINDOW, mQzRightWindow1);
break;
case R.id.rw2:
if(mQzRightWindow2 == null){
mQzRightWindow2 = new QZRightWindow2(this);
}
showRightWindow(QZRightWindowManager.HOME_PAGE_WINDOW, mQzRightWindow2);
break;
case R.id.rw3:
if(mQzRightWindow3 == null){
mQzRightWindow3 = new QZRightWindow3(this);
}
showRightWindow(QZRightWindowManager.FRIEND_LIST_WINDOW, mQzRightWindow3);
break;
case R.id.rw4:
if(mQzRightWindow4 == null){
mQzRightWindow4 = new QZRightWindow4(this);
}
showRightWindow(QZRightWindowManager.APP_CENTER_WINDOW, mQzRightWindow4);
break;
default:
break;
}
}
}
运行效果如下:

效果1
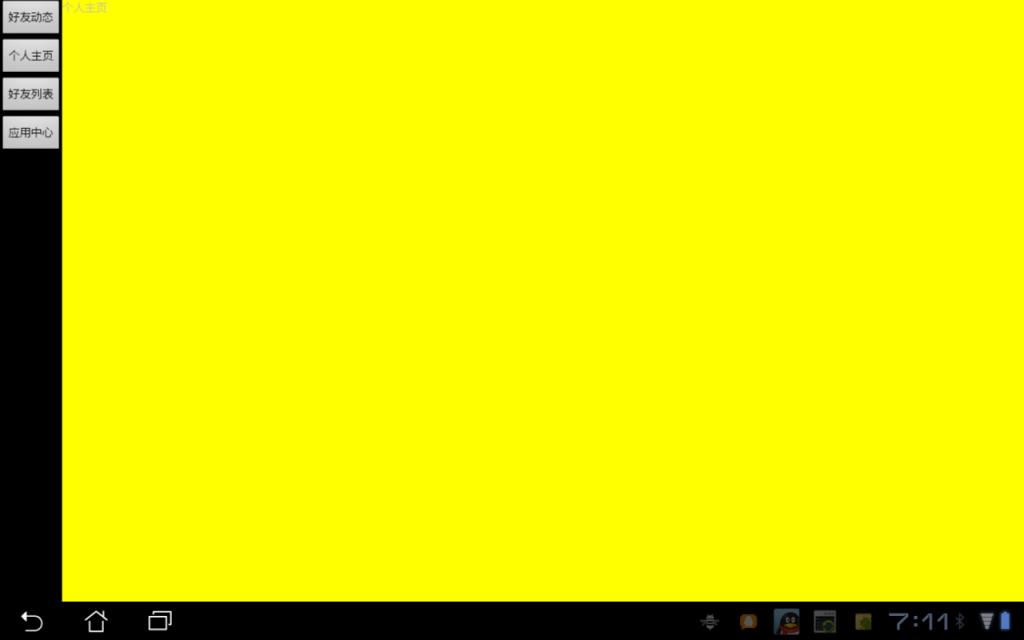
效果2.
OK,这样就大功告成了!对于pad上面的应用,单Activity化,各个功能模块化,UI控件化,是比较好的选择,这样可以加大开发效率,减少和其他同学的耦合性。
下面的链接是源代码,供新手们学习用,今天就讲到这里,谢谢大家!!!
源代码点击进入==>
图1:交互效果图.
从上图可以看出,整个应用其实UI框架相对比较简单,可以分为俩部分,左侧导航栏区域,右侧显示内容区域。当我们点击左侧导航栏时,右侧显示相对应内容。
应用的主要内容分为四个模块:好友动态;个人主页;好友列表;应用中心。右侧显示内容则统一由一个管理器管理,管理器管理了右侧的容器以及显示内容面板。
也许用文字不太好说清楚,所以我写了一个简单的Demo以及画了一个UI结构图方便大家理解:
首先是新建一个Android工程,命名为QzoneFrameDemo,结构如下:
图2:程序代码结构图:
为了更容易理解代码,我画了一个各个类的关系图如下:
上图可以清晰的看清各个类之间的关系,其中QZRightWindowManger管理了QZRightWindowContainer(剪头忘记加了)和右侧的四个Window,QZRightWindowContainer继承了FrameLayout,四个Window继承了QZRightWindowBase。
其中QZRightWindowContainer代码如下(继承了FrameLayout):
view plaincopy
to clipboardprint?
package com.tutor.frame;
import android.content.Context;
import android.util.AttributeSet;
import android.widget.FrameLayout;
public class QZRightWindowContainer extends FrameLayout {
public QZRightWindowContainer(Context context){
super(context);
}
public QZRightWindowContainer(Context context, AttributeSet attrs) {
super(context, attrs);
}
}
view plaincopy
to clipboardprint?

package com.tutor.frame;

import android.content.Context;

import android.util.AttributeSet;

import android.widget.FrameLayout;

import android.widget.TextView;

public abstract class QZRightWindowBase extends FrameLayout {

public TextView mContentTextView;

private LayoutParams params = new LayoutParams(LayoutParams.FILL_PARENT,

LayoutParams.FILL_PARENT);

public QZRightWindowBase(Context context){

super(context);

setupViews();
}

public QZRightWindowBase(Context context, AttributeSet attrs) {

super(context, attrs);

setupViews();
}

private void setupViews(){

mContentTextView = new TextView(getContext());

mContentTextView.setLayoutParams(params);
}

//做些事为了扩展举例而已
public abstract void dosomething();

//做些事2
public abstract void dosomething2();

}

package com.tutor.frame;

import android.content.Context;
import android.util.AttributeSet;
import android.widget.FrameLayout;
import android.widget.TextView;

public abstract class QZRightWindowBase extends FrameLayout {

public TextView mContentTextView;

private LayoutParams params = new LayoutParams(LayoutParams.FILL_PARENT,
LayoutParams.FILL_PARENT);

public QZRightWindowBase(Context context){
super(context);
setupViews();
}

public QZRightWindowBase(Context context, AttributeSet attrs) {
super(context, attrs);
setupViews();
}

private void setupViews(){
mContentTextView = new TextView(getContext());
mContentTextView.setLayoutParams(params);
}

//做些事为了扩展举例而已
public abstract void dosomething();
//做些事2
public abstract void dosomething2();

}
右侧窗口Window1即QZRightWindow1代码(其他的都一样不贴代码了)如下:
view plaincopy
to clipboardprint?
package com.tutor.frame;
import android.content.Context;
import android.graphics.Color;
import android.util.AttributeSet;
public class QZRightWindow1 extends QZRightWindowBase{
public QZRightWindow1(Context context){
super(context);
setupViews();
}
public QZRightWindow1(Context context, AttributeSet attrs) {
super(context, attrs);
setupViews();
}
private void setupViews(){
mContentTextView.setText("好友动态");
mContentTextView.setBackgroundColor(Color.RED);
addView(mContentTextView);
}
@Override
public void dosomething() {
// TODO Auto-generated method stub
}
@Override
public void dosomething2() {
// TODO Auto-generated method stub
}
}
view plaincopy
to clipboardprint?

package com.tutor.frame;

import java.util.HashMap;

import java.util.Iterator;

import android.view.View;

public class QZRightWindowManager {

/**
* 好友动态面板的KEY
*/
public static final int FRIEND_TRENDS_WINDOW = 0;

/**
* 个人中心面板的KEY
*/
public static final int HOME_PAGE_WINDOW = 1;

/**
* 好友关系链面板的KEY
*/
public static final int FRIEND_LIST_WINDOW = 2;

/**
* 应用中心面板的KEY
*/
public static final int APP_CENTER_WINDOW = 3;

private HashMap<Integer, QZRightWindowBase> mHashMap;

private QZRightWindowContainer mContainer;

public QZRightWindowManager(){

mHashMap = new HashMap<Integer, QZRightWindowBase>();

}

public void setmContainer(QZRightWindowContainer container) {

this.mContainer = container;

}

public void showRightWindow(int num,QZRightWindowBase mQzRightWindowBase){

if(!mHashMap.containsKey(num)){

mHashMap.put(num, mQzRightWindowBase);

if(!(mQzRightWindowBase instanceof QZRightWindow1)){

mContainer.addView(mQzRightWindowBase);

}
}

for (Iterator iter = mHashMap.keySet().iterator(); iter.hasNext();) {

Object key = iter.next();
QZRightWindowBase qzb = mHashMap.get(key);

qzb.setVisibility(View.INVISIBLE);
}

mQzRightWindowBase.setVisibility(View.VISIBLE);

}

}

package com.tutor.frame;

import java.util.HashMap;
import java.util.Iterator;

import android.view.View;

public class QZRightWindowManager {

/**
* 好友动态面板的KEY
*/
public static final int FRIEND_TRENDS_WINDOW = 0;

/**
* 个人中心面板的KEY
*/
public static final int HOME_PAGE_WINDOW = 1;

/**
* 好友关系链面板的KEY
*/
public static final int FRIEND_LIST_WINDOW = 2;

/**
* 应用中心面板的KEY
*/
public static final int APP_CENTER_WINDOW = 3;

private HashMap<Integer, QZRightWindowBase> mHashMap;

private QZRightWindowContainer mContainer;

public QZRightWindowManager(){
mHashMap = new HashMap<Integer, QZRightWindowBase>();
}

public void setmContainer(QZRightWindowContainer container) {
this.mContainer = container;
}

public void showRightWindow(int num,QZRightWindowBase mQzRightWindowBase){
if(!mHashMap.containsKey(num)){
mHashMap.put(num, mQzRightWindowBase);
if(!(mQzRightWindowBase instanceof QZRightWindow1)){
mContainer.addView(mQzRightWindowBase);
}
}

for (Iterator iter = mHashMap.keySet().iterator(); iter.hasNext();) {
Object key = iter.next();
QZRightWindowBase qzb = mHashMap.get(key);
qzb.setVisibility(View.INVISIBLE);
}

mQzRightWindowBase.setVisibility(View.VISIBLE);
}

}
主程序QzoneFrameDemoActivity代码如下:
view plaincopy
to clipboardprint?
package com.tutor.framedemo;
import com.tutor.frame.QZLeftNavBar;
import com.tutor.frame.QZRightWindow1;
import com.tutor.frame.QZRightWindow2;
import com.tutor.frame.QZRightWindow3;
import com.tutor.frame.QZRightWindow4;
import com.tutor.frame.QZRightWindowBase;
import com.tutor.frame.QZRightWindowContainer;
import com.tutor.frame.QZRightWindowManager;
import android.app.Activity;
import android.os.Bundle;
import android.view.View;
import android.view.View.OnClickListener;
public class QzoneFrameDemoActivity extends Activity implements OnClickListener{
private QZRightWindow1 mQzRightWindow1;
private QZRightWindow2 mQzRightWindow2;
private QZRightWindow3 mQzRightWindow3;
private QZRightWindow4 mQzRightWindow4;
private QZLeftNavBar mQzLeftNavBar;
private QZRightWindowContainer mQzRightWindowContainer;
private QZRightWindowManager mQzRightWindowManager;
@Override
public void onCreate(Bundle savedInstanceState) {
super.onCreate(savedInstanceState);
setContentView(R.layout.main);
setupViews();
}
private void setupViews(){
mQzRightWindowManager = new QZRightWindowManager();
mQzLeftNavBar = (QZLeftNavBar)findViewById(R.id.navbar);
mQzLeftNavBar.findViewById(R.id.rw1).setOnClickListener(this);
mQzLeftNavBar.findViewById(R.id.rw2).setOnClickListener(this);
mQzLeftNavBar.findViewById(R.id.rw3).setOnClickListener(this);
mQzLeftNavBar.findViewById(R.id.rw4).setOnClickListener(this);
mQzRightWindow1 = (QZRightWindow1)findViewById(R.id.qzrw1);
mQzRightWindowContainer = (QZRightWindowContainer)findViewById(R.id.container);
mQzRightWindowManager.setmContainer(mQzRightWindowContainer);
}
private void showRightWindow(int num,QZRightWindowBase mQzRightWindowBase){
mQzRightWindowManager.showRightWindow(num, mQzRightWindowBase);
}
@Override
public void onClick(View v) {
int id = v.getId();
switch (id) {
case R.id.rw1:
showRightWindow(QZRightWindowManager.FRIEND_TRENDS_WINDOW, mQzRightWindow1);
break;
case R.id.rw2:
if(mQzRightWindow2 == null){
mQzRightWindow2 = new QZRightWindow2(this);
}
showRightWindow(QZRightWindowManager.HOME_PAGE_WINDOW, mQzRightWindow2);
break;
case R.id.rw3:
if(mQzRightWindow3 == null){
mQzRightWindow3 = new QZRightWindow3(this);
}
showRightWindow(QZRightWindowManager.FRIEND_LIST_WINDOW, mQzRightWindow3);
break;
case R.id.rw4:
if(mQzRightWindow4 == null){
mQzRightWindow4 = new QZRightWindow4(this);
}
showRightWindow(QZRightWindowManager.APP_CENTER_WINDOW, mQzRightWindow4);
break;
default:
break;
}
}
}
view plaincopy
to clipboardprint?

<?xml version="1.0" encoding="utf-8"?>

<LinearLayout xmlns:android="http://schemas.android.com/apk/res/android"

android:layout_width="fill_parent"

android:layout_height="fill_parent"

android:orientation="horizontal" >

<com.tutor.frame.QZLeftNavBar
android:id="@+id/navbar"

android:layout_width="wrap_content"

android:layout_height="fill_parent"/>

<com.tutor.frame.QZRightWindowContainer
android:id="@+id/container"

android:layout_width="fill_parent"

android:layout_height="fill_parent"

>
<com.tutor.frame.QZRightWindow1
android:id="@+id/qzrw1"

android:layout_width="fill_parent"

android:layout_height="fill_parent"

/>
</com.tutor.frame.QZRightWindowContainer>
</LinearLayout>

<?xml version="1.0" encoding="utf-8"?>
<LinearLayout xmlns:android="http://schemas.android.com/apk/res/android"
android:layout_width="fill_parent"
android:layout_height="fill_parent"
android:orientation="horizontal" >

<com.tutor.frame.QZLeftNavBar
android:id="@+id/navbar"
android:layout_width="wrap_content"
android:layout_height="fill_parent"/>

<com.tutor.frame.QZRightWindowContainer
android:id="@+id/container"
android:layout_width="fill_parent"
android:layout_height="fill_parent"
>
<com.tutor.frame.QZRightWindow1
android:id="@+id/qzrw1"
android:layout_width="fill_parent"
android:layout_height="fill_parent"
/>
</com.tutor.frame.QZRightWindowContainer>
</LinearLayout>
运行效果如下:
效果1
效果2.
OK,这样就大功告成了!对于pad上面的应用,单Activity化,各个功能模块化,UI控件化,是比较好的选择,这样可以加大开发效率,减少和其他同学的耦合性。
下面的链接是源代码,供新手们学习用,今天就讲到这里,谢谢大家!!!
源代码点击进入==>

相关文章推荐
- Android QQ空间(Apad)项目总结(三)---应用UI框架的搭建!!!
- Android QQ空间(Apad)项目总结---应用UI框架的搭建
- Android QQ空间(Apad)项目总结(三)---应用UI框架的搭建!!!
- (转)Android QQ空间(Apad)项目总结(三)---应用UI框架的搭建!!!
- ASP.NET MVC搭建项目后台UI框架—9、服务器端排序
- android ui定义自己的dialog(项目框架搭建时就写好,之后事半功倍)
- 20161025:今日大数据知识总结(zookeeper回顾+序列化反序列化回顾+avro+zebro项目框架的搭建)
- 小程序嵌入h5项目总结(二)——移动端Vue项目框架搭建
- ASP.NET MVC搭建项目后台UI框架—8、将View中选择的数据行中的部分数据传入到Controller中
- SSH 项目框架搭建总结
- android真实项目教程(一)——App应用框架搭建_by_CJJ
- ASP.NET MVC搭建项目后台UI框架—4、tab多页签支持
- 自己搭建Android项目框架必备的框架与第三方应用
- ASP.NET MVC搭建项目后台UI框架—5、Demo演示Controller和View的交互
- ASP.NET MVC搭建项目后台UI框架—2、菜单特效
- ThinkPHP 5 项目搭建与h-ui前端框架的使用
- android ui定义自己的dialog(项目框架搭建时就写好,之后事半功倍)
- ASP.NET MVC搭建项目后台UI框架—3、面板折叠和展开
- 项目总结—校园办公管理系统(SSM框架搭建)
- Eclipse搭建SSH(Struts2+Spring3+Hibernate3)框架项目教程及增删改查经验总结