Mysql-mmm配置全自动切换主从关系和读写分离
2011-12-17 17:12
429 查看
转载http://lihuipeng.blog.51cto.com/3064864/689064
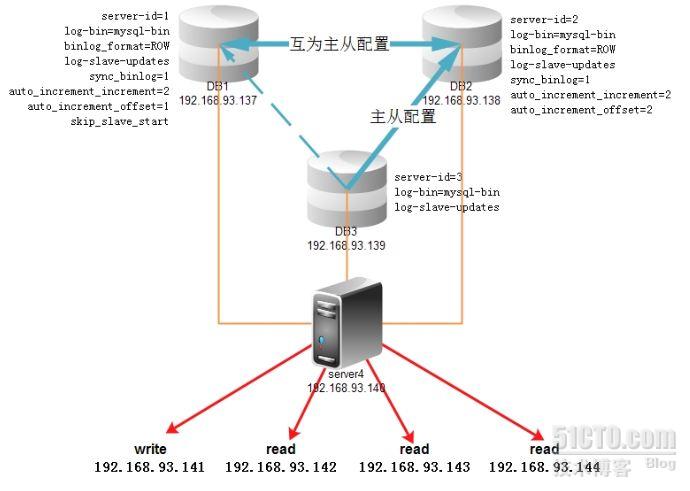
mysql-mmm的作用很简单就是读和写以ip的形式分离出来,并且可以全自动对mysql主从配置进行故障切换。
整个架构如下图:
操作系统全部为centos5.5 32bit
mysql版本为mysql-5.1.59
mysql-mmm版本为mysql-mmm-2.2.1
另外还需要4个虚拟IP,作用为:
192.168.93.141 数据库写入ip
192.168.93.142 数据库读取ip
192.168.93.143 数据库读取ip
192.168.93.144 数据库读取ip
一、安装mysql
vi /etc/my.cnf
保存退出!
继续安装Mysql
vi ~/.bash_profile
追加蓝色部分,然后保存退出
使配置立即生效
二、配置主从关系
DB1:编辑/etc/my.cnf,加入以下内容:
DB2:编辑/etc/my.cnf,加入以下内容:
DB3:编辑/etc/my.cnf,加入以下内容:
然后重启mysql服务!
接下创建一个同步用的帐号并授权:
DB1授权:
DB2授权:
DB3的话以谁为主都无所谓,当主出现故障的时候,mmm会自动切换主的,我这里就以DB2为主,配置方从的步骤:锁表——(主)导出数据——(主)查看指针位置——(主)解锁——(从)导入数据——(从)导入主服务器的指针位置——(双方)开启主从线程
DB2:(PS我这里是新的数据库,所以省了导出数据这一步!)
得出指针位置之后在DB1和DB3上操作:
看见蓝色那两行已经yes了,表示配置成功,刚才一口气把DB2配成DB1和DB3的主,现在要把DB1配成DB2的主,实现DB1和DB2互为主从关系
查看DB1的指针位置:
然后在DB2上导入指针位置:
现在三台DB的主从关系都配置好了,可以测试一下:
在DB1的test库建个表,在DB2插入一条数据,在DB3查看
DB1:
DB2:
DB3:
DB1:
OK!三台DB的主从配置正常工作
三、安装mysql-mmm
安装Mysql-mmm之前,需要先安装一些perl模块,安装方法用perl -MCPAN -e shell 直接在线安装,第一次使用perl -MCPAN -e shell 命令时会有一大堆选项的,我直接enter过去,比较关键的是选择地区、国家和源这三个,按的时候注意选择一下就没问题,DB1、DB2和DB3需要安装以下模块:
server4需要安装以下:
安装mysql-mmm,四台机器都要安装:
mysql-mmm文件位置及作用如下:
数据库授权一个Mysql-mmm专用用户(DB1、DB2和DB3都要授权):
修改mysql-mmm配置文件:
DB1:
/etc/mysql-mmm/mmm_agent.conf
蓝色的部分DB2和DB3则分别修改为db2和db3
/etc/mysql-mmm/mmm_common.conf
将这份配置复制至其它三台机器,包括server4,然后启动DB1\、DB2和DB3可以启动mysql-mmm-agant::
最后配置server4的mysql-mmm-monitor
/etc/mysql-mmm/mmm_mon.conf
启动mysql-mmm-monitor:
将所有DB服务器设为online状态:
设置成功,下面查看节点状态:
最后将除write机器的DB的read_only状态设为on:
并写入my.cnf!
在write角色的机器上授权一个帐号给外部登陆:
然后从另外一台机器上试试登陆四个虚拟IP:
四个ip都可以使用,其它功能大家可以自己去测试一下,这里不多写了,这里主要把数据库的write功能独立出来一个ip,让两台互为主从的机器中其中一台担任write角色,其余机器担任read角色,出现故障时mysql-mmm可以自动切换write角色和主从关系。
配合amoeba完成真正读写分离:http://lihuipeng.blog.51cto.com/3064864/689103
mysql-mmm的作用很简单就是读和写以ip的形式分离出来,并且可以全自动对mysql主从配置进行故障切换。
整个架构如下图:
操作系统全部为centos5.5 32bit
mysql版本为mysql-5.1.59
mysql-mmm版本为mysql-mmm-2.2.1
另外还需要4个虚拟IP,作用为:
192.168.93.141 数据库写入ip
192.168.93.142 数据库读取ip
192.168.93.143 数据库读取ip
192.168.93.144 数据库读取ip
一、安装mysql
| useradd mysql tar zxvf mysql-5.1.59.tar.gz cd mysql-5.1.59 ./configure --prefix=/usr/local/mysql --without-debug --enable-thread-safe-client --enable-assembler --enable-profiling --with-mysqld-ldflags=-all-static --with-client-ldflags=-all-static --with-charset=utf8 --with-extra-charsets=all --with-big-tables --enable-largefile --without-ndb-debug --with-plugins=partition --localstatedir=/home/var make make install |
| [client] port = 3306 socket = /tmp/mysql.sock [mysqld] port = 3306 socket = /tmp/mysql.sock skip-external-locking #skip-bdb skip-name-resolve #skip-innodb max_allowed_packet = 8M table_cache = 2048 sort_buffer_size = 2M read_buffer_size = 2M query_cache_limit = 2M myisam_sort_buffer_size = 128M thread_cache_size = 256 query_cache_size = 128M thread_concurrency = 8 log-bin=mysql-bin slow_query_log=slowquery.log long_query_time = 60 character-set-server=utf8 max_user_connections=5000 max_connections=8000 wait_timeout=31536000 tmp_table_size = 384M bulk_insert_buffer_size = 512M concurrent_insert = 2 back_log = 512 [mysqldump] quick max_allowed_packet = 16M [isamchk] key_buffer = 512M sort_buffer_size = 512M read_buffer = 2M write_buffer = 2M [myisamchk] key_buffer = 512M sort_buffer_size = 512M read_buffer = 2M write_buffer = 2M [mysqlhotcopy] interactive-timeout datadir=/home/var [mysqld_safe] open_files_limit = 65535 |
继续安装Mysql
| /usr/local/mysql/bin/mysql_install_db --user=mysql chown -R mysql:mysql /home/var /usr/local/mysql/bin/mysqld_safe --user=mysql & cp ./support-files/mysql.server /etc/rc.d/init.d/mysql chmod +x /etc/rc.d/init.d/mysqlchkconfig --add mysql service mysql start /usr/local/mysql/bin/mysqladmin -u root password 123456 |
| PATH=$PATH:$HOME/bin:/usr/local/mysql/bin/ |
使配置立即生效
| source ~/.bash_profile |
DB1:编辑/etc/my.cnf,加入以下内容:
| server-id=1 log-bin=mysql-bin binlog_format=ROW log-slave-updates sync_binlog=1 auto_increment_increment=2 auto_increment_offset=1 skip_slave_start |
| server-id=2 log-bin=mysql-bin binlog_format=ROW log-slave-updates sync_binlog=1 auto_increment_increment=2 auto_increment_offset=2 |
| server-id=3 log-bin=mysql-bin log-slave-updates |
接下创建一个同步用的帐号并授权:
DB1授权:
| mysql -uroot -p123456 -e "GRANT REPLICATION SLAVE ON *.* TO 'slave'@'192.168.93.138' IDENTIFIED BY 'slave'; " mysql -uroot -p123456 -e "GRANT REPLICATION SLAVE ON *.* TO 'slave'@'192.168.93.139' IDENTIFIED BY 'slave'; " |
| mysql -uroot -p123456 -e "GRANT REPLICATION SLAVE ON *.* TO 'slave'@'192.168.93.137' IDENTIFIED BY 'slave'; " mysql -uroot -p123456 -e "GRANT REPLICATION SLAVE ON *.* TO 'slave'@'192.168.93.139' IDENTIFIED BY 'slave'; " |
DB2:(PS我这里是新的数据库,所以省了导出数据这一步!)
| mysql> flush tables with read lock; mysql> show master status; +------------------+----------+--------------+------------------+ | File | Position | Binlog_Do_DB | Binlog_Ignore_DB | +------------------+----------+--------------+------------------+ | mysql-bin.000004 | 586 | | | +------------------+----------+--------------+------------------+ 1 row in set (0.00 sec) mysql> unlock tables; |
| mysql> change master to -> master_host='192.168.93.138', -> master_user='slave', -> master_password='slave', -> master_log_file='mysql-bin.000004', -> master_log_pos=586, -> master_connect_retry=10; Query OK, 0 rows affected (0.04 sec) mysql> slave start; Query OK, 0 rows affected (0.00 sec) mysql> show slave status\G; *************************** 1. row *************************** Slave_IO_State: Waiting for master to send event Master_Host: 192.168.93.138 Master_User: slave Master_Port: 3306 Connect_Retry: 10 Master_Log_File: mysql-bin.000004 Read_Master_Log_Pos: 586 Relay_Log_File: localhost-relay-bin.000002 Relay_Log_Pos: 251 Relay_Master_Log_File: mysql-bin.000004 Slave_IO_Running: Yes Slave_SQL_Running: Yes Replicate_Do_DB: Replicate_Ignore_DB: Replicate_Do_Table: Replicate_Ignore_Table: Replicate_Wild_Do_Table: Replicate_Wild_Ignore_Table: Last_Errno: 0 Last_Error: Skip_Counter: 0 Exec_Master_Log_Pos: 586 Relay_Log_Space: 410 Until_Condition: None Until_Log_File: Until_Log_Pos: 0 Master_SSL_Allowed: No Master_SSL_CA_File: Master_SSL_CA_Path: Master_SSL_Cert: Master_SSL_Cipher: Master_SSL_Key: Seconds_Behind_Master: 0 Master_SSL_Verify_Server_Cert: No Last_IO_Errno: 0 Last_IO_Error: Last_SQL_Errno: 0 Last_SQL_Error: 1 row in set (0.01 sec) |
查看DB1的指针位置:
| mysql> show master status; +------------------+----------+--------------+------------------+ | File | Position | Binlog_Do_DB | Binlog_Ignore_DB | +------------------+----------+--------------+------------------+ | mysql-bin.000005 | 586 | | | +------------------+----------+--------------+------------------+ 1 row in set (0.00 sec) |
| mysql> change master to -> master_host='192.168.93.137', -> master_user='slave', -> master_password='slave', -> master_log_file='mysql-bin.000005', -> master_log_pos=586, -> master_connect_retry=10; Query OK, 0 rows affected (0.01 sec) mysql> slave start; Query OK, 0 rows affected (0.00 sec) mysql> show slave status\G; *************************** 1. row *************************** Slave_IO_State: Waiting for master to send event Master_Host: 192.168.93.137 Master_User: slave Master_Port: 3306 Connect_Retry: 10 Master_Log_File: mysql-bin.000005 Read_Master_Log_Pos: 586 Relay_Log_File: localhost-relay-bin.000002 Relay_Log_Pos: 251 Relay_Master_Log_File: mysql-bin.000005 Slave_IO_Running: Yes Slave_SQL_Running: Yes Replicate_Do_DB: Replicate_Ignore_DB: Replicate_Do_Table: Replicate_Ignore_Table: Replicate_Wild_Do_Table: Replicate_Wild_Ignore_Table: Last_Errno: 0 Last_Error: Skip_Counter: 0 Exec_Master_Log_Pos: 586 Relay_Log_Space: 410 Until_Condition: None Until_Log_File: Until_Log_Pos: 0 Master_SSL_Allowed: No Master_SSL_CA_File: Master_SSL_CA_Path: Master_SSL_Cert: Master_SSL_Cipher: Master_SSL_Key: Seconds_Behind_Master: 0 Master_SSL_Verify_Server_Cert: No Last_IO_Errno: 0 Last_IO_Error: Last_SQL_Errno: 0 Last_SQL_Error: 1 row in set (0.00 sec) |
在DB1的test库建个表,在DB2插入一条数据,在DB3查看
DB1:
| mysql> create table test.t (id int(11) not null auto_increment,name varchar(30),primary key (id)); Query OK, 0 rows affected (0.03 sec) |
| mysql> use test Database changed mysql> show tables; +----------------+ | Tables_in_test | +----------------+ | t | +----------------+ 1 row in set (0.00 sec) mysql> insert into t(name) values ('mysql-mmm'); Query OK, 1 row affected (0.02 sec) |
| mysql> use test Database changed mysql> select * from t; +----+-----------+ | id | name | +----+-----------+ | 2 | mysql-mmm | +----+-----------+ 1 row in set (0.00 sec) |
| mysql> select * from test.t; +----+-----------+ | id | name | +----+-----------+ | 2 | mysql-mmm | +----+-----------+ 1 row in set (0.00 sec) |
三、安装mysql-mmm
安装Mysql-mmm之前,需要先安装一些perl模块,安装方法用perl -MCPAN -e shell 直接在线安装,第一次使用perl -MCPAN -e shell 命令时会有一大堆选项的,我直接enter过去,比较关键的是选择地区、国家和源这三个,按的时候注意选择一下就没问题,DB1、DB2和DB3需要安装以下模块:
| # perl -MCPAN -e shell cpan> install Algorithm::Diff cpan> install DBI cpan>install Log::Dispatch cpan> install Log::Log4perl cpan> install Mail::Send cpan> install Net::ARP cpan> install Proc::Daemon cpan> install Time::HiRes cpan>install DBD::mysql cpan>install File::stat cpan>install File:basename |
| # perl -MCPAN -e shell cpan> install Algorithm::Diff cpan> install Class::Singleton cpan> install Log::Dispatch cpan> install Log::Log4perl cpan> install Mail::Send cpan> install Proc::Daemon cpan> install Thread::Queue cpan> install Time::HiRes cpan> install DBI cpan>install DBD::mysql |
| tar zxvf mysql-mmm-2.2.1.tar.gz cd mysql-mmm-2.2.1 make instal |
| /usr/lib/perl5/vendor_perl/5.8.8/MMM MMM 使用的 perl 模块 /usr/lib/mysql-mmm MMM 的脚本揑件 /usr/sbin MMM 的命令保存路径 /var/log/mysql-mmm MMM 的日志保存路径 /etc MMM 配置文件保存的路径 /etc/mysql-mmm MMM 配置文件保存的路径,优先级最高 /etc/init.d/ agentd 和 monitor 的启劢关闭脚本 |
| mysql -uroot -p123456 -e "grant super,replication client,process on *.* to 'mmm_agent'@'192.168.93.137' identified by 'mmm_agent';" mysql -uroot -p123456 -e "grant super,replication client,process on *.* to 'mmm_agent'@'192.168.93.138' identified by 'mmm_agent';" mysql -uroot -p123456 -e "grant super,replication client,process on *.* to 'mmm_agent'@'192.168.93.139' identified by 'mmm_agent';" mysql -uroot -p123456 -e "grant super,replication client,process on *.* to 'mmm_agent'@'192.168.93.140' identified by 'mmm_agent';" |
DB1:
/etc/mysql-mmm/mmm_agent.conf
| include mmm_common.conf this db1 |
/etc/mysql-mmm/mmm_common.conf
| active_master_role writer <host default> cluster_interface eth0 pid_path /var/run/mmm_agentd.pid bin_path /usr/lib/mysql-mmm/ replication_user slave replication_password slave agent_user mmm_agent agent_password mmm_agent </host> <host db1> ip 192.168.93.137 mode master peer db2 </host> <host db2> ip 192.168.93.138 mode master peer db1 </host> <host db3> ip 192.168.93.139 mode slave </host> <role writer> hosts db1, db2 ips 192.168.93.141 mode exclusive </role> <role reader> hosts db1, db2, db3 ips 192.168.93.144,192.168.93.143,192.168.93.142 mode balanced </role> |
| [root@localhost mysql-mmm-2.2.1]# /etc/init.d/mysql-mmm-agent start Daemon bin: '/usr/sbin/mmm_agentd' Daemon pid: '/var/run/mmm_agentd.pid' Starting MMM Agent daemon... Ok |
/etc/mysql-mmm/mmm_mon.conf
| include mmm_common.conf <monitor> ip 192.168.93.140 pid_path /var/run/mmm_mond.pid bin_path /usr/lib/mysql-mmm/ status_path /var/lib/misc/mmm_mond.status ping_ips 192.168.93.137, 192.168.93.138, 192.168.93.139 </monitor> <host default> monitor_user mmm_agent monitor_password mmm_agent </host> debug 0 |
| [root@localhost mysql-mmm-2.2.1]# /etc/init.d/mysql-mmm-monitor start Daemon bin: '/usr/sbin/mmm_mond' Daemon pid: '/var/run/mmm_mond.pid' Starting MMM Monitor daemon: Ok [root@localhost mysql-mmm-2.2.1]# mmm_control show db1(192.168.93.137) master/AWAITING_RECOVERY. Roles: db2(192.168.93.138) master/AWAITING_RECOVERY. Roles: db3(192.168.93.139) slave/AWAITING_RECOVERY. Roles: |
| [root@localhost mysql-mmm-2.2.1]# mmm_control set_online db1 OK: State of 'db1' changed to ONLINE. Now you can wait some time and check its new roles! [root@localhost mysql-mmm-2.2.1]# mmm_control set_online db2 OK: State of 'db2' changed to ONLINE. Now you can wait some time and check its new roles! [root@localhost mysql-mmm-2.2.1]# mmm_control set_online db3 OK: State of 'db3' changed to ONLINE. Now you can wait some time and check its new roles! [root@localhost mysql-mmm-2.2.1]# mmm_control show db1(192.168.93.137) master/ONLINE. Roles: reader(192.168.93.143), writer(192.168.93.141) db2(192.168.93.138) master/ONLINE. Roles: reader(192.168.93.142) db3(192.168.93.139) slave/ONLINE. Roles: reader(192.168.93.144) |
| [root@localhost mysql-mmm-2.2.1]# mmm_control checks all db2 ping [last change: 2011/10/07 03:10:39] OK db2 mysql [last change: 2011/10/07 03:10:39] OK db2 rep_threads [last change: 2011/10/07 03:10:39] OK db2 rep_backlog [last change: 2011/10/07 03:10:39] OK: Backlog is null db3 ping [last change: 2011/10/07 03:10:39] OK db3 mysql [last change: 2011/10/07 03:10:39] OK db3 rep_threads [last change: 2011/10/07 03:10:39] OK db3 rep_backlog [last change: 2011/10/07 03:10:39] OK: Backlog is null db1 ping [last change: 2011/10/07 03:10:39] OK db1 mysql [last change: 2011/10/07 03:10:39] OK db1 rep_threads [last change: 2011/10/07 03:10:39] OK db1 rep_backlog [last change: 2011/10/07 03:10:39] OK: Backlog is null |
| set global read_only=on; |
在write角色的机器上授权一个帐号给外部登陆:
| mysql -uroot -p123456 -e "grant all privileges on test.* to lihuipeng@'192.168.93.%' identified by 'lihuipeng';" |
| [root@localhost mysql-mmm-2.2.1]# mysql -ulihuipeng -plihuipeng -h192.168.93.141 Welcome to the MySQL monitor. Commands end with ; or \g. Your MySQL connection id is 716 Server version: 5.1.59-log Source distribution Copyright (c) 2000, 2011, Oracle and/or its affiliates. All rights reserved. Oracle is a registered trademark of Oracle Corporation and/or its affiliates. Other names may be trademarks of their respective owners. Type 'help;' or '\h' for help. Type '\c' to clear the current input statement. mysql> [root@localhost mysql-mmm-2.2.1]# mysql -ulihuipeng -plihuipeng -h192.168.93.142 Welcome to the MySQL monitor. Commands end with ; or \g. Your MySQL connection id is 554 Server version: 5.1.59-log Source distribution Copyright (c) 2000, 2011, Oracle and/or its affiliates. All rights reserved. Oracle is a registered trademark of Oracle Corporation and/or its affiliates. Other names may be trademarks of their respective owners. Type 'help;' or '\h' for help. Type '\c' to clear the current input statement. mysql> [root@localhost mysql-mmm-2.2.1]# mysql -ulihuipeng -plihuipeng -h192.168.93.143 Welcome to the MySQL monitor. Commands end with ; or \g. Your MySQL connection id is 758 Server version: 5.1.59-log Source distribution Copyright (c) 2000, 2011, Oracle and/or its affiliates. All rights reserved. Oracle is a registered trademark of Oracle Corporation and/or its affiliates. Other names may be trademarks of their respective owners. Type 'help;' or '\h' for help. Type '\c' to clear the current input statement. mysql> [root@localhost mysql-mmm-2.2.1]# mysql -ulihuipeng -plihuipeng -h192.168.93.144 Welcome to the MySQL monitor. Commands end with ; or \g. Your MySQL connection id is 560 Server version: 5.1.59-log Source distribution Copyright (c) 2000, 2011, Oracle and/or its affiliates. All rights reserved. Oracle is a registered trademark of Oracle Corporation and/or its affiliates. Other names may be trademarks of their respective owners. Type 'help;' or '\h' for help. Type '\c' to clear the current input statement. mysql> |
配合amoeba完成真正读写分离:http://lihuipeng.blog.51cto.com/3064864/689103

相关文章推荐
- Mysql-mmm配置全自动切换主从关系和读写分离
- Mysql-mmm配置全自动切换主从关系和读写分离
- Mysql-mmm配置全自动切换主从关系和读写分离
- 双机高可用、负载均衡、MySQL (读写分离、主从自动切换)架构设计
- MySQL-MMM实现MySQL多主多从,高可用,读写分离,故障自动切换
- 【转】双机高可用、负载均衡、MySQL(读写分离、主从自动切换)架构设计
- 双机高可用、负载均衡、MySQL(读写分离、主从自动切换)架构设计
- 双机高可用、负载均衡、MySQL(读写分离、主从自动切换)架构设计
- 双机高可用,负载均衡,MySQL(读写分离、主从自动切换)架构设计
- 双机高可用、负载均衡、MySQL (读写分离、主从自动切换)架构设计
- 双机高可用、负载均衡、MySQL(读写分离、主从自动切换)架构设计
- 双机高可用、负载均衡、MySQL (读写分离、主从自动切换)架构设计
- 双机高可用、负载均衡、MySQL(读写分离、主从自动切换)架构设计
- redis配置读写分离以及利用哨兵sentinel进行自动主从切换
- 双机高可用、负载均衡、MySQL(读写分离、主从自动切换)架构设计
- 双机高可用、负载均衡、MySQL(读写分离、主从自动切换)架构设计
- 双机高可用、负载均衡、MySQL(读写分离、主从自动切换)架构设计
- 双机高可用、负载均衡、MySQL(读写分离、主从自动切换)架构设计
- 双机高可用、负载均衡、MySQL(读写分离、主从自动切换)架构设计
- 推荐:Mycat配置MySQL主从模式(1主1从)下读写分离和自动切换