[翻译]ASP.NET MVC 3 开发的20个秘诀(八)[20 Recipes for Programming MVC 3]:对列表进行分页
2011-12-13 16:15
691 查看
[b]议题[/b]
如果列表过长每次加载都要等很久,或者是无数的列表项中,并不都是你需要的结果。那么将列表分为多页加载,就能减少页面加载时间,尤其是要对列表进行排序,并对更快的找到结果有所帮助。
[b]解决方案[/b]
在列表页面实现PagedList.MVC。
[b]讨论[/b]
首先需要在从NuGet库中为应用程序添加PagedList.MVC的分页组件,它可以对完整的书籍列表进行分页展示。要安装这个软件包,请点击菜单栏“工具”→“Library Package Manager”→ “AddLibrary Package Reference”,点击窗口左侧“Online”按钮,在右上角搜索栏中输入“PagedList”,选中并点击“PagedList.MVC”左侧的“Install”按钮,如图1-5:
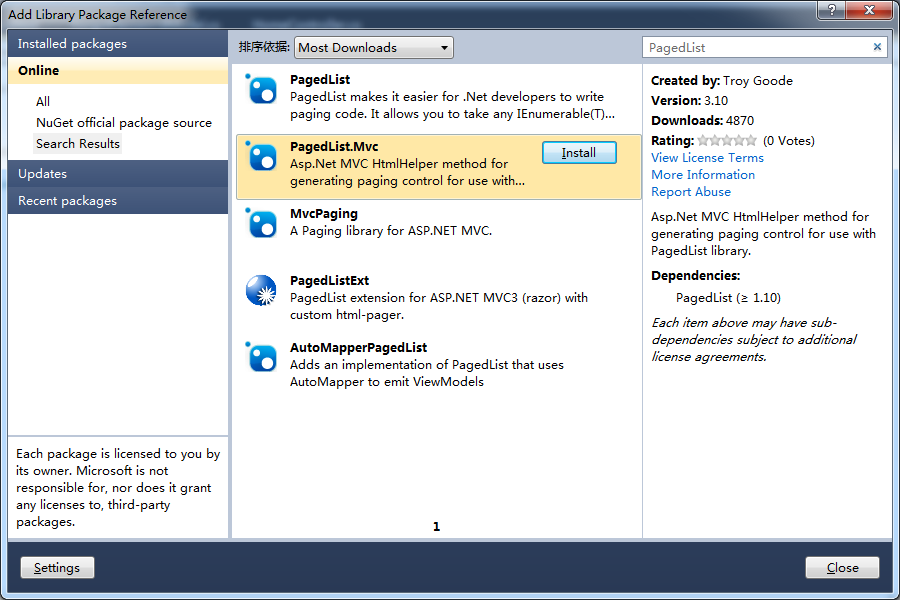
图例 5-1 ,PagedList.MVC安装包
PagedList安装后,添加一个“分部视图”来创建分页链接。这个视图中将包含在未来每个HTML列表中,只需要很少的工作把这些内容抽象成独立的文件,并可以保持一致的外观。
首先,展开“Views”文件夹,右键单击“Shared”文件夹,选择“添加”→“视图”。在对话框的视图名称中输入“_Paging”,并选中“创建分部视图”,完成之后点击“添加”。分部视图内容如下:
这个分部视图创建了四个链接:首页、前一页、下一页和尾页。因为没有前面的页面,所以首页和前一页的链接是禁用状态。同样的,当下面再没有页面的状态下,下一页和尾页的链接会被禁用。每一个链接都会为Index方法传入两个参数:跳转页码和当前排序规则,这样用户就不会因为页面跳转而失去他的排序选项。
接下来,需要在Books和Index视图中做一些修改:
上面的代码,包含了三个微妙的变化。首先,更新了强类型模型PagedList.IPagedList类型,然后是_Paging视图被加载了两次,一个在列表上,一个在列表下面。
最后,需要对BooksController控制器进行一些编辑,在Index()方法添加一个页码参数,返回值将不会返回书籍列表而是将分页后的书籍列表。另外,针对排序的参数,添加一个新的ViewBag的变量,设置当前页面的排序规则(在_Paging分部视图中使用):
如果想在其他的列表分页时也使用这个分部视图,只需要确保每个分页列表的ViewBag的变量设置都保持一致。并不是每个列表的返回类型都相同,这就需要编辑Html.ActionLink,调用动作中定义的相应的ViewBag动态变量。
[b]参考[/b]
原书地址 书籍源代码
如果列表过长每次加载都要等很久,或者是无数的列表项中,并不都是你需要的结果。那么将列表分为多页加载,就能减少页面加载时间,尤其是要对列表进行排序,并对更快的找到结果有所帮助。
[b]解决方案[/b]
在列表页面实现PagedList.MVC。
[b]讨论[/b]
首先需要在从NuGet库中为应用程序添加PagedList.MVC的分页组件,它可以对完整的书籍列表进行分页展示。要安装这个软件包,请点击菜单栏“工具”→“Library Package Manager”→ “AddLibrary Package Reference”,点击窗口左侧“Online”按钮,在右上角搜索栏中输入“PagedList”,选中并点击“PagedList.MVC”左侧的“Install”按钮,如图1-5:
图例 5-1 ,PagedList.MVC安装包
PagedList安装后,添加一个“分部视图”来创建分页链接。这个视图中将包含在未来每个HTML列表中,只需要很少的工作把这些内容抽象成独立的文件,并可以保持一致的外观。
首先,展开“Views”文件夹,右键单击“Shared”文件夹,选择“添加”→“视图”。在对话框的视图名称中输入“_Paging”,并选中“创建分部视图”,完成之后点击“添加”。分部视图内容如下:
<p>
@if (Model.HasPreviousPage)
{
@Html.ActionLink("<< First", "Index", new {
page = 1, sortOrder = ViewBag.CurrentSortOrder })
@Html.Raw(" ");
@Html.ActionLink("< Prev", "Index", new {
page = Model.PageNumber - 1, sortOrder =
ViewBag.CurrentSortOrder })
}
else
{
@:<< First
@Html.Raw(" ");
@:< Prev
}


@if (Model.HasNextPage)
{
@Html.ActionLink("Next >", "Index", new {
page = Model.PageNumber + 1,
sortOrder = ViewBag.CurrentSortOrder })
@Html.Raw(" ");
@Html.ActionLink("Last >>", "Index", new {
page = Model.PageCount,
sortOrder = ViewBag.CurrentSortOrder })
}
else
{
@:Next >
@Html.Raw(" ")
@:Last >>
}

</p>
这个分部视图创建了四个链接:首页、前一页、下一页和尾页。因为没有前面的页面,所以首页和前一页的链接是禁用状态。同样的,当下面再没有页面的状态下,下一页和尾页的链接会被禁用。每一个链接都会为Index方法传入两个参数:跳转页码和当前排序规则,这样用户就不会因为页面跳转而失去他的排序选项。
接下来,需要在Books和Index视图中做一些修改:
@model PagedList.IPagedList<MvcApplication4.Models.Book>

<h2>@ViewBag.Title</h2>
<p>
@Html.ActionLink((string)ViewBag.CreateLink, "Create")
</p>
@Html.Partial("_Paging")
<table>
<tr>
<th>
@Html.ActionLink((string)ViewBag.TitleDisplay,
"Index", new { sortOrder = ViewBag.TitleSortParam })
</th>
<th>
@Html.ActionLink((string)ViewBag.IsbnDisplay,
"Index", new { sortOrder = ViewBag.IsbnSortParam })
</th>
<th>
@ViewBag.SummaryDisplay
</th>
<th>
@Html.ActionLink((string)ViewBag.AuthorDisplay,
"Index", new { sortOrder =
ViewBag.AuthorSortParam })
</th>
<th>
@ViewBag.ThumbnailDisplay
</th>
<th>
@Html.ActionLink((string)ViewBag.PriceDisplay,
"Index", new { sortOrder = ViewBag.PriceSortParam })
</th>
<th>
@Html.ActionLink((string)ViewBag.PublishedDisplay,
"Index", new { sortOrder =
ViewBag.PublishedSortParam })
</th>
<th></th>
</tr>
@foreach (var item in Model) {
<tr>
<td>
@Html.DisplayFor(modelItem => item.Title)
</td>
<td>
@Html.DisplayFor(modelItem => item.Isbn)
</td>
<td>
@Html.DisplayFor(modelItem => item.Summary)
</td>
<td>
@Html.DisplayFor(modelItem => item.Author)
</td>
<td>
@Html.DisplayFor(modelItem => item.Thumbnail)
</td>
<td>
@Html.DisplayFor(modelItem => item.Price)
</td>
<td>
@Html.DisplayFor(modelItem => item.Published)
</td>
<td>
@Html.ActionLink((string)ViewBag.EditLink,
"Edit", new { id=item.ID }) |
@Html.ActionLink((string)ViewBag.DetailsLink,
"Details", new { id = item.ID }) |
@Html.ActionLink((string)ViewBag.DeleteLink,
"Delete", new { id = item.ID })
</td>
</tr>
}
</table>
@Html.Partial("_Paging")
上面的代码,包含了三个微妙的变化。首先,更新了强类型模型PagedList.IPagedList类型,然后是_Paging视图被加载了两次,一个在列表上,一个在列表下面。
最后,需要对BooksController控制器进行一些编辑,在Index()方法添加一个页码参数,返回值将不会返回书籍列表而是将分页后的书籍列表。另外,针对排序的参数,添加一个新的ViewBag的变量,设置当前页面的排序规则(在_Paging分部视图中使用):
using System;
using System.Collections.Generic;
using System.Data;
using System.Data.Entity;
using System.Linq;
using System.Linq.Dynamic;
using System.Web;
using System.Web.Mvc;
using MvcApplication4.Models;
using MvcApplication4.Utils;
using PagedList;

namespace MvcApplication4.Controllers
{
public class BooksController : Controller
{
private BookDBContext db = new BookDBContext();

//
// GET: /Books/
public ViewResult Index(string sortOrder, int page = 1)
{
#region ViewBag Resources
...
#endregion

#region ViewBag Sort Params
...
ViewBag.CurrentSortOrder = sortOrder;
#endregion

var books = db.Books.OrderBy(sortOrder);
int maxRecords = 1;
int currentPage = page - 1;

return View(books.ToPagedList(currentPage,
maxRecords));
}
...
}
}
如果想在其他的列表分页时也使用这个分部视图,只需要确保每个分页列表的ViewBag的变量设置都保持一致。并不是每个列表的返回类型都相同,这就需要编辑Html.ActionLink,调用动作中定义的相应的ViewBag动态变量。
[b]参考[/b]
原书地址 书籍源代码

相关文章推荐
- [翻译]ASP.NET MVC 3 开发的20个秘诀(十)[20 Recipes for Programming MVC 3]:通过关键字进行列表搜索
- [翻译]ASP.NET MVC 3 开发的20个秘诀(九)[20 Recipes for Programming MVC 3]:对列表进行筛选
- [翻译]ASP.NET MVC 3 开发的20个秘诀(七)[20 Recipes for Programming MVC 3]:对列表进行排序
- [翻译]ASP.NET MVC 3 开发的20个秘诀(十七)[20 Recipes for Programming MVC 3]:卷帘式分页加载
- [翻译]ASP.NET MVC 3 开发的20个秘诀(十二)[20 Recipes for Programming MVC 3]:缩放图片尺寸创建缩略图
- [翻译]ASP.NET MVC 3 开发的20个秘诀(十六)[20 Recipes for Programming MVC 3]:站点移动化
- [翻译]ASP.NET MVC 3 开发的20个秘诀(十八)[20 Recipes for Programming MVC 3]:自动完成搜索
- [翻译]ASP.NET MVC 3 开发的20个秘诀(十三)[20 Recipes for Programming MVC 3]:实现Ajax增强用户体验
- [翻译]ASP.NET MVC 3 开发的20个秘诀(三)[20 Recipes for Programming MVC 3]:验证用户输入
- [翻译]ASP.NET MVC 3 开发的20个秘诀(十九)[20 Recipes for Programming MVC 3]:路由用户至特定的Controller或Action
- [翻译]ASP.NET MVC 3 开发的20个秘诀(四)[20 Recipes for Programming MVC 3]:实现多语言支持
- [翻译]ASP.NET MVC 3 开发的20个秘诀(十四)[20 Recipes for Programming MVC 3]:使用Ajax提交Form
- [翻译]ASP.NET MVC 3 开发的20个秘诀(十五)[20 Recipes for Programming MVC 3]:启用图片验证码(CAPTCHA)
- [翻译]ASP.NET MVC 3 开发的20个秘诀(一)[20 Recipes for Programming MVC 3]:通过密码验证限制访问视图
- (转)[翻译]ASP.NET MVC 3 开发的20个秘诀(十八)[20 Recipes for Programming MVC 3]:自动完成搜索
- [翻译]ASP.NET MVC 3 开发的20个秘诀(二)[20 Recipes for Programming MVC 3]:自动生成控制器和视图
- [翻译]ASP.NET MVC 3 开发的20个秘诀(二十)[20 Recipes for Programming MVC 3]:缓存结果数据加速页面载入
- [翻译]ASP.NET MVC 3 开发的20个秘诀(六)[20 Recipes for Programming MVC 3]:找回忘记的密码
- [翻译]ASP.NET MVC 3 开发的20个秘诀(十一)[20 Recipes for Programming MVC 3]:通过表单上传文件
- [翻译]ASP.NET MVC 3 开发的20个秘诀(二十)[20 Recipes for Programming MVC 3]:缓存结果数据加速页面载入