SilverLight:使用MVVM实现View层在程序运行时自动生成控件并且取得其值
2011-11-16 09:47
633 查看
在有一些项目中,UI界面上的控件有时是在程序运行时才生成的。这样的功能在MVVM中也很容易实现。并且可以通过按钮取得其值。
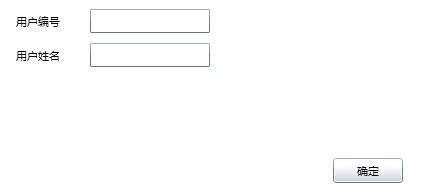
本实例主要实现程序运行时,在界面上生成四个控件,两个TextBox和两个TextBlock.并且点击按钮时,弹出TextBox中的值。如下图效果
实现方法分以下步骤
第一步:新建一个SivlerLight应用程序,命名为AutoCreatControl
第二步:新建一个ViewModel层,工程名为ViewModel
整个项目结构如下图
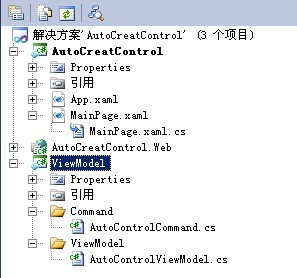
通过上面的项目结构图,大家知道需要新建什么文件了
第三步:在工程ViewModel新建一个文件夹ViewModel,并且建一个文件AutoControlViewModel.cs,在此文件中主要ViewModel层的属性和业务。首先要建一个属性,类型为StackPanel,此属性要包含两个TextBox控件和两个TextBlock控件。然后把此属性绑定到主页面即可显示在达到的效果,另外还要有一个绑定到Button的属性。详细情况请看代码
<!--
Code highlighting produced by Actipro CodeHighlighter (freeware)
http://www.CodeHighlighter.com/
-->using System;
using System.Net;
using System.Windows;
using System.Windows.Controls;
using System.Windows.Documents;
using System.Windows.Ink;
using System.Windows.Input;
using System.Windows.Media;
using System.Windows.Media.Animation;
using System.Windows.Shapes;
namespace ViewModel
{
/// <summary>
/// 自动创建控件的ViewModel
/// </summary>
public class AutoControlViewModel
{
//定义一个UI变量
StackPanel sp;
public AutoControlViewModel()
{
CreateControl();
}
/// <summary>
/// UI变量属性,用于绑定到View层
/// </summary>
public StackPanel Sp
{
get { return sp; }
set { sp = value; }
}
/// <summary>
/// 创建控件方法,在此方法中根据业务创建控件
/// </summary>
private void CreateControl()
{
sp = new StackPanel();
sp.Orientation = Orientation.Vertical;
StackPanel sp1 = new StackPanel();
sp1.Orientation = Orientation.Horizontal;
TextBlock tb1 = new TextBlock();
tb1.Text = "用户编号";
tb1.Margin = new Thickness(20, 20, 10, 10);
TextBox txt1 = new TextBox();
txt1.Width = 120;
txt1.Margin = new Thickness(20, 15, 0, 10);
sp1.Children.Add(tb1);
sp1.Children.Add(txt1);
sp.Children.Add(sp1);
StackPanel sp2 = new StackPanel();
sp2.Orientation = Orientation.Horizontal;
TextBlock tb2 = new TextBlock();
tb2.Text = "用户姓名";
tb2.Margin = new Thickness(20, 5, 10, 10);
TextBox txt2 = new TextBox();
txt2.Width = 120;
txt2.Margin = new Thickness(20, 0, 0, 10);
sp2.Children.Add(tb2);
sp2.Children.Add(txt2);
sp.Children.Add(sp2);
}
/// <summary>
/// 绑定到Button上的Command上
/// </summary>
public ICommand OkButtonCommand
{
get { return new AutoControlCommand(this); }
}
/// <summary>
/// 执行Button事件方法
/// </summary>
/// <param name="obj"></param>
public void OkButtonClick(object obj)
{
UIElementCollection uc = obj as UIElementCollection;
foreach (UIElement cc in uc)
{
if (cc != null)
{
if (cc.GetType().Name == "ContentControl")
{
ContentControl ccontrol = cc as ContentControl;
StackPanel spck = ccontrol.Content as StackPanel;
int count = spck.Children.Count;
for (int i = 0; i < count; i++)
{
if (sp.Children[i].GetType().Name == "StackPanel")
{
StackPanel spChild = sp.Children[i] as StackPanel;
for (int k = 0; k < spChild.Children.Count; k++)
{
if (spChild.Children[k].GetType().Name == "TextBox")
{
TextBox txt = spChild.Children[k] as TextBox;
MessageBox.Show(txt.Text);
}
}
}
}
}
}
}
}
}
}
第四步:在工程ViewModel中新建一个文件夹Command,然后再建一个文件AutoControlCommand.cs,在此文件中实现新口ICommand,实现在点击Button时,弹出一个对话框。代码如下
<!--
Code highlighting produced by Actipro CodeHighlighter (freeware)
http://www.CodeHighlighter.com/
-->using System;
using System.Net;
using System.Windows;
using System.Windows.Controls;
using System.Windows.Documents;
using System.Windows.Ink;
using System.Windows.Input;
using System.Windows.Media;
using System.Windows.Media.Animation;
using System.Windows.Shapes;
namespace ViewModel
{
public class AutoControlCommand:ICommand
{
AutoControlViewModel acvm;
public AutoControlCommand(AutoControlViewModel acv)
{
acvm = acv;
}
public bool CanExecute(object parameter)
{
return true;
}
public event EventHandler CanExecuteChanged;
public void Execute(object parameter)
{
if (parameter != null)
acvm.OkButtonClick(parameter);
}
}
}
第五步:在MainPage.xaml中实现数据的绑定。其中绑定自动生成控件时,使用了ContentControl类,
ContentControl类表示包含单项内容的控件。像Button,CheckBox和ScrollView 这样的控件直接或间接继承自该类,ContentControl 的
Content 属性可以是任何类型的对象,例如字符串、UIElement
或 DateTime。当
Content 设置为
UIElement 时,ContentControl 中将显示
UIElement。当
Content 设置为其他类型的对象时,ContentControl 中将显示该对象的字符串表示形式。
通过对 ContentControl类的介绍,知道ContentControl的强大了吧,那么咱们就把ViewModel中的Sp属性绑定到ContentControl的Content即可实现自动生成控件
MainPage.xaml
<!--
Code highlighting produced by Actipro CodeHighlighter (freeware)
http://www.CodeHighlighter.com/
--><UserControl x:Class="AutoCreatControl.MainPage"
xmlns="http://schemas.microsoft.com/winfx/2006/xaml/presentation"
xmlns:x="http://schemas.microsoft.com/winfx/2006/xaml"
xmlns:d="http://schemas.microsoft.com/expression/blend/2008"
xmlns:mc="http://schemas.openxmlformats.org/markup-compatibility/2006"
xmlns:local="clr-namespace:ViewModel;assembly=ViewModel"
mc:Ignorable="d"
d:DesignHeight="311" d:DesignWidth="400">
<UserControl.Resources>
<local:AutoControlViewModel x:Key="autoViewModel"/>
</UserControl.Resources>
<Grid x:Name="LayoutRoot" Background="White" DataContext="{StaticResource autoViewModel}">
<Grid.Children>
<ContentControl Content="{Binding Sp}"/>
<Button Content="确定" Height="25" Width="70" Margin="143,87,187,198" Command="{Binding OkButtonCommand}" CommandParameter="{Binding Children,ElementName=LayoutRoot,Mode=OneWay}" />
</Grid.Children>
</Grid>
</UserControl>
通过以上代码就可以达到在MVVM模式中实现自动运行时生成控件的效果。
点击下载源程序
本实例主要实现程序运行时,在界面上生成四个控件,两个TextBox和两个TextBlock.并且点击按钮时,弹出TextBox中的值。如下图效果
实现方法分以下步骤
第一步:新建一个SivlerLight应用程序,命名为AutoCreatControl
第二步:新建一个ViewModel层,工程名为ViewModel
整个项目结构如下图
通过上面的项目结构图,大家知道需要新建什么文件了
第三步:在工程ViewModel新建一个文件夹ViewModel,并且建一个文件AutoControlViewModel.cs,在此文件中主要ViewModel层的属性和业务。首先要建一个属性,类型为StackPanel,此属性要包含两个TextBox控件和两个TextBlock控件。然后把此属性绑定到主页面即可显示在达到的效果,另外还要有一个绑定到Button的属性。详细情况请看代码
<!--
Code highlighting produced by Actipro CodeHighlighter (freeware)
http://www.CodeHighlighter.com/
-->using System;
using System.Net;
using System.Windows;
using System.Windows.Controls;
using System.Windows.Documents;
using System.Windows.Ink;
using System.Windows.Input;
using System.Windows.Media;
using System.Windows.Media.Animation;
using System.Windows.Shapes;
namespace ViewModel
{
/// <summary>
/// 自动创建控件的ViewModel
/// </summary>
public class AutoControlViewModel
{
//定义一个UI变量
StackPanel sp;
public AutoControlViewModel()
{
CreateControl();
}
/// <summary>
/// UI变量属性,用于绑定到View层
/// </summary>
public StackPanel Sp
{
get { return sp; }
set { sp = value; }
}
/// <summary>
/// 创建控件方法,在此方法中根据业务创建控件
/// </summary>
private void CreateControl()
{
sp = new StackPanel();
sp.Orientation = Orientation.Vertical;
StackPanel sp1 = new StackPanel();
sp1.Orientation = Orientation.Horizontal;
TextBlock tb1 = new TextBlock();
tb1.Text = "用户编号";
tb1.Margin = new Thickness(20, 20, 10, 10);
TextBox txt1 = new TextBox();
txt1.Width = 120;
txt1.Margin = new Thickness(20, 15, 0, 10);
sp1.Children.Add(tb1);
sp1.Children.Add(txt1);
sp.Children.Add(sp1);
StackPanel sp2 = new StackPanel();
sp2.Orientation = Orientation.Horizontal;
TextBlock tb2 = new TextBlock();
tb2.Text = "用户姓名";
tb2.Margin = new Thickness(20, 5, 10, 10);
TextBox txt2 = new TextBox();
txt2.Width = 120;
txt2.Margin = new Thickness(20, 0, 0, 10);
sp2.Children.Add(tb2);
sp2.Children.Add(txt2);
sp.Children.Add(sp2);
}
/// <summary>
/// 绑定到Button上的Command上
/// </summary>
public ICommand OkButtonCommand
{
get { return new AutoControlCommand(this); }
}
/// <summary>
/// 执行Button事件方法
/// </summary>
/// <param name="obj"></param>
public void OkButtonClick(object obj)
{
UIElementCollection uc = obj as UIElementCollection;
foreach (UIElement cc in uc)
{
if (cc != null)
{
if (cc.GetType().Name == "ContentControl")
{
ContentControl ccontrol = cc as ContentControl;
StackPanel spck = ccontrol.Content as StackPanel;
int count = spck.Children.Count;
for (int i = 0; i < count; i++)
{
if (sp.Children[i].GetType().Name == "StackPanel")
{
StackPanel spChild = sp.Children[i] as StackPanel;
for (int k = 0; k < spChild.Children.Count; k++)
{
if (spChild.Children[k].GetType().Name == "TextBox")
{
TextBox txt = spChild.Children[k] as TextBox;
MessageBox.Show(txt.Text);
}
}
}
}
}
}
}
}
}
}
第四步:在工程ViewModel中新建一个文件夹Command,然后再建一个文件AutoControlCommand.cs,在此文件中实现新口ICommand,实现在点击Button时,弹出一个对话框。代码如下
<!--
Code highlighting produced by Actipro CodeHighlighter (freeware)
http://www.CodeHighlighter.com/
-->using System;
using System.Net;
using System.Windows;
using System.Windows.Controls;
using System.Windows.Documents;
using System.Windows.Ink;
using System.Windows.Input;
using System.Windows.Media;
using System.Windows.Media.Animation;
using System.Windows.Shapes;
namespace ViewModel
{
public class AutoControlCommand:ICommand
{
AutoControlViewModel acvm;
public AutoControlCommand(AutoControlViewModel acv)
{
acvm = acv;
}
public bool CanExecute(object parameter)
{
return true;
}
public event EventHandler CanExecuteChanged;
public void Execute(object parameter)
{
if (parameter != null)
acvm.OkButtonClick(parameter);
}
}
}
第五步:在MainPage.xaml中实现数据的绑定。其中绑定自动生成控件时,使用了ContentControl类,
ContentControl类表示包含单项内容的控件。像Button,CheckBox和ScrollView 这样的控件直接或间接继承自该类,ContentControl 的
Content 属性可以是任何类型的对象,例如字符串、UIElement
或 DateTime。当
Content 设置为
UIElement 时,ContentControl 中将显示
UIElement。当
Content 设置为其他类型的对象时,ContentControl 中将显示该对象的字符串表示形式。
通过对 ContentControl类的介绍,知道ContentControl的强大了吧,那么咱们就把ViewModel中的Sp属性绑定到ContentControl的Content即可实现自动生成控件
MainPage.xaml
<!--
Code highlighting produced by Actipro CodeHighlighter (freeware)
http://www.CodeHighlighter.com/
--><UserControl x:Class="AutoCreatControl.MainPage"
xmlns="http://schemas.microsoft.com/winfx/2006/xaml/presentation"
xmlns:x="http://schemas.microsoft.com/winfx/2006/xaml"
xmlns:d="http://schemas.microsoft.com/expression/blend/2008"
xmlns:mc="http://schemas.openxmlformats.org/markup-compatibility/2006"
xmlns:local="clr-namespace:ViewModel;assembly=ViewModel"
mc:Ignorable="d"
d:DesignHeight="311" d:DesignWidth="400">
<UserControl.Resources>
<local:AutoControlViewModel x:Key="autoViewModel"/>
</UserControl.Resources>
<Grid x:Name="LayoutRoot" Background="White" DataContext="{StaticResource autoViewModel}">
<Grid.Children>
<ContentControl Content="{Binding Sp}"/>
<Button Content="确定" Height="25" Width="70" Margin="143,87,187,198" Command="{Binding OkButtonCommand}" CommandParameter="{Binding Children,ElementName=LayoutRoot,Mode=OneWay}" />
</Grid.Children>
</Grid>
</UserControl>
通过以上代码就可以达到在MVVM模式中实现自动运行时生成控件的效果。
点击下载源程序

相关文章推荐
- SilverLight:使用MVVM实现View层在程序运行时自动生成控件并且取得其值 (转)
- SilverLight:使用MVVM实现View层在程序运行时自动生成控件并且取得其值
- SilverLight:使用MVVM实现View层在程序运行时自动生成控件并且取得其值
- 让Java程序作为linux的Daemon后台运行 和 使用Java Service Wrapper将java程序作为linux服务并且开机自动启动
- 使用ViewPager实现可以自动切换的广告控件
- 【asp.net 】使用js结合hidden控件实现在后台运行一段程序后提示确认,确认通过后继续执行后台代码~~~
- 数字猜大小(经典多线程和自动生成控件的小例子)和确定程序的运行时间方法
- 微信小程序中使用scroll-view控件实现上拉加载更多遇到的坑
- [Silverlight入门系列]使用MVVM模式(4):Prism的NotificationObject自动实现INotifyPropertyChanged接口
- Reporting Service Tips 101(#4) - 使用RS实现报表的自动生成以及在程序中调用RS
- [Silverlight入门系列]使用MVVM模式(7):ViewModel的INotifyPropertyChanged接口实现
- 控制Android系统 全屏并且 程序开机自动运行 并且实现程序运行中 开机不锁屏
- Android控件使用—AutoCompleteTextView自动补全实现搜索功能
- 如何解决FormView中实现DropDownList连动选择时出现 "Eval()、XPath() 和 Bind() 这类数据绑定方法只能在数据绑定控件的上下文中使用" 的错误
- 小程序 使用view实现下拉刷新,上拉加载数据
- 利用DevExpress的LayoutControl控件实现界面的自动生成
- 在一个方法里生成了一个自动释放的数组,在另一个方法里使用它会导致程序崩溃。
- 使用Aspose.Cell控件实现Excel高难度报表的生成(一)
- 使用gprof2dot和graphivz生成程序运行调用图