Android之Tab分页标签的实现方法一-----TabActivity和TabHost的结合(三)
2011-10-24 21:57
597 查看
讲了两种方式,你是否发觉它们的代码耦合性太高,如果代码过多,那就是密密麻麻的一大堆,不仅可读性差,修改维护还很困难。这里讲到的方式三,能够很好的解决这个紧耦合问题。因为它的布局文件和各块代码都是独立的文件。那步入主题吧。
三、TabActivity和TabHost的结合(三)
实现描述:
1.主类继承TabActivity
public class Tagpage extends TabActivity
2.获取当前TabHost对象
final TabHost tabHost = getTabHost();
3.添加Tab分页标签,这里就是关键,把每个分页面链接成Activity。页面的跳转,即是Activity的跳转。
tabHost.addTab(tabHost.newTabSpec("Tab1")
.setIndicator("tab2", getResources().getDrawable(R.drawable.a1))
.setContent(new Intent(this, Page1.class)));
.............
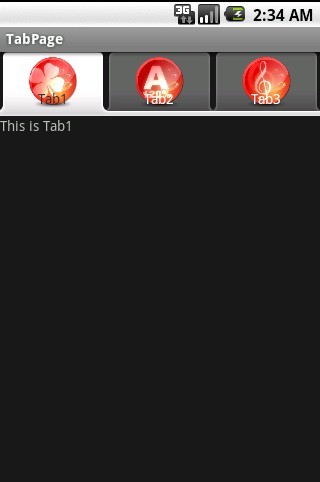

1、布局文件
page1.xml
<?xml version="1.0" encoding="utf-8"?>
<LinearLayout xmlns:android="http://schemas.android.com/apk/res/android"
android:orientation="vertical"
android:layout_width="fill_parent"
android:layout_height="fill_parent"
>
<TextView
android:layout_width="fill_parent"
android:layout_height="wrap_content"
android:text="This is Tab1"
/>
</LinearLayout>
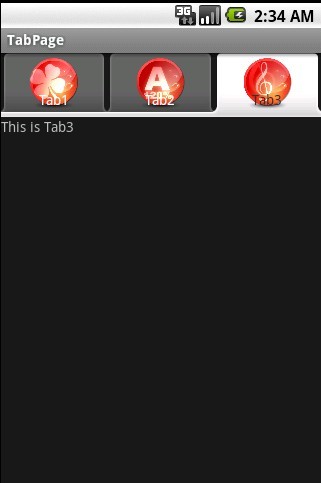
page3.xml
view plain
<?xml version="1.0" encoding="utf-8"?>
<LinearLayout xmlns:android="http://schemas.android.com/apk/res/android"
android:orientation="vertical"
android:layout_width="fill_parent"
android:layout_height="fill_parent"
>
<TextView
android:layout_width="fill_parent"
android:layout_height="wrap_content"
android:text="This is Tab3"
/>
</LinearLayout>
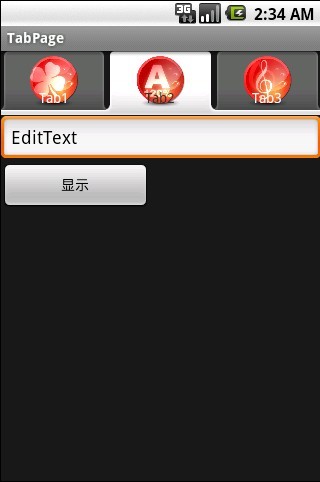
page2.xml
view plain
<?xml version="1.0" encoding="utf-8"?>
<LinearLayout
android:id="@+id/widget30"
android:layout_width="fill_parent"
android:layout_height="fill_parent"
xmlns:android="http://schemas.android.com/apk/res/android"
android:orientation="vertical"
>
<EditText
android:id="@+id/et_text"
android:layout_width="fill_parent"
android:layout_height="wrap_content"
android:text="EditText"
android:textSize="18sp"
>
</EditText>
<Button
android:id="@+id/bt_show"
android:layout_width="149px"
android:layout_height="wrap_content"
android:text="显示"
>
</Button>
</LinearLayout>
2、代码
主代码:Tagpage.java
view plain
package com.myandroid.test;
import android.app.Activity;
import android.app.TabActivity;
import android.content.Intent;
import android.os.Bundle;
import android.widget.TabHost;
public class Tagpage extends TabActivity{
/** Called when the activity is first created. */
@Override
public void onCreate(Bundle savedInstanceState) {
super.onCreate(savedInstanceState);
//setContentView(R.layout.main);
final TabHost tabHost = getTabHost();
tabHost.addTab(tabHost.newTabSpec("Tab1")
.setIndicator("tab2", getResources().getDrawable(R.drawable.a1))
.setContent(new Intent(this, Page1.class)));
tabHost.addTab(tabHost.newTabSpec("Tab2")
.setIndicator("tab2", getResources().getDrawable(R.drawable.a2))
.setContent(new Intent(this, Page2.class)));
// .addFlags(Intent.FLAG_ACTIVITY_CLEAR_TOP))); //添加这句话,会使得每次跳转到该页面都是新建一个页面,以往的数据状态会丢失,读者自己可以试验下
tabHost.addTab(tabHost.newTabSpec("Tab3")
.setIndicator("tab2", getResources().getDrawable(R.drawable.a3))
.setContent(new Intent(this, Page3.class)));
}
}
分页一Activity:Page1.java
view plain
package com.myandroid.test;
import android.app.Activity;
import android.os.Bundle;
public class Page1 extends Activity {
/** Called when the activity is first created. */
@Override
public void onCreate(Bundle savedInstanceState) {
super.onCreate(savedInstanceState);
setContentView(R.layout.page1);
}
}
分页三Activity:Page3.java
view plain
package com.myandroid.test;
import android.app.Activity;
import android.os.Bundle;
public class Page3 extends Activity {
/** Called when the activity is first created. */
@Override
public void onCreate(Bundle savedInstanceState) {
super.onCreate(savedInstanceState);
setContentView(R.layout.page3);
}
}
分页二Activity:Page2.java
view plain
package com.myandroid.test;
import android.app.Activity;
import android.os.Bundle;
import android.view.View;
import android.view.View.OnClickListener;
import android.widget.Button;
import android.widget.EditText;
import android.widget.Toast;
public class Page2 extends Activity {
private Button bt_show;
private EditText et_text;
/** Called when the activity is first created. */
@Override
public void onCreate(Bundle savedInstanceState) {
super.onCreate(savedInstanceState);
setContentView(R.layout.page2);
bt_show = (Button)findViewById(R.id.bt_show);
et_text = (EditText)findViewById(R.id.et_text);
bt_show.setOnClickListener(new ClickEvent());
}
class ClickEvent implements OnClickListener{
@Override
public void onClick(View v) {
// TODO Auto-generated method stub
Toast.makeText(Page2.this, et_text.getText(), Toast.LENGTH_SHORT).show();
}
}
}
最后,别忘了在AndroidManifest.xml文件注册上面用到三个子页面Activity,如下:
view plain
<?xml version="1.0" encoding="utf-8"?>
<manifest xmlns:android="http://schemas.android.com/apk/res/android"
package="com.myandroid.test"
android:versionCode="1"
android:versionName="1.0">
<application android:icon="@drawable/icon" android:label="@string/app_name">
..................
<!-- 要添加Activity的声明,否则系统找不到响应的Activity,会报错 -->
<activity android:name="Page1"></activity>
<activity android:name="Page2"></activity>
<activity android:name="Page3"></activity>
</application>
</manifest>
介绍完了TabActivity和TabHost的结合分页,下一篇将介绍ActivityGroup + GridView结合实现Tap分页
三、TabActivity和TabHost的结合(三)
实现描述:
1.主类继承TabActivity
public class Tagpage extends TabActivity
2.获取当前TabHost对象
final TabHost tabHost = getTabHost();
3.添加Tab分页标签,这里就是关键,把每个分页面链接成Activity。页面的跳转,即是Activity的跳转。
tabHost.addTab(tabHost.newTabSpec("Tab1")
.setIndicator("tab2", getResources().getDrawable(R.drawable.a1))
.setContent(new Intent(this, Page1.class)));
.............
1、布局文件
page1.xml
<?xml version="1.0" encoding="utf-8"?>
<LinearLayout xmlns:android="http://schemas.android.com/apk/res/android"
android:orientation="vertical"
android:layout_width="fill_parent"
android:layout_height="fill_parent"
>
<TextView
android:layout_width="fill_parent"
android:layout_height="wrap_content"
android:text="This is Tab1"
/>
</LinearLayout>
page3.xml
view plain
<?xml version="1.0" encoding="utf-8"?>
<LinearLayout xmlns:android="http://schemas.android.com/apk/res/android"
android:orientation="vertical"
android:layout_width="fill_parent"
android:layout_height="fill_parent"
>
<TextView
android:layout_width="fill_parent"
android:layout_height="wrap_content"
android:text="This is Tab3"
/>
</LinearLayout>
page2.xml
view plain
<?xml version="1.0" encoding="utf-8"?>
<LinearLayout
android:id="@+id/widget30"
android:layout_width="fill_parent"
android:layout_height="fill_parent"
xmlns:android="http://schemas.android.com/apk/res/android"
android:orientation="vertical"
>
<EditText
android:id="@+id/et_text"
android:layout_width="fill_parent"
android:layout_height="wrap_content"
android:text="EditText"
android:textSize="18sp"
>
</EditText>
<Button
android:id="@+id/bt_show"
android:layout_width="149px"
android:layout_height="wrap_content"
android:text="显示"
>
</Button>
</LinearLayout>
2、代码
主代码:Tagpage.java
view plain
package com.myandroid.test;
import android.app.Activity;
import android.app.TabActivity;
import android.content.Intent;
import android.os.Bundle;
import android.widget.TabHost;
public class Tagpage extends TabActivity{
/** Called when the activity is first created. */
@Override
public void onCreate(Bundle savedInstanceState) {
super.onCreate(savedInstanceState);
//setContentView(R.layout.main);
final TabHost tabHost = getTabHost();
tabHost.addTab(tabHost.newTabSpec("Tab1")
.setIndicator("tab2", getResources().getDrawable(R.drawable.a1))
.setContent(new Intent(this, Page1.class)));
tabHost.addTab(tabHost.newTabSpec("Tab2")
.setIndicator("tab2", getResources().getDrawable(R.drawable.a2))
.setContent(new Intent(this, Page2.class)));
// .addFlags(Intent.FLAG_ACTIVITY_CLEAR_TOP))); //添加这句话,会使得每次跳转到该页面都是新建一个页面,以往的数据状态会丢失,读者自己可以试验下
tabHost.addTab(tabHost.newTabSpec("Tab3")
.setIndicator("tab2", getResources().getDrawable(R.drawable.a3))
.setContent(new Intent(this, Page3.class)));
}
}
分页一Activity:Page1.java
view plain
package com.myandroid.test;
import android.app.Activity;
import android.os.Bundle;
public class Page1 extends Activity {
/** Called when the activity is first created. */
@Override
public void onCreate(Bundle savedInstanceState) {
super.onCreate(savedInstanceState);
setContentView(R.layout.page1);
}
}
分页三Activity:Page3.java
view plain
package com.myandroid.test;
import android.app.Activity;
import android.os.Bundle;
public class Page3 extends Activity {
/** Called when the activity is first created. */
@Override
public void onCreate(Bundle savedInstanceState) {
super.onCreate(savedInstanceState);
setContentView(R.layout.page3);
}
}
分页二Activity:Page2.java
view plain
package com.myandroid.test;
import android.app.Activity;
import android.os.Bundle;
import android.view.View;
import android.view.View.OnClickListener;
import android.widget.Button;
import android.widget.EditText;
import android.widget.Toast;
public class Page2 extends Activity {
private Button bt_show;
private EditText et_text;
/** Called when the activity is first created. */
@Override
public void onCreate(Bundle savedInstanceState) {
super.onCreate(savedInstanceState);
setContentView(R.layout.page2);
bt_show = (Button)findViewById(R.id.bt_show);
et_text = (EditText)findViewById(R.id.et_text);
bt_show.setOnClickListener(new ClickEvent());
}
class ClickEvent implements OnClickListener{
@Override
public void onClick(View v) {
// TODO Auto-generated method stub
Toast.makeText(Page2.this, et_text.getText(), Toast.LENGTH_SHORT).show();
}
}
}
最后,别忘了在AndroidManifest.xml文件注册上面用到三个子页面Activity,如下:
view plain
<?xml version="1.0" encoding="utf-8"?>
<manifest xmlns:android="http://schemas.android.com/apk/res/android"
package="com.myandroid.test"
android:versionCode="1"
android:versionName="1.0">
<application android:icon="@drawable/icon" android:label="@string/app_name">
..................
<!-- 要添加Activity的声明,否则系统找不到响应的Activity,会报错 -->
<activity android:name="Page1"></activity>
<activity android:name="Page2"></activity>
<activity android:name="Page3"></activity>
</application>
</manifest>
介绍完了TabActivity和TabHost的结合分页,下一篇将介绍ActivityGroup + GridView结合实现Tap分页

相关文章推荐
- Android之Tab分页标签的实现方法一-----TabActivity和TabHost的结合(二)
- Android之Tab分页标签的实现方法一-----TabActivity和TabHost的结合(一)
- Android之Tab分页标签的实现方法一-----TabActivity和TabHost的结合(一)
- Android之Tab分页标签的实现方法一-----TabActivity和TabHost的结合(三)
- Android之Tab分页标签的实现方法一-----TabActivity和TabHost的结合(二)
- Android之Tab分页标签的实现方法一-----TabActivity和TabHost的结合(三)
- Android之Tab分页标签的实现方法一-----TabActivity和TabHost的结合(二)
- Android之Tab分页标签的实现方法一-----TabActivity和TabHost的结合(二)
- Android之Tab分页标签的实现方法一-----TabActivity和TabHost的结合(三)
- Android之Tab分页标签的实现方法一----TabActivity和TabHost的结合(一)
- Android之Tab分页标签的实现方法一-----TabActivity和TabHost的结合(一)
- Android之Tab分页标签的实现方法一-----TabActivity和TabHost的结合(三)
- Android之Tab分页标签的实现方法一-----TabActivity和TabHost的结合(二)
- 转:Android之Tab分页标签的实现方法一-----TabActivity和TabHost的结合
- Android之Tab分页标签的实现方法一-----TabActivity和TabHost的结合(一)
- Android之Tab分页标签的实现方法一-----TabActivity和TabHost的结合(三)
- Android之Tab分页标签的实现方法--------采用ActivityGroup和GridView的结合
- Android之Tab分页标签的实现方法--------采用ActivityGroup和GridView的结合
- Android之Tab分页标签的实现方法--------采用ActivityGroup和GridView的结合
- Android之Tab分页标签的实现方法--------采用ActivityGroup和GridView的结合