我的WCF4 REST Service及Entity Framework with POCO之旅(五)——身份验证
2011-08-22 01:15
381 查看
本文将通过对2-legged OAuth的简单实现,说明如何在WCF REST Service中实现自定义的身份验证。提到验证,最显而易见的做法当然是在每个服务方法开头调用一个检查权限的方法。但这种做法显然太不好看了,如果可以在每个方法上面用一个attribute标明哪些用户(组)可以访问,那就太好了。这就是本文要介绍的AuthorizationManager方案。
首先简单提一下OAuth.
容易产生的疑问是,OAuth会不会太复杂?我只需要非常简单的身份验证而已,为什么要用这么麻烦的东西?其实OAuth, 尤其是2-legged Auth非常简单,而且如果你自己实现一个身份验证,当你把它实现完善时,你就会发现自己做了一个和OAuth一模一样的东西出来了,比如这个哥们,他非常兴奋地声明自己发明了一种不用OAuth的身份验证,结果人家在评论里直接指出他写的就是2-legged OAuth。
由于2-legged OAuth有一个初始条件是服务器和客户端已经获得了同样的Key/Secret对,也就是说身份验证的第一步是从服务器获得一个特定于用户的Secret Token。这个过程必须在安全的通道(如https)上完成,一般也就是一个简单的login就行了。本文为了简单起见,假定secret已经获得,而Key则是用户名。
然后和method以及URI,当然还有密码的散列一起计算签名,并将计算得到的结果与客户端提交的进行比较:
GetAuthScrect方法根据用户名(key)取出用户密码散列(secret)。值得注意的是,按照OAuth的标准,后面要加上一个”&”再参与计算。
SetSecurityContext方法设置当前的安全环境:
而CustomPrincipal则是IPrincipal的基本实现。
改好之后,直接运行一下试试:
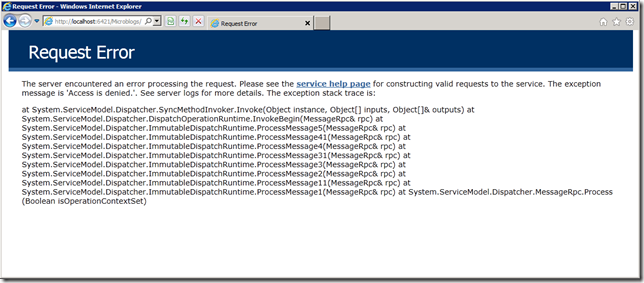
如果把includeExceptionDetailInFaults关掉,则显示:
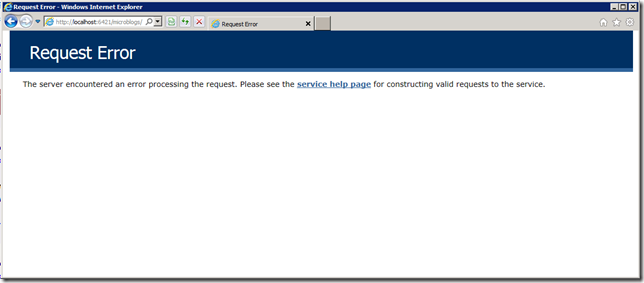
用Fiddler2可以看到这时返回的是一个400 Bad Request。这个效果并不好,因为这时应该返回401 Unauthorized,以后会解决这个问题。至少阻止匿名用户访问的目的是达到了。
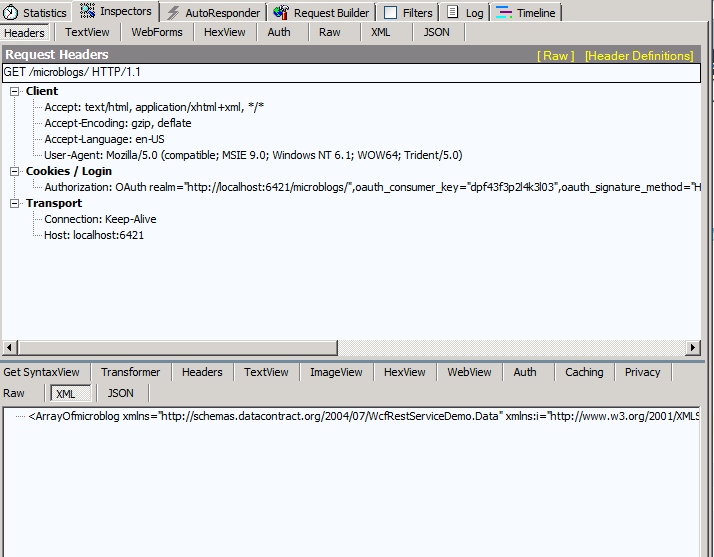
接下来,在Fiddler2中制造一个请求,提供完整的Authorization头。由于Host URI变了,所以签名也和开头示例中的有所不同:
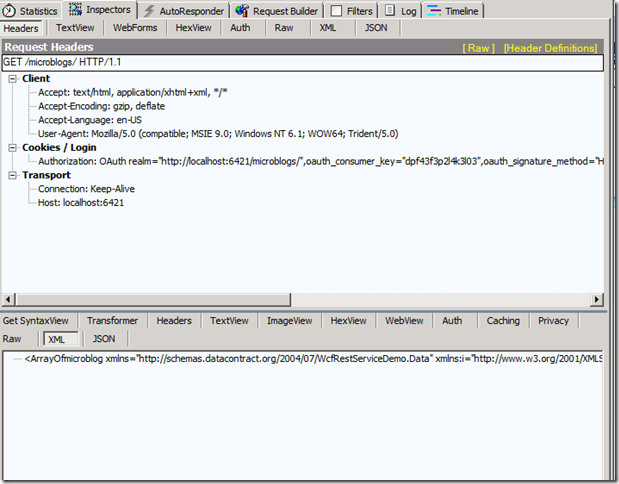
可以看到,请求通过了身份验证,成功获取了数据。
如何使用AuthorizationManager来截获请求并完成基于OAuth的身份验证
设置访问策略时,尚不能使用Role。Role其实是由CustomPrincipal的IsInRole方法来提供的,现在的实现是直接调用System.Web.Security.Roles,那就需要配置RoleProvider。比较简单的做法是直接使用ASP.NET Membership那一整套东西。当然也可以直接在CustomPrincipal中实现自定义的Role逻辑。
简单起见,我对OAuth的实现很基本,存在很多问题
不支持在URI或者Form body中提供OAuth参数
不支持HMAC-SHA1以外的签名算法
没有检查timestamp参数和服务器时间的差距
没有检查nonce参数的唯一性
没有检查realm参数(可选的)
此外,身份验证失败的返回信息并不规范,这个将在后面解决。
毕竟,我只是想要演示如何在WCF目前的框架范围内实现这一过程,实际生产应用的话,还是推荐使用成熟的library.
我将在下一篇中完善Microblog服务的身份验证功能,为其添加一个简单的用户模块。
本文代码
参考:
Using OAuth for Consumer Requests
2-legged vs. 3-legged OAuth
How to: Create a Custom Authorization Manager for a Service
OAuth and .Net
RFC 5849 - The OAuth 1.0 Protocol
Designing a Secure REST (Web) API without OAuth
WCF 4.0 REST Authorization Examples
我的WCF4 REST Service及Entity Framework with POCO之旅系列
我的WCF4 REST Service及Entity Framework with POCO之旅(一)——创建一个基本的RESTful Service
我的WCF4 REST Service及Entity Framework with POCO之旅(二)——选择请求/返回格式
我的WCF4 REST Service及Entity Framework with POCO之旅(三)——用Entity Framework和POCO Template实现数据模型及存储
我的WCF4 REST Service及Entity Framework with POCO之旅(四)——定制Entity
我的WCF4 REST Service及Entity Framework with POCO之旅(五)——身份验证
首先简单提一下OAuth.
OAuth
我们一般认为OAuth的用途就是给第三方应用/网站授权,比如我有twitter账号,我授权给yfrog读/写我的twitter,通过使用OAuth,在这个授权过程中,yfrog始终不会接触到我的密码,同时,如果我改了密码,它的访问也不会受到影响,如果我要停止向它授权,只需要在twitter设置中撤销访问权就行,安全,简单。然而这其实是OAuth的一个特定版本,叫做3-legged OAuth。OAuth还有一个版本叫做2-legged OAuth,是专门用于传统的单一客户端+服务器场景的。容易产生的疑问是,OAuth会不会太复杂?我只需要非常简单的身份验证而已,为什么要用这么麻烦的东西?其实OAuth, 尤其是2-legged Auth非常简单,而且如果你自己实现一个身份验证,当你把它实现完善时,你就会发现自己做了一个和OAuth一模一样的东西出来了,比如这个哥们,他非常兴奋地声明自己发明了一种不用OAuth的身份验证,结果人家在评论里直接指出他写的就是2-legged OAuth。
由于2-legged OAuth有一个初始条件是服务器和客户端已经获得了同样的Key/Secret对,也就是说身份验证的第一步是从服务器获得一个特定于用户的Secret Token。这个过程必须在安全的通道(如https)上完成,一般也就是一个简单的login就行了。本文为了简单起见,假定secret已经获得,而Key则是用户名。
AuthorizationManger方案
要在服务方法调用之前验证身份,就得截获请求。之前看的很多实现方法都使用了WCF 3.5 REST WCF Starter Kit中的RequestInterceptor,但是在WCF 4.0中找不到了(只有在Data Services中还有QueryInterceptor)。所以必须找到另一个地方,在调用实际的服务方法之前完成身份验证。这样一个地方就是AuthorizationManager. 添加一个继承自ServiceAuthorizationManager的类:http://provider.example.net/profile
Authorization: OAuth realm="'>var authParamString = operationContext.GetHttpHeader(AuthHeaderName);
if(authParamString == null || !authParamString.StartsWith(OAuthPrefix))
{
SetAnonymousContext(operationContext.RequestContext.RequestMessage);
return true;
}
var authParams = authParamString.Substring(OAuthPrefix.Length).Split(',')
.Select(p => p.Split('=')).ToDictionary(p => p[0], p => p[1].Trim('"'));然后和method以及URI,当然还有密码的散列一起计算签名,并将计算得到的结果与客户端提交的进行比较:
private string GetSignature(string baseString, string key)
{
var hmac = new HMACSHA1(Encoding.UTF8.GetBytes(GetAuthSecret(key) + "&"));
return Convert.ToBase64String(hmac.ComputeHash(Encoding.UTF8.GetBytes(baseString)));
}
GetAuthScrect方法根据用户名(key)取出用户密码散列(secret)。值得注意的是,按照OAuth的标准,后面要加上一个”&”再参与计算。
SetSecurityContext方法设置当前的安全环境:
internal class AuthorizationPolicy : IAuthorizationPolicy
{
private readonly Guid _id = Guid.NewGuid();

private readonly IIdentity _identity;

public AuthorizationPolicy(IIdentity identity)
{
if(identity == null)
{
throw new ArgumentNullException("identity");
}
_identity = identity;
}

#region IAuthorizationPolicy Members

// this method gets called after the authentication stage
/// <summary>
/// Evaluates whether a user meets the requirements for this authorization policy.
/// </summary>
/// <param name="evaluationContext">An <see cref="T:System.IdentityModel.Policy.EvaluationContext"/> that contains the claim set that the authorization policy evaluates.</param>
/// <param name="state">A <see cref="T:System.Object"/>, passed by reference that represents the custom state for this authorization policy.</param>
/// <returns>
/// false if the <see cref="M:System.IdentityModel.Policy.IAuthorizationPolicy.Evaluate(System.IdentityModel.Policy.EvaluationContext,System.Object@)"/> method for this authorization policy must be called if additional claims are added by other authorization policies to <paramref name="evaluationContext"/>; otherwise, true to state no additional evaluation is required by this authorization policy.
/// </returns>
public bool Evaluate(EvaluationContext evaluationContext, ref object state)
{
// get the authenticated client identity
var client = _identity; //GetClientIdentity(evaluationContext);
// set the custom principal
evaluationContext.Properties["Principal"] = new CustomPrincipal(client);
HttpContext.Current.User = new CustomPrincipal(_identity);
return true;
}

public ClaimSet Issuer
{
get { return ClaimSet.System; }
}

public string Id
{
get { return _id.ToString(); }
}

#endregion
}
而CustomPrincipal则是IPrincipal的基本实现。
internal class CustomPrincipal : IPrincipal
{
private readonly IIdentity _identity;

public CustomPrincipal(IIdentity identity)
{
_identity = identity;
}

/// <summary>
/// Gets the <see cref="CustomPrincipal"/> instance for the current user.
/// It's a helper method for easy access (without casting).
/// </summary>
public static CustomPrincipal Current
{
get { return Thread.CurrentPrincipal as CustomPrincipal; }
}

public string[] Roles
{
get { return System.Web.Security.Roles.GetRolesForUser(_identity.Name); }
}

#region IPrincipal Members

public IIdentity Identity
{
get { return _identity; }
}

public bool IsInRole(string role)
{
return Roles.Contains(role);
}

#endregion
}
修改web.config
要让AuthorizationManager嵌入WCF Service工作,还需最后一步,修改web.config,在<system.serviceModel>节中添加如下内容:[WebGet(UriTemplate = "")]
[PrincipalPermission(SecurityAction.Demand, Name = "dpf43f3p2l4k3l03")]
public List<Microblog> GetCollection()
{
...改好之后,直接运行一下试试:

如果把includeExceptionDetailInFaults关掉,则显示:

用Fiddler2可以看到这时返回的是一个400 Bad Request。这个效果并不好,因为这时应该返回401 Unauthorized,以后会解决这个问题。至少阻止匿名用户访问的目的是达到了。
接下来,在Fiddler2中制造一个请求,提供完整的Authorization头。由于Host URI变了,所以签名也和开头示例中的有所不同:
可以看到,请求通过了身份验证,成功获取了数据。
小结
本文介绍了:如何使用AuthorizationManager来截获请求并完成基于OAuth的身份验证
不足之处
容易看出,本文的实现还很不完善:设置访问策略时,尚不能使用Role。Role其实是由CustomPrincipal的IsInRole方法来提供的,现在的实现是直接调用System.Web.Security.Roles,那就需要配置RoleProvider。比较简单的做法是直接使用ASP.NET Membership那一整套东西。当然也可以直接在CustomPrincipal中实现自定义的Role逻辑。
简单起见,我对OAuth的实现很基本,存在很多问题
不支持在URI或者Form body中提供OAuth参数
不支持HMAC-SHA1以外的签名算法
没有检查timestamp参数和服务器时间的差距
没有检查nonce参数的唯一性
没有检查realm参数(可选的)
此外,身份验证失败的返回信息并不规范,这个将在后面解决。
毕竟,我只是想要演示如何在WCF目前的框架范围内实现这一过程,实际生产应用的话,还是推荐使用成熟的library.
我将在下一篇中完善Microblog服务的身份验证功能,为其添加一个简单的用户模块。
本文代码
参考:
Using OAuth for Consumer Requests
2-legged vs. 3-legged OAuth
How to: Create a Custom Authorization Manager for a Service
OAuth and .Net
RFC 5849 - The OAuth 1.0 Protocol
Designing a Secure REST (Web) API without OAuth
WCF 4.0 REST Authorization Examples
我的WCF4 REST Service及Entity Framework with POCO之旅系列
我的WCF4 REST Service及Entity Framework with POCO之旅(一)——创建一个基本的RESTful Service
我的WCF4 REST Service及Entity Framework with POCO之旅(二)——选择请求/返回格式
我的WCF4 REST Service及Entity Framework with POCO之旅(三)——用Entity Framework和POCO Template实现数据模型及存储
我的WCF4 REST Service及Entity Framework with POCO之旅(四)——定制Entity
我的WCF4 REST Service及Entity Framework with POCO之旅(五)——身份验证

相关文章推荐
- 我的WCF4 REST Service及Entity Framework with POCO之旅(五)——身份验证
- 【REST】在 WCF RESTfull service 中实现自己的身份验证方式
- SharePoint Web Service的身份验证
- [转] 分别用(Windows/Form/Soap/WebService)实现用户身份验证
- 关于WEB Service&WCF&WebApi实现身份验证之WEB Service篇
- 我的WCF4 Rest Service及Entity Framework with POCO之旅(三)——用Entity Framework和POCO Template实现数据模型及存储
- yii restfull 方法验证用户身份通过token
- SharePoint Web Service的身份验证
- SQL Server Analysis Service身份验证
- JAX-RS REST客户端实现基本身份验证机制
- 我的WCF4 Rest Service及Entity Framework with POCO之旅(二)——选择请求/返回格式
- WCF4 Rest Service及Entity Framework with POCO之旅
- REST API的身份验证(Authentication)
- 关于WEB Service&WCF&WebApi实现身份验证之WCF篇(2)
- SharePoint Web Service的身份验证
- 我的WCF4 Rest Service及Entity Framework with POCO之旅(四)——定制Entity
- 关于WEB Service&WCF&WebApi实现身份验证之WCF篇(1)
- 关于WEB Service&WCF&WebApi实现身份验证之WebApi篇
- SharePoint Web Service的身份验证
- 我的WCF4 Rest Service及Entity Framework with POCO之旅(一)——创建一个基本的RESTful Service