两分钟彻底让你明白Android Activity生命周期(图文)
2011-07-26 16:26
423 查看
大家好,今天给大家详解一下Android中Activity的生命周期,我在前面也曾经讲过这方面的内容,但是像网上大多数文章一样,基本都是翻译Android API,过于笼统,相信大家看了,会有一点点的帮助 ,但是还不能完全吃透,所以我今天特意在重新总结一下.
首先看一下Android api中所提供的Activity生命周期图(不明白的,可以看完整篇文章,在回头看一下这个图,你会明白的):
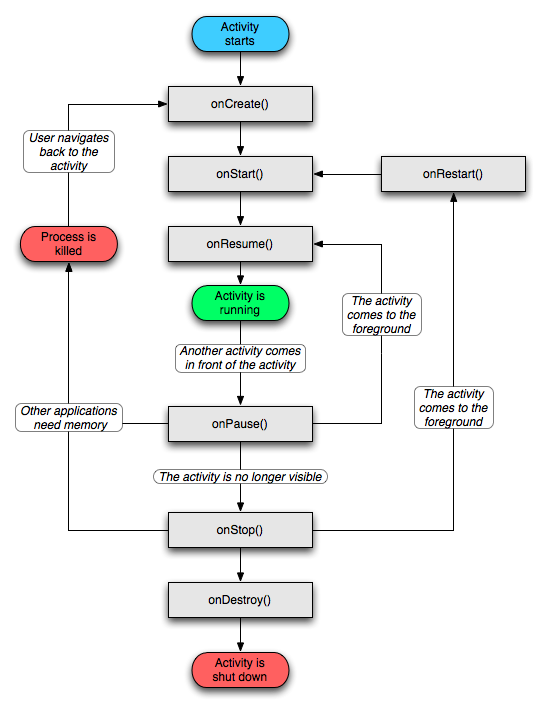
Activity其实是继承了ApplicationContext这个类,我们可以重写以下方法,如下代码:
view plaincopy to clipboardprint?public class Activity extends ApplicationContext {
protected void onCreate(Bundle savedInstanceState);
protected void onStart();
protected void onRestart();
protected void onResume();
protected void onPause();
protected void onStop();
protected void onDestroy();
}
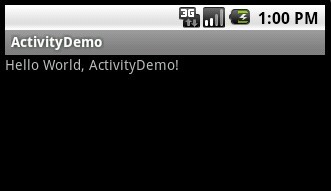
第三步:运行上述工程,效果图如下(没什么特别的):
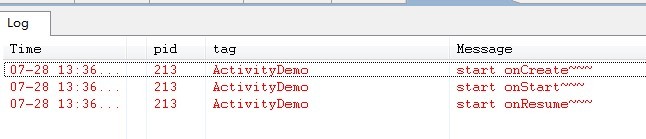
核心在Logcat视窗里,如果你还不会用Logcat你可以看一下我的这篇文章 Log图文详解(Log.v,Log.d,Log.i,Log.w,Log.e) ,我们打开应用时先后执行了onCreate()->onStart()->onResume三个方法,看一下LogCat视窗如下:
BACK键:
当我们按BACK键时,我们这个应用程序将结束,这时候我们将先后调用onPause()->onStop()->onDestory()三个方法,如下图所示:

HOME键:
当我们打开应用程序时,比如浏览器,我正在浏览NBA新闻,看到一半时,我突然想听歌,这时候我们会选择按HOME键,然后去打开音乐应用程序,而当我们按HOME的时候,Activity先后执行了onPause()->onStop()这两个方法,这时候应用程序并没有销毁。如下图所示:

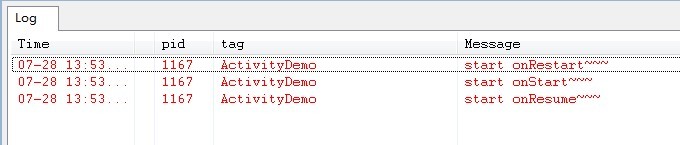
而当我们再次启动ActivityDemo应用程序时,则先后分别执行了onRestart()->onStart()->onResume()三个方法,如下图所示:
这里我们会引出一个问题,当我们按HOME键,然后再进入ActivityDemo应用时,我们的应用的状态应该是和按HOME键之前的状态是一样的,同样为了方便理解,在这里我将ActivityDemo的代码作一些修改,就是增加一个EditText。
第四步:修改main.xml布局文件(增加了一个EditText),代码如下:
view plaincopy to clipboardprint?<?xml version="1.0" encoding="utf-8"?>
<LinearLayout xmlns:android="http://schemas.android.com/apk/res/android"
android:orientation="vertical"
android:layout_width="fill_parent"
android:layout_height="fill_parent"
>
<TextView
android:layout_width="fill_parent"
android:layout_height="wrap_content"
android:text="@string/hello"
/>
<EditText
android:id="@+id/editText"
android:layout_width="fill_parent"
android:layout_height="wrap_content"
/>
</LinearLayout>
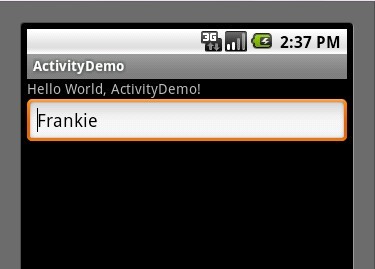
第七步:重新运行ActivityDemo程序,重复第五步操作,当我们按HOME键时,再次启动应用程序时,EditText里有上次输入的"Frankie"字样,如下图如示:
OK,大功基本告成,这时候大家可以在回上面看一下Activity生命周期图,我想大家应该完全了解了Activity的生命周期了,不知道你了解了没?
首先看一下Android api中所提供的Activity生命周期图(不明白的,可以看完整篇文章,在回头看一下这个图,你会明白的):
Activity其实是继承了ApplicationContext这个类,我们可以重写以下方法,如下代码:
view plaincopy to clipboardprint?public class Activity extends ApplicationContext {
protected void onCreate(Bundle savedInstanceState);
protected void onStart();
protected void onRestart();
protected void onResume();
protected void onPause();
protected void onStop();
protected void onDestroy();
}
view plaincopy to clipboardprint?package com.tutor.activitydemo;
import android.app.Activity;
import android.os.Bundle;
import android.util.Log;
public class ActivityDemo extends Activity {

private static final String TAG = "ActivityDemo";

public void onCreate(Bundle savedInstanceState) {
super.onCreate(savedInstanceState);
setContentView(R.layout.main);

Log.e(TAG, "start onCreate~~~");
}

@Override
protected void onStart() {
super.onStart();
Log.e(TAG, "start onStart~~~");
}

@Override
protected void onRestart() {
super.onRestart();
Log.e(TAG, "start onRestart~~~");
}

@Override
protected void onResume() {
super.onResume();
Log.e(TAG, "start onResume~~~");
}

@Override
protected void onPause() {
super.onPause();
Log.e(TAG, "start onPause~~~");
}

@Override
protected void onStop() {
super.onStop();
Log.e(TAG, "start onStop~~~");
}

@Override
protected void onDestroy() {
super.onDestroy();
Log.e(TAG, "start onDestroy~~~");
}

}
package com.tutor.activitydemo;import android.app.Activity;import android.os.Bundle;import android.util.Log;public class ActivityDemo extends Activity {   private static final String TAG = "ActivityDemo";    public void onCreate(Bundle savedInstanceState) {        super.onCreate(savedInstanceState);        setContentView(R.layout.main);                Log.e(TAG, "start onCreate~~~");    }        @Override    protected void onStart() {    	super.onStart();    	Log.e(TAG, "start onStart~~~");    }        @Override    protected void onRestart() {    	super.onRestart();    	Log.e(TAG, "start onRestart~~~");    }        @Override    protected void onResume() {    	super.onResume();    	Log.e(TAG, "start onResume~~~");    }        @Override    protected void onPause() {    	super.onPause();    	Log.e(TAG, "start onPause~~~");    }        @Override    protected void onStop() {    	super.onStop();    	Log.e(TAG, "start onStop~~~");    }        @Override    protected void onDestroy() {    	super.onDestroy();    	Log.e(TAG, "start onDestroy~~~");    }    }
第三步:运行上述工程,效果图如下(没什么特别的):
核心在Logcat视窗里,如果你还不会用Logcat你可以看一下我的这篇文章 Log图文详解(Log.v,Log.d,Log.i,Log.w,Log.e) ,我们打开应用时先后执行了onCreate()->onStart()->onResume三个方法,看一下LogCat视窗如下:
BACK键:
当我们按BACK键时,我们这个应用程序将结束,这时候我们将先后调用onPause()->onStop()->onDestory()三个方法,如下图所示:
HOME键:
当我们打开应用程序时,比如浏览器,我正在浏览NBA新闻,看到一半时,我突然想听歌,这时候我们会选择按HOME键,然后去打开音乐应用程序,而当我们按HOME的时候,Activity先后执行了onPause()->onStop()这两个方法,这时候应用程序并没有销毁。如下图所示:
而当我们再次启动ActivityDemo应用程序时,则先后分别执行了onRestart()->onStart()->onResume()三个方法,如下图所示:
这里我们会引出一个问题,当我们按HOME键,然后再进入ActivityDemo应用时,我们的应用的状态应该是和按HOME键之前的状态是一样的,同样为了方便理解,在这里我将ActivityDemo的代码作一些修改,就是增加一个EditText。
第四步:修改main.xml布局文件(增加了一个EditText),代码如下:
view plaincopy to clipboardprint?<?xml version="1.0" encoding="utf-8"?>
<LinearLayout xmlns:android="http://schemas.android.com/apk/res/android"
android:orientation="vertical"
android:layout_width="fill_parent"
android:layout_height="fill_parent"
>
<TextView
android:layout_width="fill_parent"
android:layout_height="wrap_content"
android:text="@string/hello"
/>
<EditText
android:id="@+id/editText"
android:layout_width="fill_parent"
android:layout_height="wrap_content"
/>
</LinearLayout>
view plaincopy to clipboardprint?package com.tutor.activitydemo;
import android.app.Activity;
import android.os.Bundle;
import android.util.Log;
import android.widget.EditText;
public class ActivityDemo extends Activity {

private static final String TAG = "ActivityDemo";
private EditText mEditText;
//定义一个String 类型用来存取我们EditText输入的值
private String mString;
public void onCreate(Bundle savedInstanceState) {
super.onCreate(savedInstanceState);
setContentView(R.layout.main);
mEditText = (EditText)findViewById(R.id.editText);
Log.e(TAG, "start onCreate~~~");
}

@Override
protected void onStart() {
super.onStart();
Log.e(TAG, "start onStart~~~");
}
//当按HOME键时,然后再次启动应用时,我们要恢复先前状态
@Override
protected void onRestart() {
super.onRestart();
mEditText.setText(mString);
Log.e(TAG, "start onRestart~~~");
}

@Override
protected void onResume() {
super.onResume();
Log.e(TAG, "start onResume~~~");
}

//当我们按HOME键时,我在onPause方法里,将输入的值赋给mString
@Override
protected void onPause() {
super.onPause();
mString = mEditText.getText().toString();
Log.e(TAG, "start onPause~~~");
}

@Override
protected void onStop() {
super.onStop();
Log.e(TAG, "start onStop~~~");
}

@Override
protected void onDestroy() {
super.onDestroy();
Log.e(TAG, "start onDestroy~~~");
}

}
package com.tutor.activitydemo;import android.app.Activity;import android.os.Bundle;import android.util.Log;import android.widget.EditText;public class ActivityDemo extends Activity {   private static final String TAG = "ActivityDemo";private EditText mEditText;//定义一个String 类型用来存取我们EditText输入的值private String mString;    public void onCreate(Bundle savedInstanceState) {        super.onCreate(savedInstanceState);        setContentView(R.layout.main);        mEditText = (EditText)findViewById(R.id.editText);        Log.e(TAG, "start onCreate~~~");    }        @Override    protected void onStart() {    	super.onStart();    	Log.e(TAG, "start onStart~~~");    }    //当按HOME键时,然后再次启动应用时,我们要恢复先前状态    @Override    protected void onRestart() {    	super.onRestart();    	mEditText.setText(mString);    	Log.e(TAG, "start onRestart~~~");    }        @Override    protected void onResume() {    	super.onResume();    	Log.e(TAG, "start onResume~~~");    }        //当我们按HOME键时,我在onPause方法里,将输入的值赋给mString    @Override    protected void onPause() {    	super.onPause();    	mString = mEditText.getText().toString();    	Log.e(TAG, "start onPause~~~");    }        @Override    protected void onStop() {    	super.onStop();    	Log.e(TAG, "start onStop~~~");    }        @Override    protected void onDestroy() {    	super.onDestroy();    	Log.e(TAG, "start onDestroy~~~");    }    }
第七步:重新运行ActivityDemo程序,重复第五步操作,当我们按HOME键时,再次启动应用程序时,EditText里有上次输入的"Frankie"字样,如下图如示:
OK,大功基本告成,这时候大家可以在回上面看一下Activity生命周期图,我想大家应该完全了解了Activity的生命周期了,不知道你了解了没?

相关文章推荐
- 两分钟彻底让你明白Android Activity生命周期(图文)
- 两分钟彻底让你明白Android Activity生命周期(图文)!
- 两分钟彻底让你明白Android Activity生命周期(图文)!
- 两分钟彻底让你明白Android Activity生命周期(图文)!
- 两分钟彻底让你明白Android Activity生命周期(图文)!
- 两分钟彻底让你明白Android Activity生命周期(图文)!
- 两分钟彻底让你明白Android Activity生命周期(图文)!
- 两分钟彻底让你明白Android Activity生命周期(图文)!
- 两分钟彻底让你明白Android Activity生命周期(图文)!
- 两分钟彻底让你明白Android Activity生命周期(图文)!
- [转]: 两分钟彻底让你明白Android Activity生命周期(图文)!
- 两分钟彻底让你明白Android Activity生命周期(图文)!
- 两分钟彻底让你明白Android Activity生命周期(图文)!
- 两分钟彻底让你明白Android Activity生命周期(图文)!
- 两分钟彻底让你明白Android Activity生命周期(图文)!
- 两分钟彻底让你明白Android Activity生命周期(图文)!
- android 学习教程五之----Activity 两分钟彻底让你明白Android Activity生命周期(图文)! .
- 两分钟彻底让你明白Android Activity生命周期(图文) .
- 两分钟彻底让你明白Android Activity生命周期(图文)!
- 两分钟彻底让你明白Android Activity生命周期(图文)!