开源电话交换平台FreeSwitch的安装与配置
2011-07-02 10:11
309 查看
开源电话交换平台FreeSwitch的安装与配置
环境:
操作系统:RHEL5.2
电话交换平台:FreeSwitch 1.07
支持工具:git-1.7.4.tar.bz2
1. 安装Epel源(配置这个源其实是不必要的。)
Epel官网:http://fedoraproject.org/wiki/EPEL
su -c 'rpm -Uvh http://download.fedora.redhat.com/pub/epel/5/i386/epel-release-5-4.noarch.rpm'
卸载yum-rhn-plugin
/etc/init.d/yum-updatesd stop
rpm -e --nodeps yum-rhn-plugin-0.5.3-6.el5

yum list
如有输出软件列表,说明yum源工作正常

如果yum源被墙,使用代理
vi /etc/yum.conf
proxy=http://122.205.95.14:80
su -c 'yum install foo'
2. 配置本地光盘作为YUM源,Epel源作为备用。
创建/etc/yum.repos.d/rhel-cdrom.repo,内容如下
[root@freeswitch temp]# more rhel-cdrom.repo
[rhel-cdrom]
name=Red Hat Enterprise Linux $releasever - $basearch - Debug
#baseurl=ftp://ftp.redhat.com/pub/redhat/linux/enterprise/$releasever/en/os/$basearch/Debuginfo/
baseurl=file:///mnt/cdrom/Server
enabled=1
gpgcheck=1
gpgkey=file:///etc/pki/rpm-gpg/RPM-GPG-KEY-redhat-release
3. Install Git from source,利用Git工具获得FreeSwitch最新源码
Git官网:http://wiki.freeswitch.org/wiki/Git_Install


mount -t iso9660 /dev/cdrom /mnt/cdrom
cd /usr/local/src
yum -y install gcc gcc-c++ make gettext-devel expat-devel curl-devel zlib-devel openssl-devel bzip2
备注:从本地源安装,貌似Epel源没有上述安装包,上述安装包是git所需要的环境
有可能用到的命令是yum clean all和yum update
wget http://kernel.org/pub/software/scm/git/git-1.7.4.tar.bz2

下载地址疑似被墙,使用迅雷可成功下载该软件
tar -xvjf git-1.7.4.tar.bz2
cd git-1.7.4
make prefix=/usr/local all
make prefix=/usr/local install
4. 下载及安装FreeSwitch
使用Git下载能确保使用当前最新版本FreeSwitch
cd /usr/local/src
git clone git://git.freeswitch.org/freeswitch.git
安装FreeSwitch
安装参考:http://wiki.freeswitch.org/wiki/Installation_Guide#Compiling_and_Installation
cd /usr/local/src/freeswitch
在安装FreeSwitch之前,先安装所需模块,从Rhel5光盘安装
模块的安装有两种模式,分别是
安装基本模块的FreeSwitch
yum install autoconf automake gcc-c++ git-core libjpeg-devel libtool make ncurses-devel
启用完全功能的FreeSwitch
yum install unixODBC-devel openssl-devel gnutls-devel libogg-devel libvorbis-devel curl-devel libtiff-devel libjpeg-devel python-devel expat-devel zlib zlib-devel bzip2 which
本次实验启用完全功能的FreeSwitch


下载完了,可以顺手打个包留着备用,下载过程太漫长了
tar -jcvf freeswitch.tar.bz2 /usr/local/src/freeswitch/
./bootstrap.sh && ./configure && make&&make install

安装声音文件
make all cd-sounds-install cd-moh-install
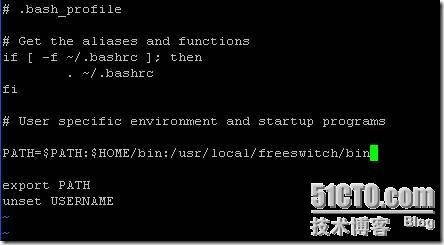
5. 修改环境变量,添加PATH
cd ~
vi .bash_profile
PATH=$PATH:$HOME/bin:/usr/local/freeswitch/bin
source ~/.bash_profile
6. Freeswitch的启动方式有两种
a) 命令直接启动
命令行直接运行freeswitch(已经加入到PATH环境变量)
或者
cd /usr/local/freeswitch/bin
./freeswitch
b) 添加到服务
cp /usr/local/src/freeswitch/build/freeswitch.init.redhat /etc/init.d/freeswitch
chmod 755 freeswitch
vi freeswitch
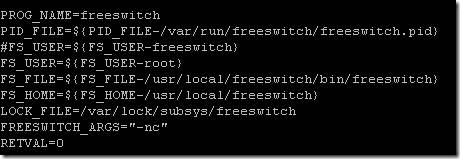
然后 mkdir /var/run/freeswitch
chkconfig --add freeswitch
官网写的是chkconfig --add freeswitch && chkconfig --levels 35 freeswitch on

接下来启动服务
[root@freeswitch freeswitch]# service freeswitch status
freeswitch is stopped
[root@freeswitch freeswitch]# service freeswitch start
Starting freeswitch: [ OK ]

7. 开放防火墙端口
iptables -I RH-Firewall-1-INPUT 2 -p tcp --dport 5060 -j ACCEPT
iptables -I RH-Firewall-1-INPUT 3 -p udp --dport 5060 -j ACCEPT
service iptables save
8. 控制FreeSWITCH的命令
netstat -an | grep 5060
FreeSwitch监听TCP及UDP5060端口
启动:freeswitch、service freeswitch start
关闭:shutdown(freeswitch控制台下执行)、service freeswitch stop
无控制台启动:freeswitch -nc
客户端连接工具:fs_cli
关闭的其它命令:freeswitch -stop;fsctl shutdown(fs_cli客户端中使用)
退出fs_cli客户端:/exit,或Ctrl + D
9. SIP软电话
SIP软电话主要有X-Lite 和 Zoiper,均支持Windows、Linux、MAC等平台
FreeSWITCH 默认配置了 1000 ~ 1019(分机号) 共 20 个用户
10. 在Winxp上安装SIP软电话X-Lite
操作系统:WinxpSp3
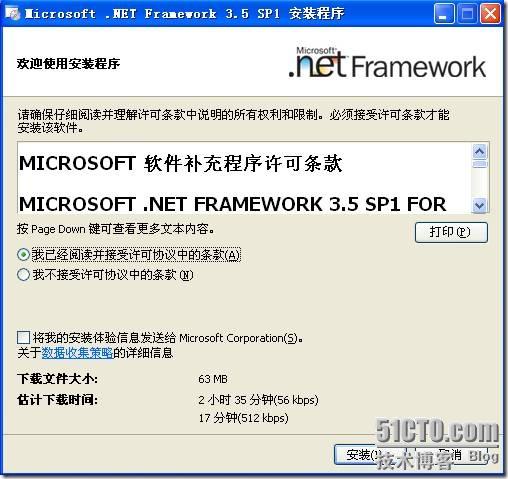
先决软件:Microsoft Visual C++ 2008 SP1 Redistributable Package (x86)及Microsoft .NET Framework 3.5 Service Pack 1
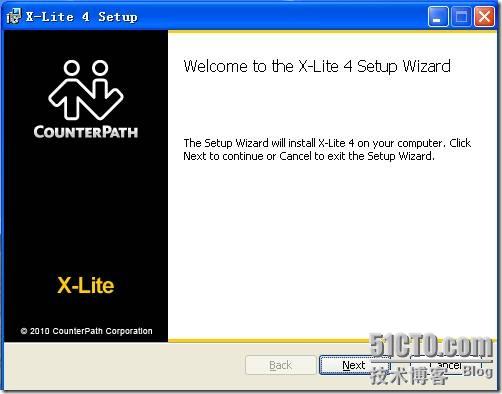
X-lite:X-Lite_Win32_4.0_58832.exe
分别安装Framework 3.5 SP1、Visual C++ 2008 SP1及X-lite,均为缺省安装
Framework 3.5 SP1需要连网安装


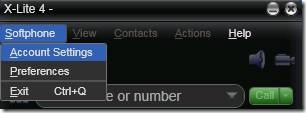
配置X-Lite
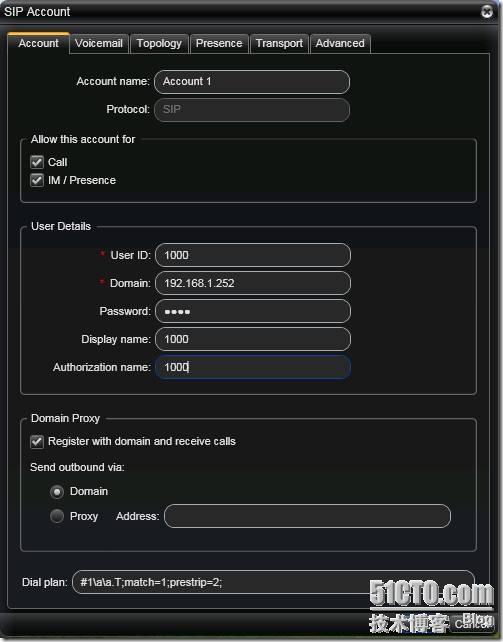
Display Name: 1000
User name: 1000
Password: 1234
Authorization user name: 1000
Domain: Freeswitch的IP,也就是侦听5060端口的IP
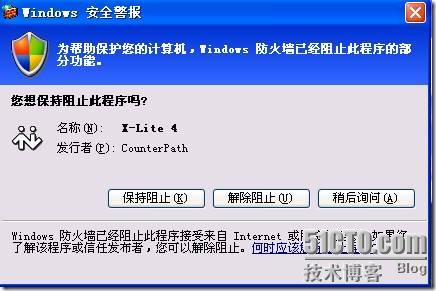
弹出Winxp防火墙,点击解除阻止
显示Available说明连接成功

可使用1000拨打1001进行测试
环境:
操作系统:RHEL5.2
电话交换平台:FreeSwitch 1.07
支持工具:git-1.7.4.tar.bz2
1. 安装Epel源(配置这个源其实是不必要的。)
Epel官网:http://fedoraproject.org/wiki/EPEL
su -c 'rpm -Uvh http://download.fedora.redhat.com/pub/epel/5/i386/epel-release-5-4.noarch.rpm'
卸载yum-rhn-plugin
/etc/init.d/yum-updatesd stop
rpm -e --nodeps yum-rhn-plugin-0.5.3-6.el5

yum list
如有输出软件列表,说明yum源工作正常

如果yum源被墙,使用代理
vi /etc/yum.conf
proxy=http://122.205.95.14:80
su -c 'yum install foo'
2. 配置本地光盘作为YUM源,Epel源作为备用。
创建/etc/yum.repos.d/rhel-cdrom.repo,内容如下
[root@freeswitch temp]# more rhel-cdrom.repo
[rhel-cdrom]
name=Red Hat Enterprise Linux $releasever - $basearch - Debug
#baseurl=ftp://ftp.redhat.com/pub/redhat/linux/enterprise/$releasever/en/os/$basearch/Debuginfo/
baseurl=file:///mnt/cdrom/Server
enabled=1
gpgcheck=1
gpgkey=file:///etc/pki/rpm-gpg/RPM-GPG-KEY-redhat-release
3. Install Git from source,利用Git工具获得FreeSwitch最新源码
Git官网:http://wiki.freeswitch.org/wiki/Git_Install


mount -t iso9660 /dev/cdrom /mnt/cdrom
cd /usr/local/src
yum -y install gcc gcc-c++ make gettext-devel expat-devel curl-devel zlib-devel openssl-devel bzip2
备注:从本地源安装,貌似Epel源没有上述安装包,上述安装包是git所需要的环境
有可能用到的命令是yum clean all和yum update
wget http://kernel.org/pub/software/scm/git/git-1.7.4.tar.bz2

下载地址疑似被墙,使用迅雷可成功下载该软件
tar -xvjf git-1.7.4.tar.bz2
cd git-1.7.4
make prefix=/usr/local all
make prefix=/usr/local install
4. 下载及安装FreeSwitch
使用Git下载能确保使用当前最新版本FreeSwitch
cd /usr/local/src
git clone git://git.freeswitch.org/freeswitch.git
安装FreeSwitch
安装参考:http://wiki.freeswitch.org/wiki/Installation_Guide#Compiling_and_Installation
cd /usr/local/src/freeswitch
在安装FreeSwitch之前,先安装所需模块,从Rhel5光盘安装
模块的安装有两种模式,分别是
安装基本模块的FreeSwitch
yum install autoconf automake gcc-c++ git-core libjpeg-devel libtool make ncurses-devel
启用完全功能的FreeSwitch
yum install unixODBC-devel openssl-devel gnutls-devel libogg-devel libvorbis-devel curl-devel libtiff-devel libjpeg-devel python-devel expat-devel zlib zlib-devel bzip2 which
本次实验启用完全功能的FreeSwitch


下载完了,可以顺手打个包留着备用,下载过程太漫长了
tar -jcvf freeswitch.tar.bz2 /usr/local/src/freeswitch/
./bootstrap.sh && ./configure && make&&make install

安装声音文件
make all cd-sounds-install cd-moh-install
5. 修改环境变量,添加PATH
cd ~
vi .bash_profile
PATH=$PATH:$HOME/bin:/usr/local/freeswitch/bin
source ~/.bash_profile

6. Freeswitch的启动方式有两种
a) 命令直接启动
命令行直接运行freeswitch(已经加入到PATH环境变量)
或者
cd /usr/local/freeswitch/bin
./freeswitch
b) 添加到服务
cp /usr/local/src/freeswitch/build/freeswitch.init.redhat /etc/init.d/freeswitch
chmod 755 freeswitch
vi freeswitch

然后 mkdir /var/run/freeswitch
chkconfig --add freeswitch
官网写的是chkconfig --add freeswitch && chkconfig --levels 35 freeswitch on

接下来启动服务
[root@freeswitch freeswitch]# service freeswitch status
freeswitch is stopped
[root@freeswitch freeswitch]# service freeswitch start
Starting freeswitch: [ OK ]

7. 开放防火墙端口
iptables -I RH-Firewall-1-INPUT 2 -p tcp --dport 5060 -j ACCEPT
iptables -I RH-Firewall-1-INPUT 3 -p udp --dport 5060 -j ACCEPT
service iptables save
8. 控制FreeSWITCH的命令
netstat -an | grep 5060
FreeSwitch监听TCP及UDP5060端口
启动:freeswitch、service freeswitch start
关闭:shutdown(freeswitch控制台下执行)、service freeswitch stop
无控制台启动:freeswitch -nc
客户端连接工具:fs_cli
关闭的其它命令:freeswitch -stop;fsctl shutdown(fs_cli客户端中使用)
退出fs_cli客户端:/exit,或Ctrl + D
9. SIP软电话
SIP软电话主要有X-Lite 和 Zoiper,均支持Windows、Linux、MAC等平台
FreeSWITCH 默认配置了 1000 ~ 1019(分机号) 共 20 个用户
10. 在Winxp上安装SIP软电话X-Lite
操作系统:WinxpSp3
先决软件:Microsoft Visual C++ 2008 SP1 Redistributable Package (x86)及Microsoft .NET Framework 3.5 Service Pack 1
X-lite:X-Lite_Win32_4.0_58832.exe
分别安装Framework 3.5 SP1、Visual C++ 2008 SP1及X-lite,均为缺省安装
Framework 3.5 SP1需要连网安装


配置X-Lite


Display Name: 1000
User name: 1000
Password: 1234
Authorization user name: 1000
Domain: Freeswitch的IP,也就是侦听5060端口的IP

弹出Winxp防火墙,点击解除阻止
显示Available说明连接成功

可使用1000拨打1001进行测试
相关文章推荐
- 开源电话交换平台FreeSwitch的安装与配置
- 开源电话交换平台FreeSwitch的安装与配置
- LINUX开源监控平台Nagios(NRPE的安装配置)
- LINUX开源监控平台Nagios(NRPE的安装配置)
- LINUX开源监控平台Nagios(插件的安装和使用)
- EasyPHP 3 + Mantis 1.2 快速搭建安装免费开源的中文缺陷管理平台(图)
- asp.Net Core免费开源分布式异常日志收集框架Exceptionless安装配置以及简单使用图文教程
- .NET平台下WEB应用程序的部署(安装数据库和自动配置)
- [平台配置] molokai.vim 配色安装
- 开源自动化配置管理工具Puppet安装
- Code::Blocks与wxWidgets安装配置——基于C++的免费IDE开发平台
- oracle10g在windows平台下的安装及监听的配置
- NET平台下WEB应用程序的部署(安装数据库和自动配置)
- Opencv2.3.1在VS2010平台上安装配置图解(64位系统)
- Redis在Windows,linux平台下的安装配置
- 开源工作流引擎Shark入门1——安装与配置
- Windows平台下Git的安装与配置
- 开源云平台 CloudStack 4.1.0 安装详解 - 1、管理节点
- Windows平台下MySQL安装与配置方法与注意事项
- Linux系统平台上安装和配置Ruby on Rails
