Ext4核心组件Grid的变化及学习(4):grid与服务端使用direct进行数据交互
2011-06-01 18:34
791 查看
大部分grid的数据都是要提交到后台服务端的,现在一种比较好用的方式就是direct。今天介绍一下这种交互方式的实现。
例子如下:
sqlserver数据库中两张表通过外键关联:
文件信息FileInfo
文件类别FileClass
需要做出的效果如下:
显示

下拉框修改

修改之后自动上传
1、服务端添加Ext.Direct.dll和Newtonsoft.Json.dll的引用
2、处理文件数据的类FileAction.cs,注意最后一个Update方法
3、统一调用接口Api.ashx
服务器端不是重点,主要看一下update方法返回的数据,之后会找时间系统讲一下服务器端direct,重点看下js文件:
因为是测试,所以就临时把fileClass建好了进行数据调用,正式使用的时候和file表一样要从服务端取,这个调用方式有很多种,之后会开篇帖子就这个进行深入讨论,不是今天的重点。
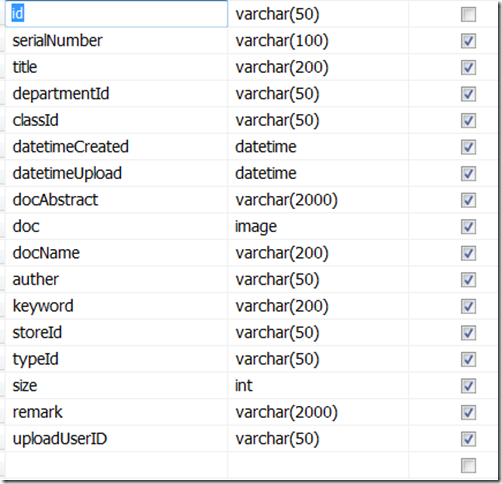
4、定义FileModel,里面的时间数据要进行转换
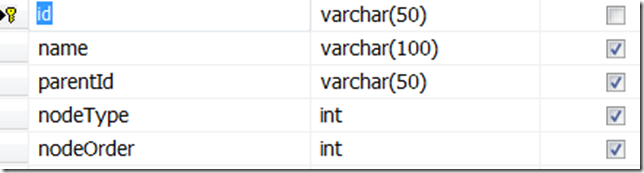
5、定义fileClass(临时内存数据,之后会开篇帖子就这个进行深入讨论)
6、创建filesStore和filesStore的callback function,如果不需要callback,也可以直接在api里面写调用的函数。具体为什么这么写请参考我写的这篇帖子
有几个需要注意的config:
a)autoSync: true 每修改好一行就直接提交到服务端,我一般都选这种,可以节省客户的时间,不需要很长时间的等待。
b)storeId: 'filesStore' 会把这个store注册到ext的storemanager,之后可以使用Ext.getStore('filesStore')访问
接下来就是grid的设置:
需要注意的是以下几点:
a)“类别”列自定义显示,根据类别id到类别store中找name
renderer: function(value) {
return Ext.getStore('fileClassStore').getById(value).data.name;
},
如果不设置就会直接显示id,效果对比如下(其中文件类型就是没有自定义的,显示原始id)

b)“类别”列的修改模式采用下拉框,只允许选择不允许输入,不能为空,而且建议提前渲染,不然第一次点击会出现空值
例子如下:
sqlserver数据库中两张表通过外键关联:
文件信息FileInfo
文件类别FileClass
需要做出的效果如下:
显示

下拉框修改

修改之后自动上传
1、服务端添加Ext.Direct.dll和Newtonsoft.Json.dll的引用
2、处理文件数据的类FileAction.cs,注意最后一个Update方法
using System;
using System.Collections.Generic;
using Ext.Direct;
using Newtonsoft.Json;
using Newtonsoft.Json.Linq;
using System.Web.SessionState;
using DBUtility;
using System.Data;
using System.Text;
using System.Data.SqlClient;
using Persister;

/// <summary>
///FileAction 的摘要说明
/// </summary>
[DirectAction]
public class FileAction
{

[DirectMethod]
public FileInfoSerializer Load(Dictionary<string,object> arg)
{
object[] sorters = (object[])arg["sort"];
Dictionary<string, object> sorter = (Dictionary<string, object>)sorters[0];
FileInfoCollection coll = new FileInfoCollection();
coll.OrderField = sorter["property"].ToString();
coll.OrderDirection = sorter["direction"].ToString().ToLower() == "desc" ? FileInfoCollection.Direction.DESC : FileInfoCollection.Direction.ASC;
return new FileInfoSerializer(coll);
}

[DirectMethod]
public FileInfoSerializer PagingLoad(string order, string direction, long start, long limit)
{
FileInfoCollection coll = new FileInfoCollection();
coll.OrderField = order;
coll.OrderDirection = direction.ToLower() == "desc" ? FileInfoCollection.Direction.DESC : FileInfoCollection.Direction.ASC;

return new FileInfoSerializer(coll, Convert.ToInt32(start), Convert.ToInt32(limit));
}

[DirectMethod]
[ParseAsJson]
public JObject Destroy(JObject o)
{
JValue val = (JValue)o["data"];
FileInfo c = new FileInfo(Convert.ToString(val.Value));
c.Destroy();
return new JObject(
new JProperty("data", new JArray())
);
}

[DirectMethod]
[ParseAsJson]
public FileInfo Create(JObject o)
{
FileInfo c = JsonConvert.DeserializeObject<FileInfo>(o.ToString());
c.Save();
return c;
}

[DirectMethod]
[ParseAsJson]
public JObject Update(JObject o)
{
FileInfo c = JsonConvert.DeserializeObject<FileInfo>(o.ToString());
JProperty success = new JProperty("success","false");
try
{
c.Save();
success = new JProperty("success", "true");
}
catch
{
}
return new JObject(
success,
new JProperty("id",c.Id),
new JProperty("title",c.Title)
);
}

}
3、统一调用接口Api.ashx
<%@ WebHandler Language="C#" Class="Api" %>

using System;
using System.Collections.Generic;
using System.Linq;
using System.Web.SessionState;
using System.Web;
using Ext.Direct;

public class Api : DirectHandler, IRequiresSessionState
{

public override string ProviderName
{
get
{
return "Ext.app.USER_API";
}
}

public override string Namespace
{
get
{
return "MyApp";
}
}

protected override void ConfigureProvider(DirectProvider provider)
{
this.Configure(provider, new object[] { new CheckLogin(),new TreeAction(),new FileAction() });
}

}
服务器端不是重点,主要看一下update方法返回的数据,之后会找时间系统讲一下服务器端direct,重点看下js文件:
因为是测试,所以就临时把fileClass建好了进行数据调用,正式使用的时候和file表一样要从服务端取,这个调用方式有很多种,之后会开篇帖子就这个进行深入讨论,不是今天的重点。
4、定义FileModel,里面的时间数据要进行转换
Ext.define('File', {
extend: 'Ext.data.Model',
fields: [
'id','title', 'classId',
{name: 'datetimeCreated',type: 'date',dateFormat: 'c'},
'docAbstract','typeId'
]
});
5、定义fileClass(临时内存数据,之后会开篇帖子就这个进行深入讨论)
//定义fileClassModel
Ext.define('FileClass', {
extend: 'Ext.data.Model',
fields: ['id', 'name']
});
//创建fileClass下拉选择框的store
new Ext.data.Store({
model: 'FileClass',
storeId:'fileClassStore',
proxy: {type: 'memory'},
data : [
{"id":"1e887509-dd86-49f4-9d63-4e8640409758", "name":".Net"},
{"id":"3384fcb7-3106-4fdd-ab65-31152eef9edb", "name":"java"}
]
});
6、创建filesStore和filesStore的callback function,如果不需要callback,也可以直接在api里面写调用的函数。具体为什么这么写请参考我写的这篇帖子
Ext.data.DirectStore中DirectAction的回调函数问题
//创建filesStore的callback function
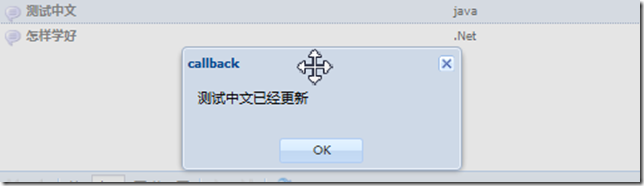
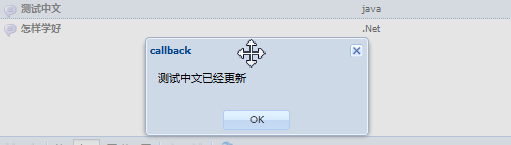
var callback = function(response, e) {
if(response.success=='true'){
Ext.getStore('filesStore').getById(response.id).commit()
Ext.MessageBox.alert('callback',response.title+'已经更新')
}
else{
Ext.getStore('filesStore').getById(response.id).reject()
Ext.MessageBox.alert('callback',response.title+'更新失败')
}};
//创建filesStore
Ext.create('Ext.data.DirectStore', {
model: 'File',
storeId: 'filesStore',
autoLoad: true,
autoSync: true,
remoteSort: true,
api: {
create: MyApp.FileAction.Create,
read: MyApp.FileAction.Load,
update: function(rec){MyApp.FileAction.Update(rec,callback);},
destroy: MyApp.FileAction.Destroy
},
writer: new Ext.data.JsonWriter({
encode: false,
writeAllFields: true
}),
idProperty: 'id',
totalProperty: 'total',
root: 'data',
sorters: [{
property: 'datetimeCreated',
direction: 'DESC'
}]
});有几个需要注意的config:
a)autoSync: true 每修改好一行就直接提交到服务端,我一般都选这种,可以节省客户的时间,不需要很长时间的等待。
b)storeId: 'filesStore' 会把这个store注册到ext的storemanager,之后可以使用Ext.getStore('filesStore')访问
接下来就是grid的设置:
//定义MainFileGrid
Ext.define('App.MainFileGrid', {
extend: 'Ext.grid.Panel',
store: 'filesStore',
alias: 'widget.MainFileGrid',
columns: [
{
header: '文档',
dataIndex: 'title',
flex: 1,
renderer: function(value, o, record) {
return Ext.String.format('<div class="topic"><b>{0}</b><span class="author">{1}</span></div>',
value, record.get('author'));
},
editor: {
// defaults to textfield if no xtype is supplied
allowBlank: false
}
}, {
header: '类别',
flex: 1,
dataIndex: 'classId',
width: 100,
renderer: function(value) {
return Ext.getStore('fileClassStore').getById(value).data.name;
},
field: {
xtype: 'combobox',
store: 'fileClassStore',
queryMode: 'local',
//提前加载数据,防止延迟
autoRender: true,
displayField: 'name',
valueField: 'id',
editable: false,
allowBlank: false
}
}, {
header: '文件类型',
flex: 1,
dataIndex: 'typeId',
width: 70,
align: 'right',
editor: {
// defaults to textfield if no xtype is supplied
allowBlank: false
}
}, {
header: '时间',
dataIndex: 'datetimeCreated',
renderer : Ext.util.Format.dateRenderer('Y年m月d日'),
width: 150,
field: {
xtype: 'datefield',
allowBlank: false,
format: 'm/d/Y',
minValue: '01/01/2006',
minText: 'Cannot have a start date before the company existed!',
maxValue: Ext.Date.format(new Date(), 'm/d/Y')
}
}
],
plugins: [Ext.create('Ext.grid.plugin.RowEditing', {
autoCancel: false,
clicksToEdit: 2
})],

initComponent: function(){
Ext.apply(this, {
dockedItems: [{
xtype: 'toolbar',
cls: 'x-docked-noborder-top',
items: [{
text: '新文件',
iconCls: 'icon-new-topic',
handler: function(){
alert('Not implemented');
}
}, '-', {
text: '显示详细信息',
iconCls: 'icon-preview',
enableToggle: true,
pressed: true,
scope: this,
toggleHandler: this.onPreviewChange
}]
},{
dock: 'bottom',
xtype: 'pagingtoolbar',
store: 'filesStore',
displayInfo: true,
displayMsg: '显示 {0} - {1} 共 {2} 文档',
emptyMsg: '无文档'
}],
selModel: Ext.create('Ext.selection.RowModel', {
mode: 'SINGLE',
listeners: {
scope: this,
select: this.onSelect
}
})
});
this.callParent();
},

onSelect: function(selModel, rec){
this.ownerCt.onSelect(rec);
},

loadForum: function(id){
var store = this.store;
store.getProxy().extraParams.forumId = id;
store.loadPage(1);
},

onPreviewChange: function(btn, pressed){
this.ownerCt.togglePreview(pressed);
},

onSummaryChange: function(btn, pressed){
this.getView().getPlugin('preview').toggleExpanded(pressed);
}
});
需要注意的是以下几点:
a)“类别”列自定义显示,根据类别id到类别store中找name
renderer: function(value) {
return Ext.getStore('fileClassStore').getById(value).data.name;
},
如果不设置就会直接显示id,效果对比如下(其中文件类型就是没有自定义的,显示原始id)

b)“类别”列的修改模式采用下拉框,只允许选择不允许输入,不能为空,而且建议提前渲染,不然第一次点击会出现空值
field: {
xtype: 'combobox',
store: 'fileClassStore',
queryMode: 'local',
//提前加载数据,防止延迟
autoRender: true,
displayField: 'name',
valueField: 'id',
editable: false,
allowBlank: false
}
相关文章推荐
- Ext4核心组件Grid的变化及学习(4):grid与服务端使用direct进行数据交互
- Ext4核心组件Grid的变化及学习(2):数据列的基本操作
- 磨刀不误砍柴工:Ext4核心组件Grid的变化及学习(2):数据列的基本操作
- android菜鸟学习笔记25----与服务器端交互(二)解析服务端返回的json数据及使用一个开源组件请求服务端数据
- Ext4核心组件Grid的变化及学习(3):可编辑的grid
- 磨刀不误砍柴工:Ext4核心组件Grid的变化及学习(3):可编辑的grid
- Ext4核心组件Grid的变化及学习(1):最简单的grid
- 磨刀不误砍柴工:Ext4核心组件Grid的变化及学习(1)
- 使用AngularJS的$http服务与服务端进行数据交互
- ZendFramework学习第三章(核心组件—使用配置数据之从php配置文件中读取数据)
- ZendFramework学习第三章(核心组件—使用配置数据之从php配置文件中读取数据)
- ZendFramework学习第三章(核心组件—使用配置数据之从ini配置文件中读取数据)
- 磨刀不误砍柴工:Ext4核心组件Grid学习 (1):最简单的grid
- ZendFramework学习第三章(核心组件—使用配置数据之从XML配置文件中读取数据)
- android菜鸟学习笔记24----与服务器端交互(一)使用HttpURLConnection和HttpClient请求服务端数据
- Flex学习笔记_05 使用组件处理数据和交互_01常用组件
- ZendFramework学习第三章(核心组件—使用配置数据之从ini配置文件中读取数据)
- ZendFramework学习第三章(核心组件—使用配置数据之从XML配置文件中读取数据)
- Spark中组件Mllib的学习11之使用ALS对movieLens中一百万条(1M)数据集进行训练,并对输入的新用户数据进行电影推荐
- Android学习-----如何使用sqlite进行后台数据交互,sqlite入门使用例程