自动化安装操作系统:Cobbler+Koan安装配置使用
2011-05-27 11:22
429 查看
cobbler+Koan介绍
Cobbler作为一个预备工具,使部署Red Hat/Centos/Fedora系统更容易,同时也支持Suse和Debian系统的部署。它提供以下服务集成:
* PXE服务支持
* DHCP服务管理
* DNS服务管理
* Kickstart服务支持
* yum仓库管理
Cobbler客户端Koan支持虚拟机安装和操作系统重新安装。
服务端安装cobbler
1、安装epel yum仓库| Wget http://download.fedora.redhat.com/pub/epel/5/x86_64/epel-release-5-4.noarch.rpm Rpm -ivh epel-release-5-4.noarch.rpm |
| Yum -y install cobbler httpd xinetd tftp-server yum-utils rsync dhcp |
| cat>/etc/dhcpd.conf<<EOF ddns-update-style interim; allow booting; allow bootp; ignore client-updates; set vendorclass = option vendor-class-identifier; subnet 192.168.0.0 netmask 255.255.255.0 { # option routers 192.168.0.1; option domain-name-servers 202.85.220.196,202.106.0.20; option subnet-mask 255.255.255.0; range dynamic-bootp 192.168.0.100 192.168.0.254; filename "/pxelinux.0"; default-lease-time 21600; max-lease-time 43200; next-server 192.168.0.2; } EOF |
| /etc/init.d/dhcpd start /etc/init.d/cobblerd restart /etc/init.d/httpd restart |
| 1 : The 'server' field in /etc/cobbler/settings must be set to something other than localhost, or kickstarting features will not work. This should be a resolvable hostname or IP for the boot server as reachable by all machines that will use it. 2 : For PXE to be functional, the 'next_server' field in /etc/cobbler/settings must be set to something other than 127.0.0.1, and should match the IP of the boot server on the PXE network. 3 : you need to set some SELinux content rules to ensure cobbler works correctly in your SELinux environment, run the following: /usr/sbin/semanage fcontext -a -t public_content_t "/tftpboot/.*" && \ /usr/sbin/semanage fcontext -a -t public_content_t "/var/www/cobbler/images/.*" 4 : some network boot-loaders are missing from /var/lib/cobbler/loaders, you may run 'cobbler get-loaders' to download them, or, if you only want to handle x86/x86_64 netbooting, you may ensure that you have installed a *recent* version of the syslinux package installed and can ignore this message entirely. Files in this directory, should you want to support all architectures, should include pxelinux.0, menu.c32, elilo.efi, and yaboot. The 'cobbler get-loaders' command is the easiest way to resolve these requirements. 5 : change 'disable' to 'no' in /etc/xinetd.d/tftp 6 : change 'disable' to 'no' in /etc/xinetd.d/rsync 7 : since iptables may be running, ensure 69, 80, and 25151 are unblocked 8 : debmirror package is not installed, it will be required to manage debian deployments and repositories 9 : The default password used by the sample templates for newly installed machines (default_password_crypted in /etc/cobbler/settings) is still set to 'cobbler' and should be changed, try: "openssl passwd -1 -salt 'random-phrase-here' 'your-password-here'" to generate new one |
(1) 修改/etc/cobbler/setings文件:
| HostIP=$(/sbin/ip addr show dev eth1 | sed -n 3p | awk '{print $2}'| awk -F\/ '{print $1}') sed -i 's/^\(server:\).*$/\1 '$HostIP'/g' /etc/cobbler/settings sed -i 's/^\(next_server:\).*$/\1 '$HostIP'/g' /etc/cobbler/settings |
| sed -i 's/disable.*$/disable = no/g' /etc/xinetd.d/tftp sed -i 's/disable.*$/disable = no/g' /etc/xinetd.d/rsync |
| /etc/init.d/iptables stop |
| cobbler get-loaders |
| yum -y install debmirror cman |
使用openssl生成新密码:
| openssl passwd -1 -salt '' '123456' |

修改/etc/cobbler/setings文件中“default_password_crypted”字段为openssl生成的新密码
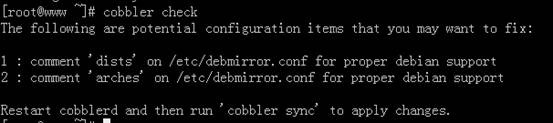
重新启动cobblerd,在此使用cobbler check检查系统,只出现如下提示,可以不用管
配置使用cobbler
1、在服务端挂载Linux安装盘,生成安装镜像| mount -o loop /usr/src/iso/CentOS-5.5-x86_64-bin-DVD-1of2.iso /mnt cobbler import --path=/mnt --name=CentOS5.5 |
| [root@testA cobbler]# cobbler list distros: CentOS5.5-x86_64 CentOS5.5-xen-x86_64 profiles: CentOS5.5-x86_64 CentOS5.5-xen-x86_64 systems: repos: images: |
| cobbler repo add --name=CentOS-5-i386 --mirror=http://mirrors.163.com/centos/5/os/i386/ cobbler repo add --name=EPEL-5-i386--mirror=http://download.fedoraproject.org/pub/epel/5/i386/ |
| cobbler reposync |
4、配置添加kickstart文件:
Kickstart文件可在图形界面下的终端中输入:system-config-kickstart,然后通过图形界面的Kickstart Configurator生成,或是参考已安装好系统机器中的anaconda-ks.cfg文件
下面是一个用Kickstart Configurator生成的ks文件
| #platform=x86, AMD64, or Intel EM64T #version=DEVEL # Firewall configuration firewall --disabled # Install OS instead of upgrade install # Use network installation url --url="http://192.168.0.2/cobbler/ks_mirror/CentOS5.5/" # Root password rootpw --iscrypted $1$JNTgjcn5$P0TVlmNCfsurVdQKvLHsS0 # System authorization information auth --useshadow --passalgo=md5 # Use text mode install text # System keyboard keyboard us # System language lang zh_CN # SELinux configuration selinux --disabled # Do not configure the X Window System skipx # Installation logging level logging --level=info # Reboot after installation reboot # System timezone timezone --isUtc Asia/Shanghai # System bootloader configuration bootloader --location=mbr # Clear the Master Boot Record zerombr # Partition clearing information clearpart --all part /boot --fstype="ext3" --size=100 part swap --fstype="swap" --size=1024 part / --fstype="ext3" --grow --size=1 reboot %pre $SNIPPET('log_ks_pre') $kickstart_start $SNIPPET('pre_install_network_config') # Enable installation monitoring $SNIPPET('pre_anamon') %packages @base @chinese-support @core @dialup @editors @gnome-desktop @games @graphical-internet @graphics @office @printing @sound-and-video @text-internet @base-x keyutils trousers fipscheck device-mapper-multipath libsane-hpaio xorg-x11-server-Xnest %post $SNIPPET('log_ks_post') # Start yum configuration #$yum_config_stanza # End yum configuration $SNIPPET('post_install_kernel_options') $SNIPPET('post_install_network_config') $SNIPPET('func_register_if_enabled') $SNIPPET('download_config_files') $SNIPPET('koan_environment') $SNIPPET('redhat_register') $SNIPPET('cobbler_register') # Enable post-install boot notification $SNIPPET('post_anamon') # Start final steps $kickstart_done # End final steps |
(1) profile可以理解为按角色进行分类
下面是几个添加删除修改profile配置的例子:
添加profile配置,名称为:CenOS5.5,指定镜像为:CentOS5.5-x86_64,kickstart文件为/var/lib/cobbler/kickstarts/CentOS5.ks
| cobbler profile add --name=CentOS5.5 --distro=CentOS5.5-x86_64 --kickstart=/var/lib/cobbler/kickstarts/CentOS5.ks |
| cobbler profile add --name=CentOS5.5 --distro=CentOS5.5-i386 |
| cobbler profile rename --name=CentOS5.5 –newname=CentOS5.5-i386 |
| cobbler profile remove --name=CentOS5.5 |
(2) system是对待安装机器做具体设置,如设置主机名、IP地址、hostname等,这些设置根据MAC应用到具体机器上。
下面是几个添加删除修改system的例子:
添加system配置,配置文件名称:webserver1,机器IP地址192.168.0.110,机器MAC地址:00:0C:29:77:89:c7,使用配置文件名称:webserver,kickstart文件为:/var/lib/cobbler/kickstarts/webserver.ks
| cobbler system add --name=webserver1 --ip=192.168.0.110 --mac=00:0C:29:77:89:c7 --profile=webserver --kickstart=/var/lib/cobbler/kickstarts/webserver.ks --static=1 |
| cobbler system add --name=webserver1 --ip=192.16810.110 |
| cobbler system rename --name= webserver1 –newname= dbserver1 |
| cobbler system remove --name=dbserver1 |
首次安装操作系统
1、 将需要安装系统的服务器,以下简称客户端,放到和cobbler服务端同样的子网中。2、 启动cobbler服务端上的cobblerd等相关服务。
3、 从PXE启动客户端主机。
(1) 客户端寻找设置DHCP。
(2) 客户端从PXE启动。
(3) 客户端进入cobbler profile选择界面,用户可以根据应用的不同,选择不同的cobbler配置文件。
重新安装服务器的操作系统
1、在客户端上安装koan| yum install koan |
| koan --server=192.168.0.2 --list=profiles |
| koan --replace-self --server=192.168.0.2 --profile=webserver1 |
cobbler BUG修复
yum安装的cobbler有一个BUG。如果服务器端上面的80端口被占用。我们肯定会想到修改Apache的http.conf文件的Listen字段来更改端口,然后再修改/etc/cobbler/settings的http_port字段更改端口,后重新启动cobblerd。修改Apache配置文件/etc/httpd/conf/httpd.conf

修改cobbler配置文件/etc/cobbler/settings

但此时再次使用cobbler sync同步时会提示如下错误:
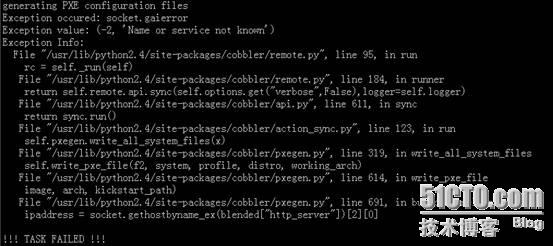
解决办法如下:
删除” /usr/lib/python2.4/site-packages/cobbler/”目录下的pxegen.py相关文件
| rm –rf /usr/lib/python2.4/site-packages/cobbler/pxegen.py* |
Cobbler命令说明
| 命令名称[/b] | 命令用途[/b] |
| cobbler check | 核对当前设置是否有问题 |
| cobbler list | 列出所有的cobbler元素 |
| cobbler report | 详细的列出个元素 |
| cobbler sync | 同步配置到dhcp/pxe和数据目录 |
| cobbler reposync | 同步yum仓库 |
Cobbler配置文件说明
Cobbler配置文件存放在/etc/cobbler下。| 配置文件名称[/b] | 用 [/b]途[/b] |
| /etc/cobbler/settings | cobbler主配置文件 |
| /etc/cobbler | dhcp、dns、pxe、dnsmasq的模板配置文件 |
| /etc/cobbler/users.digest | 用于web访问的用户名密码配置文件 |
| /etc/cobbler/modules.conf | 模块配置文件 |
| /etc/cobbler/users.conf | Cobbler WebUI/Web service授权配置文件 |
导入的发行版,repos镜像和kickstart文件都放置在/var/www/cobbler目录下。确保/var目录有足够的空间来存储这些文件。
| 目录名称[/b] | 用 [/b]途[/b] |
| images/ | 存储所有导入发行版的Kernel和initrd镜像用于远程网络启动 |
| ks_mirror/ | 存储导入的发行版 |
| repo_mirror/ | yum repos存储目录 |
| /var/log/cobbler | 存放日志文件/var/log/cobbler/cobbler.log |
| 目录名称[/b] | 用 [/b]途[/b] |
| configs/ | 存储distros、repos、systems和profiles相关信息 |
| backup/ | 备份目录 |
| snippets/ | 放置一些可以在kickstarts导入的脚本小片段 |
| triggers/ | 放置一些可执行脚本 |
| kickstarts/ | 放置kickstart模板文件 |
参考文档
预备工具:Cobbler CentOS 5.4安装使用http://blog.sina.com.cn/s/blog_4e424e210100pbp5.html
cobbler 批量安装linux
http://zhumeng8337797.blog.163.com/blog/static/100768914201131232010310/
附 录
Pxegen.py代码修改:第211行添加:
| def _get_short_host_and_port(self,blended): server_and_port = blended["http_server"].split(":", 1) http_server = server_and_port[0] if (len(server_and_port) == 2): port = server_and_port[1] else: port = "80" ipaddress = socket.gethostbyname_ex(http_server)[2][0] if port == "80": return ipaddress else: return ipaddress + ":" + port |
| # ipaddress = socket.gethostbyname_ex(blended["http_server"])[2][0] # kickstart_path = "http://%s/cblr/svc/op/ks/system/%s" % (ipaddress, system.name) short_http_server = self._get_short_host_and_port(blended) kickstart_path = "http://%s/cblr/svc/op/ks/system/%s" % (short_http_server, system.name) |
| # ipaddress = socket.gethostbyname_ex(blended["http_server"])[2][0] # kickstart_path = "http://%s/cblr/svc/op/ks/profile/%s" % (ipaddress, profile.name) short_http_server = self._get_short_host_and_port(blended) kickstart_path = "http://%s/cblr/svc/op/ks/system/%s" % (short_http_server, system.name) |
| # ipaddress = socket.gethostbyname_ex(blended["http_server"])[2][0] short_http_server = self._get_short_host_and_port(blended) if system is not None and kickstart_path.startswith("/"): # kickstart_path = "http://%s/cblr/svc/op/ks/system/%s" % (ipaddress, system.name) kickstart_path = "http://%s/cblr/svc/op/ks/system/%s" % (short_http_server, system.name) elif kickstart_path.startswith("/"): # kickstart_path = "http://%s/cblr/svc/op/ks/profile/%s" % (ipaddress, profile.name) kickstart_path = "http://%s/cblr/svc/op/ks/profile/%s" % (short_http_server, profile.name) |

相关文章推荐
- 自动化安装操作系统:Cobbler+Koan安装配置使用
- 使用cobbler自动化安装操作系统
- 2. 自动化运维系列之Cobbler给Openstack节点安装操作系统。
- pxe 简介以及 cobbler安装配置自动化
- 自动化运维之Cobbler自动化部署安装操作系统
- 运维自动化|系统运维|Ansible的安装及配置使用
- Vsphere简单的使用:创建资源池、虚拟机,配置虚拟机,安装操作系统
- linux中运维自动化之Cobbler 系统安装使用详解
- CentOS 6.5自动化运维之基于cobbler服务的自动化安装操作系统详解
- 使用kickstart软件自动化安装CentOS 6.X操作系统
- 自动化selenium--安装配置使用selenium
- Android使用Jenkins完成自动化打包操作---Jenkins的安装以及基础配置
- cobbler自动化系统安装配置
- 运维自动化之使用Cobbler自动化部署Linux操作系统
- 使用 Cobbler 自动化和管理系统安装
- CentOS 6.5自动化运维之基于cobbler服务的自动化安装操作系统详解
- 运维自动化之Cobbler系统安装使用详解[good]
- 运维自动化之使用Cobbler自动化安装系统与FAQ
- 配置和使用PEX自动化安装centos 7 修订版
- 运维自动化之 Cobbler 系统安装使用详解