简单实现顶部和底部工具栏
2011-05-12 12:59
477 查看
转自:eoe.Android开发者门户
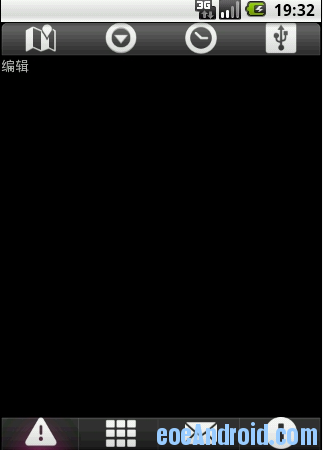
我们今天讲的主要就是android屏幕上的顶部与底部的工具栏,这样我们就可以在一个界面上实现很多种功能了,这样我们的用户用起来也比较好用,至于上面都有什么功能,那就看大家怎么来实现了,也不多说了,我们还是先来看看效果图:
这两个工具栏全是用布局来实现的。底部工具栏布局代码:
顶部工具栏布局代码:
主窗口布局代码:
最后我们来看看主程序代码:
我们今天讲的主要就是android屏幕上的顶部与底部的工具栏,这样我们就可以在一个界面上实现很多种功能了,这样我们的用户用起来也比较好用,至于上面都有什么功能,那就看大家怎么来实现了,也不多说了,我们还是先来看看效果图:
这两个工具栏全是用布局来实现的。底部工具栏布局代码:
<?xml version="1.0" encoding="utf-8"?>
<RelativeLayout xmlns:android="http://schemas.android.com/apk/res/android"
android:background="@drawable/bottom"
android:layout_width="fill_parent"
android:layout_height="wrap_content">
<TextView
android:id="@+id/edit"
android:text="测试"
android:gravity="center_horizontal"
android:drawableTop="@drawable/ic_dialog_alert"
android:layout_alignParentLeft="true"
android:layout_width="80dip"
android:layout_height="wrap_content">
</TextView>

<TextView
android:id="@+id/menu2"
android:text="测试"
android:gravity="center_horizontal"
android:drawableTop="@drawable/ic_dialog_dialer"
android:layout_toRightOf="@id/edit"
android:layout_width="80dip"
android:layout_height="wrap_content">
</TextView>

<TextView
android:id="@+id/effect"
android:text="测试"
android:gravity="center_horizontal"
android:drawableTop="@drawable/ic_dialog_email"
android:layout_toRightOf="@id/menu2"
android:layout_width="80dip"
android:layout_height="wrap_content">
</TextView>

<TextView
android:id="@+id/menu3"
android:text="测试"
android:gravity="center_horizontal"
android:drawableTop="@drawable/ic_dialog_info"
android:layout_toRightOf="@id/effect"
android:layout_width="80dip"
android:layout_height="wrap_content">

</TextView>
</RelativeLayout>
顶部工具栏布局代码:
<?xml version="1.0" encoding="utf-8"?>
<RelativeLayout xmlns:android="http://schemas.android.com/apk/res/android"
android:background="@drawable/top"
android:layout_width="fill_parent"
android:layout_height="wrap_content">

<ImageView
android:id="@+id/undo"
android:src="@drawable/ic_dialog_map"
android:layout_alignParentLeft="true"
android:layout_width="80dip"
android:layout_height="wrap_content">

</ImageView>

<ImageView
android:id="@+id/save"
android:src="@drawable/ic_dialog_menu_generic"
android:layout_toRightOf="@id/undo"
android:layout_width="80dip"
android:layout_height="wrap_content">
</ImageView>

<ImageView
android:id="@+id/share"
android:src="@drawable/ic_dialog_time"
android:layout_toRightOf="@id/save"
android:layout_width="80dip"
android:layout_height="wrap_content">

</ImageView>

<ImageView
android:id="@+id/redo"
android:src="@drawable/ic_dialog_usb"
android:layout_toRightOf="@id/share"
android:layout_width="80dip"
android:layout_height="wrap_content">

</ImageView>

</RelativeLayout>
主窗口布局代码:
< ?xml version="1.0" encoding="utf-8"?>
<RelativeLayout xmlns:android="http://schemas.android.com/apk/res/android"
android:layout_width="fill_parent"
android:layout_height="fill_parent">
<RelativeLayout xmlns:android="http://schemas.android.com/apk/res/android"
android:id="@+id/layout_topmenu"
android:layout_width="fill_parent"
android:layout_height="wrap_content"
android:layout_alignParentTop="true">

<include layout="@layout/top_menu" />
</RelativeLayout>

<TextView
android:id="@+id/txt1"
android:text="asdfasdfas"
android:layout_width="wrap_content"
android:layout_height="wrap_content"
android:layout_below="@id/layout_topmenu">
</TextView>

<RelativeLayout xmlns:android="http://schemas.android.com/apk/res/android"
android:layout_width="fill_parent"
android:layout_height="wrap_content"
android:layout_alignParentBottom="true">
<include layout="@layout/bottom_menu" />

</RelativeLayout>
</RelativeLayout>
最后我们来看看主程序代码:
import android.app.Activity;
import android.os.Bundle;
import android.view.MotionEvent;
import android.view.View;
import android.view.Window;
import android.view.View.OnTouchListener;
import android.widget.ImageView;
import android.widget.TextView;

public class MainActivity extends Activity {
TextView txt1;
TextView edittv;
ImageView imgbtn;
boolean isFirst = true;
boolean istopFirst = true;

@Override
public void onCreate(Bundle savedInstanceState) {
super.onCreate(savedInstanceState);
requestWindowFeature(Window.FEATURE_NO_TITLE);
setContentView(R.layout.main);

edittv = (TextView)findViewById(R.id.edit);
txt1 = (TextView)findViewById(R.id.txt1);
imgbtn = (ImageView)findViewById(R.id.undo);
edittv.setOnTouchListener(new OnTouchListener() {
@Override
public boolean onTouch(View v, MotionEvent event) {
if(isFirst) {
txt1.setText("编辑");
edittv.setBackgroundDrawable(getResources().getDrawable(R.drawable.item_background));
isFirst = false;
}else {
txt1.setText("退出编辑");
edittv.setBackgroundDrawable(getResources().getDrawable(R.drawable.touming));
isFirst = true;
}
return false;
}
});
imgbtn.setOnTouchListener(new OnTouchListener() {

@Override
public boolean onTouch(View v, MotionEvent event) {
if(istopFirst) {
txt1.setText("编辑");
istopFirst = false;
}else {
txt1.setText("退出编辑");
istopFirst = true;
}
return false;
}
});
}

}

相关文章推荐
- Android顶部工具栏和底部工具栏的简单实现代码
- 简单实现Android顶部工具栏和底部工具栏
- 简单实现Android顶部工具栏和底部工具栏(原创)
- 简单实现顶部和底部工具栏
- 简单实现Android顶部工具栏和底部工具栏
- 简单实现Android顶部工具栏和底部工具栏
- 简单实现Android顶部工具栏和底部工具栏
- 简单实现Android顶部工具栏和底部工具栏
- jquery 跳到顶部和底部动画2句代码简单实现
- 最简单的用jquery实现动画的跳到顶部和底部
- Android 解析RecyclerView(3)——以更简单的方法实现带顶部View和底部View的RecyclerView
- 用jquery实现动画跳到顶部和底部(这个比较简单)
- jquery 跳到顶部和底部动画2句代码简单实现
- jquery实现跳到底部,回到顶部效果的简单实例(类似锚)
- 用jquery实现动画跳到顶部和底部(这个比较简单)
- 简单实现Android底部工具栏
- jQuery实现带有动画效果的回到顶部和底部代码
- Android-实现顶部+底部双导航界面功能
- Tablayout + ViewPager + fragment 实现底部或顶部导航栏
- jquery实现"跳到底部","回到顶部"效果(类似锚)