Android 使用 TableLayout 布局拉伸宽度
2011-04-21 18:02
495 查看
布局文件
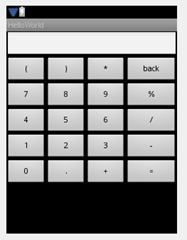
布局效果:

显然这不能满足我们的期望,下面我们演示 使用 android:stretchColumns 来自动拉伸
我们这里简单的给 TableLayout 增加一个属性 android:stretchColumns="*" 表示所有列都要自动拉伸,以便适应屏幕宽度。
布局效果
它的值即可以是数字,也可以是*,注意数字是从0开始的,即:android:stretchColumns="1" 是设置 TableLayout所有行的第二列为扩展列。
上面我们会看到 第四列的按钮比其他列的按钮要宽,如果我们想都一样宽如何办呢?
一个简单办法:
在自动拉伸的基础上,把每一列的宽度都设置成一样,比如下面的代码:
这时候的效果就成了:
注意比起最初的就多了2个设置
android:layout_width="1dip" 和 android:stretchColumns="*"

<?xml version="1.0" encoding="utf-8"?>
<LinearLayout xmlns:android="http://schemas.android.com/apk/res/android"
android:orientation="vertical" android:layout_width="fill_parent"
android:layout_height="fill_parent">

<TableLayout android:layout_width="match_parent"
android:layout_height="match_parent">
<TableRow>
<EditText android:id="@+id/et_led" android:layout_width="fill_parent"
android:digits="1234567890.+-*/=%\n\t()" android:text=""
android:layout_span="4" />
</TableRow>
<TableRow>
<Button android:text="(" android:id="@+id/btn_LeftParenthesis"></Button>
<Button android:text=")" android:id="@+id/btn_RightParenthesis"></Button>
<Button android:text="*" android:id="@+id/btn_x"></Button>
<Button android:text="back" android:id="@+id/btn_back"></Button>
</TableRow>
<TableRow>
<Button android:text="7" android:id="@+id/btn_7"></Button>
<Button android:text="8" android:id="@+id/btn_8"></Button>
<Button android:text="9" android:id="@+id/btn_9"></Button>
<Button android:text="%" android:id="@+id/btn_mod"></Button>
</TableRow>
<TableRow>
<Button android:text="4" android:id="@+id/btn_4"></Button>
<Button android:text="5" android:id="@+id/btn_5"></Button>
<Button android:text="6" android:id="@+id/btn_6"></Button>
<Button android:text="/" android:id="@+id/btn_div"></Button>
</TableRow>
<TableRow>
<Button android:text="1" android:id="@+id/btn_1"></Button>
<Button android:text="2" android:id="@+id/btn_2"></Button>
<Button android:text="3" android:id="@+id/btn_3"></Button>
<Button android:text="-" android:id="@+id/btn_sub"></Button>
</TableRow>
<TableRow>
<Button android:text="0" android:id="@+id/btn_0"></Button>
<Button android:text="." android:id="@+id/btn_dot"></Button>
<Button android:text="+" android:id="@+id/btn_plus"></Button>
<Button android:text="=" android:id="@+id/btn_equal"></Button>
</TableRow>
</TableLayout>

</LinearLayout>
布局效果:

显然这不能满足我们的期望,下面我们演示 使用 android:stretchColumns 来自动拉伸
我们这里简单的给 TableLayout 增加一个属性 android:stretchColumns="*" 表示所有列都要自动拉伸,以便适应屏幕宽度。
布局效果

它的值即可以是数字,也可以是*,注意数字是从0开始的,即:android:stretchColumns="1" 是设置 TableLayout所有行的第二列为扩展列。
上面我们会看到 第四列的按钮比其他列的按钮要宽,如果我们想都一样宽如何办呢?
一个简单办法:
在自动拉伸的基础上,把每一列的宽度都设置成一样,比如下面的代码:
<?xml version="1.0" encoding="utf-8"?>
<LinearLayout xmlns:android="http://schemas.android.com/apk/res/android"
android:orientation="vertical" android:layout_width="fill_parent"
android:layout_height="fill_parent">

<TableLayout android:layout_width="match_parent"
android:layout_height="match_parent" 		android:stretchColumns="*">
<TableRow>
<EditText android:id="@+id/et_led" android:layout_width="fill_parent"
android:digits="1234567890.+-*/=%\n\t()" android:text=""
android:layout_span="4" />
</TableRow>
<TableRow>
<Button android:text="(" android:id="@+id/btn_LeftParenthesis"
android:layout_width="1dip"></Button>
<Button android:text=")" android:id="@+id/btn_RightParenthesis"
android:layout_width="1dip"></Button>
<Button android:text="*" android:id="@+id/btn_x"
android:layout_width="1dip"></Button>
<Button android:text="back" android:id="@+id/btn_back"
android:layout_width="1dip"></Button>
</TableRow>
<TableRow>
<Button android:text="7" android:id="@+id/btn_7"></Button>
<Button android:text="8" android:id="@+id/btn_8"></Button>
<Button android:text="9" android:id="@+id/btn_9"></Button>
<Button android:text="%" android:id="@+id/btn_mod"></Button>
</TableRow>
<TableRow>
<Button android:text="4" android:id="@+id/btn_4"></Button>
<Button android:text="5" android:id="@+id/btn_5"></Button>
<Button android:text="6" android:id="@+id/btn_6"></Button>
<Button android:text="/" android:id="@+id/btn_div"></Button>
</TableRow>
<TableRow>
<Button android:text="1" android:id="@+id/btn_1"></Button>
<Button android:text="2" android:id="@+id/btn_2"></Button>
<Button android:text="3" android:id="@+id/btn_3"></Button>
<Button android:text="-" android:id="@+id/btn_sub"></Button>
</TableRow>
<TableRow>
<Button android:text="0" android:id="@+id/btn_0"></Button>
<Button android:text="." android:id="@+id/btn_dot"></Button>
<Button android:text="+" android:id="@+id/btn_plus"></Button>
<Button android:text="=" android:id="@+id/btn_equal"></Button>
</TableRow>
</TableLayout>

</LinearLayout>
这时候的效果就成了:
注意比起最初的就多了2个设置
android:layout_width="1dip" 和 android:stretchColumns="*"


相关文章推荐
- Android 使用 TableLayout 布局拉伸宽度
- Android 使用 TableLayout 布局拉伸宽度
- Android 使用 TableLayout 布局拉伸宽度
- Android 使用 TableLayout 布局拉伸宽度
- Android 使用 TableLayout 布局拉伸宽度 平均分布各列
- Android 使用 TableLayout 布局拉伸宽度
- android 使用TableLayout 实现布局自动拉伸宽度
- 【Android】56、动态加载布局的技巧——使用最小宽度限定符
- Android控件之TableLayout布局拉伸宽度
- Android布局之LinearLayout与TableLayout的嵌套使用
- android 基本布局(RelativeLayout、TableLayout等)使用方法及各种属性
- Android布局(RelativeLayout、TableLayout等)使用方法
- Android使用TableLayout动态布局实例
- Android常见布局使用
- Android使用TableLayou动态布局实例
- Android布局细节:layout_weight的使用方法
- Android开发:使用ViewDragHelper实现抽屉拉伸效果
- android使用代码布局LInearLayout达不到xml的效果(自问自答)
- Android布局优化----ViewSub的使用
- Android 基础:常用布局 介绍 & 使用(附 属性查询)