Lucene学习总结之四:Lucene索引过程分析(1)
2010-12-23 13:46
330 查看
对于Lucene的索引过程,除了将词(Term)写入倒排表并最终写入Lucene的索引文件外,还包括分词(Analyzer)和合并段(merge segments)的过程,本次不包括这两部分,将在以后的文章中进行分析。
Lucene的索引过程,很多的博客,文章都有介绍,推荐大家上网搜一篇文章:《Annotated Lucene》,好像中文名称叫《Lucene源码剖析》是很不错的。
想要真正了解Lucene索引文件过程,最好的办法是跟进代码调试,对着文章看代码,这样不但能够最详细准确的掌握索引过程(描述都是有偏差的,而代码是不会骗你的),而且还能够学习Lucene的一些优秀的实现,能够在以后的工作中为我所用,毕竟Lucene是比较优秀的开源项目之一。
由于Lucene已经升级到3.0.0了,本索引过程为Lucene 3.0.0的索引过程。
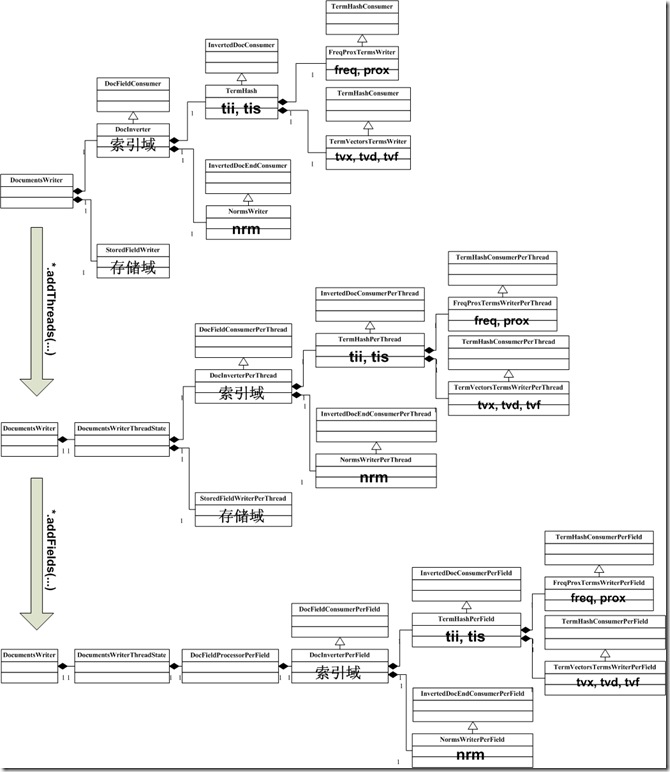
其实索引过程,就是经历下图中所示的索引链的过程,索引链中的每个节点,负责索引文档的不同部分的信息 ,当经历完所有的索引链的时候,文档就处理完毕了。最初的索引链,我们称之基本索引链 。
为了支持多线程,使得多个线程能够并发处理文档,因而每个线程都要建立自己的索引链体系,使得每个线程能够独立工作,在基本索引链基础上建立起来的每个线程独立的索引链体系,我们称之线程索引链 。线程索引链的每个节点是由基本索引链中的相应的节点调用函数addThreads创建的。
为了提高效率,考虑到对相同域的处理有相似的过程,应用的缓存也大致相当,因而不必每个线程在处理每一篇文档的时候都重新创建一系列对象,而是复用这些对象。所以对每个域也建立了自己的索引链体系,我们称之域索引链 。域索引链的每个节点是由线程索引链中的相应的节点调用addFields创建的。
当完成对文档的处理后,各部分信息都要写到索引文件中,写入索引文件的过程是同步的,不是多线程的,也是沿着基本索引链将各部分信息依次写入索引文件的。
下面详细分析这一过程。
IndexWriter对象主要包含以下几方面的信息:
用于索引文档
Directory directory; 指向索引文件夹
Analyzer analyzer; 分词器
Similarity similarity = Similarity.getDefault(); 影响打分的标准化因子(normalization factor)部分,对文档的打分分两个部分,一部分是索引阶段计算的,与查询语句无关,一部分是搜索阶段计算的,与查询语句相关。
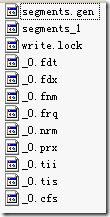
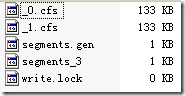
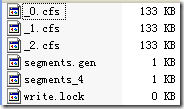
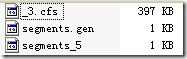
SegmentInfos segmentInfos = new SegmentInfos(); 保存段信息,大家会发现,和segments_N中的信息几乎一一对应。
IndexFileDeleter deleter; 此对象不是用来删除文档的,而是用来管理索引文件的。
Lock writeLock; 每一个索引文件夹只能打开一个IndexWriter,所以需要锁。
Set segmentsToOptimize = new HashSet(); 保存正在最优化(optimize)的段信息。当调用optimize的时候,当前所有的段信息加入此Set,此后新生成的段并不参与此次最优化。
用于合并段,在合并段的文章中将详细描述
SegmentInfos localRollbackSegmentInfos;
HashSet mergingSegments = new HashSet();
MergePolicy mergePolicy = new LogByteSizeMergePolicy(this);
MergeScheduler mergeScheduler = new ConcurrentMergeScheduler();
LinkedList pendingMerges = new LinkedList();
Set runningMerges = new HashSet();
List mergeExceptions = new ArrayList();
long mergeGen;
为保持索引完整性,一致性和事务性
SegmentInfos rollbackSegmentInfos; 当IndexWriter对索引进行了添加,删除文档操作后,可以调用commit将修改提交到文件中去,也可以调用rollback取消从上次commit到此时的修改。
SegmentInfos localRollbackSegmentInfos; 此段信息主要用于将其他的索引文件夹合并到此索引文件夹的时候,为防止合并到一半出错可回滚所保存的原来的段信息。
一些配置
long writeLockTimeout; 获得锁的时间超时。当超时的时候,说明此索引文件夹已经被另一个IndexWriter打开了。
int termIndexInterval; 同tii和tis文件中的indexInterval。
有关SegmentInfos对象所保存的信息:
当索引文件夹如下的时候,SegmentInfos对象如下表
有关IndexFileDeleter:
其不是用来删除文档的,而是用来管理索引文件的。
在对文档的添加,删除,对段的合并的处理过程中,会生成很多新的文件,并需要删除老的文件,因而需要管理。
然而要被删除的文件又可能在被用,因而要保存一个引用计数,仅仅当引用计数为零的时候,才执行删除。
下面这个例子能很好的说明IndexFileDeleter如何对文件引用计数并进行添加和删除的。
有时候,我们写java程序的时候,也需要不同的JVM之间进行同步,来保护一个整个系统中唯一的资源。
如果唯一的资源仅仅在一个进程中,则可以使用线程同步的机制
然而如果唯一的资源要被多个进程进行访问,则需要进程间同步的机制,无论是Windows和Linux在操作系统层面都有很多的进程间同步的机制。
但进程间的同步却不是Java的特长,Lucene的SimpleFSLock给我们提供了一种方式。
Document对象主要包括以下部分:
此文档的boost,默认为1,大于一说明比一般的文档更加重要,小于一说明更不重要。
一个ArrayList保存此文档所有的域
每一个域包括域名,域值,和一些标志位,和fnm,fdx,fdt中的描述相对应。
Lucene的索引过程,很多的博客,文章都有介绍,推荐大家上网搜一篇文章:《Annotated Lucene》,好像中文名称叫《Lucene源码剖析》是很不错的。
想要真正了解Lucene索引文件过程,最好的办法是跟进代码调试,对着文章看代码,这样不但能够最详细准确的掌握索引过程(描述都是有偏差的,而代码是不会骗你的),而且还能够学习Lucene的一些优秀的实现,能够在以后的工作中为我所用,毕竟Lucene是比较优秀的开源项目之一。
由于Lucene已经升级到3.0.0了,本索引过程为Lucene 3.0.0的索引过程。
一、索引过程体系结构
Lucene 3.0的搜索要经历一个十分复杂的过程,各种信息分散在不同的对象中分析,处理,写入,为了支持多线程,每个线程都创建了一系列类似结构的对象集,为了提高效率,要复用一些对象集,这使得索引过程更加复杂。其实索引过程,就是经历下图中所示的索引链的过程,索引链中的每个节点,负责索引文档的不同部分的信息 ,当经历完所有的索引链的时候,文档就处理完毕了。最初的索引链,我们称之基本索引链 。
为了支持多线程,使得多个线程能够并发处理文档,因而每个线程都要建立自己的索引链体系,使得每个线程能够独立工作,在基本索引链基础上建立起来的每个线程独立的索引链体系,我们称之线程索引链 。线程索引链的每个节点是由基本索引链中的相应的节点调用函数addThreads创建的。
为了提高效率,考虑到对相同域的处理有相似的过程,应用的缓存也大致相当,因而不必每个线程在处理每一篇文档的时候都重新创建一系列对象,而是复用这些对象。所以对每个域也建立了自己的索引链体系,我们称之域索引链 。域索引链的每个节点是由线程索引链中的相应的节点调用addFields创建的。
当完成对文档的处理后,各部分信息都要写到索引文件中,写入索引文件的过程是同步的,不是多线程的,也是沿着基本索引链将各部分信息依次写入索引文件的。
下面详细分析这一过程。
二、详细索引过程
1、创建IndexWriter对象
代码:| IndexWriter writer = new IndexWriter(FSDirectory.open(INDEX_DIR), new StandardAnalyzer(Version.LUCENE_CURRENT), true, IndexWriter.MaxFieldLength.LIMITED); |
用于索引文档
Directory directory; 指向索引文件夹
Analyzer analyzer; 分词器
Similarity similarity = Similarity.getDefault(); 影响打分的标准化因子(normalization factor)部分,对文档的打分分两个部分,一部分是索引阶段计算的,与查询语句无关,一部分是搜索阶段计算的,与查询语句相关。
SegmentInfos segmentInfos = new SegmentInfos(); 保存段信息,大家会发现,和segments_N中的信息几乎一一对应。
IndexFileDeleter deleter; 此对象不是用来删除文档的,而是用来管理索引文件的。
Lock writeLock; 每一个索引文件夹只能打开一个IndexWriter,所以需要锁。
Set segmentsToOptimize = new HashSet(); 保存正在最优化(optimize)的段信息。当调用optimize的时候,当前所有的段信息加入此Set,此后新生成的段并不参与此次最优化。
用于合并段,在合并段的文章中将详细描述
SegmentInfos localRollbackSegmentInfos;
HashSet mergingSegments = new HashSet();
MergePolicy mergePolicy = new LogByteSizeMergePolicy(this);
MergeScheduler mergeScheduler = new ConcurrentMergeScheduler();
LinkedList pendingMerges = new LinkedList();
Set runningMerges = new HashSet();
List mergeExceptions = new ArrayList();
long mergeGen;
为保持索引完整性,一致性和事务性
SegmentInfos rollbackSegmentInfos; 当IndexWriter对索引进行了添加,删除文档操作后,可以调用commit将修改提交到文件中去,也可以调用rollback取消从上次commit到此时的修改。
SegmentInfos localRollbackSegmentInfos; 此段信息主要用于将其他的索引文件夹合并到此索引文件夹的时候,为防止合并到一半出错可回滚所保存的原来的段信息。
一些配置
long writeLockTimeout; 获得锁的时间超时。当超时的时候,说明此索引文件夹已经被另一个IndexWriter打开了。
int termIndexInterval; 同tii和tis文件中的indexInterval。
有关SegmentInfos对象所保存的信息:
当索引文件夹如下的时候,SegmentInfos对象如下表
| segmentInfos SegmentInfos (id=37) capacityIncrement 0 counter 3 elementCount 3 elementData Object[10] (id=68) [0] SegmentInfo (id=166) delCount 0 delGen -1 diagnostics HashMap (id=170) dir SimpleFSDirectory (id=171) docCount 2 docStoreIsCompoundFile false docStoreOffset -1 docStoreSegment null files ArrayList (id=173) hasProx true hasSingleNormFile true isCompoundFile 1 name "_0" normGen null preLockless false sizeInBytes 635 [1] SegmentInfo (id=168) delCount 0 delGen -1 diagnostics HashMap (id=177) dir SimpleFSDirectory (id=171) docCount 2 docStoreIsCompoundFile false docStoreOffset -1 docStoreSegment null files ArrayList (id=178) hasProx true hasSingleNormFile true isCompoundFile 1 name "_1" normGen null preLockless false sizeInBytes 635 [2] SegmentInfo (id=169) delCount 0 delGen -1 diagnostics HashMap (id=180) dir SimpleFSDirectory (id=171) docCount 2 docStoreIsCompoundFile false docStoreOffset -1 docStoreSegment null files ArrayList (id=214) hasProx true hasSingleNormFile true isCompoundFile 1 name "_2" normGen null preLockless false sizeInBytes 635 generation 4 lastGeneration 4 modCount 3 pendingSegnOutput null userData HashMap (id=146) version 1263044890832 |
其不是用来删除文档的,而是用来管理索引文件的。
在对文档的添加,删除,对段的合并的处理过程中,会生成很多新的文件,并需要删除老的文件,因而需要管理。
然而要被删除的文件又可能在被用,因而要保存一个引用计数,仅仅当引用计数为零的时候,才执行删除。
下面这个例子能很好的说明IndexFileDeleter如何对文件引用计数并进行添加和删除的。


有时候,我们写java程序的时候,也需要不同的JVM之间进行同步,来保护一个整个系统中唯一的资源。
如果唯一的资源仅仅在一个进程中,则可以使用线程同步的机制
然而如果唯一的资源要被多个进程进行访问,则需要进程间同步的机制,无论是Windows和Linux在操作系统层面都有很多的进程间同步的机制。
但进程间的同步却不是Java的特长,Lucene的SimpleFSLock给我们提供了一种方式。
| Lock的抽象类 public abstract class Lock { public static long LOCK_POLL_INTERVAL = 1000; public static final long LOCK_OBTAIN_WAIT_FOREVER = -1; public abstract boolean obtain() throws IOException; public boolean obtain(long lockWaitTimeout) throws LockObtainFailedException, IOException { boolean locked = obtain(); if (lockWaitTimeout < 0 && lockWaitTimeout != LOCK_OBTAIN_WAIT_FOREVER) throw new IllegalArgumentException("..."); long maxSleepCount = lockWaitTimeout / LOCK_POLL_INTERVAL; long sleepCount = 0; while (!locked) { if (lockWaitTimeout != LOCK_OBTAIN_WAIT_FOREVER && sleepCount++ >= maxSleepCount) { throw new LockObtainFailedException("Lock obtain timed out."); } try { Thread.sleep(LOCK_POLL_INTERVAL); } catch (InterruptedException ie) { throw new ThreadInterruptedException(ie); } locked = obtain(); } return locked; } public abstract void release() throws IOException; public abstract boolean isLocked() throws IOException; } LockFactory的抽象类 public abstract class LockFactory { public abstract Lock makeLock(String lockName); abstract public void clearLock(String lockName) throws IOException; } SimpleFSLock的实现类 class SimpleFSLock extends Lock { File lockFile; File lockDir; public SimpleFSLock(File lockDir, String lockFileName) { this.lockDir = lockDir; lockFile = new File(lockDir, lockFileName); } @Override public boolean obtain() throws IOException { if (!lockDir.exists()) { if (!lockDir.mkdirs()) throw new IOException("Cannot create directory: " + lockDir.getAbsolutePath()); } else if (!lockDir.isDirectory()) { throw new IOException("Found regular file where directory expected: " + lockDir.getAbsolutePath()); } return lockFile.createNewFile(); } @Override public void release() throws LockReleaseFailedException { if (lockFile.exists() && !lockFile.delete()) throw new LockReleaseFailedException("failed to delete " + lockFile); } @Override public boolean isLocked() { return lockFile.exists(); } } SimpleFSLockFactory的实现类 public class SimpleFSLockFactory extends FSLockFactory { public SimpleFSLockFactory(String lockDirName) throws IOException { setLockDir(new File(lockDirName)); } @Override public Lock makeLock(String lockName) { if (lockPrefix != null) { lockName = lockPrefix + "-" + lockName; } return new SimpleFSLock(lockDir, lockName); } @Override public void clearLock(String lockName) throws IOException { if (lockDir.exists()) { if (lockPrefix != null) { lockName = lockPrefix + "-" + lockName; } File lockFile = new File(lockDir, lockName); if (lockFile.exists() && !lockFile.delete()) { throw new IOException("Cannot delete " + lockFile); } } } }; |
2、创建文档Document对象,并加入域(Field)
代码:| Document doc = new Document(); doc.add(new Field("path", f.getPath(), Field.Store.YES, Field.Index.NOT_ANALYZED)); doc.add(new Field("modified",DateTools.timeToString(f.lastModified(), DateTools.Resolution.MINUTE), Field.Store.YES, Field.Index.NOT_ANALYZED)); doc.add(new Field("contents", new FileReader(f))); |
此文档的boost,默认为1,大于一说明比一般的文档更加重要,小于一说明更不重要。
一个ArrayList保存此文档所有的域
每一个域包括域名,域值,和一些标志位,和fnm,fdx,fdt中的描述相对应。
| doc Document (id=42) boost 1.0 fields ArrayList (id=44) elementData Object[10] (id=46) [0] Field (id=48) binaryLength 0 binaryOffset 0 boost 1.0 fieldsData "exampledocs//file01.txt" isBinary false isIndexed true isStored true isTokenized false lazy false name "path" omitNorms false omitTermFreqAndPositions false storeOffsetWithTermVector false storePositionWithTermVector false storeTermVector false tokenStream null [1] Field (id=50) binaryLength 0 binaryOffset 0 boost 1.0 fieldsData "200910240957" isBinary false isIndexed true isStored true isTokenized false lazy false name "modified" omitNorms false omitTermFreqAndPositions false storeOffsetWithTermVector false storePositionWithTermVector false storeTermVector false tokenStream null [2] Field (id=52) binaryLength 0 binaryOffset 0 boost 1.0 fieldsData FileReader (id=58) isBinary false isIndexed true isStored false isTokenized true lazy false name "contents" omitNorms false omitTermFreqAndPositions false storeOffsetWithTermVector false storePositionWithTermVector false storeTermVector false tokenStream null modCount 3 size 3 |

相关文章推荐
- Lucene学习总结之四:Lucene索引过程分析(2)
- Lucene学习总结之四:Lucene索引过程分析(4)
- Lucene学习总结之四:Lucene索引过程分析(3)
- Lucene学习总结之四:Lucene索引过程分析(3)
- Lucene学习总结之四:Lucene索引过程分析(4)
- Lucene学习总结之四:Lucene索引过程分析(2)
- Lucene学习总结之四:Lucene索引过程分析(1)
- Lucene学习总结之四:Lucene索引过程分析
- Lucene学习总结之四:Lucene索引过程分析
- Lucene学习总结之四:Lucene索引过程分析(1)
- Lucene学习总结之四:Lucene索引过程分析(2)
- Lucene学习总结之四:Lucene索引过程分析(1)
- Lucene学习总结之四:Lucene索引过程分析(3)
- Lucene学习总结之四:Lucene索引过程分析(2)
- Lucene学习总结之四:Lucene索引过程分析(1)
- Lucene学习总结之四:Lucene索引过程分析(4)
- Lucene学习总结之四:Lucene索引过程分析(4)
- Lucene学习总结之四:Lucene索引过程分析(1)
- Lucene学习总结之四:Lucene索引过程分析(1)
- Lucene学习总结之四:Lucene索引过程分析(2)