[ASP.NET MVC 专题] 如何为Route构造相关的自定义Configuration
2010-10-11 16:05
543 查看
[ASP.NET MVC 专题]
[ASP.NET MVC 专题] 如何为Route构造相关的自定义Configuration
[ASP.NET MVC 专题] ViewEngine的发展以及应用
背景
大家对配置文件都是非常的熟悉,至于怎么个玩法就各有千秋。本人偶然在一个开源项目中看到牛人写的代码,其中就有关于配置文件的操作的方面。惊叹于代码的艺术的时候,更多的是感叹,唉!高手真多,本人什么时候才能达到这个水平,一步一步来,说不定,3,5几年后哥也成了高手了,哈哈。低调,一定要低调!
Configuration自定义操作基础
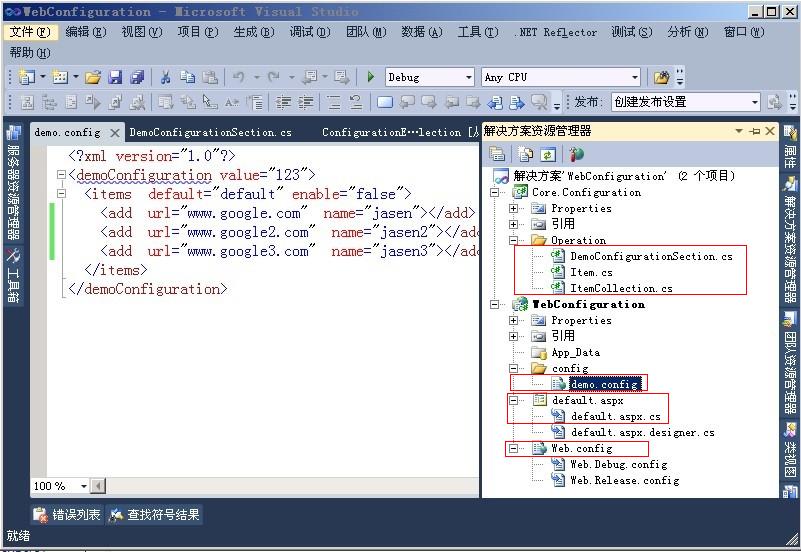
先来看本人总结出来的比较肤浅的代码,熟悉下基本操作,然后在看牛人在ASP.NET MVC中如何玩转Configuration。如下图所示,我们先仅仅拿几个类和比较简单的配置文件(下图标红色框的)入手:
Web.config如下:
1 <?xml version="1.0"?>
2 <configuration>
3 <configSections>
4 <section name="demoConfiguration" type="Core.Configuration.Operation.DemoConfigurationSection,Core.Configuration"/>
5 </configSections>
6 <demoConfiguration configSource="config\demo.config"/>
7 <system.web>
8 <compilation debug="true" targetFramework="4.0"/>
9 </system.web>
10 </configuration>
从上面我们看出,增加了一个ConfigurationSection部分,类名为Core.Configuration.Operation.DemoConfigurationSection,程序集为Core.Configuration。<demoConfiguration configSource="config\demo.config"/>中configSource标识了我们的这部分配置内容在config\demo.config的文件中。
demo.config如下:
1 <?xml version="1.0"?>
2 <demoConfiguration value="123">
3 <items default="default" enable="false">
4 <add url="www.google.com" name="jasen"></add>
5 <add url="www.google2.com" name="jasen2"></add>
6 <add url="www.google3.com" name="jasen3"></add>
7 </items>
8 </demoConfiguration>
现在,我们增加的configurationSection这部分如何在代码中运用?
Core.Configuration.Operation.DemoConfigurationSection section = (Core.Configuration.Operation.DemoConfigurationSection)System.Configuration.ConfigurationManager.GetSection("demoConfiguration");
// 检索当前应用程序默认配置的指定配置节。
// 参数: sectionName: 配置节的路径和名称。
// 返回结果: 指定的 System.Configuration.ConfigurationSection 对象,或者,如果该节不存在,则为 null。
public static object System.Configuration.ConfigurationSection.GetSection(string sectionName); 显然返回的是一个object对象,我们接下来需要做的就是该如何定义我们的这部分相关类。
先看下ConfigurationSection
1 public class DemoConfigurationSection : ConfigurationSection
2 {
3 public DemoConfigurationSection()
4 {
5 }
6
7 [ConfigurationProperty("items", IsRequired = false)]
8 public ItemCollection Items
9 {
10 get { return (ItemCollection)(this["items"]); }
11 set { this["items"] = value; }
12 }
13
14 [ConfigurationProperty("value", IsRequired = false)]
15 public string Value
16 {
17 get { return this["value"].ToString(); }
18 set { this["value"] = value; }
19 }
20 }
ConfigurationElementCollection
1 public class ItemCollection:ConfigurationElementCollection
2 {
3 public Item this[int index]
4 {
5 get
6 {
7 return base.BaseGet(index) as Item;
8 }
9 set
10 {
11 if (base.BaseGet(index) != null)
12 {
13 base.BaseRemoveAt(index);
14 }
16 this.BaseAdd(index, value);
17 }
18 }
19
20 protected override ConfigurationElement CreateNewElement()
21 {
22 return new Item();
23 }
24
25 protected override object GetElementKey(ConfigurationElement element)
26 {
27 return ((Item)element).Name;
28 }
29
30 [ConfigurationProperty("default", IsRequired = true)]
31 public string Default
32 {
33 get { return Convert.ToString(this["default"]); }
34 set { this["default"] = value; }
35 }
36
37 [ConfigurationProperty("enable", IsRequired = true, DefaultValue = true)]
38 public bool Enable
39 {
40 get { return Boolean.Parse(this["enable"].ToString()); }
41 set { this["enable"] = value; }
42 }
43 }
集合中提供对ConfigurationElement的索引(base.BaseGet()与base.BaseAdd()),重写了父类的CreateNewElement(),GetElementKey(ConfigurationElement element)方法。
ConfigurationElement
1 public class Item:ConfigurationElement
2 {
3 [ConfigurationProperty("name", IsRequired = true, IsKey = true)]
4 public string Name
5 {
6 get { return this["name"].ToString(); }
7 set { this["name"] = value; }
8 }
9
10 [ConfigurationProperty("url", IsRequired = true, IsKey = true)]
11 public string Url
12 {
13 get { return this["url"].ToString(); }
14 set { this["url"] = value; }
15 }
16 }

从上往下看的话,整体就是一个树形结构,想必大家都很熟悉。如果我们需要扩展上述的ConfigurationSection,我们仅仅需要多增加ConfigurationEelementCollection以及ConfigurationElement类,看情况而定(可能还有其他属性什么的)。
这样我们就可以将System.Configuration.ConfigurationManager.GetSection("demoConfiguration");强制转换成我们自定义的Core.Configuration.Operation.DemoConfigurationSection 了,进而进行你自己的编码操作。我们可以核查一下我们的操作,是否与我们开始设定的情况一致。我们编写如下方法进行检测。
1 private void DisplaySectionData(Core.Configuration.Operation.DemoConfigurationSection section)
2 {
3 System.Text.StringBuilder sb = new System.Text.StringBuilder();
4 sb.Append("?xml version=\"1.0\"?<br/>");
5 sb.Append(string.Format("demoConfiguration value=\"{0}\"<br/>", section.Value));
6 sb.Append(string.Format(" items default=\"{0}\" enable=\"{1}\"<br/>", section.Items.Default, section.Items.Enable));
7 foreach (Core.Configuration.Operation.Item item in section.Items){
8 sb.Append(string.Format(" add url=\"{0}\" name=\"{1}\" /add<br/>", item.Url, item.Name));
9 }
10 sb.Append(" /items<br/>");
11 sb.Append("/demoConfiguration<br/>");
12
13 Response.Write(sb.ToString());
14 }
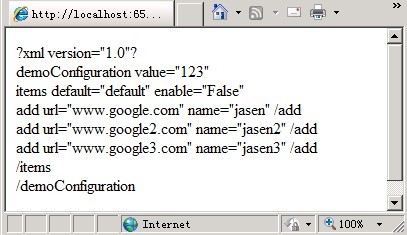
编译下项目,显示如下:
是不是和我们预想的结果一样? 肯定一样的,不需要多想。现在基础的应该大家都懂的差不多了。下面看那些高人写的,哈哈,哥也很崇拜!
Configuration自定义操作进阶(ASP.NET MVC)
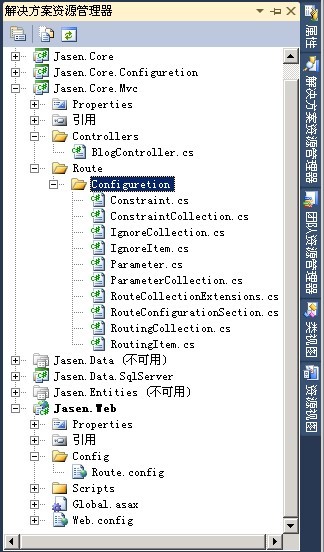
上面是本人将所有代码分离出来重新构建的(下次我需要运用的),截图中可以基本看出我们的文件和目录情况。(我们把大概的配置文件写好了,这些类什么的都不是问题,依样画葫芦就行!)
其中最重要的就是下面的扩展类(本人稍微重构了一下方法),如下:
public static class RouteCollectionExtensions {
private static string defaultpage;
private static string extendName;
public static string GetDefaultPage(this System.Web.Routing.RouteCollection routes) {
return defaultpage;
}
public static string GetExtendName(this System.Web.Routing.RouteCollection routes) {
return extendName;
}
/// <summary>
/// 根据配置的Routing规则来加载Routing规则
/// </summary>
public static void RegisterRoutes(this System.Web.Routing.RouteCollection routes, RouteConfigurationSection section) {
if (!section.Short.Enable && !section.Map.Enable) throw new ConfigurationErrorsException("Short与Map必须至少有一个开启.");
extendName = section.Extend;
defaultpage = (section.Short != null && section.Short.Enable) ? section.Short.Default.Replace("$0", extendName) : section.Map.Default.Replace("$0", extendName);
HandleIgnoreItemCollection(routes, section);
HandleShortRoutingCollection(routes, section);
HandleMapRoutingCollection(routes, section);
}
private static void HandleMapRoutingCollection(System.Web.Routing.RouteCollection routes, RouteConfigurationSection section)
{
// Manipluate the Routing Table
foreach (RoutingItem routingItem in section.Map)
{
RouteValueDictionary defaults = new RouteValueDictionary();
RouteValueDictionary constraints = new RouteValueDictionary();
if (routingItem.Controller != string.Empty)
defaults.Add("controller", routingItem.Controller);
if (routingItem.Action != string.Empty)
defaults.Add("action", routingItem.Action);
foreach (Parameter param in routingItem.Paramaters)
{
defaults.Add(param.Name, param.Value);
if (!string.IsNullOrEmpty(param.Constraint))
{
constraints.Add(param.Name, param.Constraint);
}
}
routes.MapRoute(routingItem.Name, routingItem.Url.Replace("$0", section.Extend), defaults, constraints);
}
}
private static void HandleShortRoutingCollection(System.Web.Routing.RouteCollection routes, RouteConfigurationSection section)
{
// Maniplute the short Routing Table
if (section.Short != null && section.Short.Enable)
{
foreach (RoutingItem item in section.Short)
{
RouteValueDictionary defaults = new RouteValueDictionary();
RouteValueDictionary constraints = new RouteValueDictionary();
if (item.Controller != string.Empty)
defaults.Add("controller", item.Controller);
if (item.Action != string.Empty)
defaults.Add("action", item.Action);
foreach (Parameter param in item.Paramaters)
{
defaults.Add(param.Name, param.Value);
if (!string.IsNullOrEmpty(param.Constraint))
{
constraints.Add(param.Name, param.Constraint);
}
}
routes.MapRoute(item.Name, item.Url.Replace("$0", extendName), defaults, constraints);
}
}
}
private static void HandleIgnoreItemCollection(System.Web.Routing.RouteCollection routes, RouteConfigurationSection section)
{
// Manipulate the Ignore List
foreach (IgnoreItem ignoreItem in section.Ignore)
{
RouteValueDictionary ignoreConstraints = new RouteValueDictionary();
foreach (Constraint constraint in ignoreItem.Constraints)
ignoreConstraints.Add(constraint.Name, constraint.Value);
routes.IgnoreRoute(ignoreItem.Url, ignoreConstraints);
}
}
public static void IgnoreRoute(this RouteCollection routes, string url, RouteValueDictionary constraints) {
if (routes == null) throw new ArgumentNullException("routes");
if (url == null) throw new ArgumentNullException("url");
IgnoreRoute ignore = new IgnoreRoute(url);
ignore.Constraints = constraints;
routes.Add(ignore);
}
/// <summary>
/// 框架的这个方法的defaults、constraints参数都是Object类型的,只好重写
/// </summary>
public static void MapRoute( this RouteCollection routes, string name, string url, RouteValueDictionary defaults, RouteValueDictionary constraints) {
if (routes == null) throw new ArgumentNullException("routes");
if (url == null) throw new ArgumentNullException("url");
System.Web.Routing.Route route = new System.Web.Routing.Route(url, new MvcRouteHandler());
route.Defaults = defaults;
route.Constraints = constraints;
routes.Add(name, route);
}
public static RouteConfigurationSection GetSection() {
RouteConfigurationSection section = (RouteConfigurationSection)ConfigurationManager.GetSection("routeConfiguration");
return section;
}
}
sealed class IgnoreRoute : System.Web.Routing.Route {
public IgnoreRoute(string url)
: base(url, new StopRoutingHandler()) {
}
public override VirtualPathData GetVirtualPath(RequestContext requestContext, RouteValueDictionary values) {
return null;
}
}
上面采用了2种处理route的方案,其中包括 public class StopRoutingHandler()这种方式的,它提供一种方式,来指定 ASP.NET 路由不应处理 URL 模式的请求。另外一种就是我们常规的操作。这些扩展方法基本都是实现RouteCollection.Add();
其他的相关类本人就不概述了,因为都是纯粹的机械运动。基本运用代码如下:
1 public static void RegisterRoutes(RouteCollection routes)
2 {
3 //routes.IgnoreRoute("{resource}.axd/{*pathInfo}");
4 //routes.MapRoute(
5 // "Default", // Route name
6 // "{controller}/{action}/{id}", // URL with parameters
7 // new { controller = "Home", action = "Index", id = UrlParameter.Optional } // Parameter defaults
8 //);
9 Jasen.Core.Mvc.Route.Configuretion.RouteConfigurationSection section =
10 (Jasen.Core.Mvc.Route.Configuretion.RouteConfigurationSection)System.Configuration.ConfigurationManager.GetSection("routeConfiguration");
11 if (section==null) throw new Exception("还没有配置你的Route规则,请配置你的Route规则");
12 RouteTable.Routes.RegisterRoutes(section);
13 }
明显,你仅仅只要配置好你的路由文件就可以了,再也不需要在这个方法里面写好大一片的routes.MapRoute()代码了。
当然,这里仅仅介绍的是ASP.NET MVC的路由映射配置文件运用,你也可以举一反三进行其他运用。本人刚开始看到开源项目的这段代码,哥知道,高手太TM的恐怖,哈哈,基础的东西被用得TM的神了。神马都是浮云!我们需要做的不是浮云,而是沉石!
为了读者更好的了解,本人将代码进行了分离,以使各位能够更加清晰,更加清楚,更加容易地学到该种方法------->下载地址如下
分离的源代码下载地址:ASP.NET MVC Configuration Perfect Using下载
后续:
ASP.NET MVC ViewEngine
$(function () {
$("input[name=fc1]").click(function () {
$("div[class=diggit]").trigger('click');
$("textarea[class=comment_textarea]").val(" 好文要顶,推荐一下!");
PostComment();
});
$("input[name=fc2]").click(function () {
$("textarea[class=comment_textarea]").val(" 楼主辛苦,支持一下!");
PostComment();
});
$("input[name=fc3]").click(function () {
$("textarea[class=comment_textarea]").val(" 文章不错,继续加油!");
PostComment();
});
$("input[name=fc4]").click(function () {
$("textarea[class=comment_textarea]").val(" 一般一般,期待好文。");
PostComment();
});
$("input[name=fc5]").click(function () {
$("textarea[class=comment_textarea]").val(" 看不懂哦~~");
PostComment();
});
$("input[name=fc6]").click(function () {
$("textarea[class=comment_textarea]").val(" 文章写的没意思...");
PostComment();
});
$("input[name=fc7]").click(function () {
$("textarea[class=comment_textarea]").val(" 路过,凑个热闹^_^");
PostComment();
});
});
[ASP.NET MVC 专题] 如何为Route构造相关的自定义Configuration
[ASP.NET MVC 专题] ViewEngine的发展以及应用
背景
大家对配置文件都是非常的熟悉,至于怎么个玩法就各有千秋。本人偶然在一个开源项目中看到牛人写的代码,其中就有关于配置文件的操作的方面。惊叹于代码的艺术的时候,更多的是感叹,唉!高手真多,本人什么时候才能达到这个水平,一步一步来,说不定,3,5几年后哥也成了高手了,哈哈。低调,一定要低调!
Configuration自定义操作基础
先来看本人总结出来的比较肤浅的代码,熟悉下基本操作,然后在看牛人在ASP.NET MVC中如何玩转Configuration。如下图所示,我们先仅仅拿几个类和比较简单的配置文件(下图标红色框的)入手:
Web.config如下:
1 <?xml version="1.0"?>
2 <configuration>
3 <configSections>
4 <section name="demoConfiguration" type="Core.Configuration.Operation.DemoConfigurationSection,Core.Configuration"/>
5 </configSections>
6 <demoConfiguration configSource="config\demo.config"/>
7 <system.web>
8 <compilation debug="true" targetFramework="4.0"/>
9 </system.web>
10 </configuration>
从上面我们看出,增加了一个ConfigurationSection部分,类名为Core.Configuration.Operation.DemoConfigurationSection,程序集为Core.Configuration。<demoConfiguration configSource="config\demo.config"/>中configSource标识了我们的这部分配置内容在config\demo.config的文件中。
demo.config如下:
1 <?xml version="1.0"?>
2 <demoConfiguration value="123">
3 <items default="default" enable="false">
4 <add url="www.google.com" name="jasen"></add>
5 <add url="www.google2.com" name="jasen2"></add>
6 <add url="www.google3.com" name="jasen3"></add>
7 </items>
8 </demoConfiguration>
现在,我们增加的configurationSection这部分如何在代码中运用?
Core.Configuration.Operation.DemoConfigurationSection section = (Core.Configuration.Operation.DemoConfigurationSection)System.Configuration.ConfigurationManager.GetSection("demoConfiguration");
// 检索当前应用程序默认配置的指定配置节。
// 参数: sectionName: 配置节的路径和名称。
// 返回结果: 指定的 System.Configuration.ConfigurationSection 对象,或者,如果该节不存在,则为 null。
public static object System.Configuration.ConfigurationSection.GetSection(string sectionName); 显然返回的是一个object对象,我们接下来需要做的就是该如何定义我们的这部分相关类。
先看下ConfigurationSection
1 public class DemoConfigurationSection : ConfigurationSection
2 {
3 public DemoConfigurationSection()
4 {
5 }
6
7 [ConfigurationProperty("items", IsRequired = false)]
8 public ItemCollection Items
9 {
10 get { return (ItemCollection)(this["items"]); }
11 set { this["items"] = value; }
12 }
13
14 [ConfigurationProperty("value", IsRequired = false)]
15 public string Value
16 {
17 get { return this["value"].ToString(); }
18 set { this["value"] = value; }
19 }
20 }
ConfigurationElementCollection
1 public class ItemCollection:ConfigurationElementCollection
2 {
3 public Item this[int index]
4 {
5 get
6 {
7 return base.BaseGet(index) as Item;
8 }
9 set
10 {
11 if (base.BaseGet(index) != null)
12 {
13 base.BaseRemoveAt(index);
14 }
16 this.BaseAdd(index, value);
17 }
18 }
19
20 protected override ConfigurationElement CreateNewElement()
21 {
22 return new Item();
23 }
24
25 protected override object GetElementKey(ConfigurationElement element)
26 {
27 return ((Item)element).Name;
28 }
29
30 [ConfigurationProperty("default", IsRequired = true)]
31 public string Default
32 {
33 get { return Convert.ToString(this["default"]); }
34 set { this["default"] = value; }
35 }
36
37 [ConfigurationProperty("enable", IsRequired = true, DefaultValue = true)]
38 public bool Enable
39 {
40 get { return Boolean.Parse(this["enable"].ToString()); }
41 set { this["enable"] = value; }
42 }
43 }
集合中提供对ConfigurationElement的索引(base.BaseGet()与base.BaseAdd()),重写了父类的CreateNewElement(),GetElementKey(ConfigurationElement element)方法。
ConfigurationElement
1 public class Item:ConfigurationElement
2 {
3 [ConfigurationProperty("name", IsRequired = true, IsKey = true)]
4 public string Name
5 {
6 get { return this["name"].ToString(); }
7 set { this["name"] = value; }
8 }
9
10 [ConfigurationProperty("url", IsRequired = true, IsKey = true)]
11 public string Url
12 {
13 get { return this["url"].ToString(); }
14 set { this["url"] = value; }
15 }
16 }
从上往下看的话,整体就是一个树形结构,想必大家都很熟悉。如果我们需要扩展上述的ConfigurationSection,我们仅仅需要多增加ConfigurationEelementCollection以及ConfigurationElement类,看情况而定(可能还有其他属性什么的)。
这样我们就可以将System.Configuration.ConfigurationManager.GetSection("demoConfiguration");强制转换成我们自定义的Core.Configuration.Operation.DemoConfigurationSection 了,进而进行你自己的编码操作。我们可以核查一下我们的操作,是否与我们开始设定的情况一致。我们编写如下方法进行检测。
1 private void DisplaySectionData(Core.Configuration.Operation.DemoConfigurationSection section)
2 {
3 System.Text.StringBuilder sb = new System.Text.StringBuilder();
4 sb.Append("?xml version=\"1.0\"?<br/>");
5 sb.Append(string.Format("demoConfiguration value=\"{0}\"<br/>", section.Value));
6 sb.Append(string.Format(" items default=\"{0}\" enable=\"{1}\"<br/>", section.Items.Default, section.Items.Enable));
7 foreach (Core.Configuration.Operation.Item item in section.Items){
8 sb.Append(string.Format(" add url=\"{0}\" name=\"{1}\" /add<br/>", item.Url, item.Name));
9 }
10 sb.Append(" /items<br/>");
11 sb.Append("/demoConfiguration<br/>");
12
13 Response.Write(sb.ToString());
14 }
编译下项目,显示如下:
是不是和我们预想的结果一样? 肯定一样的,不需要多想。现在基础的应该大家都懂的差不多了。下面看那些高人写的,哈哈,哥也很崇拜!
Configuration自定义操作进阶(ASP.NET MVC)
上面是本人将所有代码分离出来重新构建的(下次我需要运用的),截图中可以基本看出我们的文件和目录情况。(我们把大概的配置文件写好了,这些类什么的都不是问题,依样画葫芦就行!)
其中最重要的就是下面的扩展类(本人稍微重构了一下方法),如下:
public static class RouteCollectionExtensions {
private static string defaultpage;
private static string extendName;
public static string GetDefaultPage(this System.Web.Routing.RouteCollection routes) {
return defaultpage;
}
public static string GetExtendName(this System.Web.Routing.RouteCollection routes) {
return extendName;
}
/// <summary>
/// 根据配置的Routing规则来加载Routing规则
/// </summary>
public static void RegisterRoutes(this System.Web.Routing.RouteCollection routes, RouteConfigurationSection section) {
if (!section.Short.Enable && !section.Map.Enable) throw new ConfigurationErrorsException("Short与Map必须至少有一个开启.");
extendName = section.Extend;
defaultpage = (section.Short != null && section.Short.Enable) ? section.Short.Default.Replace("$0", extendName) : section.Map.Default.Replace("$0", extendName);
HandleIgnoreItemCollection(routes, section);
HandleShortRoutingCollection(routes, section);
HandleMapRoutingCollection(routes, section);
}
private static void HandleMapRoutingCollection(System.Web.Routing.RouteCollection routes, RouteConfigurationSection section)
{
// Manipluate the Routing Table
foreach (RoutingItem routingItem in section.Map)
{
RouteValueDictionary defaults = new RouteValueDictionary();
RouteValueDictionary constraints = new RouteValueDictionary();
if (routingItem.Controller != string.Empty)
defaults.Add("controller", routingItem.Controller);
if (routingItem.Action != string.Empty)
defaults.Add("action", routingItem.Action);
foreach (Parameter param in routingItem.Paramaters)
{
defaults.Add(param.Name, param.Value);
if (!string.IsNullOrEmpty(param.Constraint))
{
constraints.Add(param.Name, param.Constraint);
}
}
routes.MapRoute(routingItem.Name, routingItem.Url.Replace("$0", section.Extend), defaults, constraints);
}
}
private static void HandleShortRoutingCollection(System.Web.Routing.RouteCollection routes, RouteConfigurationSection section)
{
// Maniplute the short Routing Table
if (section.Short != null && section.Short.Enable)
{
foreach (RoutingItem item in section.Short)
{
RouteValueDictionary defaults = new RouteValueDictionary();
RouteValueDictionary constraints = new RouteValueDictionary();
if (item.Controller != string.Empty)
defaults.Add("controller", item.Controller);
if (item.Action != string.Empty)
defaults.Add("action", item.Action);
foreach (Parameter param in item.Paramaters)
{
defaults.Add(param.Name, param.Value);
if (!string.IsNullOrEmpty(param.Constraint))
{
constraints.Add(param.Name, param.Constraint);
}
}
routes.MapRoute(item.Name, item.Url.Replace("$0", extendName), defaults, constraints);
}
}
}
private static void HandleIgnoreItemCollection(System.Web.Routing.RouteCollection routes, RouteConfigurationSection section)
{
// Manipulate the Ignore List
foreach (IgnoreItem ignoreItem in section.Ignore)
{
RouteValueDictionary ignoreConstraints = new RouteValueDictionary();
foreach (Constraint constraint in ignoreItem.Constraints)
ignoreConstraints.Add(constraint.Name, constraint.Value);
routes.IgnoreRoute(ignoreItem.Url, ignoreConstraints);
}
}
public static void IgnoreRoute(this RouteCollection routes, string url, RouteValueDictionary constraints) {
if (routes == null) throw new ArgumentNullException("routes");
if (url == null) throw new ArgumentNullException("url");
IgnoreRoute ignore = new IgnoreRoute(url);
ignore.Constraints = constraints;
routes.Add(ignore);
}
/// <summary>
/// 框架的这个方法的defaults、constraints参数都是Object类型的,只好重写
/// </summary>
public static void MapRoute( this RouteCollection routes, string name, string url, RouteValueDictionary defaults, RouteValueDictionary constraints) {
if (routes == null) throw new ArgumentNullException("routes");
if (url == null) throw new ArgumentNullException("url");
System.Web.Routing.Route route = new System.Web.Routing.Route(url, new MvcRouteHandler());
route.Defaults = defaults;
route.Constraints = constraints;
routes.Add(name, route);
}
public static RouteConfigurationSection GetSection() {
RouteConfigurationSection section = (RouteConfigurationSection)ConfigurationManager.GetSection("routeConfiguration");
return section;
}
}
sealed class IgnoreRoute : System.Web.Routing.Route {
public IgnoreRoute(string url)
: base(url, new StopRoutingHandler()) {
}
public override VirtualPathData GetVirtualPath(RequestContext requestContext, RouteValueDictionary values) {
return null;
}
}
上面采用了2种处理route的方案,其中包括 public class StopRoutingHandler()这种方式的,它提供一种方式,来指定 ASP.NET 路由不应处理 URL 模式的请求。另外一种就是我们常规的操作。这些扩展方法基本都是实现RouteCollection.Add();
其他的相关类本人就不概述了,因为都是纯粹的机械运动。基本运用代码如下:
1 public static void RegisterRoutes(RouteCollection routes)
2 {
3 //routes.IgnoreRoute("{resource}.axd/{*pathInfo}");
4 //routes.MapRoute(
5 // "Default", // Route name
6 // "{controller}/{action}/{id}", // URL with parameters
7 // new { controller = "Home", action = "Index", id = UrlParameter.Optional } // Parameter defaults
8 //);
9 Jasen.Core.Mvc.Route.Configuretion.RouteConfigurationSection section =
10 (Jasen.Core.Mvc.Route.Configuretion.RouteConfigurationSection)System.Configuration.ConfigurationManager.GetSection("routeConfiguration");
11 if (section==null) throw new Exception("还没有配置你的Route规则,请配置你的Route规则");
12 RouteTable.Routes.RegisterRoutes(section);
13 }
明显,你仅仅只要配置好你的路由文件就可以了,再也不需要在这个方法里面写好大一片的routes.MapRoute()代码了。
当然,这里仅仅介绍的是ASP.NET MVC的路由映射配置文件运用,你也可以举一反三进行其他运用。本人刚开始看到开源项目的这段代码,哥知道,高手太TM的恐怖,哈哈,基础的东西被用得TM的神了。神马都是浮云!我们需要做的不是浮云,而是沉石!
为了读者更好的了解,本人将代码进行了分离,以使各位能够更加清晰,更加清楚,更加容易地学到该种方法------->下载地址如下
分离的源代码下载地址:ASP.NET MVC Configuration Perfect Using下载
后续:
ASP.NET MVC ViewEngine
$(function () {
$("input[name=fc1]").click(function () {
$("div[class=diggit]").trigger('click');
$("textarea[class=comment_textarea]").val(" 好文要顶,推荐一下!");
PostComment();
});
$("input[name=fc2]").click(function () {
$("textarea[class=comment_textarea]").val(" 楼主辛苦,支持一下!");
PostComment();
});
$("input[name=fc3]").click(function () {
$("textarea[class=comment_textarea]").val(" 文章不错,继续加油!");
PostComment();
});
$("input[name=fc4]").click(function () {
$("textarea[class=comment_textarea]").val(" 一般一般,期待好文。");
PostComment();
});
$("input[name=fc5]").click(function () {
$("textarea[class=comment_textarea]").val(" 看不懂哦~~");
PostComment();
});
$("input[name=fc6]").click(function () {
$("textarea[class=comment_textarea]").val(" 文章写的没意思...");
PostComment();
});
$("input[name=fc7]").click(function () {
$("textarea[class=comment_textarea]").val(" 路过,凑个热闹^_^");
PostComment();
});
});

相关文章推荐
- Asp.net Mvc 请求是如何到达 MvcHandler的——UrlRoutingModule、MvcRouteHandler分析,并造个轮子
- 在ASP.NET MVC 如何在Response.StatusCode = 404的同时,显示友好的自定义错误页面
- [ASP.NET MVC2 系列] ASP.NET MVC 之如何创建自定义路由约束
- Asp.net MVC 利用自定义RouteHandler来防止图片盗链
- MVC学习十四:ASP.NET MVC如何实现自定义验证 AgeRangeAttribute
- 如何提高码农产量,基于ASP.NET MVC的敏捷开发框架之自定义表单开发随笔四
- asp.net MVC中如何用Membership类和自定义的数据库进行登录验证
- Asp.net MVC 利用PartialView 构造自定义菜单
- 如何提高码农产量,基于ASP.NET MVC的敏捷开发框架之自定义表单开发随笔四
- ASP.NET MVC:自定义Route让URL更优雅
- ASP.NET MVC如何实现自定义验证(服务端验证+客户端验证)
- ASP.NET MVC如何实现自定义验证(服务端验证+客户端验证)
- Asp.net MVC防止图片盗链的实现方法,通过自定义RouteHandler来操作
- [转]Asp.net MVC 利用PartialView 构造自定义菜单
- Asp.net Mvc 请求是如何到达 MvcHandler的——UrlRoutingModule、MvcRouteHandler分析,并造个轮子
- ASP.NET MVC如何实现自定义验证(服务端验证+客户端验证)
- ASP.NET MVC如何实现自定义验证(服务端验证+客户端验证)
- Asp.Net MVC对类HtmlHelper的自定义扩展方法以及如何调用
- 【译】Asp.net MVC 利用自定义RouteHandler来防止图片盗链 (转)
- asp.net mvc Route 使用自定义条件(constraints)禁止某ip登陆