无人值守网络安装Linux系统—pxe
2010-05-28 18:14
1106 查看
概述:本文描述的是通过网络安装linux系统(PXE),完全自动无人值守安装,是通过Linux系统的kickstart工具来实现的
实验环境:分为安装服务器,启动服务器和客户机,本文把安装服务器和启动服务器放在了一台机器上,服务器的ip是192.168.10.197,操作系统是CentOS 5.3,客户机要安装的操作系统是CentOS 5.2(系统可选),是个虚拟机,硬盘是8G
下面就开始我们的奇妙旅程吧,分为如下几大部分:
一 。配置启动服务器
1. 首先安装dhcp服务,目的是给客户机动态分配ip地址
1)[root@tomcat1 ~]# yum -y install dhcp
2)编辑主配置文件,此处只是个简单的配置足以达到分配ip的作用
[root@tomcat1 ~]# vi /etc/dhcpd.conf(内容如下)
option domain-name "mydomain";
ddns-update-style none;
max-lease-time 7200;
server-name "bootserver";
default-lease-time 600;
allow booting;
allow bootp;
subnet 192.168.10.0 netmask 255.255.255.0 {
range 192.168.10.1 192.168.10.102;
deny unknown-clients;
}
group pxe {
next-server 192.168.10.197;
filename "pxelinux.0";
host testserver { hardware ethernet 00:0c:29:31:fc:38; fixed-address 192.168.10.112; }
}
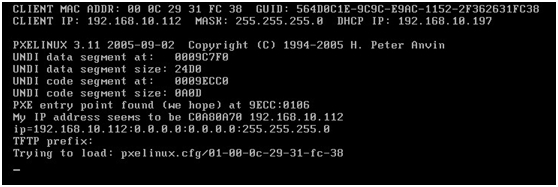
注意分配的ip段,掩码等信息不要错误,filename "pxelinux.0"(在 TFTP 服务器的根目录中)将作为启动映像被网卡ROM里的PXE客户端载入内存并运行,hardware ethernet 00:0c:29:31:fc:38; fixed-address 192.168.10.112此处是绑定了客户机的MAC地址,每当要部署一个客户机的时候都要添加一条绑定记录
3)然后启动dhcp服务器
[root@tomcat1 ~]# /etc/init.d/dhcpd start
2. 安装和配置tftp服务器以获取安装包
1)[root@tomcat1 ~]# yum install tftp-server
2)编辑主配置文件
[root@tomcat1 ~]# vi /etc/xinetd.d/tftp(内容如下)
service tftp
{
socket_type = dgram
protocol = udp
wait = yes
user = root
server = /usr/sbin/in.tftpd
server_args = -s /tftpboot(指定根目录)
disable = no
}
3)挂载系统的iso文件,本文只有一个CentOS系统故只挂载了一个
1)创建挂载点
[root@tomcat1 ~]# mkdir /mnt/iso/
2)挂载iso
[root@tomcat1~]#mount-o loop,ro CentOS-5.3-i386-bin-DVD.iso/mnt/iso/
3) isolinux目录下会包含Linux安装程序的内核/根文件系统文件,将其复制到tftp的根目录
[root@tomcat1 ~]# cd /mnt/iso/
[root@tomcat1 iso]# ls

[root@tomcat1 iso]# cp isolinux/initrd.img /tftpboot/
[root@tomcat1 iso]# cp isolinux/ vmlinuz /tftpboot/
4) 然后按照系统重命名
[root@tomcat1 tftpboot]# mv initrd.img initrd-centos-5.3-i386.img
[root@tomcat1 tftpboot]# mv vmlinuz vmlinuz-centos-5.3-i386
5)将启动镜像文件pxelinux.0复制到TFTP服务器根目录。
启动镜像pxelinux.0可以在syslinux安装包里获得。安装好syslinux安装包后,将pxelinux.0复制到TFTP服务器根目录
[root@tomcat1 tftpboot]# cp /usr/lib/syslinux/pxelinux.0 ./
6)创建/tftpboot/pxelinux.cfg/目录
[root@tomcat1 tftpboot]# mkdir pxelinux.cfg/
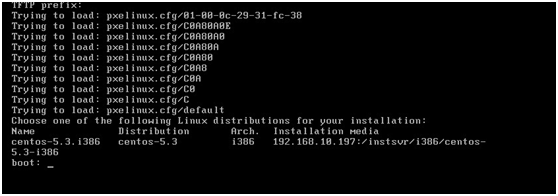
7)创建default文件并且编辑(里面是系统的列表,可能安装的系统都写在里面)
[root@tomcat1 tftpboot]# cd pxelinux.cfg/
[root@tomcat1 tftpboot]# vi default(内容如下)
DEFAULT centos-5.3-i386
DISPLAY pxelinux.cfg/list
PROMPT 1
LABEL centos-5.3-i386
KERNEL vmlinuz.centos-5.3-i386
APPENDks initrd=initrd.centos-5.3-i386.img
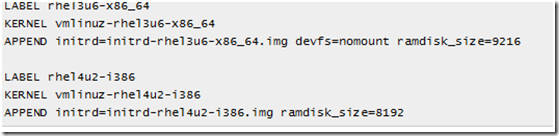
注意:红色加粗的这三段是指定操作系统信息,如果有多个系统可选的话就在加上,例如
8)创建并且编辑系统list文件
[root@tomcat1 tftpboot]# vi pxelinux.cfg/list(内容如下)
Choose one of the following Linux distributions for your installation:
Name Distribution Arch. Installation media
centos-5.3.i386 centos-5.3 i386 192.168.10.197:/instsvr/i386/centos-5.3-i386
注意:如果还有别的可选系统,可以按如下格式继续安添加

此处的centos-5.3-i386要和default文件的LABEL内容相同
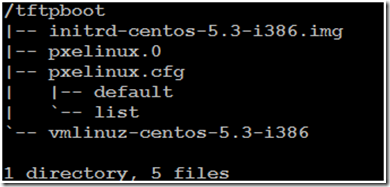
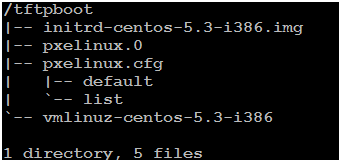
9)检查一下文件和目录的结果
[root@tomcat1 /]# tree /tftpboot
10)启动服务
[root@tomcat1 tftpboot]# /etc/init.d/xinetd restart
二. 配置安装服务器
1. 安装配置NFS服务器
1)把iso文件都放在指定的目录
[root@tomcat1 tftpboot]# mkdir /instsvr/i386/
[root@tomcat1 tftpboot]#cd /instsvr/i386/
[root@tomcat1 i386]# mkdir centos-5.3.i386/
[root@tomcat1 tftpboot]# mv /srv/CentOS-5.3-i386-bin-DVD.iso /instsvr/i386/centos-5.3.i386/
2)[root@tomcat1 tftpboot]# yum -y install nfs
3)设置输出目录
[root@tomcat1 tftpboot]# vi /etc/exports(内容如下)
/instsvr/i386/centos-5.3.i386/ *(ro,no_root_squash,sync)
/instsvr/ks/ *(ro,no_root_squash,sync)
4)重启服务
[root@tomcat1 tftpboot]# /etc/init.d/nfs restart
5)验证输出
[root@tomcat1 tftpboot]# showmount -e localhost
Export list for localhost:
/instsvr/ks *
/instsvr/i386/centos-5.3.i386 *
三. 安装和配置kickstart
1. 安装服务
[root@tomcat1 tftpboot]# yum -y install system-config-kickstart
2, 编辑配置文件
[root@tomcat1 tftpboot]# mkdir /instsvr/ks/
[root@tomcat1 tftpboot]# cd /instsvr/ks/
[root@tomcat1 ks]# vi ks.cfg(内容如下)
install
text
lang en_US
keyboard us
skipx
network --device eth0 --bootproto dhcp
rootpw --iscrypted $1$LsW3tY7b$CpK4Hvc8A.pD.tm91T.oE/
firewall --enabled --port=22:tcp
#firewall --disabled
authconfig --enableshadow --enablemd5
selinux --disabled
timezone --utc Asia/Chongqing
nfs --server=192.168.10.197 --dir=/instsvr/i386/centos-5.3.i386/
# The following is the partition information you requested
# Note that any partitions you deleted are not expressed
# here so unless you clear all partitions first, this is
# not guaranteed to work
bootloader --location=mbr --driveorder=sda
clearpart --linux --initlabel
part /boot --fstype ext3 --size=100 --ondrive=hda
part / --fstype ext3 --size=6000 --ondrive=hda
part swap --size=2000 --ondrive=hda
reboot
%packages
@base
@core
@gnome-desktop
@development-libs
@development-tools
@editors
keyutils
trousers
fipscheck
device-mapper-multipath
imake
lrzsz
3. 重新修改default文件
[root@tomcat1 ks]# vi /tftpboot/pxelinux.cfg/default(修改如下)
4. 把所有的服务重启
[root@tomcat1 ks]#/etc/init.d/nfs restart;/etc/init.d/dhcpd restart;/etc/init.d/xinetd restart

这样在启动安装程序的时候,参数ks=nfs:192.168.138.1:/instsvr/ks/ks.cfg会被传递给它,告诉它使用这个文件作为kickstart配置文件来进行kickstart安装
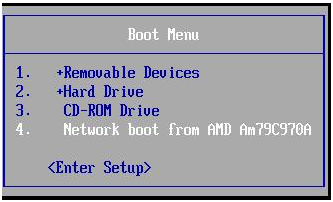
至此服务器端的配置就完成了,下面要做的就是安装客户机,叫其从网卡启动


实验环境:分为安装服务器,启动服务器和客户机,本文把安装服务器和启动服务器放在了一台机器上,服务器的ip是192.168.10.197,操作系统是CentOS 5.3,客户机要安装的操作系统是CentOS 5.2(系统可选),是个虚拟机,硬盘是8G
下面就开始我们的奇妙旅程吧,分为如下几大部分:
一 。配置启动服务器
1. 首先安装dhcp服务,目的是给客户机动态分配ip地址
1)[root@tomcat1 ~]# yum -y install dhcp
2)编辑主配置文件,此处只是个简单的配置足以达到分配ip的作用
[root@tomcat1 ~]# vi /etc/dhcpd.conf(内容如下)
option domain-name "mydomain";
ddns-update-style none;
max-lease-time 7200;
server-name "bootserver";
default-lease-time 600;
allow booting;
allow bootp;
subnet 192.168.10.0 netmask 255.255.255.0 {
range 192.168.10.1 192.168.10.102;
deny unknown-clients;
}
group pxe {
next-server 192.168.10.197;
filename "pxelinux.0";
host testserver { hardware ethernet 00:0c:29:31:fc:38; fixed-address 192.168.10.112; }
}
注意分配的ip段,掩码等信息不要错误,filename "pxelinux.0"(在 TFTP 服务器的根目录中)将作为启动映像被网卡ROM里的PXE客户端载入内存并运行,hardware ethernet 00:0c:29:31:fc:38; fixed-address 192.168.10.112此处是绑定了客户机的MAC地址,每当要部署一个客户机的时候都要添加一条绑定记录
3)然后启动dhcp服务器
[root@tomcat1 ~]# /etc/init.d/dhcpd start
2. 安装和配置tftp服务器以获取安装包
1)[root@tomcat1 ~]# yum install tftp-server
2)编辑主配置文件
[root@tomcat1 ~]# vi /etc/xinetd.d/tftp(内容如下)
service tftp
{
socket_type = dgram
protocol = udp
wait = yes
user = root
server = /usr/sbin/in.tftpd
server_args = -s /tftpboot(指定根目录)
disable = no
}
3)挂载系统的iso文件,本文只有一个CentOS系统故只挂载了一个
1)创建挂载点
[root@tomcat1 ~]# mkdir /mnt/iso/
2)挂载iso
[root@tomcat1~]#mount-o loop,ro CentOS-5.3-i386-bin-DVD.iso/mnt/iso/
3) isolinux目录下会包含Linux安装程序的内核/根文件系统文件,将其复制到tftp的根目录
[root@tomcat1 ~]# cd /mnt/iso/
[root@tomcat1 iso]# ls

[root@tomcat1 iso]# cp isolinux/initrd.img /tftpboot/
[root@tomcat1 iso]# cp isolinux/ vmlinuz /tftpboot/
4) 然后按照系统重命名
[root@tomcat1 tftpboot]# mv initrd.img initrd-centos-5.3-i386.img
[root@tomcat1 tftpboot]# mv vmlinuz vmlinuz-centos-5.3-i386
5)将启动镜像文件pxelinux.0复制到TFTP服务器根目录。
启动镜像pxelinux.0可以在syslinux安装包里获得。安装好syslinux安装包后,将pxelinux.0复制到TFTP服务器根目录
[root@tomcat1 tftpboot]# cp /usr/lib/syslinux/pxelinux.0 ./
6)创建/tftpboot/pxelinux.cfg/目录
[root@tomcat1 tftpboot]# mkdir pxelinux.cfg/
7)创建default文件并且编辑(里面是系统的列表,可能安装的系统都写在里面)
[root@tomcat1 tftpboot]# cd pxelinux.cfg/
[root@tomcat1 tftpboot]# vi default(内容如下)
DEFAULT centos-5.3-i386
DISPLAY pxelinux.cfg/list
PROMPT 1
LABEL centos-5.3-i386
KERNEL vmlinuz.centos-5.3-i386
APPENDks initrd=initrd.centos-5.3-i386.img
注意:红色加粗的这三段是指定操作系统信息,如果有多个系统可选的话就在加上,例如

8)创建并且编辑系统list文件
[root@tomcat1 tftpboot]# vi pxelinux.cfg/list(内容如下)
Choose one of the following Linux distributions for your installation:
Name Distribution Arch. Installation media
centos-5.3.i386 centos-5.3 i386 192.168.10.197:/instsvr/i386/centos-5.3-i386
注意:如果还有别的可选系统,可以按如下格式继续安添加

此处的centos-5.3-i386要和default文件的LABEL内容相同
9)检查一下文件和目录的结果
[root@tomcat1 /]# tree /tftpboot
10)启动服务
[root@tomcat1 tftpboot]# /etc/init.d/xinetd restart
二. 配置安装服务器
1. 安装配置NFS服务器
1)把iso文件都放在指定的目录
[root@tomcat1 tftpboot]# mkdir /instsvr/i386/
[root@tomcat1 tftpboot]#cd /instsvr/i386/
[root@tomcat1 i386]# mkdir centos-5.3.i386/
[root@tomcat1 tftpboot]# mv /srv/CentOS-5.3-i386-bin-DVD.iso /instsvr/i386/centos-5.3.i386/
2)[root@tomcat1 tftpboot]# yum -y install nfs
3)设置输出目录
[root@tomcat1 tftpboot]# vi /etc/exports(内容如下)
/instsvr/i386/centos-5.3.i386/ *(ro,no_root_squash,sync)
/instsvr/ks/ *(ro,no_root_squash,sync)
4)重启服务
[root@tomcat1 tftpboot]# /etc/init.d/nfs restart
5)验证输出
[root@tomcat1 tftpboot]# showmount -e localhost
Export list for localhost:
/instsvr/ks *
/instsvr/i386/centos-5.3.i386 *
三. 安装和配置kickstart
1. 安装服务
[root@tomcat1 tftpboot]# yum -y install system-config-kickstart
2, 编辑配置文件
[root@tomcat1 tftpboot]# mkdir /instsvr/ks/
[root@tomcat1 tftpboot]# cd /instsvr/ks/
[root@tomcat1 ks]# vi ks.cfg(内容如下)
install
text
lang en_US
keyboard us
skipx
network --device eth0 --bootproto dhcp
rootpw --iscrypted $1$LsW3tY7b$CpK4Hvc8A.pD.tm91T.oE/
firewall --enabled --port=22:tcp
#firewall --disabled
authconfig --enableshadow --enablemd5
selinux --disabled
timezone --utc Asia/Chongqing
nfs --server=192.168.10.197 --dir=/instsvr/i386/centos-5.3.i386/
# The following is the partition information you requested
# Note that any partitions you deleted are not expressed
# here so unless you clear all partitions first, this is
# not guaranteed to work
bootloader --location=mbr --driveorder=sda
clearpart --linux --initlabel
part /boot --fstype ext3 --size=100 --ondrive=hda
part / --fstype ext3 --size=6000 --ondrive=hda
part swap --size=2000 --ondrive=hda
reboot
%packages
@base
@core
@gnome-desktop
@development-libs
@development-tools
@editors
keyutils
trousers
fipscheck
device-mapper-multipath
imake
lrzsz
3. 重新修改default文件
[root@tomcat1 ks]# vi /tftpboot/pxelinux.cfg/default(修改如下)
4. 把所有的服务重启
[root@tomcat1 ks]#/etc/init.d/nfs restart;/etc/init.d/dhcpd restart;/etc/init.d/xinetd restart

这样在启动安装程序的时候,参数ks=nfs:192.168.138.1:/instsvr/ks/ks.cfg会被传递给它,告诉它使用这个文件作为kickstart配置文件来进行kickstart安装
至此服务器端的配置就完成了,下面要做的就是安装客户机,叫其从网卡启动

相关文章推荐
- 第一次修改:pxe无人值守网络安装redhat linux系统脚本
- 无人值守网络安装Linux系统
- pxe无人值守linux系统安装
- PXE无人值守网络安装RedHat Linux操作系统
- linux系统管理之无人值守网络安装linux操作系统
- < < PXE实现Linux系统无人值守批量安装 > >
- pxe网络安装系统---------基于windows xp做服务器(dhcp+ftp)安装linux系统
- PXE网络安装Linux系统
- PXE+kicstart+Vsftpd/NFS/HTTP无人值守批量网络安装
- 无人值守网络安装Linux系统—pxe(纯实践笔记)
- 基于网络linux无人值守安装2
- [置顶] CentOS7下的PXE无人值守系统安装
- Linux上基于网络自动化安装系统(CentOS6.5+DHCP+TFTP+PXE)
- linux 使用PXE方式,kickstar网络安装系统
- linux下PXE无人值守环境自动安装脚本
- 部署一:PXE+ Kickstart 实现网络安装 单 发行版LINUX系统
- Cobbler无人值守全自动安装部署Linux系统
- 无人值守自动安装linux系统
- pxe无人值守自动安装linux
- PXE无人值守系统安装配置简要说明