MOSS 2010:Visual Studio 2010开发体验(31)——如何给列表绑定多个内容类型
2010-05-14 11:19
633 查看
有朋友看了下面这篇文章,给我留言提到一个问题。
MOSS 2010:Visual Studio 2010开发体验(10)——列表开发之内容类型
他的问题是:如果在列表定义的时候,使用多个内容类型
关于这个问题的简单答复如下。我在原文下面做了回复。
×××××××××××××××××××××××××××××××××××××××××××××
修改那个schema.xml文件,再注册一个ContentType,但要注意的是,必须设置EnableContentTypes=true
如下供参考
×××××××××××××××××××××××××××××××××××××××××××××××
为了帮助大家更好地理解这个问题,我还是单独写了一篇做介绍。如果你对上面的回复不是很清楚,请继续往下看


这样,我们就有了第一个ContentType了。为了更加易于理解,我们可以稍微修改一下它的名称
.csharpcode, .csharpcode pre
{
font-size: small;
color: black;
font-family: consolas, "Courier New", courier, monospace;
background-color: #ffffff;
/*white-space: pre;*/
}
.csharpcode pre { margin: 0em; }
.csharpcode .rem { color: #008000; }
.csharpcode .kwrd { color: #0000ff; }
.csharpcode .str { color: #006080; }
.csharpcode .op { color: #0000c0; }
.csharpcode .preproc { color: #cc6633; }
.csharpcode .asp { background-color: #ffff00; }
.csharpcode .html { color: #800000; }
.csharpcode .attr { color: #ff0000; }
.csharpcode .alt
{
background-color: #f4f4f4;
width: 100%;
margin: 0em;
}
.csharpcode .lnum { color: #606060; }


出于同样的目的,我们对名称和描述进行如下的修改
.csharpcode, .csharpcode pre
{
font-size: small;
color: black;
font-family: consolas, "Courier New", courier, monospace;
background-color: #ffffff;
/*white-space: pre;*/
}
.csharpcode pre { margin: 0em; }
.csharpcode .rem { color: #008000; }
.csharpcode .kwrd { color: #0000ff; }
.csharpcode .str { color: #006080; }
.csharpcode .op { color: #0000c0; }
.csharpcode .preproc { color: #cc6633; }
.csharpcode .asp { background-color: #ffff00; }
.csharpcode .html { color: #800000; }
.csharpcode .attr { color: #ff0000; }
.csharpcode .alt
{
background-color: #f4f4f4;
width: 100%;
margin: 0em;
}
.csharpcode .lnum { color: #606060; }
通过这样的过程,我们就有了两个内容类型的定义,下面,我们需要创建一个列表定义来使用他们


【注意】这里先选择第一个内容类型
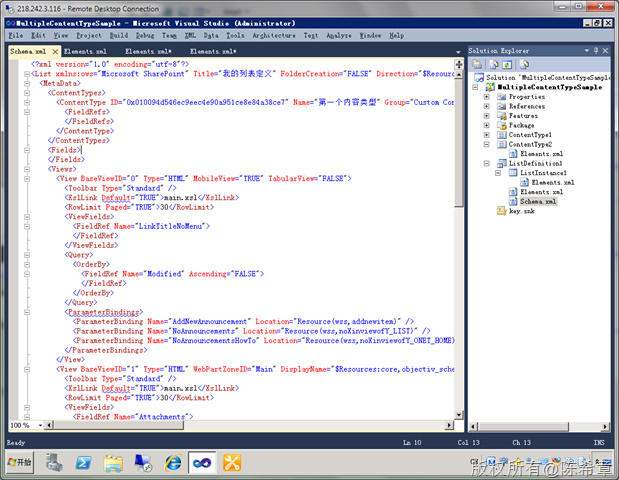
点击“Finish”之后,会产生一批文件,我们可以打开其中一个Schema.xml文件

那么,如何指定第二个内容类型呢?我们发现那个Schema.xml文件中的下面一段似乎有些玄机
.csharpcode, .csharpcode pre
{
font-size: small;
color: black;
font-family: consolas, "Courier New", courier, monospace;
background-color: #ffffff;
/*white-space: pre;*/
}
.csharpcode pre { margin: 0em; }
.csharpcode .rem { color: #008000; }
.csharpcode .kwrd { color: #0000ff; }
.csharpcode .str { color: #006080; }
.csharpcode .op { color: #0000c0; }
.csharpcode .preproc { color: #cc6633; }
.csharpcode .asp { background-color: #ffff00; }
.csharpcode .html { color: #800000; }
.csharpcode .attr { color: #ff0000; }
.csharpcode .alt
{
background-color: #f4f4f4;
width: 100%;
margin: 0em;
}
.csharpcode .lnum { color: #606060; }
看起来这就是注册内容类型的语法。那么,我们不妨就复制一下,添加第二个内容类型
最终看起来像下面这样
.csharpcode, .csharpcode pre
{
font-size: small;
color: black;
font-family: consolas, "Courier New", courier, monospace;
background-color: #ffffff;
/*white-space: pre;*/
}
.csharpcode pre { margin: 0em; }
.csharpcode .rem { color: #008000; }
.csharpcode .kwrd { color: #0000ff; }
.csharpcode .str { color: #006080; }
.csharpcode .op { color: #0000c0; }
.csharpcode .preproc { color: #cc6633; }
.csharpcode .asp { background-color: #ffff00; }
.csharpcode .html { color: #800000; }
.csharpcode .attr { color: #ff0000; }
.csharpcode .alt
{
background-color: #f4f4f4;
width: 100%;
margin: 0em;
}
.csharpcode .lnum { color: #606060; }
【注意】第二个内容类型的ID要修改
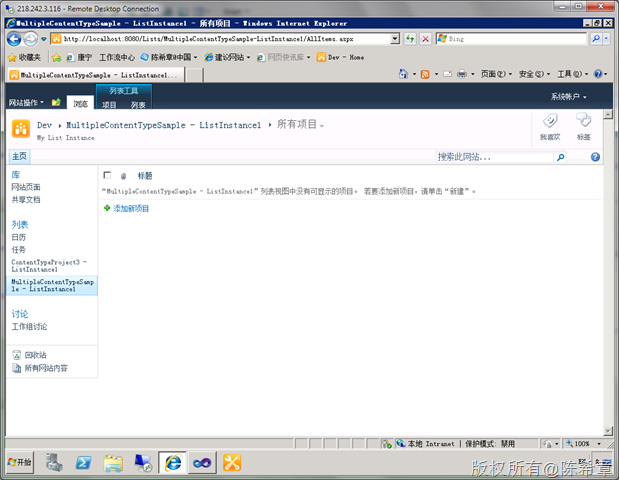
部署成功之后,我们确实可以看到一个列表实例,如下图所示

现在,我们去看看创建项目的时候,是否有两个内容类型呢?

奇怪的是,非但没有两个内容类型,而且所显示的那个“新建项目”与我们之前定义的两个内容类型都好像没有什么关系的。
这是怎么回事呢?难道我们的内容类型没有定义成功吗?但下图可以推翻这个假设

很显然,我们这里是看到了这两个内容类型的。
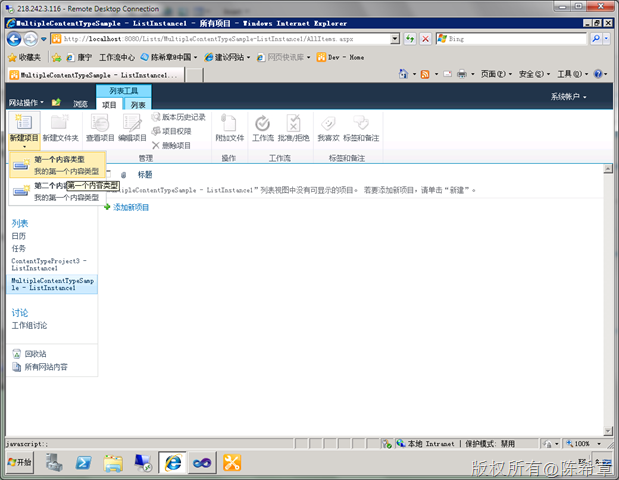
那么,问题究竟出现在哪里呢?其实这是由于列表默认不允许有多个内容类型这种特性导致的问题,如果我们需要做这样的事情,就必须在高级设置中,启用这个选项

保存设置之后,就可以看到下面的效果

看起来解决了我们的问题吧?但是,是不是每次都要求用户自己去设置这个选项呢?有没有办法自动设置好该选项呢?带着这个疑问,让我们继续下一步,也是最后一步操作吧
.csharpcode, .csharpcode pre
{
font-size: small;
color: black;
font-family: consolas, "Courier New", courier, monospace;
background-color: #ffffff;
/*white-space: pre;*/
}
.csharpcode pre { margin: 0em; }
.csharpcode .rem { color: #008000; }
.csharpcode .kwrd { color: #0000ff; }
.csharpcode .str { color: #006080; }
.csharpcode .op { color: #0000c0; }
.csharpcode .preproc { color: #cc6633; }
.csharpcode .asp { background-color: #ffff00; }
.csharpcode .html { color: #800000; }
.csharpcode .attr { color: #ff0000; }
.csharpcode .alt
{
background-color: #f4f4f4;
width: 100%;
margin: 0em;
}
.csharpcode .lnum { color: #606060; }
【注意】请注意这里的EnabelContentTypes属性
MOSS 2010:Visual Studio 2010开发体验(10)——列表开发之内容类型
他的问题是:如果在列表定义的时候,使用多个内容类型
关于这个问题的简单答复如下。我在原文下面做了回复。
×××××××××××××××××××××××××××××××××××××××××××××
修改那个schema.xml文件,再注册一个ContentType,但要注意的是,必须设置EnableContentTypes=true
如下供参考
×××××××××××××××××××××××××××××××××××××××××××××××
为了帮助大家更好地理解这个问题,我还是单独写了一篇做介绍。如果你对上面的回复不是很清楚,请继续往下看
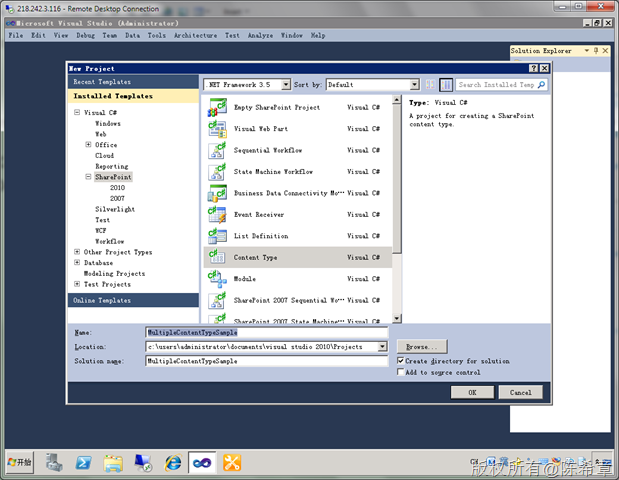
第一步:创建一个ContentType项目

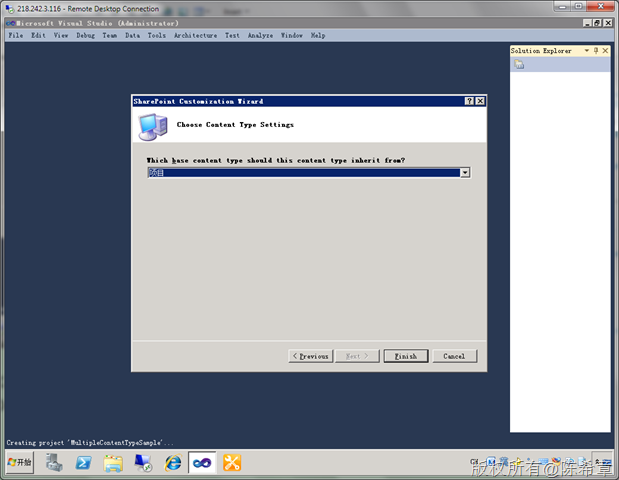
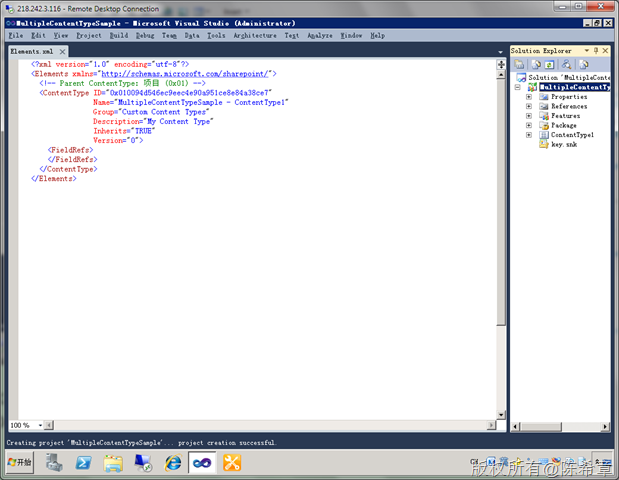
这样,我们就有了第一个ContentType了。为了更加易于理解,我们可以稍微修改一下它的名称
.csharpcode, .csharpcode pre
{
font-size: small;
color: black;
font-family: consolas, "Courier New", courier, monospace;
background-color: #ffffff;
/*white-space: pre;*/
}
.csharpcode pre { margin: 0em; }
.csharpcode .rem { color: #008000; }
.csharpcode .kwrd { color: #0000ff; }
.csharpcode .str { color: #006080; }
.csharpcode .op { color: #0000c0; }
.csharpcode .preproc { color: #cc6633; }
.csharpcode .asp { background-color: #ffff00; }
.csharpcode .html { color: #800000; }
.csharpcode .attr { color: #ff0000; }
.csharpcode .alt
{
background-color: #f4f4f4;
width: 100%;
margin: 0em;
}
.csharpcode .lnum { color: #606060; }
第二步:添加另外一个ContentType

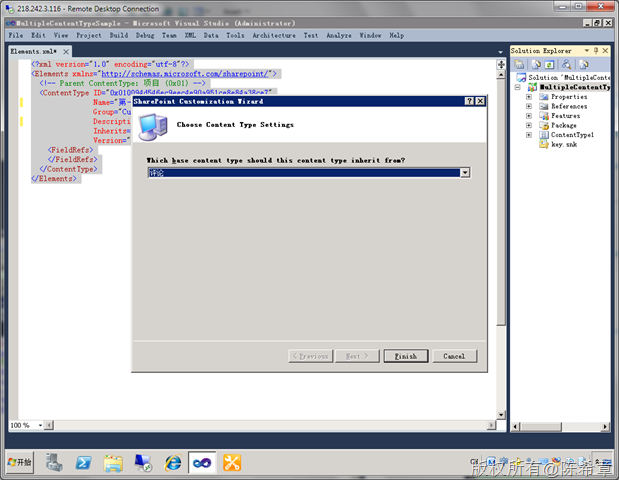
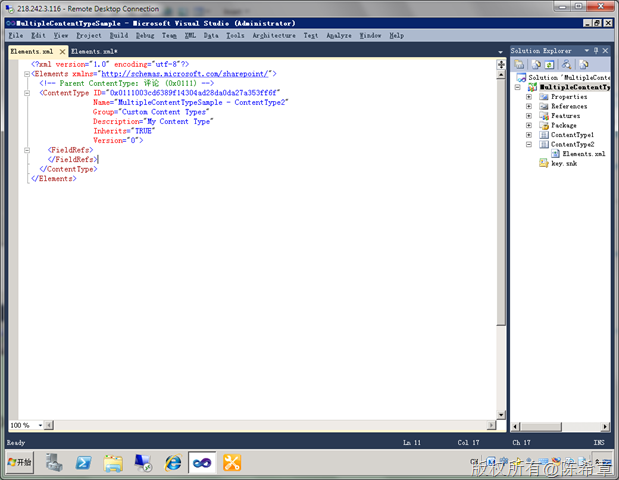
出于同样的目的,我们对名称和描述进行如下的修改
.csharpcode, .csharpcode pre
{
font-size: small;
color: black;
font-family: consolas, "Courier New", courier, monospace;
background-color: #ffffff;
/*white-space: pre;*/
}
.csharpcode pre { margin: 0em; }
.csharpcode .rem { color: #008000; }
.csharpcode .kwrd { color: #0000ff; }
.csharpcode .str { color: #006080; }
.csharpcode .op { color: #0000c0; }
.csharpcode .preproc { color: #cc6633; }
.csharpcode .asp { background-color: #ffff00; }
.csharpcode .html { color: #800000; }
.csharpcode .attr { color: #ff0000; }
.csharpcode .alt
{
background-color: #f4f4f4;
width: 100%;
margin: 0em;
}
.csharpcode .lnum { color: #606060; }
通过这样的过程,我们就有了两个内容类型的定义,下面,我们需要创建一个列表定义来使用他们
第三步:添加一个List Definition
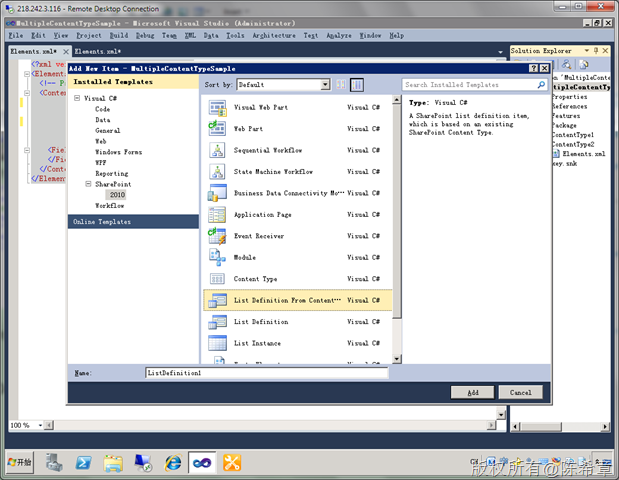

【注意】这里先选择第一个内容类型
点击“Finish”之后,会产生一批文件,我们可以打开其中一个Schema.xml文件
那么,如何指定第二个内容类型呢?我们发现那个Schema.xml文件中的下面一段似乎有些玄机
.csharpcode, .csharpcode pre
{
font-size: small;
color: black;
font-family: consolas, "Courier New", courier, monospace;
background-color: #ffffff;
/*white-space: pre;*/
}
.csharpcode pre { margin: 0em; }
.csharpcode .rem { color: #008000; }
.csharpcode .kwrd { color: #0000ff; }
.csharpcode .str { color: #006080; }
.csharpcode .op { color: #0000c0; }
.csharpcode .preproc { color: #cc6633; }
.csharpcode .asp { background-color: #ffff00; }
.csharpcode .html { color: #800000; }
.csharpcode .attr { color: #ff0000; }
.csharpcode .alt
{
background-color: #f4f4f4;
width: 100%;
margin: 0em;
}
.csharpcode .lnum { color: #606060; }
看起来这就是注册内容类型的语法。那么,我们不妨就复制一下,添加第二个内容类型
最终看起来像下面这样
.csharpcode, .csharpcode pre
{
font-size: small;
color: black;
font-family: consolas, "Courier New", courier, monospace;
background-color: #ffffff;
/*white-space: pre;*/
}
.csharpcode pre { margin: 0em; }
.csharpcode .rem { color: #008000; }
.csharpcode .kwrd { color: #0000ff; }
.csharpcode .str { color: #006080; }
.csharpcode .op { color: #0000c0; }
.csharpcode .preproc { color: #cc6633; }
.csharpcode .asp { background-color: #ffff00; }
.csharpcode .html { color: #800000; }
.csharpcode .attr { color: #ff0000; }
.csharpcode .alt
{
background-color: #f4f4f4;
width: 100%;
margin: 0em;
}
.csharpcode .lnum { color: #606060; }
【注意】第二个内容类型的ID要修改
第四步:部署并测试
看起来没有什么问题,也不难理解。那么我们就部署一下看看是否有效果吧部署成功之后,我们确实可以看到一个列表实例,如下图所示
现在,我们去看看创建项目的时候,是否有两个内容类型呢?
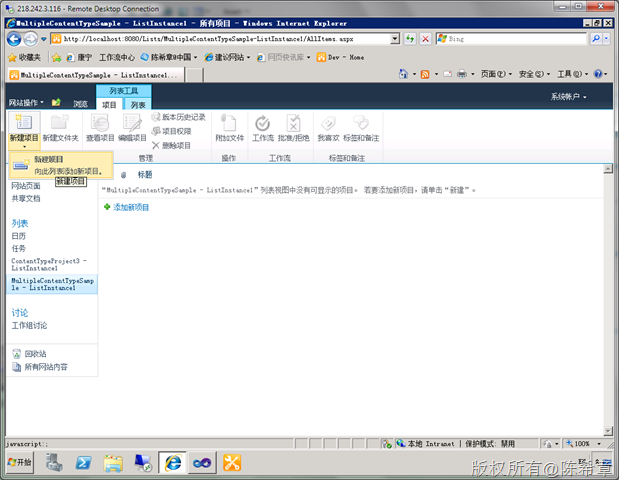
奇怪的是,非但没有两个内容类型,而且所显示的那个“新建项目”与我们之前定义的两个内容类型都好像没有什么关系的。
这是怎么回事呢?难道我们的内容类型没有定义成功吗?但下图可以推翻这个假设
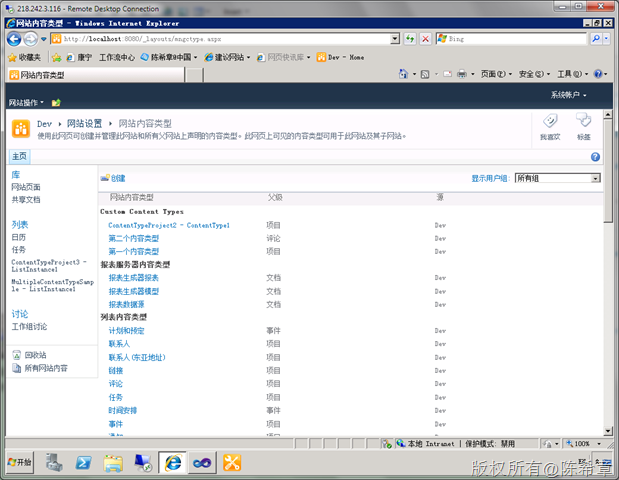
很显然,我们这里是看到了这两个内容类型的。
那么,问题究竟出现在哪里呢?其实这是由于列表默认不允许有多个内容类型这种特性导致的问题,如果我们需要做这样的事情,就必须在高级设置中,启用这个选项

保存设置之后,就可以看到下面的效果
看起来解决了我们的问题吧?但是,是不是每次都要求用户自己去设置这个选项呢?有没有办法自动设置好该选项呢?带着这个疑问,让我们继续下一步,也是最后一步操作吧
第五步:调整Schema
其实,这个选项我们可以通过修改Schema定义的方式来实现EnableContentTypes="true">
.csharpcode, .csharpcode pre
{
font-size: small;
color: black;
font-family: consolas, "Courier New", courier, monospace;
background-color: #ffffff;
/*white-space: pre;*/
}
.csharpcode pre { margin: 0em; }
.csharpcode .rem { color: #008000; }
.csharpcode .kwrd { color: #0000ff; }
.csharpcode .str { color: #006080; }
.csharpcode .op { color: #0000c0; }
.csharpcode .preproc { color: #cc6633; }
.csharpcode .asp { background-color: #ffff00; }
.csharpcode .html { color: #800000; }
.csharpcode .attr { color: #ff0000; }
.csharpcode .alt
{
background-color: #f4f4f4;
width: 100%;
margin: 0em;
}
.csharpcode .lnum { color: #606060; }
【注意】请注意这里的EnabelContentTypes属性
总结:
本文用一个简单的例子演示了如何给列表定义绑定多个内容类型,并且自动启用多个内容类型的支持
相关文章推荐
- MOSS 2010:Visual Studio 2010开发体验(31)——如何给列表绑定多个内容类型
- MOSS 2010:Visual Studio 2010开发体验(10)——列表开发之内容类型
- MOSS 2010:Visual Studio 2010开发体验(10)——列表开发之内容类型
- MOSS 2010:Visual Studio 2010开发体验(10)——列表开发之内容类型
- MOSS 2010:Visual Studio 2010开发体验(9)—列表开发之基本概念
- MOSS 2010:Visual Studio 2010开发体验(13)——列表开发之列表实例
- MOSS 2010:Visual Studio 2010开发体验(20)——使用ADO.NET Data Service快速访问SharePoint列表数据
- MOSS 2010:Visual Studio 2010开发体验(24)——如何在浏览器中直接对BCS模型直接进行编辑和新增操作
- MOSS 2010:Visual Studio 2010开发体验(14)——列表开发之事件接收器
- MOSS 2010:Visual Studio 2010开发体验(24)——如何在浏览器中直接对BCS模型直接进行编辑和新增操作
- MOSS 2010:Visual Studio 2010开发体验(9)—列表开发之基本概念
- MOSS 2010:Visual Studio 2010开发体验(14)——列表开发之事件接收器
- MOSS 2010:Visual Studio 2010开发体验(12)——列表开发之列表定义
- MOSS 2010:Visual Studio 2010开发体验(9)—列表开发之基本概念
- MOSS 2010:Visual Studio 2010开发体验(14)——列表开发之事件接收器
- MOSS 2010:Visual Studio 2010开发体验(13)——列表开发之列表实例
- MOSS 2010:Visual Studio 2010开发体验(14)——列表开发之事件接收器
- MOSS 2010:Visual Studio 2010开发体验(14)——列表开发之事件接收器
- MOSS 2010:Visual Studio 2010开发体验(20)——使用ADO.NET Data Service快速访问SharePoint列表数据
- MOSS 2010:Visual Studio 2010开发体验(12)——列表开发之列表定义