MFC中调用WPF教程
2010-05-07 00:07
232 查看
呵呵, 这几天看到社区里大家对如何在vc中调用WPF兴致很高, 现在我就带领大家按部就班来实现它.废话不说了, 开始.
WPF是微软主推的新一代桌面程序开发技术, 它极大加快了程序界面开发,也增强了界面的用户体验,至于详细的介绍大家可以google, 本文主要还是介绍如何在vc中处理wpf数据和事件.开发工具嘛vs2008+sp1+[Blend].
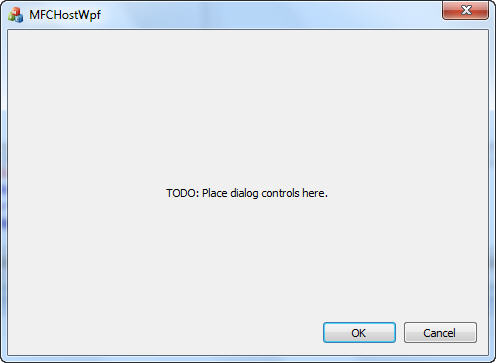
1.新建一个项目MFCHostWpf, 建立2个工程, 一个为vc对话框的工程MFCDlgDemo,另一个为C#普通应用程序的工程WPFDemo.如图所示:

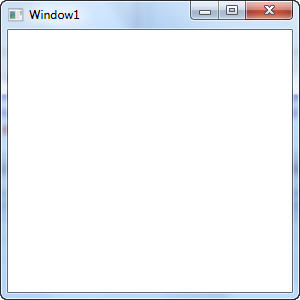
2.分别运行2个工程后, 程序截图如下:


3.修改WPF工程以便MFC工程调用, 具体如下:
1.删除WPF工程中的 App.xaml和App.xaml.cs两个源文件.
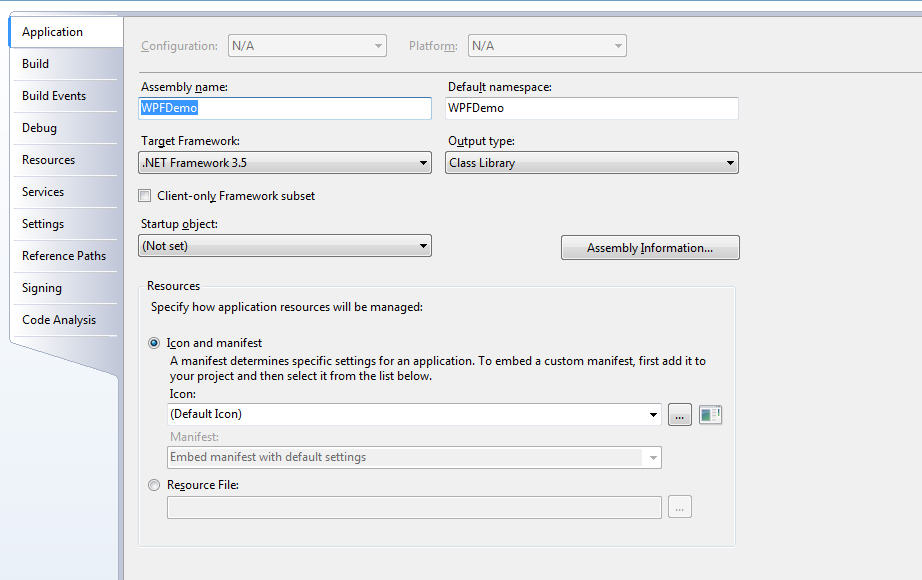
2.双击WPF工程的Properties(属性), 选择Application(应用程序)选项卡, 将Output type(输出类型)下拉框选为Class Library(类库). 保存后关闭. 如图所示:

4.接下来修改MFC工程以便调用WPF组件, 具体如下:
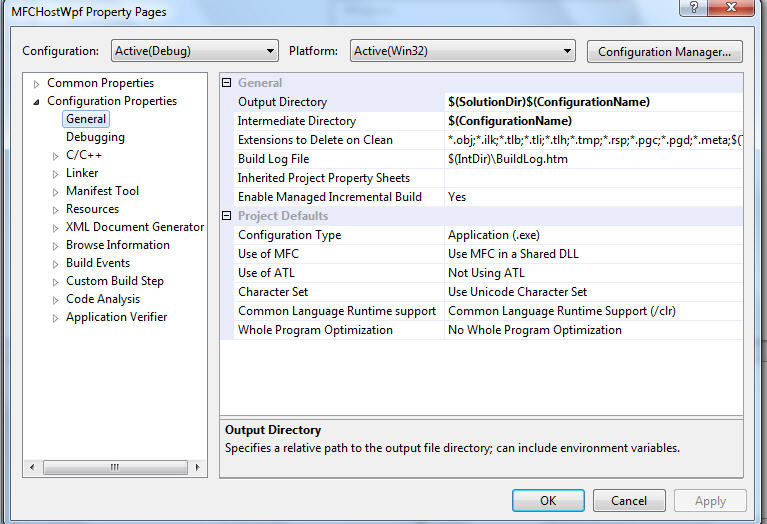
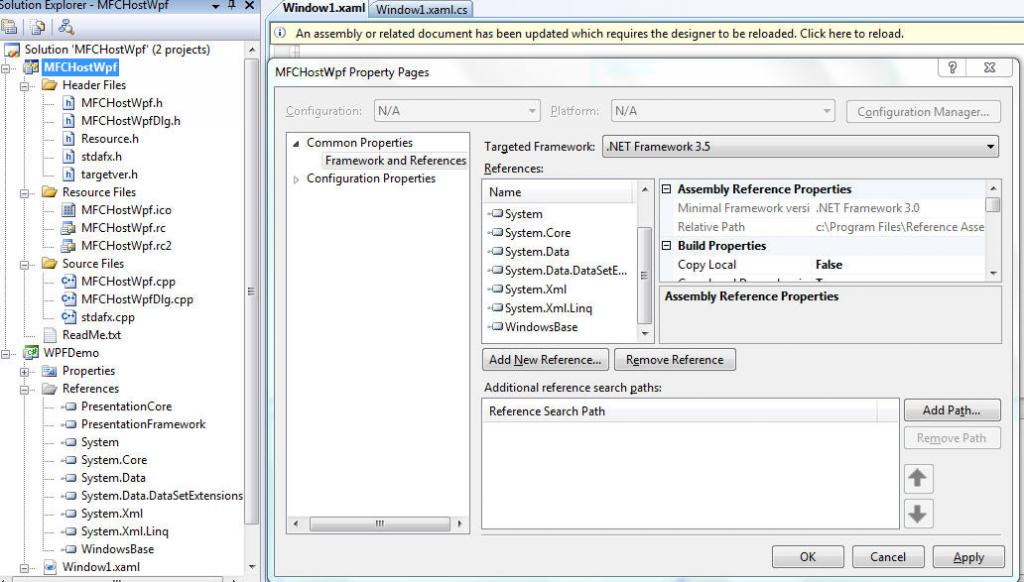
1.右击MFC工程, 选择弹出菜单的Properties(属性), 在Configuration Properties/General/Common Language Runtime support中选择Common Language Runtime support(/clr), 保存关闭后按F7编译. 如图所示:

2.重新右击MFC工程, 选择"工程属性", 在Common Properties中, 点击"Add New Reference", 在".net"选项卡下添加如下引用PresentationCore, PresentationFramework, System, System.Core, Systems.Data, Systems.Data.DataSetExtensions, Systems.Xml, System.Xml.Linq, WindowsBase. (p.s. 具体引用一定要和WPF工程中的引用一致),保存后退出, 如图所示:

3.重新选择"工程属性", 在Common Properties中, 点击"Add New Reference", 在"Project"选项卡下选择WPFDemo工程, 选择"Ok"后保存退出, 如图所示:

4.建立一个CLI类CHostWPFWnd, 代码如下:
5.在MFC工程的App文件CMFCHostWpfApp中添加CLI类的引用#include "HostWPFWnd.h", 在App的InitInstance函数里, 修改如下代码:

ok, 相信细心的哥们已经发现这个运行出来的Dlg的程序图标已经换为咱们熟悉的MFC默认icon. O(∩_∩)O~. (p.s. 注意启动的是MFC工程, 应将MFCDemo设为首选项, 具体是右击MFCDemo, 选择Set as StartUp Project).
7.接下来, 我们在WPF工程中定义一个实现INotifyPropertyChanged 接口的类TestModel, 里面有个int字段TestValue, 添加一个Button和一个TextBox, 并添加一个Click事件, 具体代码如下:
//cs
8.这一步我们把_txtValue的Text属性绑定到我们上面定义的TestValue字段, 把_txtValue设为ReadOnly, 并修正下Dlg显示出来的位置, 修改后的xaml代码为:
9.接下来我们自定义一个event, 在Button的Click事件中触发此事件, 具体代码如下:

ok, 通过本文相信大家都了解了如何在MFC中调用WPF, 有什么问题欢迎大家和我讨论.
工程附件:MFCHostWPF
WPF是微软主推的新一代桌面程序开发技术, 它极大加快了程序界面开发,也增强了界面的用户体验,至于详细的介绍大家可以google, 本文主要还是介绍如何在vc中处理wpf数据和事件.开发工具嘛vs2008+sp1+[Blend].
1.新建一个项目MFCHostWpf, 建立2个工程, 一个为vc对话框的工程MFCDlgDemo,另一个为C#普通应用程序的工程WPFDemo.如图所示:

2.分别运行2个工程后, 程序截图如下:
3.修改WPF工程以便MFC工程调用, 具体如下:
1.删除WPF工程中的 App.xaml和App.xaml.cs两个源文件.
2.双击WPF工程的Properties(属性), 选择Application(应用程序)选项卡, 将Output type(输出类型)下拉框选为Class Library(类库). 保存后关闭. 如图所示:
4.接下来修改MFC工程以便调用WPF组件, 具体如下:
1.右击MFC工程, 选择弹出菜单的Properties(属性), 在Configuration Properties/General/Common Language Runtime support中选择Common Language Runtime support(/clr), 保存关闭后按F7编译. 如图所示:
2.重新右击MFC工程, 选择"工程属性", 在Common Properties中, 点击"Add New Reference", 在".net"选项卡下添加如下引用PresentationCore, PresentationFramework, System, System.Core, Systems.Data, Systems.Data.DataSetExtensions, Systems.Xml, System.Xml.Linq, WindowsBase. (p.s. 具体引用一定要和WPF工程中的引用一致),保存后退出, 如图所示:
3.重新选择"工程属性", 在Common Properties中, 点击"Add New Reference", 在"Project"选项卡下选择WPFDemo工程, 选择"Ok"后保存退出, 如图所示:

4.建立一个CLI类CHostWPFWnd, 代码如下:
//HostWPFWnd.h
#pragma once

using namespace System;
using namespace System::Windows;
using namespace System::Windows::Interop;
using namespace System::Runtime;
using namespace WPFDemo;

public ref class CHostWPFWnd
{
public:
	CHostWPFWnd(void){};
	~CHostWPFWnd(void){};
protected:
	!CHostWPFWnd(){};

public:
	static Window1^ hostedWnd;
	static HWND hWnd;
};

HWND GetHwnd(HWND hwnd = NULL);

//HostWPFWnd.cpp
#include "StdAfx.h"
#include "HostWPFWnd.h"

HWND GetHwnd(HWND hwnd)
{
	CHostWPFWnd::hostedWnd = gcnew Window1();

	WindowInteropHelper^ wih = gcnew WindowInteropHelper(CHostWPFWnd::hostedWnd);
	wih->Owner = IntPtr(hwnd);
	CHostWPFWnd::hWnd = (HWND) wih->Handle.ToPointer();

	return CHostWPFWnd::hWnd;
}
5.在MFC工程的App文件CMFCHostWpfApp中添加CLI类的引用#include "HostWPFWnd.h", 在App的InitInstance函数里, 修改如下代码:
CMFCHostWpfDlg dlg;
    m_pMainWnd = &dlg;
    INT_PTR nResponse = dlg.DoModal();
    if (nResponse == IDOK)
    {
        // TODO: Place code here to handle when the dialog is
        //  dismissed with OK
    }
    else if (nResponse == IDCANCEL)
    {
        // TODO: Place code here to handle when the dialog is
        //  dismissed with Cancel
}为:::GetHwnd();
if (CHostWPFWnd::hostedWnd)
{
CHostWPFWnd::hostedWnd->ShowDialog();
}6.通过以上5步, 我们已经成功在MFC工程调用WPF, 按F7编译后, F5运行, 效果如下: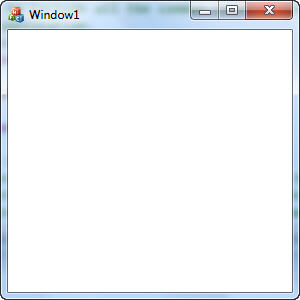
ok, 相信细心的哥们已经发现这个运行出来的Dlg的程序图标已经换为咱们熟悉的MFC默认icon. O(∩_∩)O~. (p.s. 注意启动的是MFC工程, 应将MFCDemo设为首选项, 具体是右击MFCDemo, 选择Set as StartUp Project).
7.接下来, 我们在WPF工程中定义一个实现INotifyPropertyChanged 接口的类TestModel, 里面有个int字段TestValue, 添加一个Button和一个TextBox, 并添加一个Click事件, 具体代码如下:
//cs
using System;
using System.Collections.Generic;
using System.Linq;
using System.Text;
using System.Windows;
using System.Windows.Controls;
using System.Windows.Data;
using System.Windows.Documents;
using System.Windows.Input;
using System.Windows.Media;
using System.Windows.Media.Imaging;
using System.Windows.Navigation;
using System.Windows.Shapes;

using System.ComponentModel;

namespace WPFDemo
{
    /// <summary>
    /// Interaction logic for Window1.xaml
    /// </summary>
    public partial class Window1 : Window
    {
        public class TestModel : INotifyPropertyChanged
        {
            public TestModel()
            {
            }

            private int _testValue = 0;

            public int TestValue
            {
                get { return _testValue; }
                set
                {
                    _testValue = value;
                    OnPropertyChanged("TestValue");
                }
            }

            // Declare the event
            public event PropertyChangedEventHandler PropertyChanged;

            // Create the OnPropertyChanged method to raise the event
            protected void OnPropertyChanged(string name)
            {
                PropertyChangedEventHandler handler = PropertyChanged;
                if (handler != null)
                {
                    handler(this, new PropertyChangedEventArgs(name));
                }
            }
        }

        public Window1()
        {
            InitializeComponent();
        }

        private TestModel test;

        public TestModel Test
        {
            get { return test; }
            set { test = value; }
        }

        public delegate void ButtonClickHandler();
        public event ButtonClickHandler ClickEvent;

        private void _btnTest_Click(object sender, RoutedEventArgs e)
        {
            //
            ClickEvent();
        }
    }

}
//xaml <Window x:Class="WPFDemo.Window1"
xmlns="http://schemas.microsoft.com/winfx/2006/xaml/presentation"
xmlns:x="http://schemas.microsoft.com/winfx/2006/xaml"
Title="Window1" Height="300" Width="300">
<Grid>
<TextBox Height="23" HorizontalAlignment="Left" Margin="10,10,0,0" Name="_txtValue" VerticalAlignment="Top"Width="120" />
<Button Height="23" Margin="136,10,67,0" Name="_btnTest" VerticalAlignment="Top" Click="_btnTest_Click">Test</Button>
</Grid>
</Window> 8.这一步我们把_txtValue的Text属性绑定到我们上面定义的TestValue字段, 把_txtValue设为ReadOnly, 并修正下Dlg显示出来的位置, 修改后的xaml代码为:
<TextBox Height="23" HorizontalAlignment="Left" Margin="10,10,0,0" Name="_txtValue" VerticalAlignment="Top" Width="120"
Text="{Binding Test.TestValue, ElementName=window, Mode=OneWay}" IsReadOnly="True" />运行效果如图:9.接下来我们自定义一个event, 在Button的Click事件中触发此事件, 具体代码如下:
public delegate void ButtonClickHandler();
      public event ButtonClickHandler ClickEvent;

      private void _btnTest_Click(object sender, RoutedEventArgs e)
      {
          //
          ClickEvent();
      }
10.然后我们在MFC通过自定义一个Add方法, 并在方法中通过CLI修改WPF中的TextValue字段, 然后通过CLI把此Add方法加到自定义event中. 修改后代码如下://HostWPFWnd.h
#pragma once
using namespace System;
using namespace System::Windows;
using namespace System::Windows::Interop;
using namespace System::Runtime;
using namespace WPFDemo;
public ref class CHostWPFWnd
{
public:
CHostWPFWnd(void){};
~CHostWPFWnd(void){};
protected:
!CHostWPFWnd(){};
public:
static Window1^ hostedWnd;
static HWND hWnd;
};
HWND GetHwnd(HWND hwnd = NULL);
void Add(); //Increase TestValue;//HostWPFWnd.cpp
#include "StdAfx.h"
#include "HostWPFWnd.h"
HWND GetHwnd(HWND hwnd)
{
CHostWPFWnd::hostedWnd = gcnew Window1();
CHostWPFWnd::hostedWnd->ClickEvent += gcnew Window1::ButtonClickHandler(Add);
WindowInteropHelper^ wih = gcnew WindowInteropHelper(CHostWPFWnd::hostedWnd);
wih->Owner = IntPtr(hwnd);
CHostWPFWnd::hWnd = (HWND) wih->Handle.ToPointer();
return CHostWPFWnd::hWnd;
}void Add()
{
CHostWPFWnd::hostedWnd->Test->TestValue++;
}11.F7编译后, F5运行, 结果如下:
ok, 通过本文相信大家都了解了如何在MFC中调用WPF, 有什么问题欢迎大家和我讨论.
工程附件:MFCHostWPF

相关文章推荐
- MFC中调用WPF教程
- MFC中调用WPF教程
- MFC中调用WPF教程
- [置顶] MFC中调用WPF教程
- MFC中调用WPF教程
- MFC中调用WPF教程
- MFC中调用WPF教程
- MFC中子窗口调用父窗口指针教程
- 非托管MFC调用WPF控件
- WPF调用MFC DLL总结
- 【ASP.NET Web API教程】3.3 通过WPF应用程序调用Web API(C#)
- 在MFC下调用WPF控件的总结
- 在MFC下调用WPF控件的总结
- 在MFC下用托管形式调用WPF
- 【ASP.NET Web API教程】3.3 通过WPF应用程序调用Web API(C#)
- wpf中调用w32的mfc dll 对话框
- WPF入门教程
- MFC:AfxLoadLibrary-将指定的 DLL 映射到调用进程的地址空间
- C#开发WPF/Silverlight动画及游戏系列教程(Game Tutorial):(四十四)制作主角属性面板及加点器
- JasperReport初级教程(2.0.3)调用Java代码_图文详解_绝对原创