解读 LWUIT 之四:LWUIT 控件(中)
2010-02-22 15:45
316 查看
解读 LWUIT 之四:LWUIT 控件(中)
LWUIT 开发指南下载
作者写的 Hello RadioButton、Hello CheckBox、Hello ComboBox 源代码下载
本文继上篇博客继续对 LWUIT 常见控件进行介绍。本文主要介绍 LWUIT 常用控件单选按钮(RadioButton)、复选按钮(CheckBox)、组合按钮(ComboBox)的使用并附源代码。文章对这三种控件分别进行了说明和比较。
注:源码编写中关于 .res 的编写这里不再赘述,详细编写步骤请参考作者的前一篇博客《解读 LWUIT 之二:关于 LWUIT 开发指南中的 Hello World》。每个项目的 .res 具体配置请到作者上传源码中的 res 目录下使用 ResourceEdit 查看。
com.sun.lwuit.RadioButton 控件
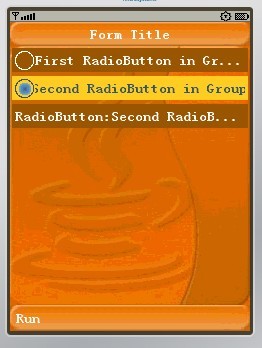
RadioButton 必须和 ButtonGroup 配合才能使用。ButtonGroup 管理一组选中和未选中的单选按钮的组件,一次只产生一个选中的按钮,通过调用它的 getRadioButton(int index) 方法获得一个指定的单选按钮,而通过调用它的 getSelectedIndex() 方法获得被选中的按钮的索引。作者写的 HelloRadioButton 源代码如下:
HelloRadioButton 运行效果图如下(作者毕竟美术功底有限):
com.sun.lwuit.CheckBox 控件
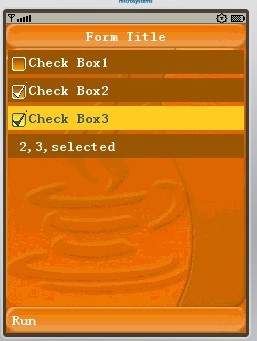
CheckBox 类似于 Html 表单中的 CheckBox,不同的是 Html 中的 CheckBox 多个一起提交时名字一样,而 LWUIT 中的 CheckBox 自行管理,需要程序员分别把结果组织。HelloCheckBox 源代码如下:
HelloCheckBox 运行效果图如下:
com.sun.lwuit.ComboBox 控件
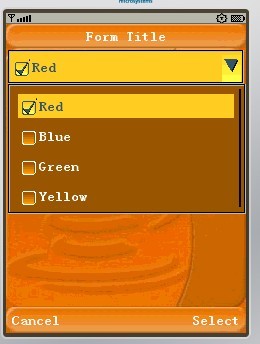
ComboBox 类似于 RadioButton,也是一次只能有一个选择的列表。但是 ComboBox 可以自行使用,并不依赖于 ButtonGroup。由于 ComboBox 可以自行定义呈现器,所以它可以不必像 RadioButton 似的占用太多空间。因此当显示空间有限,或者有多组选项的时候,ComboBox 更合适。作者写的 HelloComboBox 源代码如下:
HelloComboBox 运行效果图如下:
LWUIT 开发指南下载
作者写的 Hello RadioButton、Hello CheckBox、Hello ComboBox 源代码下载
本文继上篇博客继续对 LWUIT 常见控件进行介绍。本文主要介绍 LWUIT 常用控件单选按钮(RadioButton)、复选按钮(CheckBox)、组合按钮(ComboBox)的使用并附源代码。文章对这三种控件分别进行了说明和比较。
注:源码编写中关于 .res 的编写这里不再赘述,详细编写步骤请参考作者的前一篇博客《解读 LWUIT 之二:关于 LWUIT 开发指南中的 Hello World》。每个项目的 .res 具体配置请到作者上传源码中的 res 目录下使用 ResourceEdit 查看。
com.sun.lwuit.RadioButton 控件
RadioButton 必须和 ButtonGroup 配合才能使用。ButtonGroup 管理一组选中和未选中的单选按钮的组件,一次只产生一个选中的按钮,通过调用它的 getRadioButton(int index) 方法获得一个指定的单选按钮,而通过调用它的 getSelectedIndex() 方法获得被选中的按钮的索引。作者写的 HelloRadioButton 源代码如下:
package com.defonds.lwuit;

import com.sun.lwuit.ButtonGroup;
import com.sun.lwuit.Command;
import com.sun.lwuit.Display;
import com.sun.lwuit.Form;
import com.sun.lwuit.Label;
import com.sun.lwuit.RadioButton;
import com.sun.lwuit.animations.CommonTransitions;
import com.sun.lwuit.events.ActionEvent;
import com.sun.lwuit.events.ActionListener;
import com.sun.lwuit.layouts.BoxLayout;
import com.sun.lwuit.plaf.UIManager;
import com.sun.lwuit.util.Resources;

public class HelloMidlet extends javax.microedition.midlet.MIDlet implements ActionListener{

	private Form exampleContainer;// declare a Form
	private ButtonGroup group1;//declare a ButtonGroup
	private RadioButton selectedButton = new RadioButton();//remember the selected radioButton
	private RadioButton rb1;//declare a ButtonGroup
	private RadioButton rb2;//declare a ButtonGroup
	private Label radioButtonsLabel;//declare a Label

	public void startApp() {
		// init the LWUIT Display
		Display.init(this);
		// Setting the application theme is discussed
		// later in the theme chapter and the resources chapter
		try {
			Resources r = Resources.open("/myresources.res");
			UIManager.getInstance().setThemeProps(r.getTheme("myresources"));
		} catch (java.io.IOException e) {}

		exampleContainer = new Form("Form Title");// Create a Form;//Create a Form
		group1 = new ButtonGroup();//Create a ButtonGroup
		rb1 = new RadioButton("First RadioButton in Group 1");//Create a ButtonGroup
		rb2 = new RadioButton("Second RadioButton in Group 1");//Create a ButtonGroup
		radioButtonsLabel = new Label("RadioButton:");//Create a Label

		rb1.addActionListener(this);//add a listener to the button
		rb2.addActionListener(this);//add a listener to the button

		group1.add(rb1);//add rb1 to group1
		group1.add(rb2);//add rb2 to group1

		exampleContainer.setLayout(new BoxLayout(BoxLayout.Y_AXIS));//Set LayoutManager
		exampleContainer.addComponent(rb1);//Add a RadioButton to the Form content pane
		exampleContainer.addComponent(rb2);//Add a RadioButton to the Form content pane
		exampleContainer.addComponent(radioButtonsLabel);//Add a Label to the Form content pane
		exampleContainer.setTransitionOutAnimator(CommonTransitions.createFade(400));//Set Transitions animation of Fade
		exampleContainer.addCommand(new Command("Run", 2));//Add Command key
		exampleContainer.show();//Show it
	}

	public void pauseApp() {}

	public void destroyApp(boolean unconditional) {}

	//implements the method of ActionListener
	public void actionPerformed(ActionEvent evt) {
		selectedButton = group1.getRadioButton(group1.getSelectedIndex());//get the radioButton which is selected by the user
		System.out.println(selectedButton.getText());
		radioButtonsLabel.setText("RadioButton:" + selectedButton.getText());//reset the text of the label
	}
}
HelloRadioButton 运行效果图如下(作者毕竟美术功底有限):
com.sun.lwuit.CheckBox 控件
CheckBox 类似于 Html 表单中的 CheckBox,不同的是 Html 中的 CheckBox 多个一起提交时名字一样,而 LWUIT 中的 CheckBox 自行管理,需要程序员分别把结果组织。HelloCheckBox 源代码如下:
package com.defonds.lwuit;

import com.sun.lwuit.CheckBox;
import com.sun.lwuit.Command;
import com.sun.lwuit.Display;
import com.sun.lwuit.Form;
import com.sun.lwuit.Label;
import com.sun.lwuit.animations.CommonTransitions;
import com.sun.lwuit.events.ActionEvent;
import com.sun.lwuit.events.ActionListener;
import com.sun.lwuit.layouts.BoxLayout;
import com.sun.lwuit.plaf.UIManager;
import com.sun.lwuit.util.Resources;

public class HelloMidlet extends javax.microedition.midlet.MIDlet implements ActionListener{

	private Form exampleContainer;// declare a Form
	private CheckBox checkBox1;//declare a CheckBox
	private CheckBox checkBox2;//declare a CheckBox
	private CheckBox checkBox3;//declare a CheckBox
	private Label checkBoxLabel;//declare a Label

	private String str = new String(" ");//a String used to remember the checkBox selected

	public void startApp() {
		// init the LWUIT Display
		Display.init(this);
		// Setting the application theme is discussed
		// later in the theme chapter and the resources chapter
		try {
			Resources r = Resources.open("/myresources.res");
			UIManager.getInstance().setThemeProps(r.getTheme("myresources"));
		} catch (java.io.IOException e) {}

		exampleContainer = new Form("Form Title");// Create a Form
		checkBox1 = new CheckBox("Check Box1");//Create a CheckBox
		checkBox2 = new CheckBox("Check Box2");//Create a CheckBox
		checkBox3 = new CheckBox("Check Box3");//Create a CheckBox
		checkBoxLabel = new Label("selected");//Create a Label

		checkBox1.addActionListener(this);//add a listener to the CheckBox
		checkBox2.addActionListener(this);//add a listener to the CheckBox
		checkBox3.addActionListener(this);//add a listener to the CheckBox

		exampleContainer.setLayout(new BoxLayout(BoxLayout.Y_AXIS));//Set LayoutManager
		exampleContainer.addComponent(checkBox1);//Add a CheckBox to the Form content pane
		exampleContainer.addComponent(checkBox2);//Add a CheckBox to the Form content pane
		exampleContainer.addComponent(checkBox3);//Add a CheckBox to the Form content pane
		exampleContainer.addComponent(checkBoxLabel);//Add a Label to the Form content pane
		exampleContainer.setTransitionOutAnimator(CommonTransitions.createFade(400));//Set Transitions animation of Fade
		exampleContainer.addCommand(new Command("Run", 2));//Add Command key
		exampleContainer.show();//Show it
	}

	public void pauseApp() {}

	public void destroyApp(boolean unconditional) {}

	//implements the method of ActionListener
	public void actionPerformed(ActionEvent evt) {
		if(checkBox1.isSelected()){
			str = "1,";
		}
		if(checkBox2.isSelected()){
			str += "2,";
		}
		if(checkBox3.isSelected()){
			str += "3,";
		}
		checkBoxLabel.setText(str + "selected");//reset the text of the label
		str = " ";
	}
}
HelloCheckBox 运行效果图如下:
com.sun.lwuit.ComboBox 控件
ComboBox 类似于 RadioButton,也是一次只能有一个选择的列表。但是 ComboBox 可以自行使用,并不依赖于 ButtonGroup。由于 ComboBox 可以自行定义呈现器,所以它可以不必像 RadioButton 似的占用太多空间。因此当显示空间有限,或者有多组选项的时候,ComboBox 更合适。作者写的 HelloComboBox 源代码如下:
package com.defonds.lwuit;

import com.sun.lwuit.CheckBox;
import com.sun.lwuit.ComboBox;
import com.sun.lwuit.Command;
import com.sun.lwuit.Component;
import com.sun.lwuit.Display;
import com.sun.lwuit.Form;
import com.sun.lwuit.Label;
import com.sun.lwuit.List;
import com.sun.lwuit.animations.CommonTransitions;
import com.sun.lwuit.events.ActionEvent;
import com.sun.lwuit.events.ActionListener;
import com.sun.lwuit.layouts.BoxLayout;
import com.sun.lwuit.list.ListCellRenderer;
import com.sun.lwuit.plaf.UIManager;
import com.sun.lwuit.util.Resources;

public class HelloMidlet extends javax.microedition.midlet.MIDlet implements ActionListener{

	private Form exampleContainer;// declare a Form
	private Label comboBoxLabel;//declare a Label
	private String[] content = { "Red", "Blue", "Green", "Yellow" };
	private ComboBox comboBox;//declare a ComboBox

	public void startApp() {
		// init the LWUIT Display
		Display.init(this);
		// Setting the application theme is discussed
		// later in the theme chapter and the resources chapter
		try {
			Resources r = Resources.open("/myresources.res");
			UIManager.getInstance().setThemeProps(r.getTheme("myresources"));
		} catch (java.io.IOException e) {}

		exampleContainer = new Form("Form Title");// Create a Form
		comboBoxLabel = new Label(" ");
		comboBox = new ComboBox(content);//Creating the combo box
		comboBox.setListCellRenderer(new checkBoxRenderer());//Setting a checkBox renderer
		comboBox.addActionListener(this);//Adding a action listener to catch user clicking

		exampleContainer.setLayout(new BoxLayout(BoxLayout.Y_AXIS));//Set LayoutManager
		exampleContainer.addComponent(comboBox);//Add a ComboBox to the Form content pane
		exampleContainer.addComponent(comboBoxLabel);//Add a Label to the Form content pane
		exampleContainer.setTransitionOutAnimator(CommonTransitions.createFade(400));//Set Transitions animation of Fade
		exampleContainer.addCommand(new Command("Run", 2));//Add Command key
		exampleContainer.show();//Show it
	}

	public void pauseApp() {}

	public void destroyApp(boolean unconditional) {}

	//implements the method of ActionListener
	public void actionPerformed(ActionEvent evt) {
		comboBoxLabel.setText(content[comboBox.getSelectedIndex()] + " selected");
	}

	/**
	* Demonstrates implementation of a renderer derived from a CheckBox
	*/
	private static class checkBoxRenderer extends CheckBox implements ListCellRenderer{
		/** Creates a new instance of checkBoxRenderer */
		public checkBoxRenderer(){
			super("");
		}

		// Setting the current check box text and status
		public Component getListCellRendererComponent(List list,
				Object value, int index, boolean isSelected) {
			setText("" + value);
			if (isSelected){
				setFocus(true);
				setSelected(true);
			}else{
				setFocus(false);
				setSelected(false);
			}
			return this;
		}

		// Returning the list focus component
		public Component getListFocusComponent(List list) {
			setText("");
			setFocus(true);
			setSelected(true);
			return this;
		}
	}
}
HelloComboBox 运行效果图如下:

相关文章推荐
- 解读 LWUIT 之三:LWUIT 控件(上)
- 解读 LWUIT 之五:LWUIT 控件(下)
- 解读 LWUIT 之五:LWUIT 控件(下)
- 解读 LWUIT 之三:LWUIT 控件(上)
- 解读 LWUIT 之四:LWUIT 控件(中)
- Lwuit精简解说,Lwuit的21条
- 解读 LWUIT 之六:使用表格(Table)和树(Tree)
- 解读 LWUIT 之十二:LWUIT Implementation
- 解读 LWUIT 之七:深入理解 LWUIT 框架的 MVC
- 解读 LWUIT 之二:关于 LWUIT 开发指南中的 Hello World
- 解读 LWUIT 之七:深入理解 LWUIT 框架的 MVC
- LWUIT Font显示的解决方法,LWUIT设置自定义的Font
- (javame)lwuit 时间控件显示格式及中文显示
- 解读 LWUIT 之二:关于 LWUIT 开发指南中的 Hello World
- 解读 LWUIT 之九:使用布局管理器(Layout Manager)
- LWUIT中的进度条实现(Progress Indicator & Threads In LWUIT by Shai Almog)
- lwuit-List控件使用
- 解读 LWUIT 之八:模态对话框(Dialog)
- 解读 LWUIT 之九:使用布局管理器(Layout Manager)
- 解读 LWUIT 之十三:可插拔主题(Theming)