Flex与.NET互操作(五):使用FileReference+HttpHandler实现文件上传/下载
2009-11-02 19:40
1016 查看
在Flex的应用开发中,同ASP.NET,JSP,PHP等应用一样,都会有上传/下载文件的应用需求,Flex的SDK也为我们提供了专门的类FileRefUdderence实现文件上传/下载 。Flex只是作为一个客户端,要实现上传或下载必须得为其提供一个服务端来接受上传或下载的请求,本文以ASP.NET中的HttpHandler作为文件上传的服务端来完成上传功能。
OK,我们从Flex客户端开始,看看客户端是通过什么方式想服务端发起请求。Flex客户端要完成文件上传下载都是通过FileRefUdderence来实现,首先得定义一个该类型对象实例:
1 [Bindable]
2 private var stateText:String = "请选择一个文件上传";
3 //通过调用file对象的方法来完成上传和下载功能
4 private var file:FileReference = new FileReference();
上传文件通常涉及到的有选择文件、上传文件以及上传完成这些最基本的处理过程。OK,下面我们就以这三个过程为例来看看Flex是怎么来完成文件的上传功能。首先为这三个功能点分别添加监听事件处理函数,在程序加载时调用:
1 internal function initApp():void
2 {
3 file.addEventListener(Event.SELECT,onSelected);
4 file.addEventListener(Event.COMPLETE,onCompleted);
5 file.addEventListener(ProgressEvent.PROGRESS,onProgress);
6 }
另外我们也可以不用上面这中定义一个函数在程序加载时调用进行初始化操作,应用程序(mxml)的初始化操作又creationComplete方法完成,另外还有一个比它先执行的方法createChildren(),我们可以直接在mxml下重写该方法来实现应用程序的初始化,如下:
1 /**
2 * createChildren 比 creationComplete 事件更早发生
3 * */
4 protected override function createChildren():void
5 {
6 file.addEventListener(Event.SELECT,onSelected);
7 file.addEventListener(Event.COMPLETE,onCompleted);
8 file.addEventListener(ProgressEvent.PROGRESS,onProgress);
9 }
这三个事件处理函数的详细定义如下(其中的stateText为String的变量,用于显示文件上传状态提示):
1 internal function onSelected(evt:Event):void
2 {
3 stateText = "选择了文件" + file.name;
4 }
5
6 internal function onCompleted(evt:Event):void
7 {
8 stateText = "上传完毕!";
9 }
10
11 internal function onProgress(evt:ProgressEvent):void
12 {
13 stateText = "已上传 " + Math.round(100 * evt.bytesLoaded / evt.bytesTotal) + "%";
14 }
到这里客户端就只差一步了,那就是完成发起上传请求的方法,实际上就是通过URLRequest对象创建一个与服务端的连接,然后直接调用FielReference类的upload()方法就可完成该功能,详细如下代码定义:
1 /**
2 * 调用FileReference的实例方法upload()实现文件上传
3 * */
4 internal function onUpLoad():void
5 {
6 if(file.size > 0)
7 {
8 stateText = "正在上传文件:" + file.name;
9 }
10 var request:URLRequest = new URLRequest();
11 request.url="http://localhost/Web/UpLoadHandler.ashx";
12 file.upload(request);
13 }
写好了upload方法,现在就是调用他了,通过按扭的click事件直接调用就可以,另外调用file.browse()方法则实现选择文件的功能,如下mxml代码描述:
1 <mx:TextInput x="10" y="57" id="txtFile" text="{stateText}" width="229"/>
2 <mx:Button x="247" y="57" label="选择" fontWeight="normal" click="{file.browse()}"/>
3 <mx:Button x="29" y="111" label="上传文件" width="111" fontWeight="normal" click="onUpLoad()"/>
如上便完成了上传文件的Flex客户端开发,通过file.upload()方法,将把选择的文件通过二进制的形式发送到指定的服务端,并自动传递一个叫“fileName”的参数,服务端通过fileName便可以接收到客户端请求上传的文件。最后我们来看看服务端的UpLoadHandler.ashx的详细定义:
1 public class UpLoadHandler : IHttpHandler
2 {
3 //文件上传目录
4 private string uploadFolder = "UpLoad";
5
6 public void ProcessRequest(HttpContext context)
7 {
8 context.Response.ContentType = "text/plain";
9
10 HttpFileCollection files = context.Request.Files;
11 if (files.Count > 0)
12 {
13 string path = context.Server.MapPath(uploadFolder);
14 HttpPostedFile file = files[0];
15
16 if (file != null && file.ContentLength > 0)
17 {
18 string savePath = path + "/" + context.Request.Form["fileName"];
19 file.SaveAs(savePath);
20 }
21 }
22 else
23 {
24 context.Response.Write("参数错误");
25 context.Response.End();
26 }
27 }
28
29 public bool IsReusable
30 {
31 get
32 {
33 return false;
34 }
35 }
36 }
如上一系列的步骤便可完成上传文件的功能,下面便是上传文件示例程序运行截图:
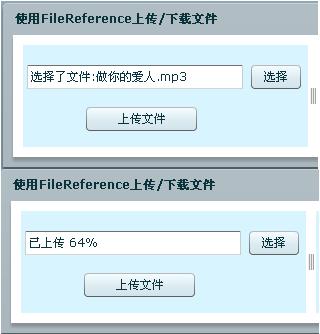
实现了文件上传下面来看看怎么实现文件下载, 以上面上传示例中上传的mp3为例,下面我们来看看怎么从服务器(http://localhost/Web/UpLoad/做你的爱人.mp3)上完成文件(做你的爱人.mp3)的下载。
要实现文件下载对服务器端只要保证被下载文件存在就OK,同上传文件一样需要实例化一个FielReference对象的实例,并为其添加相应的事件处理函数:
1 private var fileDown:FileReference = new FileReference();
1 /**
2 * createChildren 比 creationComplete 事件更早发生
3 * */
4 protected override function createChildren():void
5 {
6 super.createChildren();
7 file.addEventListener(Event.SELECT,onSelected);
8 file.addEventListener(Event.COMPLETE,onCompleted);
9 file.addEventListener(ProgressEvent.PROGRESS,onProgress);
10 //实现文件下载
11 fileDown.addEventListener(Event.COMPLETE,onDownCompleted);
12 fileDown.addEventListener(ProgressEvent.PROGRESS,onDownProgress);
13 }
如上为实现下载文件的实例fileDown注册了成功下载文件后事件处理函数和下载过程处理函数,下面是两个方法的详细定义:
1 internal function onDownCompleted(evt:Event):void
2 {
3 var fileRef:FileReference = evt.currentTarget as FileReference;
4 resultLabel.text = "文件名:" + fileRef.name + "下载完毕!";
5 }
6
7 internal function onDownProgress(evt:ProgressEvent):void
8 {
9 downState.text = "已下载: " + Math.round(100 * evt.bytesLoaded / evt.bytesTotal) + "%";
10 }
完成了对象事件的开发,最后便上惩罚下载请求了,直接调用FileReference类所提供的download()方法既可:
1 /**
2 * 调用FileReference类的实例方法download()实现文件下载
3 * */
4 internal function onDownLoad():void
5 {
6 var request:URLRequest = new URLRequest();
7 request.url="http://localhost:1146/UpLoad/做你的爱人.mp3";
8 fileDown.download(request);
9 }
程序执行到download()方法的时候会自动弹出选择保存文件对话框,根据实际情况选择好保存路径就OK。下面是实现上传和下载的完整代码:


实现上传和下载的完整代码
1 <?xml version="1.0" encoding="utf-8"?>
2 <mx:Application xmlns:mx="http://www.adobe.com/2006/mxml" layout="absolute">
3 <mx:Panel x="49" y="66" width="551" height="164" layout="absolute"
4 title="使用FileReference上传/下载文件" fontSize="12">
5 <mx:HDividedBox x="10" y="10" width="511" height="102">
6 <mx:Canvas id="left" backgroundColor="#D7F4FF" height="100%" width="209">
7 <mx:TextInput x="4" y="20" id="txtFile" text="{stateText}" width="135"/>
8 <mx:Button x="147" y="20" label="选择" fontWeight="normal" click="{file.browse()}"/>
9 <mx:Button x="31" y="68" label="上传文件" width="111" fontWeight="normal" click="onUpLoad()"/>
10 </mx:Canvas>
11 <mx:Canvas id="right" backgroundColor="#D7F4FF" height="100%" width="282">
12 <mx:Label x="6" y="9" text="http://localhost/Web/UpLoad/做你的爱人.mp3"/>
13 <mx:Button x="10" y="37" label="下载文件" fontWeight="normal" click="onDownLoad()"/>
14 <mx:Label x="10" y="74" width="272" id="resultLabel"/>
15 <mx:TextInput x="122" y="37" id="downState"/>
16 </mx:Canvas>
17 </mx:HDividedBox>
18
19 </mx:Panel>
20 <mx:Script>
21 <![CDATA[
22 [Bindable]
23 private var stateText:String = "请选择一个文件上传";
24
25 private var file:FileReference = new FileReference();
26 private var fileDown:FileReference = new FileReference();
27
28 /**
29 * createChildren 比 creationComplete 事件更早发生
30 * */
31 protected override function createChildren():void
32 {
33 super.createChildren();
34 file.addEventListener(Event.SELECT,onSelected);
35 file.addEventListener(Event.COMPLETE,onCompleted);
36 file.addEventListener(ProgressEvent.PROGRESS,onProgress);
37
38 fileDown.addEventListener(Event.COMPLETE,onDownCompleted);
39 fileDown.addEventListener(ProgressEvent.PROGRESS,onDownProgress);
40 }
41
42 // internal function initApp():void
43 // {
44 // file.addEventListener(Event.SELECT,onSelected);
45 // file.addEventListener(Event.COMPLETE,onCompleted);
46 // file.addEventListener(ProgressEvent.PROGRESS,onProgress);
47 // }
48
49 internal function onSelected(evt:Event):void
50 {
51 stateText = "选择了文件:" + file.name;
52 }
53
54 internal function onCompleted(evt:Event):void
55 {
56 stateText = "上传完毕!";
57 }
58
59
60 internal function onDownCompleted(evt:Event):void
61 {
62 var fileRef:FileReference = evt.currentTarget as FileReference;
63 resultLabel.text = "文件名:" + fileRef.name + "下载完毕!";
64 }
65
66 internal function onProgress(evt:ProgressEvent):void
67 {
68 stateText = "已上传: " + Math.round(100 * evt.bytesLoaded / evt.bytesTotal) + "%";
69
70 }
71
72 internal function onDownProgress(evt:ProgressEvent):void
73 {
74 downState.text = "已下载: " + Math.round(100 * evt.bytesLoaded / evt.bytesTotal) + "%";
75 }
76
77 /**
78 * 调用FileReference的实例方法upload()实现文件上传
79 * */
80 internal function onUpLoad():void
81 {
82 if(file.size > 0)
83 {
84 stateText = "正在上传文件:" + file.name;
85 }
86 var request:URLRequest = new URLRequest();
87 request.url=http://localhost/Web/UpLoadHandler.ashx;
88 file.upload(request);
89 }
90
91 /**
92 * 调用FileReference类的实例方法download()实现文件下载
93 * */
94 internal function onDownLoad():void
95 {
96 var request:URLRequest = new URLRequest();
97 request.url="http://localhost/Web/UpLoad/做你的爱人.mp3";
98 fileDown.download(request);
99 }
100 ]]>
101 </mx:Script>
102 </mx:Application>
103
程序运行截图:

OK,我们从Flex客户端开始,看看客户端是通过什么方式想服务端发起请求。Flex客户端要完成文件上传下载都是通过FileRefUdderence来实现,首先得定义一个该类型对象实例:
1 [Bindable]
2 private var stateText:String = "请选择一个文件上传";
3 //通过调用file对象的方法来完成上传和下载功能
4 private var file:FileReference = new FileReference();
上传文件通常涉及到的有选择文件、上传文件以及上传完成这些最基本的处理过程。OK,下面我们就以这三个过程为例来看看Flex是怎么来完成文件的上传功能。首先为这三个功能点分别添加监听事件处理函数,在程序加载时调用:
1 internal function initApp():void
2 {
3 file.addEventListener(Event.SELECT,onSelected);
4 file.addEventListener(Event.COMPLETE,onCompleted);
5 file.addEventListener(ProgressEvent.PROGRESS,onProgress);
6 }
另外我们也可以不用上面这中定义一个函数在程序加载时调用进行初始化操作,应用程序(mxml)的初始化操作又creationComplete方法完成,另外还有一个比它先执行的方法createChildren(),我们可以直接在mxml下重写该方法来实现应用程序的初始化,如下:
1 /**
2 * createChildren 比 creationComplete 事件更早发生
3 * */
4 protected override function createChildren():void
5 {
6 file.addEventListener(Event.SELECT,onSelected);
7 file.addEventListener(Event.COMPLETE,onCompleted);
8 file.addEventListener(ProgressEvent.PROGRESS,onProgress);
9 }
这三个事件处理函数的详细定义如下(其中的stateText为String的变量,用于显示文件上传状态提示):
1 internal function onSelected(evt:Event):void
2 {
3 stateText = "选择了文件" + file.name;
4 }
5
6 internal function onCompleted(evt:Event):void
7 {
8 stateText = "上传完毕!";
9 }
10
11 internal function onProgress(evt:ProgressEvent):void
12 {
13 stateText = "已上传 " + Math.round(100 * evt.bytesLoaded / evt.bytesTotal) + "%";
14 }
到这里客户端就只差一步了,那就是完成发起上传请求的方法,实际上就是通过URLRequest对象创建一个与服务端的连接,然后直接调用FielReference类的upload()方法就可完成该功能,详细如下代码定义:
1 /**
2 * 调用FileReference的实例方法upload()实现文件上传
3 * */
4 internal function onUpLoad():void
5 {
6 if(file.size > 0)
7 {
8 stateText = "正在上传文件:" + file.name;
9 }
10 var request:URLRequest = new URLRequest();
11 request.url="http://localhost/Web/UpLoadHandler.ashx";
12 file.upload(request);
13 }
写好了upload方法,现在就是调用他了,通过按扭的click事件直接调用就可以,另外调用file.browse()方法则实现选择文件的功能,如下mxml代码描述:
1 <mx:TextInput x="10" y="57" id="txtFile" text="{stateText}" width="229"/>
2 <mx:Button x="247" y="57" label="选择" fontWeight="normal" click="{file.browse()}"/>
3 <mx:Button x="29" y="111" label="上传文件" width="111" fontWeight="normal" click="onUpLoad()"/>
如上便完成了上传文件的Flex客户端开发,通过file.upload()方法,将把选择的文件通过二进制的形式发送到指定的服务端,并自动传递一个叫“fileName”的参数,服务端通过fileName便可以接收到客户端请求上传的文件。最后我们来看看服务端的UpLoadHandler.ashx的详细定义:
1 public class UpLoadHandler : IHttpHandler
2 {
3 //文件上传目录
4 private string uploadFolder = "UpLoad";
5
6 public void ProcessRequest(HttpContext context)
7 {
8 context.Response.ContentType = "text/plain";
9
10 HttpFileCollection files = context.Request.Files;
11 if (files.Count > 0)
12 {
13 string path = context.Server.MapPath(uploadFolder);
14 HttpPostedFile file = files[0];
15
16 if (file != null && file.ContentLength > 0)
17 {
18 string savePath = path + "/" + context.Request.Form["fileName"];
19 file.SaveAs(savePath);
20 }
21 }
22 else
23 {
24 context.Response.Write("参数错误");
25 context.Response.End();
26 }
27 }
28
29 public bool IsReusable
30 {
31 get
32 {
33 return false;
34 }
35 }
36 }
如上一系列的步骤便可完成上传文件的功能,下面便是上传文件示例程序运行截图:
实现了文件上传下面来看看怎么实现文件下载, 以上面上传示例中上传的mp3为例,下面我们来看看怎么从服务器(http://localhost/Web/UpLoad/做你的爱人.mp3)上完成文件(做你的爱人.mp3)的下载。
要实现文件下载对服务器端只要保证被下载文件存在就OK,同上传文件一样需要实例化一个FielReference对象的实例,并为其添加相应的事件处理函数:
1 private var fileDown:FileReference = new FileReference();
1 /**
2 * createChildren 比 creationComplete 事件更早发生
3 * */
4 protected override function createChildren():void
5 {
6 super.createChildren();
7 file.addEventListener(Event.SELECT,onSelected);
8 file.addEventListener(Event.COMPLETE,onCompleted);
9 file.addEventListener(ProgressEvent.PROGRESS,onProgress);
10 //实现文件下载
11 fileDown.addEventListener(Event.COMPLETE,onDownCompleted);
12 fileDown.addEventListener(ProgressEvent.PROGRESS,onDownProgress);
13 }
如上为实现下载文件的实例fileDown注册了成功下载文件后事件处理函数和下载过程处理函数,下面是两个方法的详细定义:
1 internal function onDownCompleted(evt:Event):void
2 {
3 var fileRef:FileReference = evt.currentTarget as FileReference;
4 resultLabel.text = "文件名:" + fileRef.name + "下载完毕!";
5 }
6
7 internal function onDownProgress(evt:ProgressEvent):void
8 {
9 downState.text = "已下载: " + Math.round(100 * evt.bytesLoaded / evt.bytesTotal) + "%";
10 }
完成了对象事件的开发,最后便上惩罚下载请求了,直接调用FileReference类所提供的download()方法既可:
1 /**
2 * 调用FileReference类的实例方法download()实现文件下载
3 * */
4 internal function onDownLoad():void
5 {
6 var request:URLRequest = new URLRequest();
7 request.url="http://localhost:1146/UpLoad/做你的爱人.mp3";
8 fileDown.download(request);
9 }
程序执行到download()方法的时候会自动弹出选择保存文件对话框,根据实际情况选择好保存路径就OK。下面是实现上传和下载的完整代码:
实现上传和下载的完整代码
1 <?xml version="1.0" encoding="utf-8"?>
2 <mx:Application xmlns:mx="http://www.adobe.com/2006/mxml" layout="absolute">
3 <mx:Panel x="49" y="66" width="551" height="164" layout="absolute"
4 title="使用FileReference上传/下载文件" fontSize="12">
5 <mx:HDividedBox x="10" y="10" width="511" height="102">
6 <mx:Canvas id="left" backgroundColor="#D7F4FF" height="100%" width="209">
7 <mx:TextInput x="4" y="20" id="txtFile" text="{stateText}" width="135"/>
8 <mx:Button x="147" y="20" label="选择" fontWeight="normal" click="{file.browse()}"/>
9 <mx:Button x="31" y="68" label="上传文件" width="111" fontWeight="normal" click="onUpLoad()"/>
10 </mx:Canvas>
11 <mx:Canvas id="right" backgroundColor="#D7F4FF" height="100%" width="282">
12 <mx:Label x="6" y="9" text="http://localhost/Web/UpLoad/做你的爱人.mp3"/>
13 <mx:Button x="10" y="37" label="下载文件" fontWeight="normal" click="onDownLoad()"/>
14 <mx:Label x="10" y="74" width="272" id="resultLabel"/>
15 <mx:TextInput x="122" y="37" id="downState"/>
16 </mx:Canvas>
17 </mx:HDividedBox>
18
19 </mx:Panel>
20 <mx:Script>
21 <![CDATA[
22 [Bindable]
23 private var stateText:String = "请选择一个文件上传";
24
25 private var file:FileReference = new FileReference();
26 private var fileDown:FileReference = new FileReference();
27
28 /**
29 * createChildren 比 creationComplete 事件更早发生
30 * */
31 protected override function createChildren():void
32 {
33 super.createChildren();
34 file.addEventListener(Event.SELECT,onSelected);
35 file.addEventListener(Event.COMPLETE,onCompleted);
36 file.addEventListener(ProgressEvent.PROGRESS,onProgress);
37
38 fileDown.addEventListener(Event.COMPLETE,onDownCompleted);
39 fileDown.addEventListener(ProgressEvent.PROGRESS,onDownProgress);
40 }
41
42 // internal function initApp():void
43 // {
44 // file.addEventListener(Event.SELECT,onSelected);
45 // file.addEventListener(Event.COMPLETE,onCompleted);
46 // file.addEventListener(ProgressEvent.PROGRESS,onProgress);
47 // }
48
49 internal function onSelected(evt:Event):void
50 {
51 stateText = "选择了文件:" + file.name;
52 }
53
54 internal function onCompleted(evt:Event):void
55 {
56 stateText = "上传完毕!";
57 }
58
59
60 internal function onDownCompleted(evt:Event):void
61 {
62 var fileRef:FileReference = evt.currentTarget as FileReference;
63 resultLabel.text = "文件名:" + fileRef.name + "下载完毕!";
64 }
65
66 internal function onProgress(evt:ProgressEvent):void
67 {
68 stateText = "已上传: " + Math.round(100 * evt.bytesLoaded / evt.bytesTotal) + "%";
69
70 }
71
72 internal function onDownProgress(evt:ProgressEvent):void
73 {
74 downState.text = "已下载: " + Math.round(100 * evt.bytesLoaded / evt.bytesTotal) + "%";
75 }
76
77 /**
78 * 调用FileReference的实例方法upload()实现文件上传
79 * */
80 internal function onUpLoad():void
81 {
82 if(file.size > 0)
83 {
84 stateText = "正在上传文件:" + file.name;
85 }
86 var request:URLRequest = new URLRequest();
87 request.url=http://localhost/Web/UpLoadHandler.ashx;
88 file.upload(request);
89 }
90
91 /**
92 * 调用FileReference类的实例方法download()实现文件下载
93 * */
94 internal function onDownLoad():void
95 {
96 var request:URLRequest = new URLRequest();
97 request.url="http://localhost/Web/UpLoad/做你的爱人.mp3";
98 fileDown.download(request);
99 }
100 ]]>
101 </mx:Script>
102 </mx:Application>
103
程序运行截图:

相关文章推荐
- Flex与.NET互操作 使用FileReference+HttpHandler实现文件上传/下载
- Flex与.NET互操作(五):使用FileReference+HttpHandler实现文件上传/下载
- Flex与.NET互操作(五):使用FileReference+HttpHandler实现文件上传/下载
- Flex与.NET互操作(五):使用FileReference+HttpHandler实现文件上传/下载
- Flex与.NET互操作(五):使用FileReference+HttpHandler实现文件上传/下载
- 使用FileReference+HttpHandler实现文件上传/下载(Flex与.NET互操作)
- Flex与.NET互操作(五):使用FileReference+HttpHandler实现文件上传/下载
- Flex与.NET互操作(五):使用FileReference+HttpHandler实现文件上传/下载
- Flex与.NET互操作(五):使用FileReference+HttpHandler实现文件上传/下载
- flex使用filereference+httphandler实现文件上传/下载(转)
- flex使用filereference+httphandler实现文件上传/下载
- flex使用filereference+httphandler实现文件上传/下载
- Flex与.NET互操作(五):FileReference+HttpHandler实现上传/下载
- Flex FileReference 上传或下载文件
- Flex与.NET互操作(十五):使用FluorineFx中的字节数组(ByteArray)实现图片上传
- Cordova - fileTransfer插件的使用详解(实现文件上传、下载)
- 利用flex+sevlet+fileupload组件实现文件的上传和下载
- Flex与.NET互操作(十五):使用FluorineFx中的字节数组(ByteArray)实现图片上传
- flex:使用FileReference上传文件
- 使用.net FtpWebRequest 实现FTP常用功能 上传 下载 获取文件列表 移动 切换目录 改名