为SSIS编写自定义任务项(Task)之进阶篇
2009-06-20 17:17
489 查看
上一篇,我们演示了如何编写一个简单的Task,并将其部署到SSIS中去使用。
.csharpcode, .csharpcode pre
{
font-size: small;
color: black;
font-family: consolas, "Courier New", courier, monospace;
background-color: #ffffff;
/*white-space: pre;*/
}
.csharpcode pre { margin: 0em; }
.csharpcode .rem { color: #008000; }
.csharpcode .kwrd { color: #0000ff; }
.csharpcode .str { color: #006080; }
.csharpcode .op { color: #0000c0; }
.csharpcode .preproc { color: #cc6633; }
.csharpcode .asp { background-color: #ffff00; }
.csharpcode .html { color: #800000; }
.csharpcode .attr { color: #ff0000; }
.csharpcode .alt
{
background-color: #f4f4f4;
width: 100%;
margin: 0em;
}
.csharpcode .lnum { color: #606060; }
上面的代码很简单,这个任务在执行的时候仅仅显示一个对话框。这显然是不够的,我们在这一篇讲解一下,如何为任务添加自定义编辑视图,并且根据用户的设置执行任务。
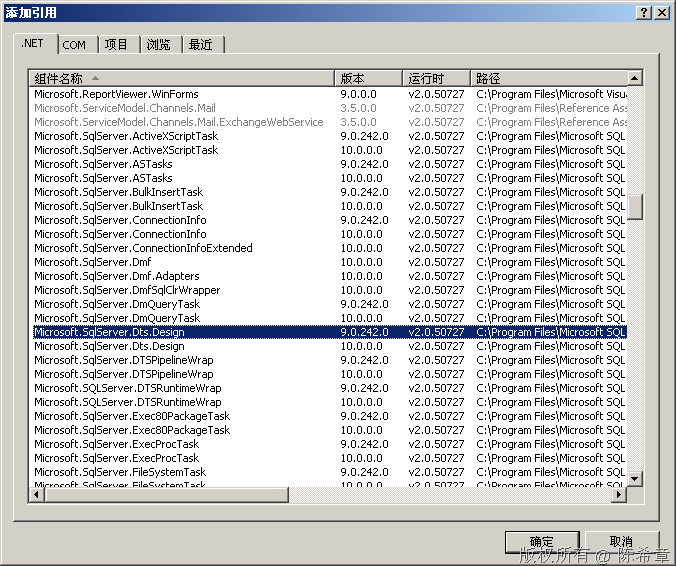
1. 添加一个引用

2. 添加一个类型
.csharpcode, .csharpcode pre
{
font-size: small;
color: black;
font-family: consolas, "Courier New", courier, monospace;
background-color: #ffffff;
/*white-space: pre;*/
}
.csharpcode pre { margin: 0em; }
.csharpcode .rem { color: #008000; }
.csharpcode .kwrd { color: #0000ff; }
.csharpcode .str { color: #006080; }
.csharpcode .op { color: #0000c0; }
.csharpcode .preproc { color: #cc6633; }
.csharpcode .asp { background-color: #ffff00; }
.csharpcode .html { color: #800000; }
.csharpcode .attr { color: #ff0000; }
.csharpcode .alt
{
background-color: #f4f4f4;
width: 100%;
margin: 0em;
}
.csharpcode .lnum { color: #606060; }
3. 添加一个窗体

.csharpcode, .csharpcode pre
{
font-size: small;
color: black;
font-family: consolas, "Courier New", courier, monospace;
background-color: #ffffff;
/*white-space: pre;*/
}
.csharpcode pre { margin: 0em; }
.csharpcode .rem { color: #008000; }
.csharpcode .kwrd { color: #0000ff; }
.csharpcode .str { color: #006080; }
.csharpcode .op { color: #0000c0; }
.csharpcode .preproc { color: #cc6633; }
.csharpcode .asp { background-color: #ffff00; }
.csharpcode .html { color: #800000; }
.csharpcode .attr { color: #ff0000; }
.csharpcode .alt
{
background-color: #f4f4f4;
width: 100%;
margin: 0em;
}
.csharpcode .lnum { color: #606060; }
4. 实现MyTaskUI
.csharpcode, .csharpcode pre
{
font-size: small;
color: black;
font-family: consolas, "Courier New", courier, monospace;
background-color: #ffffff;
/*white-space: pre;*/
}
.csharpcode pre { margin: 0em; }
.csharpcode .rem { color: #008000; }
.csharpcode .kwrd { color: #0000ff; }
.csharpcode .str { color: #006080; }
.csharpcode .op { color: #0000c0; }
.csharpcode .preproc { color: #cc6633; }
.csharpcode .asp { background-color: #ffff00; }
.csharpcode .html { color: #800000; }
.csharpcode .attr { color: #ff0000; }
.csharpcode .alt
{
background-color: #f4f4f4;
width: 100%;
margin: 0em;
}
.csharpcode .lnum { color: #606060; }
5. 将该UI与我们的任务进行关联。
.csharpcode, .csharpcode pre
{
font-size: small;
color: black;
font-family: consolas, "Courier New", courier, monospace;
background-color: #ffffff;
/*white-space: pre;*/
}
.csharpcode pre { margin: 0em; }
.csharpcode .rem { color: #008000; }
.csharpcode .kwrd { color: #0000ff; }
.csharpcode .str { color: #006080; }
.csharpcode .op { color: #0000c0; }
.csharpcode .preproc { color: #cc6633; }
.csharpcode .asp { background-color: #ffff00; }
.csharpcode .html { color: #800000; }
.csharpcode .attr { color: #ff0000; }
.csharpcode .alt
{
background-color: #f4f4f4;
width: 100%;
margin: 0em;
}
.csharpcode .lnum { color: #606060; }
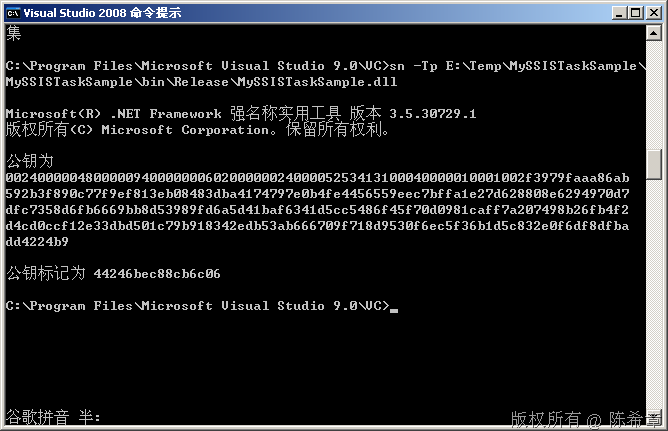
这里的关键,在于要完整地描述出来UI的名称。里面有一个PublicKeyToken,可以通过下面这样的方式取得

6. 重新生成,部署
为了方便部署,我们可以编写如下的生成后事件

7. 测试该任务

现在,我们去点击“超级XML任务”,右键中选择“编辑”

我们欣喜地看到,虽然我们的窗体没有任何内容,但无论如何,它已经显示出来了
我们下一篇还要探讨到底如何设计这个编辑界面
本文由作者:陈希章 于 2009/6/20 17:16:40
发布在:http://www.cnblogs.com/chenxizhang/
本文版权归作者所有,可以转载,但未经作者同意必须保留此段声明,且在文章页面明显位置给出原文连接,否则保留追究法律责任的权利。
更多博客文章,以及作者对于博客引用方面的完整声明以及合作方面的政策,请参考以下站点:陈希章的博客中心
本文是使用博客同步和管理系统自动于2009/6/20 17:16:45 从 陈希章@博客园 同步过来的。原文地址: http://www.cnblogs.com/chenxizhang/archive/2009/06/20/1507423.html ,发表于2009/6/20 9:17:00.
using System;
using System.Collections.Generic;
using System.Text;
using Microsoft.SqlServer.Dts.Runtime;
using System.Windows.Forms;
namespace MySSISTaskSample
{
[DtsTask(
Description="这是我的一个自定义XML任务,"+
"它与标准的XML任务的区别就在于可以自动处理命名空间问题",
DisplayName="超强XML任务",
TaskContact="陈希章:http://www.xizhang.com"
)]
public class MyXMLTask:Task
{

///
/// 这个方法真正执行操作
///
///
///
///
///
///
///
public override DTSExecResult Execute(Connections connections,
VariableDispenser variableDispenser,
IDTSComponentEvents componentEvents,
IDTSLogging log, object transaction)
{

MessageBox.Show("我在工作了");
return base.Execute(connections, variableDispenser, componentEvents, log, transaction);
}
}
}
.csharpcode, .csharpcode pre
{
font-size: small;
color: black;
font-family: consolas, "Courier New", courier, monospace;
background-color: #ffffff;
/*white-space: pre;*/
}
.csharpcode pre { margin: 0em; }
.csharpcode .rem { color: #008000; }
.csharpcode .kwrd { color: #0000ff; }
.csharpcode .str { color: #006080; }
.csharpcode .op { color: #0000c0; }
.csharpcode .preproc { color: #cc6633; }
.csharpcode .asp { background-color: #ffff00; }
.csharpcode .html { color: #800000; }
.csharpcode .attr { color: #ff0000; }
.csharpcode .alt
{
background-color: #f4f4f4;
width: 100%;
margin: 0em;
}
.csharpcode .lnum { color: #606060; }
上面的代码很简单,这个任务在执行的时候仅仅显示一个对话框。这显然是不够的,我们在这一篇讲解一下,如何为任务添加自定义编辑视图,并且根据用户的设置执行任务。
1. 添加一个引用
2. 添加一个类型
using Microsoft.SqlServer.Dts.Runtime.Design;
.csharpcode, .csharpcode pre
{
font-size: small;
color: black;
font-family: consolas, "Courier New", courier, monospace;
background-color: #ffffff;
/*white-space: pre;*/
}
.csharpcode pre { margin: 0em; }
.csharpcode .rem { color: #008000; }
.csharpcode .kwrd { color: #0000ff; }
.csharpcode .str { color: #006080; }
.csharpcode .op { color: #0000c0; }
.csharpcode .preproc { color: #cc6633; }
.csharpcode .asp { background-color: #ffff00; }
.csharpcode .html { color: #800000; }
.csharpcode .attr { color: #ff0000; }
.csharpcode .alt
{
background-color: #f4f4f4;
width: 100%;
margin: 0em;
}
.csharpcode .lnum { color: #606060; }
public class MyTaskUI : IDtsTaskUI
{

#region IDtsTaskUI 成员

public void Delete(IWin32Window parentWindow)
{
throw new NotImplementedException();
}

public ContainerControl GetView()
{
throw new NotImplementedException();
}

public void Initialize(TaskHost taskHost, IServiceProvider serviceProvider)
{
throw new NotImplementedException();
}

public void New(IWin32Window parentWindow)
{
throw new NotImplementedException();
}

#endregion
}
.csharpcode, .csharpcode pre
{
font-size: small;
color: black;
font-family: consolas, "Courier New", courier, monospace;
background-color: #ffffff;
/*white-space: pre;*/
}
.csharpcode pre { margin: 0em; }
.csharpcode .rem { color: #008000; }
.csharpcode .kwrd { color: #0000ff; }
.csharpcode .str { color: #006080; }
.csharpcode .op { color: #0000c0; }
.csharpcode .preproc { color: #cc6633; }
.csharpcode .asp { background-color: #ffff00; }
.csharpcode .html { color: #800000; }
.csharpcode .attr { color: #ff0000; }
.csharpcode .alt
{
background-color: #f4f4f4;
width: 100%;
margin: 0em;
}
.csharpcode .lnum { color: #606060; }
3. 添加一个窗体
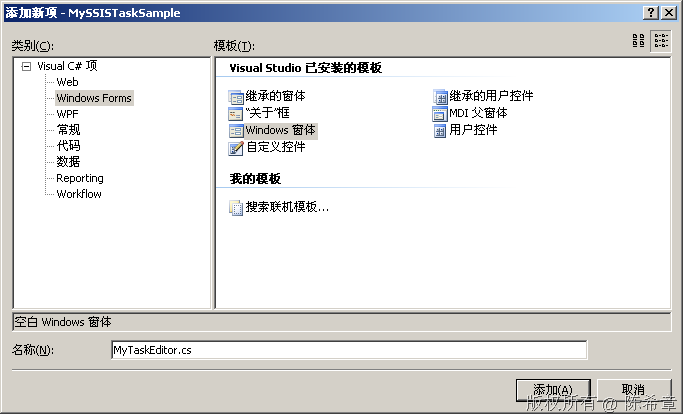
为该窗体添加一个特殊的构造器。以便该窗体与宿主环境可以关联。主要是属性的读写。
using System;
using System.Collections.Generic;
using System.ComponentModel;
using System.Data;
using System.Drawing;
using System.Text;
using System.Windows.Forms;

using Microsoft.SqlServer.Dts.Runtime;

namespace MySSISTaskSample
{
public partial class MyTaskEditor : Form
{
public MyTaskEditor()
{
InitializeComponent();
}

        private TaskHost taskHost = null;
public MyTaskEditor(TaskHost host):this()
{
taskHost = host;//这里接受传递过来的宿主
}

}
}
.csharpcode, .csharpcode pre
{
font-size: small;
color: black;
font-family: consolas, "Courier New", courier, monospace;
background-color: #ffffff;
/*white-space: pre;*/
}
.csharpcode pre { margin: 0em; }
.csharpcode .rem { color: #008000; }
.csharpcode .kwrd { color: #0000ff; }
.csharpcode .str { color: #006080; }
.csharpcode .op { color: #0000c0; }
.csharpcode .preproc { color: #cc6633; }
.csharpcode .asp { background-color: #ffff00; }
.csharpcode .html { color: #800000; }
.csharpcode .attr { color: #ff0000; }
.csharpcode .alt
{
background-color: #f4f4f4;
width: 100%;
margin: 0em;
}
.csharpcode .lnum { color: #606060; }
4. 实现MyTaskUI
public class MyTaskUI : IDtsTaskUI
{

private TaskHost host = null;

#region IDtsTaskUI 成员

public void Delete(IWin32Window parentWindow)
{

}

public ContainerControl GetView()
{
            return new MyTaskEditor(host);
}

public void Initialize(TaskHost taskHost, IServiceProvider serviceProvider)
{
host = taskHost;
}

public void New(IWin32Window parentWindow)
{

}

#endregion
}
.csharpcode, .csharpcode pre
{
font-size: small;
color: black;
font-family: consolas, "Courier New", courier, monospace;
background-color: #ffffff;
/*white-space: pre;*/
}
.csharpcode pre { margin: 0em; }
.csharpcode .rem { color: #008000; }
.csharpcode .kwrd { color: #0000ff; }
.csharpcode .str { color: #006080; }
.csharpcode .op { color: #0000c0; }
.csharpcode .preproc { color: #cc6633; }
.csharpcode .asp { background-color: #ffff00; }
.csharpcode .html { color: #800000; }
.csharpcode .attr { color: #ff0000; }
.csharpcode .alt
{
background-color: #f4f4f4;
width: 100%;
margin: 0em;
}
.csharpcode .lnum { color: #606060; }
5. 将该UI与我们的任务进行关联。
[DtsTask(
Description="这是我的一个自定义XML任务,"+
"它与标准的XML任务的区别就在于可以自动处理命名空间问题",
DisplayName="超强XML任务",
TaskContact="陈希章:http://www.xizhang.com",
UITypeName = "MySSISTaskSample.MyTaskUI,MySSISTaskSample,"+
"Version=1.0.0.0,Culture=Neutral,PublicKeyToken=44246bec88cb6c06"
)]
public class MyXMLTask:Task
{

///
/// 这个方法真正执行操作
///
///
///
///
///
///
///
public override DTSExecResult Execute(Connections connections,
VariableDispenser variableDispenser,
IDTSComponentEvents componentEvents,
IDTSLogging log, object transaction)
{

MessageBox.Show("我在工作了");
return base.Execute(connections, variableDispenser, componentEvents, log, transaction);
}
}
.csharpcode, .csharpcode pre
{
font-size: small;
color: black;
font-family: consolas, "Courier New", courier, monospace;
background-color: #ffffff;
/*white-space: pre;*/
}
.csharpcode pre { margin: 0em; }
.csharpcode .rem { color: #008000; }
.csharpcode .kwrd { color: #0000ff; }
.csharpcode .str { color: #006080; }
.csharpcode .op { color: #0000c0; }
.csharpcode .preproc { color: #cc6633; }
.csharpcode .asp { background-color: #ffff00; }
.csharpcode .html { color: #800000; }
.csharpcode .attr { color: #ff0000; }
.csharpcode .alt
{
background-color: #f4f4f4;
width: 100%;
margin: 0em;
}
.csharpcode .lnum { color: #606060; }
这里的关键,在于要完整地描述出来UI的名称。里面有一个PublicKeyToken,可以通过下面这样的方式取得
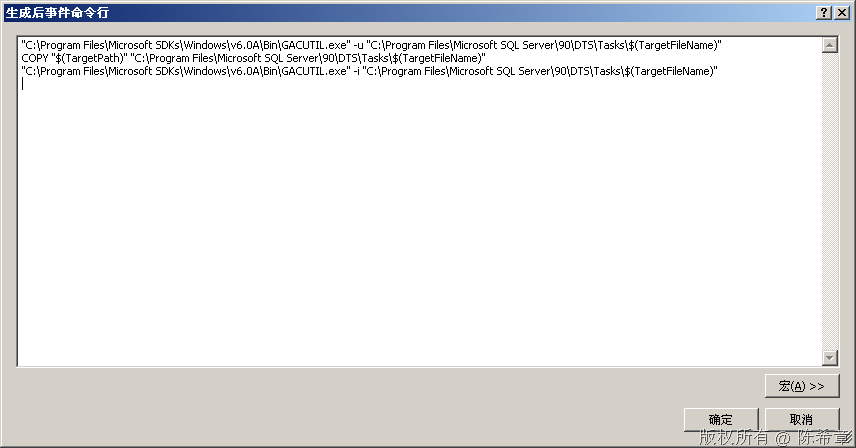
6. 重新生成,部署
为了方便部署,我们可以编写如下的生成后事件
7. 测试该任务
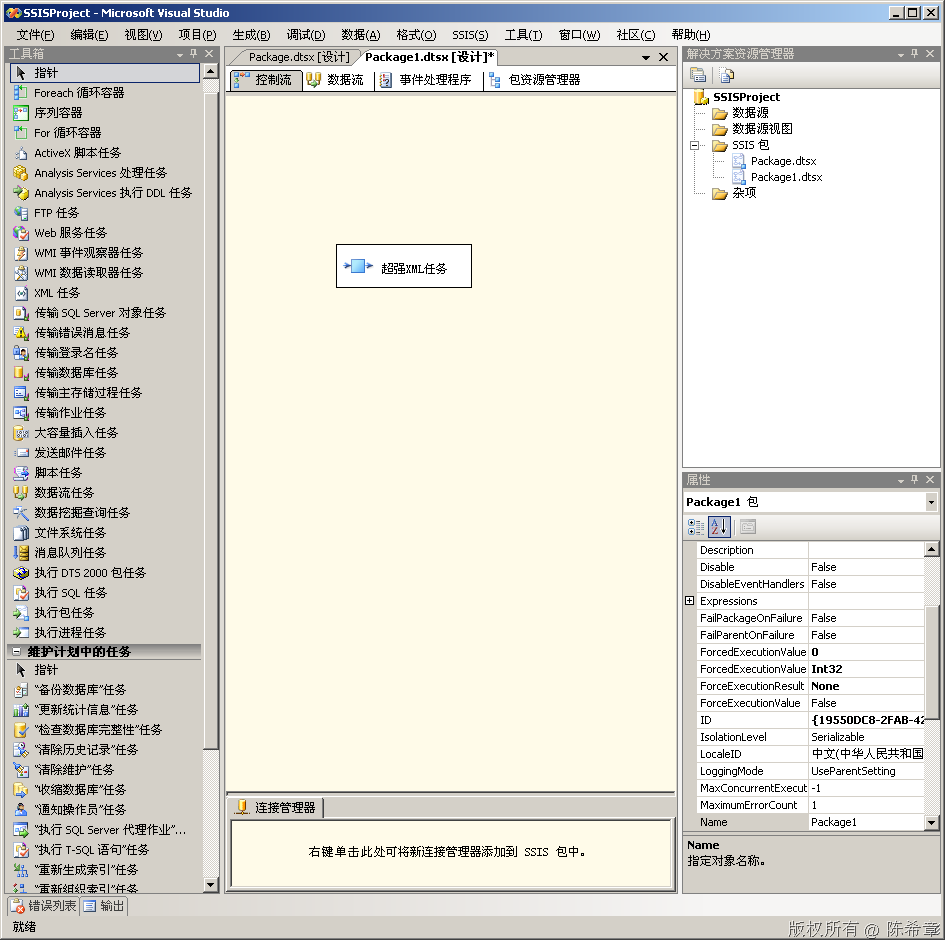
现在,我们去点击“超级XML任务”,右键中选择“编辑”
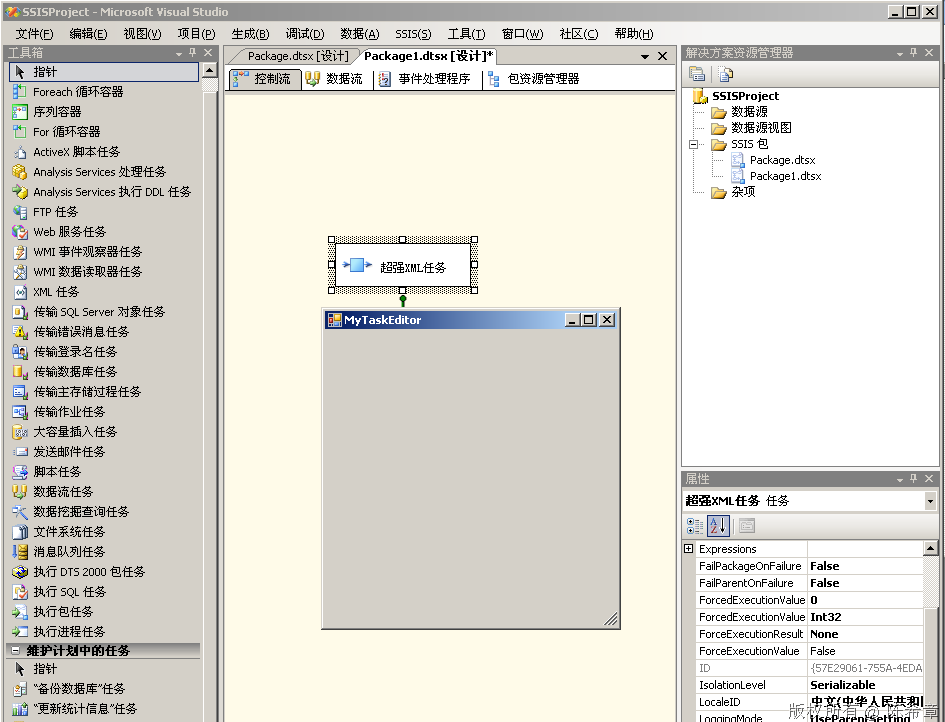
我们欣喜地看到,虽然我们的窗体没有任何内容,但无论如何,它已经显示出来了
我们下一篇还要探讨到底如何设计这个编辑界面
本文由作者:陈希章 于 2009/6/20 17:16:40
发布在:http://www.cnblogs.com/chenxizhang/
本文版权归作者所有,可以转载,但未经作者同意必须保留此段声明,且在文章页面明显位置给出原文连接,否则保留追究法律责任的权利。
更多博客文章,以及作者对于博客引用方面的完整声明以及合作方面的政策,请参考以下站点:陈希章的博客中心
本文是使用博客同步和管理系统自动于2009/6/20 17:16:45 从 陈希章@博客园 同步过来的。原文地址: http://www.cnblogs.com/chenxizhang/archive/2009/06/20/1507423.html ,发表于2009/6/20 9:17:00.

相关文章推荐
- 为SSIS编写自定义任务项(Task)之进阶篇
- 为SSIS编写自定义任务项(Task)之入门篇
- 为SSIS编写自定义任务项(Task)之入门篇
- 为SSIS编写自定义任务项(Task)之高级篇
- 为SSIS编写自定义任务项(Task)之高级篇
- 为SSIS编写自定义数据流组件(DataFlow Component)之进阶篇:数据源组件
- 为SSIS编写自定义数据流组件之进阶篇:自定义属性的下拉式编辑器
- 为SSIS编写自定义数据流组件之进阶篇:自定义属性的下拉式编辑器
- 为SSIS编写自定义数据流组件(DataFlow Component)之进阶篇:数据源组件
- 【IDL】编写自定义Task需要注意的问题
- 为SSIS编写自定义数据流组件(DataFlow Component)之进阶篇:自定义编辑器
- 为SSIS编写自定义数据流组件(DataFlow Component)之进阶篇:自定义编辑器
- 为SSIS编写自定义数据流组件(DataFlow Component)之入门篇
- 为SSIS编写自定义数据流组件(DataFlow Component)之入门篇
- django 1.8 官方文档翻译: 3-3-5 编写自定义存储系统
- [翻译]Writing Custom Report Components 编写自定义报表组件
- hadoop-1.0.0的hadoop-streaming-1.0.0.jar还是按照以前的api编写/如何将自定义InputFormat加入Streaming
- 用POP动画编写带富文本的自定义动画效果
- C# webservices 之自定义编写发布【2】
- 微软BI 之SSIS 系列 - 使用 SQL Profilling Task (数据探测) 检测数据源数据