使用silverlight中的Storyboard实现动画效果
2008-07-14 10:12
651 查看
在silverlight中,可以使用StoryBoard(故事板)不实现类似于动画的效果,本文就是借助该
对象来实现一个相册显示的例子,其运行效果如下图所示(鼠标放在中间图片上,然后离开):
在正文开始之后,先介绍一下Storyboard, 其定义如下:
Controls animations with a timeline, and provides object and property targeting
information for its child animations.
因为它用时间线(timeline)来控制,并提供了要绑定的对象和目标属性信息。其在XAML中的
格式如下:
<Storyboard

>
oneOrMoreChildTimelines
</Storyboard>
其中的oneOrMoreChildTimelines可以是如下任一或多个对象元素:
Storyboard, ColorAnimation, ColorAnimationUsingKeyFrames, DoubleAnimation,
DoubleAnimationUsingKeyFrames, PointAnimation, PointAnimationUsingKeyFrames
下面就其中几个主要的元素作如下演示说明,首先请看“DoubleAnimation”:
DoubleAnimation:当动画值的变化(FROM ...TO...)类型是 Double型时使用。
下面演示的就是矩形(MyAnimatedRectangle)的“Opacity”(透明度)属性在一秒内从1到0
的动画(参数说明见注释)。
<StackPanel>
<StackPanel.Resources>
<!--将Storyboard 放入Resources中是为了更方便的在代码中引用 Storyboard 以及进行互操作,如
start, stop, pause,和恢复Storyboard. -->
<Storyboard x:Name="myStoryboard">
<DoubleAnimation
Storyboard.TargetName="MyAnimatedRectangle"
Storyboard.TargetProperty="Opacity"
From="1.0"
To="0.0"
Duration="0:0:1"
AutoReverse="True"
RepeatBehavior="Forever" />
</Storyboard>
</StackPanel.Resources>
<!--参数说明:
Storyboard.TargetName:附加属性操作到指定的对象上;
Storyboard.TargetProperty:要操作指定对象的属性;
From..To :上述属性值的起始范围;
Duration: 在多少时间内完成上述属性值的变化;
AutoReverse:是否在vanishes 之后 fade back 到初始状态;
RepeatBehavior:指示当前animation 不断反复
-->
<Rectangle MouseLeftButtonDown="Mouse_Clicked"
x:Name="MyAnimatedRectangle"
Width="100" Height="100" Fill="Blue" />
</StackPanel>
ColorAnimation:当动画值的变化(FROM ...TO...)类型是 Color型时使用。
下面演示的是myStackPanel背景色在4秒内从红到绿的动画。
<StackPanel x:Name="myStackPanel" Background="Red" Grid.Row="0"
Loaded="Start_Animation">
<TextBlock Foreground="White">使用层级方式绑定TargetProperty:</TextBlock>
<StackPanel.Resources>
<Storyboard x:Name="colorStoryboard">
<ColorAnimation BeginTime="00:00:00" Storyboard.TargetName="myStackPanel"
Storyboard.TargetProperty="(Panel.Background).(SolidColorBrush.Color)"
From="Red" To="Green" Duration="0:0:4" />
</Storyboard>
</StackPanel.Resources>
</StackPanel>
下面XAML代码与上面所示的实现效果相同:
<StackPanel Loaded="Start_Animation">
<TextBlock Foreground="White">普通方式绑定TargetProperty:</TextBlock>
<StackPanel.Resources>
<Storyboard x:Name="colorStoryboard2">
<ColorAnimation BeginTime="00:00:00" Storyboard.TargetName="mySolidColorBrush"
Storyboard.TargetProperty="Color" From="AliceBlue" To="Green" Duration="0:0:4" FillBehavior="Stop"/>
</Storyboard>
</StackPanel.Resources>
<StackPanel.Background>
<SolidColorBrush x:Name="mySolidColorBrush" Color="AliceBlue" />
</StackPanel.Background>
</StackPanel>
接下来是PointAnimation: 当动画值的变化(FROM ...TO...)类型是 Point型时使用。
下面的XAML演示的是EllipseGeometry对象从point(20,200)移动到point(400,100)的动画。
<PointAnimation Storyboard.TargetProperty="Center"
Storyboard.TargetName="MyAnimatedEllipseGeometry"
Duration="0:0:5"
From="20,200"
To="400,100"
RepeatBehavior="Forever" />
</Storyboard>
</Canvas.Resources>
<Path Fill="Blue">
<Path.Data>
<!-- Describes an ellipse. -->
<EllipseGeometry x:Name="MyAnimatedEllipseGeometry"
Center="20,20" RadiusX="15" RadiusY="15" />
</Path.Data>
</Path>
好了,有了上面的介绍之后,我们下面着手开发这个DEMO。
首先我们建立一个silverlight application,并将其命名为:Animation_Sample。
然后我们要去找几张相册用的图片,将其放在项目中的resource文件夹下,并将其设置为资源,
如下图所示:
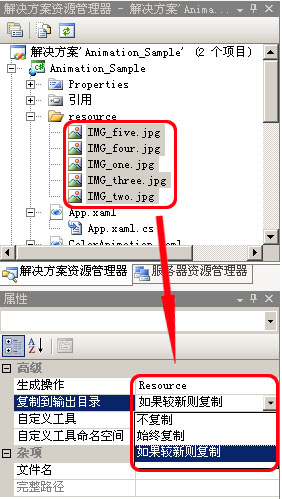
然后在xaml中加入如下代码段作为Image元素对相应图片的引用:
<Grid x:Name="LayoutRoot" Background="White" MouseEnter="LayoutRoot_MouseEnter"
MouseLeave="LayoutRoot_MouseLeave">
<Image x:Name="image_one" Source="resource/img_one.jpg" Height="40" Width="400" Canvas.Left="30"
Canvas.Top="30" Margin="12,0,0,0"></Image>
<Image x:Name="image_two" Source="resource/img_two.jpg" Height="40" Width="400" Canvas.Left="30"
Canvas.Top="30" Margin="12,0,0,0"></Image>
<Image x:Name="img_three" Source="resource/img_three.jpg" Height="40" Width="400" Canvas.Left="30"
Canvas.Top="30" Margin="12,0,0,0"></Image>
<Image x:Name="img_four" Source="resource/img_four.jpg" Height="40" Width="400" Canvas.Left="30"
Canvas.Top="30" Margin="12,0,0,0"></Image>
<Image x:Name="img_five" Source="resource/img_five.jpg" Height="40" Width="400" Canvas.Left="30"
Canvas.Top="30" Margin="12,0,0,0"></Image>
</Grid>
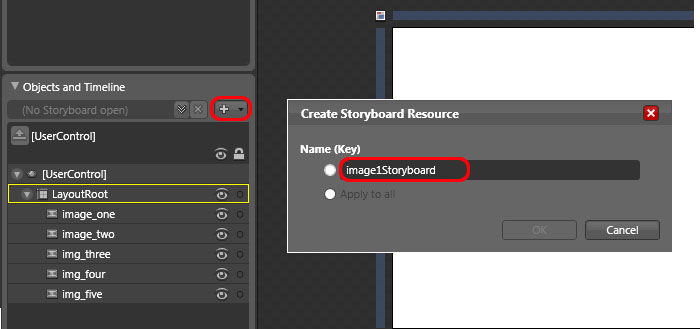
然后在该xaml文件上击鼠标右键,选择"在 Expression Blend 中打开"菜单项,然后在打开的Blend 窗口中
按下图中所指示的方式来创建一个Storyboard,名为:image1Storyboard .
接着拖动当前帧到2秒处,执行“record keyframe”操作:
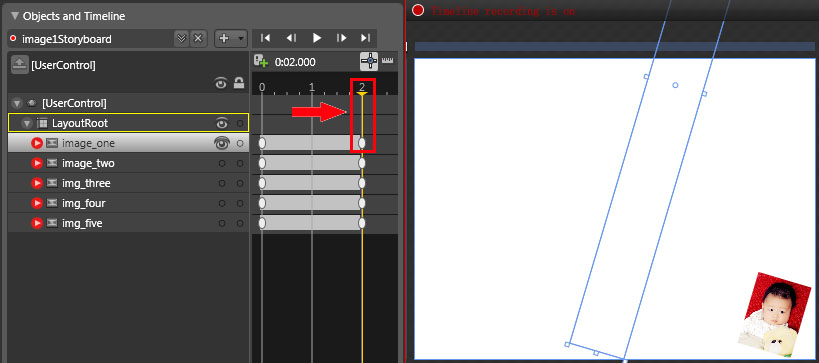
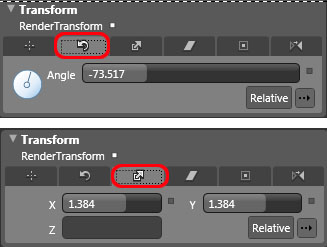
然后对左侧的图片进行"rotate transfer"和"scale transfer"操作,如下图:
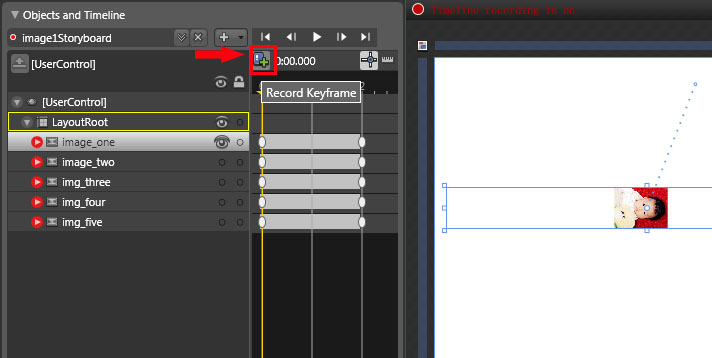
而其最终的值如下图所示:
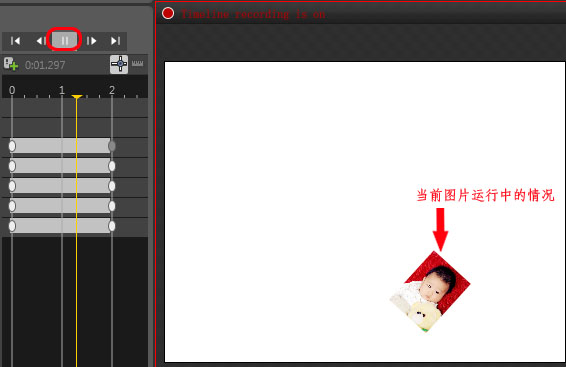
这里我们可以通过下图所示演示一下当前图片从0秒到2秒的运行情况:
同理对其它图片进行相类似的操作后,就可以将当前文件进行保存,并单击F5进行试运行了。接着,我们还要
再切换回VS完成动画播放的工作。在本DEMO中,因为使用了鼠标移入移出方式来实现动画的播放任务。所以我们
要在相应的xaml.cs文件中加入storyboard的"Begin()"方法绑定如下:
private void LayoutRoot_MouseEnter(object sender, MouseEventArgs e)
{
image1Storyboard.Begin();
}
这样就可以运行该DEMO了。
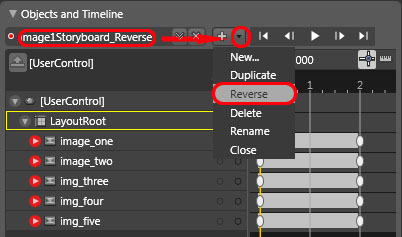
到这里,我们只是实现了将图片从初始位置移动到指定位置。而没有实现reverse操作,即图片从分散展示状态
再回到实始状态。但实现这个功能也非常简单,主要是用了一个小技巧:
1.首先我们要对当前的storyboard执行复制操作,如下图:

2. 然后在新生成的storyboard中修改其名称,并对其进行reverse操作,如下图:
这样我们就得到了一个对展开的“逆操作”的storyboard.然后我们在xaml.cs中调用这个storyboard的
Begin()方法即可,如下:

private void LayoutRoot_MouseLeave(object sender, MouseEventArgs e)


{

image1Storyboard_Reverse.Begin();

}
通过Blend工具,我们非常轻松的实现了展示效果,这远比在XAML中手写代码要来得“简单正确”。
好了,今天的内容就到这里了。
源码下载链接,请点击这里:)
Tag标签: js,daizhj,代震军,silverlight,animation
对象来实现一个相册显示的例子,其运行效果如下图所示(鼠标放在中间图片上,然后离开):
在正文开始之后,先介绍一下Storyboard, 其定义如下:
Controls animations with a timeline, and provides object and property targeting
information for its child animations.
因为它用时间线(timeline)来控制,并提供了要绑定的对象和目标属性信息。其在XAML中的
格式如下:
<Storyboard
>
oneOrMoreChildTimelines
</Storyboard>
其中的oneOrMoreChildTimelines可以是如下任一或多个对象元素:
Storyboard, ColorAnimation, ColorAnimationUsingKeyFrames, DoubleAnimation,
DoubleAnimationUsingKeyFrames, PointAnimation, PointAnimationUsingKeyFrames
下面就其中几个主要的元素作如下演示说明,首先请看“DoubleAnimation”:
DoubleAnimation:当动画值的变化(FROM ...TO...)类型是 Double型时使用。
下面演示的就是矩形(MyAnimatedRectangle)的“Opacity”(透明度)属性在一秒内从1到0
的动画(参数说明见注释)。
<StackPanel>
<StackPanel.Resources>
<!--将Storyboard 放入Resources中是为了更方便的在代码中引用 Storyboard 以及进行互操作,如
start, stop, pause,和恢复Storyboard. -->
<Storyboard x:Name="myStoryboard">
<DoubleAnimation
Storyboard.TargetName="MyAnimatedRectangle"
Storyboard.TargetProperty="Opacity"
From="1.0"
To="0.0"
Duration="0:0:1"
AutoReverse="True"
RepeatBehavior="Forever" />
</Storyboard>
</StackPanel.Resources>
<!--参数说明:
Storyboard.TargetName:附加属性操作到指定的对象上;
Storyboard.TargetProperty:要操作指定对象的属性;
From..To :上述属性值的起始范围;
Duration: 在多少时间内完成上述属性值的变化;
AutoReverse:是否在vanishes 之后 fade back 到初始状态;
RepeatBehavior:指示当前animation 不断反复
-->
<Rectangle MouseLeftButtonDown="Mouse_Clicked"
x:Name="MyAnimatedRectangle"
Width="100" Height="100" Fill="Blue" />
</StackPanel>
ColorAnimation:当动画值的变化(FROM ...TO...)类型是 Color型时使用。
下面演示的是myStackPanel背景色在4秒内从红到绿的动画。
<StackPanel x:Name="myStackPanel" Background="Red" Grid.Row="0"
Loaded="Start_Animation">
<TextBlock Foreground="White">使用层级方式绑定TargetProperty:</TextBlock>
<StackPanel.Resources>
<Storyboard x:Name="colorStoryboard">
<ColorAnimation BeginTime="00:00:00" Storyboard.TargetName="myStackPanel"
Storyboard.TargetProperty="(Panel.Background).(SolidColorBrush.Color)"
From="Red" To="Green" Duration="0:0:4" />
</Storyboard>
</StackPanel.Resources>
</StackPanel>
下面XAML代码与上面所示的实现效果相同:
<StackPanel Loaded="Start_Animation">
<TextBlock Foreground="White">普通方式绑定TargetProperty:</TextBlock>
<StackPanel.Resources>
<Storyboard x:Name="colorStoryboard2">
<ColorAnimation BeginTime="00:00:00" Storyboard.TargetName="mySolidColorBrush"
Storyboard.TargetProperty="Color" From="AliceBlue" To="Green" Duration="0:0:4" FillBehavior="Stop"/>
</Storyboard>
</StackPanel.Resources>
<StackPanel.Background>
<SolidColorBrush x:Name="mySolidColorBrush" Color="AliceBlue" />
</StackPanel.Background>
</StackPanel>
接下来是PointAnimation: 当动画值的变化(FROM ...TO...)类型是 Point型时使用。
下面的XAML演示的是EllipseGeometry对象从point(20,200)移动到point(400,100)的动画。
<PointAnimation Storyboard.TargetProperty="Center"
Storyboard.TargetName="MyAnimatedEllipseGeometry"
Duration="0:0:5"
From="20,200"
To="400,100"
RepeatBehavior="Forever" />
</Storyboard>
</Canvas.Resources>
<Path Fill="Blue">
<Path.Data>
<!-- Describes an ellipse. -->
<EllipseGeometry x:Name="MyAnimatedEllipseGeometry"
Center="20,20" RadiusX="15" RadiusY="15" />
</Path.Data>
</Path>
好了,有了上面的介绍之后,我们下面着手开发这个DEMO。
首先我们建立一个silverlight application,并将其命名为:Animation_Sample。
然后我们要去找几张相册用的图片,将其放在项目中的resource文件夹下,并将其设置为资源,
如下图所示:
然后在xaml中加入如下代码段作为Image元素对相应图片的引用:
<Grid x:Name="LayoutRoot" Background="White" MouseEnter="LayoutRoot_MouseEnter"
MouseLeave="LayoutRoot_MouseLeave">
<Image x:Name="image_one" Source="resource/img_one.jpg" Height="40" Width="400" Canvas.Left="30"
Canvas.Top="30" Margin="12,0,0,0"></Image>
<Image x:Name="image_two" Source="resource/img_two.jpg" Height="40" Width="400" Canvas.Left="30"
Canvas.Top="30" Margin="12,0,0,0"></Image>
<Image x:Name="img_three" Source="resource/img_three.jpg" Height="40" Width="400" Canvas.Left="30"
Canvas.Top="30" Margin="12,0,0,0"></Image>
<Image x:Name="img_four" Source="resource/img_four.jpg" Height="40" Width="400" Canvas.Left="30"
Canvas.Top="30" Margin="12,0,0,0"></Image>
<Image x:Name="img_five" Source="resource/img_five.jpg" Height="40" Width="400" Canvas.Left="30"
Canvas.Top="30" Margin="12,0,0,0"></Image>
</Grid>
然后在该xaml文件上击鼠标右键,选择"在 Expression Blend 中打开"菜单项,然后在打开的Blend 窗口中
按下图中所指示的方式来创建一个Storyboard,名为:image1Storyboard .
接着拖动当前帧到2秒处,执行“record keyframe”操作:
然后对左侧的图片进行"rotate transfer"和"scale transfer"操作,如下图:
而其最终的值如下图所示:
这里我们可以通过下图所示演示一下当前图片从0秒到2秒的运行情况:
同理对其它图片进行相类似的操作后,就可以将当前文件进行保存,并单击F5进行试运行了。接着,我们还要
再切换回VS完成动画播放的工作。在本DEMO中,因为使用了鼠标移入移出方式来实现动画的播放任务。所以我们
要在相应的xaml.cs文件中加入storyboard的"Begin()"方法绑定如下:
private void LayoutRoot_MouseEnter(object sender, MouseEventArgs e)
{
image1Storyboard.Begin();
}
这样就可以运行该DEMO了。
到这里,我们只是实现了将图片从初始位置移动到指定位置。而没有实现reverse操作,即图片从分散展示状态
再回到实始状态。但实现这个功能也非常简单,主要是用了一个小技巧:
1.首先我们要对当前的storyboard执行复制操作,如下图:
2. 然后在新生成的storyboard中修改其名称,并对其进行reverse操作,如下图:
这样我们就得到了一个对展开的“逆操作”的storyboard.然后我们在xaml.cs中调用这个storyboard的
Begin()方法即可,如下:
private void LayoutRoot_MouseLeave(object sender, MouseEventArgs e)
{
image1Storyboard_Reverse.Begin();
}
通过Blend工具,我们非常轻松的实现了展示效果,这远比在XAML中手写代码要来得“简单正确”。
好了,今天的内容就到这里了。
源码下载链接,请点击这里:)
Tag标签: js,daizhj,代震军,silverlight,animation

相关文章推荐
- 使用silverlight中的Storyboard实现动画效果
- 使用silverlight中的Storyboard实现动画效果
- 使用silverlight中的Storyboard实现动画效果
- 使用Silverlight实现 FLASH的动画效果
- silverlight中 Storyboard(动画)的使用,实现球的上下循环移动,左右移动,及旋转功能
- 使用storyboard实现粒子效果
- Android中使用Animation实现控件的动画效果以及Interpolator和AnimationListener的使用
- 使用JavaScript和Canvas实现下雪动画效果
- 如何使用CSS3的transition实现动画效果?
- 使用CALayer的Mask实现注水动画效果
- 安卓开发20:动画之Animation 详细使用-主要通过java代码实现动画效果
- Silverlight学习笔记(十)-----故事板storyboard实现动画效果
- 使用Design包实现QQ动画侧滑效果和滑动菜单导航
- Android程序开发之使用Design包实现QQ动画侧滑效果和滑动菜单导航
- 使用ToggleButton和StackPanel+Border实现圆角开关按钮动画效果
- 使用 CSS3 实现超炫的 Loading(加载)动画效果
- window.requestAnimationFrame与Tween.js配合使用实现动画缓动效果
- 一步一步学Silverlight 2系列(29):使用Transform实现更炫的效果(上)
- 使用CSS3实现超炫的Loading(加载)动画效果
- Silverlight、WPF 平台实现 旋转、缩放等动画效果