WCF后续之旅(2): 如何对Channel Layer进行扩展——创建自定义Channel
2008-07-09 09:14
821 查看
在上一篇文章中,我们通过一个直接借助BasicHttpBinding对象实现Client和Server端进行通信的例子,对WCF channel layer进行了一个大致上的介绍。由此引出了一些列通信相关的概念和对象,比如Channel,Output channel, Input channel,Request channel, Reply Channel,Duplex channel, Channel Shape,Channel manager,Channel factory, Channel listener, Binding element 等。通过这些元素,我们很容易地实现对WCF channel layer进行扩展。
对channel layer进行扩展一般适用于当你的需求通过现有的Binding,或者channel不能实现,而需要自定义一些channel来实现你所需的功能。不如现在的WCF系统定义的Channel中没有实现对Message body的压缩功能。你可以就需要将此功能定义到一个custom channel中,然后将其注入到channel stack中。一般来说,仅仅创建custom channel是不够的,因为在runtime, channel是通过Channel manager进行创建的,所以你需要创建对应的Channel factory(如何对发送方进行扩展)或者Channel listener(如果对接受方进行扩展)。而Channel factory和channel listener最终又是通过Binding element进行创建的,所以你还需要创建相应的Binding element。(Binding element=〉Channel factory&Channel listener=>Channel)
在本章节中,我们将继续讨论WCF channel layer。我们将通过如何创建和应用custom channel来介绍channel layer一些知识。
ICommunicationObject定义了3种成员:
属性:State, 得到当前的状态,返回值是一个CommunicationState 枚举。
方法:同步、异步Open和Close方法。
事件:通过注册这些状态相关的Event,当时对象转化到对应的状态时执行相应操作。
WCF定义了一个abstract class: CommunicationObject直接实现了该Interface。CommunicationObject的实现统一的State machine。WCF channel layer的很多的class都直接或者间接的继承了这个class。你也可以让你的class继承该class。当你让你自己的class继承CommunicationObject的时候,在override 掉base相应的method的时候,强烈建议你先调用base对应的方法,CommunicationObject会帮你进行相应的State转换和触发相应的事件。
对于Datagram channel shape,采用了One-way的MEP。发送方的channel 必须实现IOutputChannel interface。该Interface的方法成员主要集中在用于发送message的Send方法(同步/异步):
与之相应是IInputChannel inteface,该Interface用于Datagram channel shape中接收方的channel定义。其主要方法成员主要集中在用于接收Message的Receive方法(同步/异步):
注:无论对于同步或者异步方法,一般由两个重载,一个接收一个TimeSpan 作为参数,表是Send或者Receive允许的时间范围。而另一个没有该参数的方式,并不是建议你使用一个无限的TimeSpan,而是使用一个可配置的默认时间段(实际上是Binding对象对应的属性)
不同于Datagram channel shape,Request/request channel shape下交互双方的Channel具有不同的行为。发送方的Channel实现IRequestChannel。该interface的方面成员主要集中在一些用于向接收方进行请求的Request方法(同步/异步):
同理,对于接收方的IReplyChannel则主要定义了一些用于Reply的方法:
而对与Duplex和P2P,消息交互双方使用相同的Channel:Duplex channel。本质上讲,DuplexChannel = OutputChannel + IntputChannel。这一点从IDuplexChannel的定义上就可以看出来:
这个Sample将基于我们最为常用的Request/Reply channel shape。所以我们需要创建两个Channel,一个是用于发送方的实现了IRequestChannel的Channel,而另一个则是实现了IReplyChannel的用于接收方的Channel。
为了简单起见,在我定义的channel的每个方法仅仅打印出相应的方法名称而已(这样做不但简单,还有的一个好处,那就是当我最后将其应用到具体的Messaging场景中,可以根据控制台打印出来的文字清楚地看清当我们的Channel应用到具体的场景中后先后执行了那些方法)。我们先来看看实现了IRequestChannel的MyRequestChannel的定义:
这里唯一需要注意的一点是:在实际的运行环境中,我们的channel仅仅了位于Channel stack的某个环节。该channel和其他的一些channel组成一个管道,这个管道里流淌是Message。所以当一个Channel执行了它相应的操作的时候,需要将message传到下一个channel作进一步处理。所有我们的Channel需要下一个Channel的应用,这个Channel就是我们的InnerChannel字段,该成员在构造函数中指定。
所以,对于每一个方法,在实现了本Channel的功能之后,只需要调用InnerChannel 的对应的方法即可。 我们再来看看实现了IReplyChannel的MyReplyChannel, 它用于接收方:
MyReplyChannel的定义方式和MyRequestChannel完全一样,我们就不用再多说什么了。
还定义了两个Base class:ChannelFactoryBase 和ChannelFactoryBase<TChannel>(限于篇幅,在这里就不多作介绍了)。 为了简单起见,我们上我们的Channel factory继承自ChannelFactoryBase<TChannel>。
我们说过,和Channel stack一样,Channel factory仍然是一个stack,原因很简单,一个个的Channel需要相应的channel factory来创建。同Channel一样,当channel factory创建了自己的channel之后需要将接力棒交到下一个Channel factory。不过不通于Channel的是,下一个Channel factory不时在构造函数直接指定的,而是通过构造函数中的BindingContext 对象的BuildInnerChannelFactory()创建。
注:BindingContext 的两个最重要的方法就是BuildInnerChannelFactory和BuildInnerChannelListener。前者创建Inner channel factory后者创建Inner Channel listener。
熟悉了ChannelFactory的定义,大家很自然的想得到ChannelListner的定义(不过ChannelListner的成员比ChannelFactory 要多些):
注:对BindElement的组装可以通过configuration来实现。
下面是Client端的代码:
运行的结果将会是这样,下面是服务端输出结果:

这是客户端的输出结果:

通过上面的输出结果,你很直观的了解到了整个程序执行过程中,我们的定义在Channel,Channel factory,Channel listener和Binding element的方法是如何被依次执行的。
WCF后续之旅:
WCF后续之旅(1): WCF是如何通过Binding进行通信的
WCF后续之旅(2): 如何对Channel Layer进行扩展——创建自定义Channel
WCF后续之旅(3): WCF Service Mode Layer 的中枢—Dispatcher
WCF后续之旅(4):WCF Extension Point 概览
WCF后续之旅(5): 通过WCF Extension实现Localization
WCF后续之旅(6): 通过WCF Extension实现Context信息的传递
WCF后续之旅(7):通过WCF Extension实现和Enterprise Library Unity Container的集成
WCF后续之旅(8):通过WCF Extension 实现与MS Enterprise Library Policy Injection Application Block 的集成
WCF后续之旅(9):通过WCF的双向通信实现Session管理[Part I]
WCF后续之旅(9): 通过WCF双向通信实现Session管理[Part II]
WCF后续之旅(10): 通过WCF Extension实现以对象池的方式创建Service Instance
WCF后续之旅(11): 关于并发、回调的线程关联性(Thread Affinity)
WCF后续之旅(12): 线程关联性(Thread Affinity)对WCF并发访问的影响
WCF后续之旅(13): 创建一个简单的WCF SOAP Message拦截、转发工具[上篇]
WCF后续之旅(13):创建一个简单的SOAP Message拦截、转发工具[下篇]
WCF后续之旅(14):TCP端口共享
WCF后续之旅(15): 逻辑地址和物理地址
WCF后续之旅(16): 消息是如何分发到Endpoint的--消息筛选(Message Filter)
WCF后续之旅(17):通过tcpTracer进行消息的路由
对channel layer进行扩展一般适用于当你的需求通过现有的Binding,或者channel不能实现,而需要自定义一些channel来实现你所需的功能。不如现在的WCF系统定义的Channel中没有实现对Message body的压缩功能。你可以就需要将此功能定义到一个custom channel中,然后将其注入到channel stack中。一般来说,仅仅创建custom channel是不够的,因为在runtime, channel是通过Channel manager进行创建的,所以你需要创建对应的Channel factory(如何对发送方进行扩展)或者Channel listener(如果对接受方进行扩展)。而Channel factory和channel listener最终又是通过Binding element进行创建的,所以你还需要创建相应的Binding element。(Binding element=〉Channel factory&Channel listener=>Channel)
在本章节中,我们将继续讨论WCF channel layer。我们将通过如何创建和应用custom channel来介绍channel layer一些知识。
一、ICommunicationObject 和 CommunicationObject
我们知道WCF channel layer的绝大部分对象,比如Channel,Channel factory,Channel listener,从功能上讲都是用于通信(Communication)的对象,对传统的communication object,比如socket,他们往往都具有通过状态和状态转化规则(状态机:State machine)。这些状态包括Creating、Created、Opening、Opened、Closing、Closed等等。为了统一管理这些状态和状态之间的转化,WCF定义个一个特殊的Interface:ICommunicationObjectpublic interface ICommunicationObject
{
// Events
event EventHandler Closed;
event EventHandler Closing;
event EventHandler Faulted;
event EventHandler Opened;
event EventHandler Opening;
// Methods
void Abort();
IAsyncResult BeginClose(AsyncCallback callback, object state);
IAsyncResult BeginClose(TimeSpan timeout, AsyncCallback callback, object state);
IAsyncResult BeginOpen(AsyncCallback callback, object state);
IAsyncResult BeginOpen(TimeSpan timeout, AsyncCallback callback, object state);
void Close();
void Close(TimeSpan timeout);
void EndClose(IAsyncResult result);
void EndOpen(IAsyncResult result);
void Open();
void Open(TimeSpan timeout);
// Properties
CommunicationState State { get; }
}ICommunicationObject定义了3种成员:
属性:State, 得到当前的状态,返回值是一个CommunicationState 枚举。
方法:同步、异步Open和Close方法。
事件:通过注册这些状态相关的Event,当时对象转化到对应的状态时执行相应操作。
WCF定义了一个abstract class: CommunicationObject直接实现了该Interface。CommunicationObject的实现统一的State machine。WCF channel layer的很多的class都直接或者间接的继承了这个class。你也可以让你的class继承该class。当你让你自己的class继承CommunicationObject的时候,在override 掉base相应的method的时候,强烈建议你先调用base对应的方法,CommunicationObject会帮你进行相应的State转换和触发相应的事件。
二、Channel 和Channel Shape
在上一篇文章中,我们讨论过了。在不同的消息交换模式(MEP)中,发送方和接受方的Channel扮演的角色是不相同的。我们并把这种不同MEP中消息交互双方Channel的结构差异表述为Channel shape。我们有四种不同的Channel shape:Datagram、Request/reply、Duplex和P2P。不同Channel shape中Channel的结构性差性通过实现不同的Channel interface来体现。对于Datagram channel shape,采用了One-way的MEP。发送方的channel 必须实现IOutputChannel interface。该Interface的方法成员主要集中在用于发送message的Send方法(同步/异步):
public interface IOutputChannel : IChannel, ICommunicationObject

     {

         // Methods

         IAsyncResult BeginSend(Message message, AsyncCallback callback, object state);

         IAsyncResult BeginSend(Message message, TimeSpan timeout, AsyncCallback callback, object state);

         void EndSend(IAsyncResult result);

         void Send(Message message);

         void Send(Message message, TimeSpan timeout);


         // Properties

         EndpointAddress RemoteAddress { get; }

         Uri Via { get; }

     }
与之相应是IInputChannel inteface,该Interface用于Datagram channel shape中接收方的channel定义。其主要方法成员主要集中在用于接收Message的Receive方法(同步/异步):
public interface IInputChannel : IChannel, ICommunicationObject

     {

         // Methods

         IAsyncResult BeginReceive(AsyncCallback callback, object state);

         IAsyncResult BeginReceive(TimeSpan timeout, AsyncCallback callback, object state);

         IAsyncResult BeginTryReceive(TimeSpan timeout, AsyncCallback callback, object state);

         IAsyncResult BeginWaitForMessage(TimeSpan timeout, AsyncCallback callback, object state);

         Message EndReceive(IAsyncResult result);

         bool EndTryReceive(IAsyncResult result, out Message message);

         bool EndWaitForMessage(IAsyncResult result);

         Message Receive();

         Message Receive(TimeSpan timeout);

         bool TryReceive(TimeSpan timeout, out Message message);

         bool WaitForMessage(TimeSpan timeout);


         // Properties

         EndpointAddress LocalAddress { get; }

}注:无论对于同步或者异步方法,一般由两个重载,一个接收一个TimeSpan 作为参数,表是Send或者Receive允许的时间范围。而另一个没有该参数的方式,并不是建议你使用一个无限的TimeSpan,而是使用一个可配置的默认时间段(实际上是Binding对象对应的属性)
不同于Datagram channel shape,Request/request channel shape下交互双方的Channel具有不同的行为。发送方的Channel实现IRequestChannel。该interface的方面成员主要集中在一些用于向接收方进行请求的Request方法(同步/异步):
public interface IRequestChannel : IChannel, ICommunicationObject

     {

         // Methods

         IAsyncResult BeginRequest(Message message, AsyncCallback callback, object state);

         IAsyncResult BeginRequest(Message message, TimeSpan timeout, AsyncCallback callback, object state);

         Message EndRequest(IAsyncResult result);

         Message Request(Message message);

         Message Request(Message message, TimeSpan timeout);


         // Properties

         EndpointAddress RemoteAddress { get; }

         Uri Via { get; }

     }
同理,对于接收方的IReplyChannel则主要定义了一些用于Reply的方法:
public interface IReplyChannel : IChannel, ICommunicationObject

     {

         // Methods

         IAsyncResult BeginReceiveRequest(AsyncCallback callback, object state);

         IAsyncResult BeginReceiveRequest(TimeSpan timeout, AsyncCallback callback, object state);

         IAsyncResult BeginTryReceiveRequest(TimeSpan timeout, AsyncCallback callback, object state);

         IAsyncResult BeginWaitForRequest(TimeSpan timeout, AsyncCallback callback, object state);

         RequestContext EndReceiveRequest(IAsyncResult result);

         bool EndTryReceiveRequest(IAsyncResult result, out RequestContext context);

         bool EndWaitForRequest(IAsyncResult result);

         RequestContext ReceiveRequest();

         RequestContext ReceiveRequest(TimeSpan timeout);

         bool TryReceiveRequest(TimeSpan timeout, out RequestContext context);

         bool WaitForRequest(TimeSpan timeout);


         // Properties

         EndpointAddress LocalAddress { get; }

     }
而对与Duplex和P2P,消息交互双方使用相同的Channel:Duplex channel。本质上讲,DuplexChannel = OutputChannel + IntputChannel。这一点从IDuplexChannel的定义上就可以看出来:
public interface IDuplexChannel : IInputChannel, IOutputChannel, IChannel, ICommunicationObject

     {

     }
三、创建Custom Channel
为了让大家对WCF channel layer有一个深刻的认识,以及掌握如何有效地对其进行扩展。我在整篇文章中穿插介绍一个具体的Sample:创建一个自定义的channel,以及相关的辅助对象,比如Channel factory、Channel listener和Binding element。这个Sample将基于我们最为常用的Request/Reply channel shape。所以我们需要创建两个Channel,一个是用于发送方的实现了IRequestChannel的Channel,而另一个则是实现了IReplyChannel的用于接收方的Channel。
为了简单起见,在我定义的channel的每个方法仅仅打印出相应的方法名称而已(这样做不但简单,还有的一个好处,那就是当我最后将其应用到具体的Messaging场景中,可以根据控制台打印出来的文字清楚地看清当我们的Channel应用到具体的场景中后先后执行了那些方法)。我们先来看看实现了IRequestChannel的MyRequestChannel的定义:
namespace Artech.ChannleStackExplore.Channels

     {

         public class MyRequestChannel :ChannelBase, IRequestChannel

         {

             private IRequestChannel InnerChannel

             {get;set;}


             public MyRequestChannel(ChannelManagerBase channleManager, IRequestChannel innerChannel)

                 : base(channleManager)

             {

                 this.InnerChannel = innerChannel;

             }


             #region ChannelBase Members

             protected override void OnAbort()

             {

                 Console.WriteLine("MyRequestChannel.OnAbort()");

                 this.InnerChannel.Abort();

             }


             protected override IAsyncResult OnBeginClose(TimeSpan timeout, AsyncCallback callback, object state)

             {

                 Console.WriteLine("MyRequestChannel.OnBeginClose()");

                 return this.InnerChannel.BeginClose(timeout, callback, state);

             }


             protected override IAsyncResult OnBeginOpen(TimeSpan timeout, AsyncCallback callback, object state)

             {

                 Console.WriteLine("MyRequestChannel.OnBeginOpen()");

                 return this.InnerChannel.BeginOpen(timeout, callback, state);

             }


             protected override void OnClose(TimeSpan timeout)

             {

                 Console.WriteLine("MyRequestChannel.OnClose()");

                 this.Close(timeout);

             }


             protected override void OnEndClose(IAsyncResult result)

             {

                 Console.WriteLine("MyRequestChannel.OnEndClose()");

                 this.InnerChannel.EndClose(result);

             }


             protected override void OnEndOpen(IAsyncResult result)

             {

                 Console.WriteLine("MyRequestChannel.OnEndOpen()");

                 this.InnerChannel.EndOpen(result);

             }


             protected override void OnOpen(TimeSpan timeout)

             {

                 Console.WriteLine("MyRequestChannel.OnOpen()");

                 this.InnerChannel.Open(timeout);

             }

             #endregion


             #region IRequestChannel Members


             public IAsyncResult BeginRequest(Message message, TimeSpan timeout, AsyncCallback callback, object state)

             {

                 Console.WriteLine("MyRequestChannel.BeginRequest()");

                 return this.BeginRequest(message, timeout, callback, state);

             }


             public IAsyncResult BeginRequest(Message message, AsyncCallback callback, object state)

             {

                 Console.WriteLine("MyRequestChannel.BeginRequest()");

                 return this.InnerChannel.BeginRequest(message, callback, state);

             }


             public Message EndRequest(IAsyncResult result)

             {

                 Console.WriteLine("MyRequestChannel.EndRequest()");

                 return this.InnerChannel.EndRequest(result);

             }


             public EndpointAddress RemoteAddress

             {

                 get

                 {

                     Console.WriteLine("MyRequestChannel.RemoteAddress");

                     return this.InnerChannel.RemoteAddress;

                 }


             }


             public Message Request(Message message, TimeSpan timeout)

             {

                 Console.WriteLine("MyRequestChannel.Request()");

                 return this.InnerChannel.Request(message, timeout);

             }


             public Message Request(Message message)

             {

                 Console.WriteLine("MyRequestChannel.Request()");

                 return this.InnerChannel.Request(message);

             }


             public Uri Via

             {

                 get

                 {

                     Console.WriteLine("MyRequestChannel.Via)");

                     return this.InnerChannel.Via;

                 }


             }


             #endregion

         }

     }
这里唯一需要注意的一点是:在实际的运行环境中,我们的channel仅仅了位于Channel stack的某个环节。该channel和其他的一些channel组成一个管道,这个管道里流淌是Message。所以当一个Channel执行了它相应的操作的时候,需要将message传到下一个channel作进一步处理。所有我们的Channel需要下一个Channel的应用,这个Channel就是我们的InnerChannel字段,该成员在构造函数中指定。
private IRequestChannel InnerChannel

     {get;set;}


     public MyRequestChannel(ChannelManagerBase channleManager, IRequestChannel innerChannel)

                 : base(channleManager)

     {

         this.InnerChannel = innerChannel;

     }
所以,对于每一个方法,在实现了本Channel的功能之后,只需要调用InnerChannel 的对应的方法即可。 我们再来看看实现了IReplyChannel的MyReplyChannel, 它用于接收方:
namespace Artech.ChannleStackExplore.Channels

     {

         public class MyReplyChannel: ChannelBase, IReplyChannel

         {

             private IReplyChannel InnerChannel

             { get; set; }


             public MyReplyChannel(ChannelManagerBase channelManager, IReplyChannel innerChannel):base(channelManager)

             {

                 this.InnerChannel = innerChannel;

             }


             ChannelBase Members


             IReplyChannel Members

         }

     }
MyReplyChannel的定义方式和MyRequestChannel完全一样,我们就不用再多说什么了。
4. 创建Custom Channel Factory & Channel Listener
通过上一篇文章的介绍,我们知道Channel是通过Channel Manager来创建并管理的,在发送方的Channel Manager被称为Channel Factory。对于Channel factory,除了定义了两个Interface之外(IChannelFactory 和IChannelFactory<TChannel>)public interface IChannelFactory : ICommunicationObject
{
// Methods
T GetProperty<T>() where T : class;
}
public interface IChannelFactory<TChannel> : IChannelFactory, ICommunicationObject
{
// Methods
TChannel CreateChannel(EndpointAddress to);
TChannel CreateChannel(EndpointAddress to, Uri via);
}还定义了两个Base class:ChannelFactoryBase 和ChannelFactoryBase<TChannel>(限于篇幅,在这里就不多作介绍了)。 为了简单起见,我们上我们的Channel factory继承自ChannelFactoryBase<TChannel>。
namespace Artech.ChannleStackExplore.Channels

     {

         public class MyChannelFactory<TChannel> : ChannelFactoryBase<TChannel>

         {

             private IChannelFactory<TChannel> InnerChannelFactory

             { get; set; }


             public MyChannelFactory(BindingContext context)

             {

                 this.InnerChannelFactory = context.BuildInnerChannelFactory<TChannel>();

             }


             protected override TChannel OnCreateChannel(EndpointAddress address, Uri via)

             {

                 Console.WriteLine("MyChannelFactory<TChannel>.OnClose()");

                 TChannel innerChannel = this.InnerChannelFactory.CreateChannel(address, via);

                 return (TChannel)(object)(new MyRequestChannel(this, innerChannel as IRequestChannel));

             }


             protected override IAsyncResult OnBeginOpen(TimeSpan timeout, AsyncCallback callback, object state)

             {

                 Console.WriteLine("MyChannelFactory<TChannel>.OnBeginOpen()");

                 return this.InnerChannelFactory.BeginOpen(timeout, callback, state);

             }


             protected override void OnEndOpen(IAsyncResult result)

             {

                 Console.WriteLine("MyChannelFactory<TChannel>.OnEndOpen()");

                 this.InnerChannelFactory.EndOpen(result);

             }


             protected override void OnOpen(TimeSpan timeout)

             {

                 Console.WriteLine("MyChannelFactory<TChannel>.OnOpen()");

                 this.InnerChannelFactory.Open();

             }

         }

     }
我们说过,和Channel stack一样,Channel factory仍然是一个stack,原因很简单,一个个的Channel需要相应的channel factory来创建。同Channel一样,当channel factory创建了自己的channel之后需要将接力棒交到下一个Channel factory。不过不通于Channel的是,下一个Channel factory不时在构造函数直接指定的,而是通过构造函数中的BindingContext 对象的BuildInnerChannelFactory()创建。
private IChannelFactory<TChannel> InnerChannelFactory

     { get; set; }


     public MyChannelFactory(BindingContext context)

     {

           this.InnerChannelFactory = context.BuildInnerChannelFactory<TChannel>();

}注:BindingContext 的两个最重要的方法就是BuildInnerChannelFactory和BuildInnerChannelListener。前者创建Inner channel factory后者创建Inner Channel listener。
熟悉了ChannelFactory的定义,大家很自然的想得到ChannelListner的定义(不过ChannelListner的成员比ChannelFactory 要多些):
namespace Artech.ChannleStackExplore.Channels

     {

         public class MyChannelListener<TChannel> : ChannelListenerBase<TChannel> where TChannel : class, IChannel

         {

             private IChannelListener<TChannel> InnerChannelListener

             { get; set; }


             public MyChannelListener(BindingContext context)

             {

                 this.InnerChannelListener = context.BuildInnerChannelListener<TChannel>();

             }


             protected override TChannel OnAcceptChannel(TimeSpan timeout)

             {

                 Console.WriteLine("MyChannelListener<TChannel>.OnAcceptChannel()");

                 TChannel innerChannel = this.InnerChannelListener.AcceptChannel(timeout);

                 return new MyReplyChannel(this, innerChannel as IReplyChannel) as TChannel;

             }


             protected override IAsyncResult OnBeginAcceptChannel(TimeSpan timeout, AsyncCallback callback, object state)

             {

                 Console.WriteLine("MyChannelListener<TChannel>.OnBeginAcceptChannel()");

                return this.InnerChannelListener.BeginAcceptChannel(timeout, callback, state);

             }


             protected override TChannel OnEndAcceptChannel(IAsyncResult result)

             {

                 Console.WriteLine("MyChannelListener<TChannel>.OnEndAcceptChannel()");

                 TChannel innerChannel = this.InnerChannelListener.EndAcceptChannel(result);

                 return new MyReplyChannel(this, innerChannel as IReplyChannel) as TChannel;

             }


             protected override IAsyncResult OnBeginWaitForChannel(TimeSpan timeout, AsyncCallback callback, object state)

             {

                 Console.WriteLine("MyChannelListener<TChannel>.OnBeginWaitForChannel()");

                 return this.InnerChannelListener.BeginWaitForChannel(timeout, callback, state);

             }


             protected override bool OnEndWaitForChannel(IAsyncResult result)

             {

                 Console.WriteLine("MyChannelListener<TChannel>.OnEndWaitForChannel()");

                 return this.InnerChannelListener.EndWaitForChannel(result);

             }


             protected override bool OnWaitForChannel(TimeSpan timeout)

             {

                 Console.WriteLine("MyChannelListener<TChannel>.OnWaitForChannel()");

                 return this.InnerChannelListener.WaitForChannel(timeout);

             }


             public override Uri Uri

             {

                 get

                 {

                     Console.WriteLine("MyChannelListener<TChannel>.Uri");

                     return this.InnerChannelListener.Uri;

                 }


             }


             protected override void OnAbort()

             {

                 Console.WriteLine("MyChannelListener<TChannel>.OnAbort()");

                 this.InnerChannelListener.Abort();

             }


             protected override IAsyncResult OnBeginClose(TimeSpan timeout, AsyncCallback callback, object state)

             {

                 Console.WriteLine("MyChannelListener<TChannel>.OnBeginClose()");

                 return this.InnerChannelListener.BeginClose(timeout, callback, state);

             }


             protected override IAsyncResult OnBeginOpen(TimeSpan timeout, AsyncCallback callback, object state)

             {

                 Console.WriteLine("MyChannelListener<TChannel>.OnBeginOpen()");

                 return this.InnerChannelListener.BeginOpen(timeout, callback, state);

             }


             protected override void OnClose(TimeSpan timeout)

             {

                 Console.WriteLine("MyChannelListener<TChannel>.OnClose()");

                 this.InnerChannelListener.Close(timeout);

             }


             protected override void OnEndClose(IAsyncResult result)

             {

                 Console.WriteLine("MyChannelListener<TChannel>.OnEndClose()");

                 this.InnerChannelListener.EndClose(result);

             }


             protected override void OnEndOpen(IAsyncResult result)

             {

                 Console.WriteLine("MyChannelListener<TChannel>.OnEndOpen()");

                 this.InnerChannelListener.EndOpen(result);

             }


             protected override void OnOpen(TimeSpan timeout)

             {

                 Console.WriteLine("MyChannelListener<TChannel>.OnOpen()");

                 this.InnerChannelListener.Open(timeout);

             }

         }

     }
五、创建Custom Binding Element
我们知道Binding是Service mode layer进入Channel layer的中介,而Binding由一系列的Binding element组成。我们上面创建的Channel factory和Channel listener需要最终通过对应的BindingElement应用到Binding中才能最终发挥作用。我们就来创建这个BindingElement:MyBindingElement。够简单吧,直接调用MyChannelFactory和MyChannelListener的构造函数就可以了。namespace Artech.ChannleStackExplore.Channels
{
public class MyBindingElement:BindingElement
{
public override BindingElement Clone()
{
return new MyBindingElement();
}
public override T GetProperty<T>(BindingContext context)
{
return context.GetInnerProperty<T>();
}
public override IChannelFactory<TChannel> BuildChannelFactory<TChannel>(BindingContext context)
{
Console.WriteLine("MyBindingElement.BuildChannelFactory()");
return new MyChannelFactory<TChannel>(context) as IChannelFactory<TChannel>;
}
public override IChannelListener<TChannel> BuildChannelListener<TChannel>(BindingContext context)
{
Console.WriteLine("MyBindingElement.BuildChannelListener()");
return new MyChannelListener<TChannel>(context) as IChannelListener<TChannel>;
}
}
}六、创建Custom Binding
我们进入了最后的阶段,创建一个Custom Binding。MyBinding继承Binding。 在CreateBindingElements方法中将我们的Binding element(MyBindingElement),连同其他必须的Binding element添加到BindingElementCollection 中。namespace Artech.ChannleStackExplore.Channels
{
public class MyBinding:Binding
{
public override BindingElementCollection CreateBindingElements()
{
BindingElementCollection elemens = new BindingElementCollection();
elemens.Add(new TextMessageEncodingBindingElement());
elemens.Add(new MyBindingElement());
elemens.Add(new HttpTransportBindingElement());
return elemens.Clone();
}
public override string Scheme
{
get
{
return "http";
}
}
}
}注:对BindElement的组装可以通过configuration来实现。
七、使用Custom Binding
我们上面所做的一切都汇集到我们的Custom binding:MyBinding。既然我们为之写了那么多代码,我们一定要通过某种方式测试一下它时候具有我们需要的功能。我们通过MyBinding创建一个Messaging via Binding的应用。不熟悉的朋友可以转到上一篇去熟悉一下。下面是Server端的代码。namespace Server
{
class Program
{
static void Main(string[] args)
{
MyBinding binding = new MyBinding();
IChannelListener<IReplyChannel> channelListener= binding.BuildChannelListener<IReplyChannel>(new Uri("http://127.0.0.1:8888/messagingviabinding"));
channelListener.Open();
while (true)
{
IReplyChannel channel= channelListener.AcceptChannel(TimeSpan.MaxValue);
channel.Open();
RequestContext context = channel.ReceiveRequest(TimeSpan.MaxValue);
Console.WriteLine("Receive a request message:\n{0}", context.RequestMessage);
Message replyMessage = Message.CreateMessage(MessageVersion.Soap12WSAddressing10, "http://artech.messagingviabinding", "This is a mannualy created reply message for the purpose of testing");
context.Reply(replyMessage);
channel.Close();
}
}
}
}下面是Client端的代码:
namespace Client

       {

           class Program

           {

               static void Main(string[] args)

               {

                   MyBinding binding = new MyBinding();

                   IChannelFactory<IRequestChannel> channelFactory = binding.BuildChannelFactory<IRequestChannel>();

                   channelFactory.Open();


                   IRequestChannel channel = channelFactory.CreateChannel(new EndpointAddress("http://127.0.0.1:8888/messagingviabinding"));

                   channel.Open();


                   Message requestMessage = Message.CreateMessage(MessageVersion.Soap12WSAddressing10, "http://artech.messagingviabinding", "This is a mannualy created reply message for the purpose of testing");

                   Message replyMessage = channel.Request(requestMessage);

                   Console.WriteLine("Receive a reply message:\n{0}", replyMessage);

                   channel.Close();

                   channelFactory.Close();

                   Console.Read();

               }


           }

       }
运行的结果将会是这样,下面是服务端输出结果:
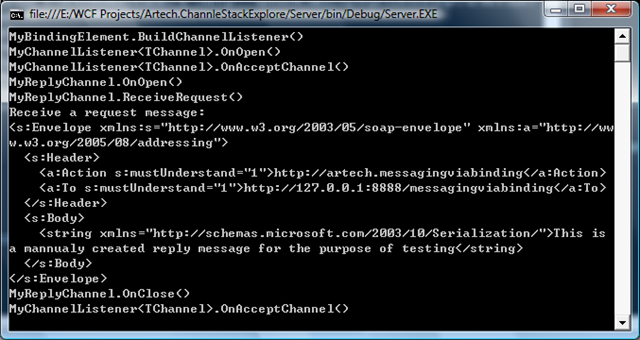
这是客户端的输出结果:

通过上面的输出结果,你很直观的了解到了整个程序执行过程中,我们的定义在Channel,Channel factory,Channel listener和Binding element的方法是如何被依次执行的。
WCF后续之旅:
WCF后续之旅(1): WCF是如何通过Binding进行通信的
WCF后续之旅(2): 如何对Channel Layer进行扩展——创建自定义Channel
WCF后续之旅(3): WCF Service Mode Layer 的中枢—Dispatcher
WCF后续之旅(4):WCF Extension Point 概览
WCF后续之旅(5): 通过WCF Extension实现Localization
WCF后续之旅(6): 通过WCF Extension实现Context信息的传递
WCF后续之旅(7):通过WCF Extension实现和Enterprise Library Unity Container的集成
WCF后续之旅(8):通过WCF Extension 实现与MS Enterprise Library Policy Injection Application Block 的集成
WCF后续之旅(9):通过WCF的双向通信实现Session管理[Part I]
WCF后续之旅(9): 通过WCF双向通信实现Session管理[Part II]
WCF后续之旅(10): 通过WCF Extension实现以对象池的方式创建Service Instance
WCF后续之旅(11): 关于并发、回调的线程关联性(Thread Affinity)
WCF后续之旅(12): 线程关联性(Thread Affinity)对WCF并发访问的影响
WCF后续之旅(13): 创建一个简单的WCF SOAP Message拦截、转发工具[上篇]
WCF后续之旅(13):创建一个简单的SOAP Message拦截、转发工具[下篇]
WCF后续之旅(14):TCP端口共享
WCF后续之旅(15): 逻辑地址和物理地址
WCF后续之旅(16): 消息是如何分发到Endpoint的--消息筛选(Message Filter)
WCF后续之旅(17):通过tcpTracer进行消息的路由

相关文章推荐
- [原创]WCF后续之旅(2): 如何对Channel Layer进行扩展——创建自定义Channel
- WCF后续之旅(2): 如何对Channel Layer进行扩展——创建自定义Channel
- WCF后续之旅(2): 如何对Channel Layer进行扩展——创建自定义Channel
- WCF后续之旅(1): WCF是如何通过Binding进行通信的
- WCF后续之旅(1): WCF是如何通过Binding进行通信的
- WCF 项目应用连载[5] - 自定义配置 扩展ChannelFactory<T> - LDuplex<T>
- WCF后续之旅(1): WCF是如何通过Binding进行通信的
- Anaconda包查找,conda自定义本地channel作为python package源进行离线安装,离线创建环境
- [原创]WCF后续之旅(1): WCF是如何通过Binding进行通信的
- 跟着Artech学习WCF扩展(2) 自定义Channel与执行的顺序
- 使用Directory.GetFiles,如何按文件名,扩展名,创建时间分别进行升序或降序排序
- Ecshop二次开发:如何创建一个自定义页面(一)
- Solidworks如何在自定义的基准面上创建3D草图
- 《WF编程》系列之36 - 自定义活动:如何创建自定义活动?活动的组合
- 如何自己对EditPlus进行扩展
- 如何进行邮件系统后续维护
- 我的WCF之旅(10):如何在WCF进行Exception Handling
- Visual Studio 的自定义代码转换工具,如何自己扩展自己的ResxFileCodeGenerator.
- 如何创建一个自定义jQuery插件
- 如何使用花生壳 发布WCF服务 进行外网访问 z