使用ASP.NET 2.0 Profile存储用户信息_1
2007-10-08 10:56
309 查看
作者: Stephen Walther
原文地址:http://msdn.microsoft.com/asp.net/default.aspx?pull=/library/en-us/dnvs05/html/UserProfiles.asp
译者:Tony Qu
概要:许多ASP.NET应用程序需要跨访问的用户属性跟踪功能,在ASP.NET1.1中,我们只能人工实现这一功能。但如今,使用 ASP.NET 2.0的Profile对象,这个过程变得异常简单。Stephen Walther将验证该对象,并向你展示如何使用Profile来跟踪用户属性、创建一个购物篮,及其他一些例子。
总目录
介绍
User Profile总揽
定义User Profile
使用Profile组
使用复杂的Profile属性
继承一个Profile
迁移匿名Profile设置
配置Profile Provider
管理Profiles并生成Profile报告
总结
相关书籍
Microsoft ASP.NET 2.0支持被称为Profile的新对象,它可以自动在多个Web应用程序的访问之间存储用户信息。一个User Profile中可以存储各种类型的信息,这些信息既可以是简单的string和integer类型,也可以是复杂的自定义类型。例如,你可以存储用户的姓、购物篮、用户属性或网站使用情况统计。
本文中,你将学习如何在一个应用中定义user profile。我们也会向你演示如何配置使用不同provider的profile。最后,你将学习如何管理和生成user profile的报告。
User Profiles总揽
Profile 对象与Session对象十分相似,但是更好用一些。与Session相似的地方在于,Profile是相对于一个特定的用户的,也就是说,每个Web应用程序的用户都有他们自己的profile对象。与Session不同的是,Profile对象是持久对象。如果你向Session中添加一个项,在你离开网站时,该项就会消失。而Profile则完全不同,当你修改Profile的状态时,修改在多个访问之间均有效。
profile使用provider模式来存储信息,默认情况下,user profile的内容会保存在SQL Server Express数据库中,该数据库位于网站的App_Data目录。然而,在本文的后半部分,你将了解如何使用其他数据提供者(data provider)来存储信息,如完整版的SQL Server中的一个数据库或者一个Oracle数据库。
与Session不同,Profile是强类型的,Session对象仅仅是一个项集合而已,而profile对象则有强类型属性。
使用强类型是有它的道理的。例如,使用强类型,你就可以在Microsoft Visual Web Developer中使用智能感知技术,当你键入Profile和一个点的时候,智能感知会弹出你已经定义过的profile属性列表。
定义user profile
你既可以在machine.config中,也可以在web.config中定义一个user profile,由于你不能在应用程序的二级目录中创建一个包含文件profile节的web.config文件,这意味着你将无法在一个应用程序中定义两个以上的profile。
在列表1的web.config中,列举了一个简单的profile定义的实例,该profile有三个属性,FirstName, LastName和PageVisits。

列表1
<configuration>
<system.web>
<authentication mode="Forms" />
<anonymousIdentification enabled="true" />
<profile>
<properties>
<add
name="FirstName"
defaultValue="??"
allowAnonymous="true" />
<add
name="LastName"
defaultValue="??"
allowAnonymous="true" />
<add
name="PageVisits"
type="Int32"
allowAnonymous="true"/>
</properties>
</profile>
</system.web>
</configuration>
由于该profile需要同时被匿名用户和已认证用户使用,因此我们在web.config文件中增加包含一个< anonymousIdentification>元素,有了这个元素,系统就会自动为匿名用户生成唯一的ID。仔细看的话我们会发现,每一个 profile属性都有一个allowAnonymous特性,该特性表明这个profile属性是否允许被匿名用户使用。
默认的profile属性类型是System.String类型。列表1中,由于没有为FirstName和LastName这两个profile属性增加type特性,那么系统默认它们是string类型,而PageVisits属性则指定了type特性为Int32,因此该profile属性可用于表示一个整型值。
最后,注意FirstName和LastName属性都有defaultValue特性。你可以为简单的数据类型设置defaultValue特性,但你不能为复杂类型设置defaultValue特性。
当你定义好一个profile之后,系统会自动在下一次页面被调用时,生成一个与该profile相对应的类。这个类会被保存在"Temporary ASP.NET Files Directory"目录(该目录也用于存放用于动态生成页面的类)。你可以使用HttpContext的Profile属性(Property)调用该类。
当你定义好一个profile后,你可以使用如下方法为profile属性赋值。
[Visual Basic .NET]
Profile.FirstName = "Bill"
[C#]
Profile.FirstName = "Bill";
任何在web.config中定义的profile属性都会在Profile对象中呈现。
列表2演示了你该如何使用profile来持久化保存用户信息。这个页显示了FirstName,LastName, PageVisits三个属性的值,同时它包含了一个能够用于修改这三个属性的表单(form)。在Page_Load中更新PageVisits的值,这意味着每一次刷新页面,PageVisits的值都会改变。
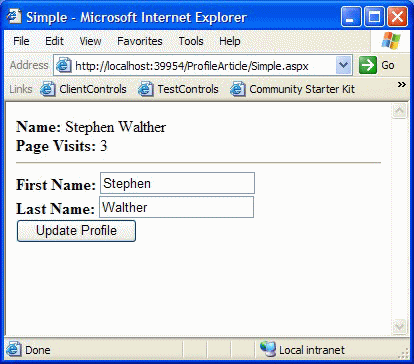
图1 使用简单的profile
列表 2. Simple.aspx (C#)


<%...@ Page Language="C#" %>
<script runat="server">...


void Page_Load() ...{
Profile.PageVisits ++;

}
void UpdateProfile(Object s, EventArgs e) ...{
Profile.FirstName = txtFirstName.Text;
Profile.LastName = txtLastName.Text;
}

</script>
<html>
<head>
<title>Simple</title>
</head>
<body>
<form id="form1" runat="server">
<b>Name:</b> <%= Profile.FirstName %> <%= Profile.LastName %>
<br />
<b>Page Visits:</b> <%= Profile.PageVisits %>
<hr />
<b>First Name:</b>
<asp:TextBox ID="txtFirstName" Runat="Server" />
<br />
<b>Last Name:</b>
<asp:TextBox ID="txtLastName" Runat="Server" />
<br />
<asp:Button ID="Button1"
Text="Update Profile"
OnClick="UpdateProfile"
Runat="server" />
</form>
</body>
</html>
-------------------------------------------
列表 2. Simple.aspx (Visual Basic .NET)
<%...@ Page Language="VB" %>
<script runat="server">...
Sub Page_Load()
Profile.PageVisits += 1
End Sub
Sub UpdateProfile(ByVal s As Object, ByVal e As EventArgs)
Profile.FirstName = txtFirstName.Text
Profile.LastName = txtLastName.Text
End Sub
</script>
<html>
<head>
<title>Simple</title>
</head>
<body>
<form id="form1" runat="server">
<b>Name:</b> <%= Profile.FirstName %> <%= Profile.LastName %>
<br />
<b>Page Visits:</b> <%= Profile.PageVisits %>
<hr />
<b>First Name:</b>
<asp:TextBox ID="txtFirstName" Runat="Server" />
<br />
<b>Last Name:</b>
<asp:TextBox ID="txtLastName" Runat="Server" />
<br />
<asp:Button
Text="Update Profile"
OnClick="UpdateProfile"
Runat="server" />
</form>
</body>
</html>
如果你多次访问列表2中的页面,你会注意到PageVisits在不断增大。如果你关闭的浏览器,并在一周之后调用该页面,PageVisits属性仍然会保留原值。从这一点可以看出Profile为每个用户自动保存一个副本。
使用Profile组
尽管你仅可以为一个应用程序定义一个profile,但如果你需要让几个profile属性一起工作,把它们放在组中,会让你觉得它们更易管理。
例如,在列表3中,有一个带有两个组的profile,这两个组分别是Address和Preferences
列表3. Web.Config
<configuration>
<system.web>
<anonymousIdentification enabled="true" />
<profile>
<properties>
<group name="Address">
<add
name="Street"
allowAnonymous="true" />
<add
name="City"
allowAnonymous="true" />
</group>
<group name="Preferences">
<add
name="ReceiveNewsletter"
type="Boolean"
defaultValue="false"
allowAnonymous="true" />
</group>
</properties>
</profile>
</system.web>
</configuration>
当你用组来定义profile时,你应该使用组名来设置或读取profile属性。例如,在列表3中,你可以使用以下一些句子来完成三个profile属性的赋值。
[C#]
Profile.Address.City = "Modesto";
Profile.Address.Street = "111 King Arthur Ln";
Profile.Preferences.ReceiveNewsletter = false;
[Visual Basic .NET]
Profile.Address.City = "Modesto"
Profile.Address.Street = "111 King Arthur Ln"
Profile.Preferences.ReceiveNewsletter = False
一个profile的定义只能包含一层组,换句话说,你不能把其他的组放在一个profile组的下面一层。
使用复杂的profile属性
到目前为止,我们已经介绍了声明包含简单类型(如string或整型)属性的profile,其实你也可以在profile中声明复杂属性。
举个例子,假设你现在需要在profile中存储一个购物篮,如果这样做的话,你就可以在每次访问网站时获得自己的购物篮。
列表4 声明了一个包含profile,这个profile包含一个名为ShoppingCart的属性,而该属性的type特性是一个叫ShoppingCart的类(我们接下来会创建该类),该类名是有效的。
我们还会注意到,该声明中包含一个serializeAs特性,该特性可以帮助ShoppingCart使用二进制序列化器(binary serializer)进行持久化,而不是使用xml序列化器。
列表4 Web.config
<configuration>
<system.web>
<anonymousIdentification enabled="true" />
<profile>
<properties>
<add
name="ShoppingCart"
type="ShoppingCart"
serializeAs="Binary"
allowAnonymous="true" />
</properties>
</profile>
</system.web>
</configuration>
列表5 中有一个简单购物篮的实现代码,该购物篮拥有添加和删除项(item)的方法(method),同时它还拥有两个属性(property),一个是用于获得该购物篮中的所有项的,一个是用于表示所有商品的总价的。
列表5 ShoppingCart (c#)
using System;
using System.Collections;
[Serializable]
public class ShoppingCart
...{
public Hashtable _CartItems = new Hashtable();
// Return all the items from the Shopping Cart
public ICollection CartItems
...{
get ...{ return _CartItems.Values; }
}
// The sum total of the prices
public decimal Total
...{
get
...{
decimal sum = 0;
foreach (CartItem item in _CartItems.Values)
sum += item.Price * item.Quantity;
return sum;
}
}
// Add a new item to the shopping cart
public void AddItem(int ID, string Name, decimal Price)
...{
CartItem item = (CartItem)_CartItems[ID];
if (item == null)
_CartItems.Add(ID, new CartItem(ID, Name, Price));
else
...{
item.Quantity++;
_CartItems[ID] = item;
}
}
// Remove an item from the shopping cart
public void RemoveItem(int ID)
...{
CartItem item = (CartItem)_CartItems[ID];
if (item == null)
return;
item.Quantity--;
if (item.Quantity == 0)
_CartItems.Remove(ID);
else
_CartItems[ID] = item;
}
}
[Serializable]
public class CartItem
...{
private int _ID;
private string _Name;
private decimal _Price;
private int _Quantity = 1;
public int ID
...{
get ...{ return _ID; }
}
public string Name
...{
get ...{ return _Name; }
}
public decimal Price
...{
get ...{ return _Price; }
}
public int Quantity
...{
get ...{ return _Quantity; }
set ...{ _Quantity = value; }
}
public CartItem(int ID, string Name, decimal Price)
...{
_ID = ID;
_Name = Name;
_Price = Price;
}
}
如果你把列表5中的代码添加到应用程序的App_Code目录中,购物篮会自动被编译。
在列表5中有一点值得注意,那就是ShoppingCart和CartItem类都加上了可序列化的特性,这一点对于他们能否被序列化十分重要,只有这样才能保存在Profile对象中。最后,列表6的页面显示了可以被添加到购物篮中的产品。购物篮是通过BindShoppingCart方法从Profile对象中载入,该方法把购物篮中的对象绑定到一个GridView对象上,这些对象可以通过ShoppingCart类的CartItems属性获得。
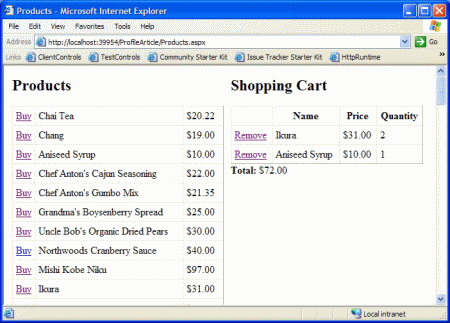
图2 在profile中存储购物篮
AddCartItem方法用于在购物篮中添加一个产品,该方法中包含了检测Profile是否存在ShoppingCart的代码。对于Profile中存储的对象,你必须自己实例化这些对象,他们不会自动实例化。
RemoveCartItem方法用于从购物篮中移除一个产品,该方法只是简单地通过调用Profile中的ShoppingCart对象的RemoveItem方法。
列表 6. Products.aspx (C#)
<%...@ Page Language="C#" %>
<%...@ Import Namespace="System.Globalization" %>
<script runat="server">...
void Page_Load() ...{
if (!IsPostBack)
BindShoppingCart();
}
void BindShoppingCart()
...{
if (Profile.ShoppingCart != null)
...{
CartGrid.DataSource = Profile.ShoppingCart.CartItems;
CartGrid.DataBind();
lblTotal.Text = Profile.ShoppingCart.Total.ToString("c");
}
}
void AddCartItem(Object s, EventArgs e)
...{
GridViewRow row = ProductGrid.SelectedRow;
int ID = (int)ProductGrid.SelectedDataKey.Value;
String Name = row.Cells[1].Text;
decimal Price = Decimal.Parse(row.Cells[2].Text,
NumberStyles.Currency);
if (Profile.ShoppingCart == null)
Profile.ShoppingCart = new ShoppingCart();
Profile.ShoppingCart.AddItem(ID, Name, Price);
BindShoppingCart();
}
void RemoveCartItem(Object s, EventArgs e)
...{
int ID = (int)CartGrid.SelectedDataKey.Value;
Profile.ShoppingCart.RemoveItem(ID);
BindShoppingCart();
}
</script>
<html>
<head>
<title>Products</title>
</head>
<body>
<form id="form1" runat="server">
<table width="100%">
<tr>
<td valign="top">
<h2>Products</h2>
<asp:GridView
ID="ProductGrid"
DataSourceID="ProductSource"
DataKeyNames="ProductID"
AutoGenerateColumns="false"
OnSelectedIndexChanged="AddCartItem"
ShowHeader="false"
CellPadding="5"
Runat="Server">
<Columns>
<asp:ButtonField
CommandName="select"
Text="Buy" />
<asp:BoundField
DataField="ProductName" />
<asp:BoundField
DataField="UnitPrice"
DataFormatString="{0:c}" />
</Columns>
</asp:GridView>
<asp:SqlDataSource
ID="ProductSource"
ConnectionString=
"Server=localhost;Database=Northwind;Trusted_Connection=true;"
SelectCommand=
"SELECT ProductID,ProductName,UnitPrice FROM Products"
Runat="Server" />
</td>
<td valign="top">
<h2>Shopping Cart</h2>
<asp:GridView
ID="CartGrid"
AutoGenerateColumns="false"
DataKeyNames="ID"
OnSelectedIndexChanged="RemoveCartItem"
CellPadding="5"
Width="300"
Runat="Server">
<Columns>
<asp:ButtonField
CommandName="select"
Text="Remove" />
<asp:BoundField
DataField="Name"
HeaderText="Name" />
<asp:BoundField
DataField="Price"
HeaderText="Price"
DataFormatString="{0:c}" />
<asp:BoundField
DataField="Quantity"
HeaderText="Quantity" />
</Columns>
</asp:GridView>
<b>Total:</b>
<asp:Label ID="lblTotal" Runat="Server" />
</td>
</tr>
</table>
</form>
</body>
</html>
原文地址:http://msdn.microsoft.com/asp.net/default.aspx?pull=/library/en-us/dnvs05/html/UserProfiles.asp
译者:Tony Qu
概要:许多ASP.NET应用程序需要跨访问的用户属性跟踪功能,在ASP.NET1.1中,我们只能人工实现这一功能。但如今,使用 ASP.NET 2.0的Profile对象,这个过程变得异常简单。Stephen Walther将验证该对象,并向你展示如何使用Profile来跟踪用户属性、创建一个购物篮,及其他一些例子。
总目录
介绍
User Profile总揽
定义User Profile
使用Profile组
使用复杂的Profile属性
继承一个Profile
迁移匿名Profile设置
配置Profile Provider
管理Profiles并生成Profile报告
总结
相关书籍
Microsoft ASP.NET 2.0支持被称为Profile的新对象,它可以自动在多个Web应用程序的访问之间存储用户信息。一个User Profile中可以存储各种类型的信息,这些信息既可以是简单的string和integer类型,也可以是复杂的自定义类型。例如,你可以存储用户的姓、购物篮、用户属性或网站使用情况统计。
本文中,你将学习如何在一个应用中定义user profile。我们也会向你演示如何配置使用不同provider的profile。最后,你将学习如何管理和生成user profile的报告。
User Profiles总揽
Profile 对象与Session对象十分相似,但是更好用一些。与Session相似的地方在于,Profile是相对于一个特定的用户的,也就是说,每个Web应用程序的用户都有他们自己的profile对象。与Session不同的是,Profile对象是持久对象。如果你向Session中添加一个项,在你离开网站时,该项就会消失。而Profile则完全不同,当你修改Profile的状态时,修改在多个访问之间均有效。
profile使用provider模式来存储信息,默认情况下,user profile的内容会保存在SQL Server Express数据库中,该数据库位于网站的App_Data目录。然而,在本文的后半部分,你将了解如何使用其他数据提供者(data provider)来存储信息,如完整版的SQL Server中的一个数据库或者一个Oracle数据库。
与Session不同,Profile是强类型的,Session对象仅仅是一个项集合而已,而profile对象则有强类型属性。
使用强类型是有它的道理的。例如,使用强类型,你就可以在Microsoft Visual Web Developer中使用智能感知技术,当你键入Profile和一个点的时候,智能感知会弹出你已经定义过的profile属性列表。
定义user profile
你既可以在machine.config中,也可以在web.config中定义一个user profile,由于你不能在应用程序的二级目录中创建一个包含文件profile节的web.config文件,这意味着你将无法在一个应用程序中定义两个以上的profile。
在列表1的web.config中,列举了一个简单的profile定义的实例,该profile有三个属性,FirstName, LastName和PageVisits。
列表1
<configuration>
<system.web>
<authentication mode="Forms" />
<anonymousIdentification enabled="true" />
<profile>
<properties>
<add
name="FirstName"
defaultValue="??"
allowAnonymous="true" />
<add
name="LastName"
defaultValue="??"
allowAnonymous="true" />
<add
name="PageVisits"
type="Int32"
allowAnonymous="true"/>
</properties>
</profile>
</system.web>
</configuration>
由于该profile需要同时被匿名用户和已认证用户使用,因此我们在web.config文件中增加包含一个< anonymousIdentification>元素,有了这个元素,系统就会自动为匿名用户生成唯一的ID。仔细看的话我们会发现,每一个 profile属性都有一个allowAnonymous特性,该特性表明这个profile属性是否允许被匿名用户使用。
默认的profile属性类型是System.String类型。列表1中,由于没有为FirstName和LastName这两个profile属性增加type特性,那么系统默认它们是string类型,而PageVisits属性则指定了type特性为Int32,因此该profile属性可用于表示一个整型值。
最后,注意FirstName和LastName属性都有defaultValue特性。你可以为简单的数据类型设置defaultValue特性,但你不能为复杂类型设置defaultValue特性。
当你定义好一个profile之后,系统会自动在下一次页面被调用时,生成一个与该profile相对应的类。这个类会被保存在"Temporary ASP.NET Files Directory"目录(该目录也用于存放用于动态生成页面的类)。你可以使用HttpContext的Profile属性(Property)调用该类。
当你定义好一个profile后,你可以使用如下方法为profile属性赋值。
[Visual Basic .NET]
Profile.FirstName = "Bill"
[C#]
Profile.FirstName = "Bill";
任何在web.config中定义的profile属性都会在Profile对象中呈现。
列表2演示了你该如何使用profile来持久化保存用户信息。这个页显示了FirstName,LastName, PageVisits三个属性的值,同时它包含了一个能够用于修改这三个属性的表单(form)。在Page_Load中更新PageVisits的值,这意味着每一次刷新页面,PageVisits的值都会改变。
图1 使用简单的profile
列表 2. Simple.aspx (C#)
<%...@ Page Language="C#" %>
<script runat="server">...
void Page_Load() ...{
Profile.PageVisits ++;
}
void UpdateProfile(Object s, EventArgs e) ...{
Profile.FirstName = txtFirstName.Text;
Profile.LastName = txtLastName.Text;
}
</script>
<html>
<head>
<title>Simple</title>
</head>
<body>
<form id="form1" runat="server">
<b>Name:</b> <%= Profile.FirstName %> <%= Profile.LastName %>
<br />
<b>Page Visits:</b> <%= Profile.PageVisits %>
<hr />
<b>First Name:</b>
<asp:TextBox ID="txtFirstName" Runat="Server" />
<br />
<b>Last Name:</b>
<asp:TextBox ID="txtLastName" Runat="Server" />
<br />
<asp:Button ID="Button1"
Text="Update Profile"
OnClick="UpdateProfile"
Runat="server" />
</form>
</body>
</html>
-------------------------------------------
列表 2. Simple.aspx (Visual Basic .NET)
<%...@ Page Language="VB" %>
<script runat="server">...
Sub Page_Load()
Profile.PageVisits += 1
End Sub
Sub UpdateProfile(ByVal s As Object, ByVal e As EventArgs)
Profile.FirstName = txtFirstName.Text
Profile.LastName = txtLastName.Text
End Sub
</script>
<html>
<head>
<title>Simple</title>
</head>
<body>
<form id="form1" runat="server">
<b>Name:</b> <%= Profile.FirstName %> <%= Profile.LastName %>
<br />
<b>Page Visits:</b> <%= Profile.PageVisits %>
<hr />
<b>First Name:</b>
<asp:TextBox ID="txtFirstName" Runat="Server" />
<br />
<b>Last Name:</b>
<asp:TextBox ID="txtLastName" Runat="Server" />
<br />
<asp:Button
Text="Update Profile"
OnClick="UpdateProfile"
Runat="server" />
</form>
</body>
</html>
如果你多次访问列表2中的页面,你会注意到PageVisits在不断增大。如果你关闭的浏览器,并在一周之后调用该页面,PageVisits属性仍然会保留原值。从这一点可以看出Profile为每个用户自动保存一个副本。
使用Profile组
尽管你仅可以为一个应用程序定义一个profile,但如果你需要让几个profile属性一起工作,把它们放在组中,会让你觉得它们更易管理。
例如,在列表3中,有一个带有两个组的profile,这两个组分别是Address和Preferences
列表3. Web.Config
<configuration>
<system.web>
<anonymousIdentification enabled="true" />
<profile>
<properties>
<group name="Address">
<add
name="Street"
allowAnonymous="true" />
<add
name="City"
allowAnonymous="true" />
</group>
<group name="Preferences">
<add
name="ReceiveNewsletter"
type="Boolean"
defaultValue="false"
allowAnonymous="true" />
</group>
</properties>
</profile>
</system.web>
</configuration>
当你用组来定义profile时,你应该使用组名来设置或读取profile属性。例如,在列表3中,你可以使用以下一些句子来完成三个profile属性的赋值。
[C#]
Profile.Address.City = "Modesto";
Profile.Address.Street = "111 King Arthur Ln";
Profile.Preferences.ReceiveNewsletter = false;
[Visual Basic .NET]
Profile.Address.City = "Modesto"
Profile.Address.Street = "111 King Arthur Ln"
Profile.Preferences.ReceiveNewsletter = False
一个profile的定义只能包含一层组,换句话说,你不能把其他的组放在一个profile组的下面一层。
使用复杂的profile属性
到目前为止,我们已经介绍了声明包含简单类型(如string或整型)属性的profile,其实你也可以在profile中声明复杂属性。
举个例子,假设你现在需要在profile中存储一个购物篮,如果这样做的话,你就可以在每次访问网站时获得自己的购物篮。
列表4 声明了一个包含profile,这个profile包含一个名为ShoppingCart的属性,而该属性的type特性是一个叫ShoppingCart的类(我们接下来会创建该类),该类名是有效的。
我们还会注意到,该声明中包含一个serializeAs特性,该特性可以帮助ShoppingCart使用二进制序列化器(binary serializer)进行持久化,而不是使用xml序列化器。
列表4 Web.config
<configuration>
<system.web>
<anonymousIdentification enabled="true" />
<profile>
<properties>
<add
name="ShoppingCart"
type="ShoppingCart"
serializeAs="Binary"
allowAnonymous="true" />
</properties>
</profile>
</system.web>
</configuration>
列表5 中有一个简单购物篮的实现代码,该购物篮拥有添加和删除项(item)的方法(method),同时它还拥有两个属性(property),一个是用于获得该购物篮中的所有项的,一个是用于表示所有商品的总价的。
列表5 ShoppingCart (c#)
using System;
using System.Collections;
[Serializable]
public class ShoppingCart
...{
public Hashtable _CartItems = new Hashtable();
// Return all the items from the Shopping Cart
public ICollection CartItems
...{
get ...{ return _CartItems.Values; }
}
// The sum total of the prices
public decimal Total
...{
get
...{
decimal sum = 0;
foreach (CartItem item in _CartItems.Values)
sum += item.Price * item.Quantity;
return sum;
}
}
// Add a new item to the shopping cart
public void AddItem(int ID, string Name, decimal Price)
...{
CartItem item = (CartItem)_CartItems[ID];
if (item == null)
_CartItems.Add(ID, new CartItem(ID, Name, Price));
else
...{
item.Quantity++;
_CartItems[ID] = item;
}
}
// Remove an item from the shopping cart
public void RemoveItem(int ID)
...{
CartItem item = (CartItem)_CartItems[ID];
if (item == null)
return;
item.Quantity--;
if (item.Quantity == 0)
_CartItems.Remove(ID);
else
_CartItems[ID] = item;
}
}
[Serializable]
public class CartItem
...{
private int _ID;
private string _Name;
private decimal _Price;
private int _Quantity = 1;
public int ID
...{
get ...{ return _ID; }
}
public string Name
...{
get ...{ return _Name; }
}
public decimal Price
...{
get ...{ return _Price; }
}
public int Quantity
...{
get ...{ return _Quantity; }
set ...{ _Quantity = value; }
}
public CartItem(int ID, string Name, decimal Price)
...{
_ID = ID;
_Name = Name;
_Price = Price;
}
}
如果你把列表5中的代码添加到应用程序的App_Code目录中,购物篮会自动被编译。
在列表5中有一点值得注意,那就是ShoppingCart和CartItem类都加上了可序列化的特性,这一点对于他们能否被序列化十分重要,只有这样才能保存在Profile对象中。最后,列表6的页面显示了可以被添加到购物篮中的产品。购物篮是通过BindShoppingCart方法从Profile对象中载入,该方法把购物篮中的对象绑定到一个GridView对象上,这些对象可以通过ShoppingCart类的CartItems属性获得。
图2 在profile中存储购物篮
AddCartItem方法用于在购物篮中添加一个产品,该方法中包含了检测Profile是否存在ShoppingCart的代码。对于Profile中存储的对象,你必须自己实例化这些对象,他们不会自动实例化。
RemoveCartItem方法用于从购物篮中移除一个产品,该方法只是简单地通过调用Profile中的ShoppingCart对象的RemoveItem方法。
列表 6. Products.aspx (C#)
<%...@ Page Language="C#" %>
<%...@ Import Namespace="System.Globalization" %>
<script runat="server">...
void Page_Load() ...{
if (!IsPostBack)
BindShoppingCart();
}
void BindShoppingCart()
...{
if (Profile.ShoppingCart != null)
...{
CartGrid.DataSource = Profile.ShoppingCart.CartItems;
CartGrid.DataBind();
lblTotal.Text = Profile.ShoppingCart.Total.ToString("c");
}
}
void AddCartItem(Object s, EventArgs e)
...{
GridViewRow row = ProductGrid.SelectedRow;
int ID = (int)ProductGrid.SelectedDataKey.Value;
String Name = row.Cells[1].Text;
decimal Price = Decimal.Parse(row.Cells[2].Text,
NumberStyles.Currency);
if (Profile.ShoppingCart == null)
Profile.ShoppingCart = new ShoppingCart();
Profile.ShoppingCart.AddItem(ID, Name, Price);
BindShoppingCart();
}
void RemoveCartItem(Object s, EventArgs e)
...{
int ID = (int)CartGrid.SelectedDataKey.Value;
Profile.ShoppingCart.RemoveItem(ID);
BindShoppingCart();
}
</script>
<html>
<head>
<title>Products</title>
</head>
<body>
<form id="form1" runat="server">
<table width="100%">
<tr>
<td valign="top">
<h2>Products</h2>
<asp:GridView
ID="ProductGrid"
DataSourceID="ProductSource"
DataKeyNames="ProductID"
AutoGenerateColumns="false"
OnSelectedIndexChanged="AddCartItem"
ShowHeader="false"
CellPadding="5"
Runat="Server">
<Columns>
<asp:ButtonField
CommandName="select"
Text="Buy" />
<asp:BoundField
DataField="ProductName" />
<asp:BoundField
DataField="UnitPrice"
DataFormatString="{0:c}" />
</Columns>
</asp:GridView>
<asp:SqlDataSource
ID="ProductSource"
ConnectionString=
"Server=localhost;Database=Northwind;Trusted_Connection=true;"
SelectCommand=
"SELECT ProductID,ProductName,UnitPrice FROM Products"
Runat="Server" />
</td>
<td valign="top">
<h2>Shopping Cart</h2>
<asp:GridView
ID="CartGrid"
AutoGenerateColumns="false"
DataKeyNames="ID"
OnSelectedIndexChanged="RemoveCartItem"
CellPadding="5"
Width="300"
Runat="Server">
<Columns>
<asp:ButtonField
CommandName="select"
Text="Remove" />
<asp:BoundField
DataField="Name"
HeaderText="Name" />
<asp:BoundField
DataField="Price"
HeaderText="Price"
DataFormatString="{0:c}" />
<asp:BoundField
DataField="Quantity"
HeaderText="Quantity" />
</Columns>
</asp:GridView>
<b>Total:</b>
<asp:Label ID="lblTotal" Runat="Server" />
</td>
</tr>
</table>
</form>
</body>
</html>

相关文章推荐
- 使用ASP.NET 2.0 Profile存储用户信息[翻译] Level 200
- 使用ASP.NET 2.0 Profile存储用户信息[翻译] Level 200
- 使用ASP.NET 2.0 Profile存储用户信息[翻译] Level 200
- 使用ASP.NET 2.0 Profile存储用户信息[翻译] Level 200
- 使用ASP.NET 2.0 Profile存储用户信息[翻译] Level 200
- 使用ASP.NET 2.0 Profile存储用户信息_1[翻译] Level 200
- 使用ASP.NET 2.0 Profile存储用户信息[翻译] Level 200
- 使用ASP.NET 2.0 Profile存储用户信息
- 使用ASP.NET 2.0 Profile存储用户信息_1[翻译] Level 200
- 使用ASP.NET 2.0 Profile存储用户信息
- 使用ASP.NET 2.0 Profile存储用户信息_2[翻译]
- 使用ASP.NET 2.0 Profile存储用户信息[翻译] Level 200
- 使用ASP.NET 2.0 Profile存储用户信息_2[翻译]
- 使用ASP.NET 2.0 Profile存储用户信息[翻译]
- 使用ASP.NET 2.0 Profile存储用户信息[翻译] Level 200
- 使用ASP.NET 2.0 Profile存储用户信息[翻译] Level 200
- 使用ASP.NET 2.0 Profile存储用户信息_2[翻译]
- 使用ASP.NET 2.0 Profile存储用户信息
- 使用ASP.NET 2.0 Profile存储用户信息_2[翻译] Level 200
- 使用ASP.NET 2.0 Profile存储用户信息