模型评估与改进:网格搜索
2022-05-26 22:45
1456 查看
我们已经知道如何评估一个模型的泛化能力:交叉验证 接着学习如何通过调参来提升模型的泛化能力
⭐网格搜索:尝试我们所关心的参数的所有可能组合
1、简单网格搜索
from sklearn.svm import SVC
from sklearn.model_selection import train_test_split
from sklearn.datasets import load_iris

#在两个参数上使用for循环

#加载数据
iris = load_iris()
X_train,X_test,y_train,y_test = train_test_split(iris.data,iris.target,random_state=0)

best_score = 0
p={}

C = [0.001,0.01,0.1,1,10,100]
G = [0.001,0.01,0.1,1,10,100]

for c in C:
for g in G:
svc = SVC(C=c,gamma=g)
svc.fit(X_train,y_train)
score = svc.score(X_test,y_test)

if score > best_score:
best_score = score
p = {'C':c,'gamma':g}

print("best score:{}".format(best_score))
print('best parameters:{}'.format(p))

'''
输出
```
best score:0.9736842105263158
best parameters:{'C': 0.1, 'gamma': 1}
```
'''
📣 虽然最好精度达到了0.97,但该精度不一定能推广到新数据上
- 因为这个例子中,使用了训练集来调参,因此不能用训练集来评估模型
- 要找一个独立的数据集,没有被用过的
2、参数过拟合的风险与验证集
⭐再次划分数据:训练集,验证集,测试集
训练集:拟合模型
验证集:调参
测试集:评估模型性能
mglearn.plots.plot_threefold_split()

#利用验证集选定最佳参数后,利用找到的参数构建一个模型
#再次在训练集和验证集上训练(使得训练数据尽可能的多)

#训练集+验证集 以及 测试集
X_train_val,X_test,y_train_val,y_test = train_test_split(iris.data,iris.target,random_state=0)

#将训练集+验证集分开
X_train,X_val,y_train,y_val = train_test_split(X_train_val,y_train_val,random_state=1)

print("size of train_set:{}\n val_set:{} \n test_set:{}".format(X_train.shape,X_val.shape,X_test.shape))

'''
```
size of train_set:(84, 4)
val_set:(28, 4)
test_set:(38, 4)
```
'''
best_score = 0
p={}

C = [0.001,0.01,0.1,1,10,100]
G = [0.001,0.01,0.1,1,10,100]

for c in C:
for g in G:
svc = SVC(C=c,gamma=g)
svc.fit(X_train,y_train)
score = svc.score(X_val,y_val)

if score > best_score:
best_score = score
p = {'C':c,'gamma':g}

print("best score:{}".format(best_score))
print('best parameters:{}'.format(p))

#用最优参数构建一个模型

svc = SVC(**p)
svc.fit(X_train_val,y_train_val)
score = svc.score(X_test,y_test)
print("Test set with best parameters:{}".format(score))

'''
```
best score:0.9642857142857143
best parameters:{'C': 0.1, 'gamma': 1}
Test set with best parameters:0.9736842105263158
```
'''
📣 保留一个单独的测试集,仅用于最终评估是很重要的!
- 利用训练集和验证集组合完成所有的探索性分析与模型选择
- 并保留测试集用于最终的模型评估
3、带交叉验证的网格搜索
将数据划分为3个数据集:训练集、验证集、测试集是可行的,但这种方法对数据的划分方法相当敏感
- 不同的划分方法,会导致不同的最优参数
⭐为了得到泛化性能的更好估计,我们可以选择使用带交叉验证的网格搜索
from sklearn.model_selection import cross_val_score

#加载数据
iris = load_iris()
X_train,X_test,y_train,y_test = train_test_split(iris.data,iris.target,random_state=0)

best_score = 0
p={}

C = [0.001,0.01,0.1,1,10,100]
G = [0.001,0.01,0.1,1,10,100]

for c in C:
for g in G:
svc = SVC(C=c,gamma=g)

#交叉验证
score = cross_val_score(svc,X_train,y_train,cv=5)
score = score.mean()

if score > best_score:
best_score = score
p = {'C':c,'gamma':g}

print("best score:{}".format(best_score))
print('best parameters:{}'.format(p))

#用最优参数构建一个模型

svc = SVC(**p)
svc.fit(X_train,y_train)
score = svc.score(X_test,y_test)
print("Test set with best parameters:{}".format(score))

```
输出:
'''
best score:0.9731225296442687
best parameters:{'C': 10, 'gamma': 0.1}
Test set with best parameters:0.9736842105263158
```

'''
📣 使用5折交叉验证对C和gamma特定取值的svm的精度进行评估,需要训练36*5=180个模型
- 花费时间多
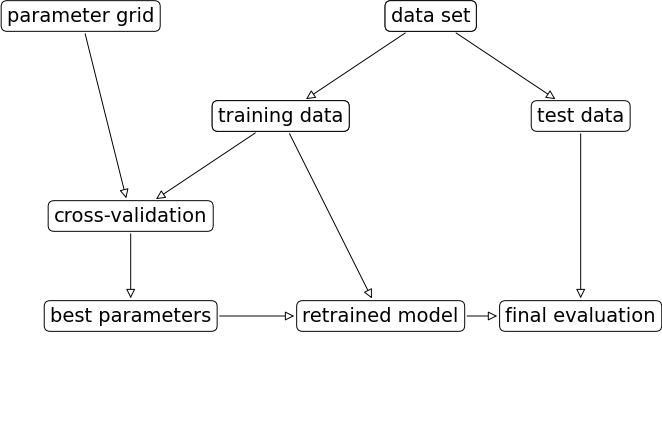
网格搜索的实现流程:
mglearn.plots.plot_grid_search_overview()
3.1 GridSearchCV类
ps:带交叉验证的网格搜索sklearn已经实现
⭐GridSearchCV类
以估计器estimator的方式实现,需要用一个字典指定要搜索的参数
#参数字典

param_grid = {"C":[0.001,0.01,0.1,1,10,100],
"gamma":[0.001,0.01,0.1,1,10,100]}

#使用模型(svm)、参数网格(param_grid)、交叉验证策略(比如说5折),将GridSearchCV实例化

from sklearn.model_selection import GridSearchCV

#实例化
grid_search = GridSearchCV(SVC(),param_grid,cv=5)

#交叉验证可以代替划分训练集和验证集
#但我们需要将数据划分为训练集和验证集,避免参数过拟合
X_train,X_test,y_train,y_test = train_test_split(iris.data,iris.target,random_state=0)

#创建的grid_search对象的行为就像是一个分类器,它具有fit,score,predict的方法,因此可以在训练集和测试集使用

grid_search.fit(X_train,y_train)
print("Teat score:{}".format(grid_search.score(X_test,y_test)))

'''
`Teat score:0.9736842105263158`
'''
#gird_search的最优参数保存在best_params_属性中
#交叉验证的最佳精度保存在best_score_属性中

print("Best parametes:{}".format(grid_search.best_params_))
print("Best cross validation scire:{}".format(grid_search.best_score_))

'''
```
Best parametes:{'C': 10, 'gamma': 0.1}
Best cross validation scire:0.9731225296442687
```
'''
(1)分析交叉验证的结果
⭐通常最好从相对比较稀疏且较小的网格开始搜索
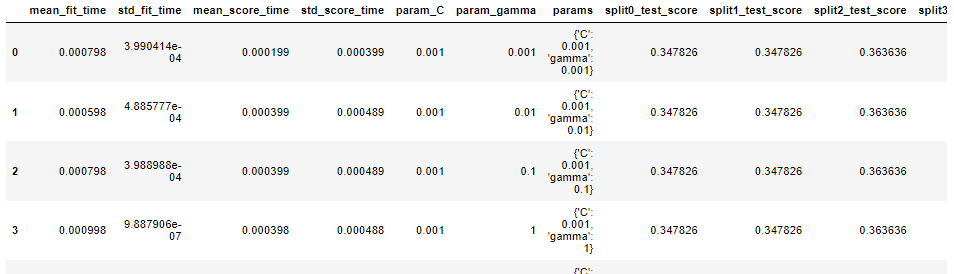
网格搜索的结果可以在cv_results_属性中找到
results = pd.DataFrame(grid_search.cv_results_)
results.head()
#用热图可视化cv_results,x轴为gamma,y轴为C,表格中的值代表精度

scores = np.array(results.mean_test_score).reshape(6,6)

mglearn.tools.heatmap(scores,xlabel='gamma',xticklabels=param_grid['gamma'],
ylabel='C',yticklabels=param_grid['C'],cmap='viridis')
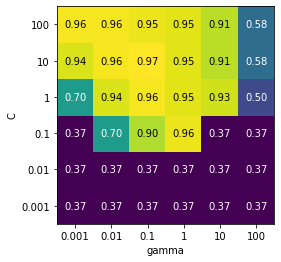
📣
图中每一个方块对应一次交叉验证的结果(36个方块)
参数的范围要足够大,每个参数的最佳取值不能位于图像边界上
(2)在非网格的空间中搜索
GridSearchCV的param_gird可以是字典组成的列表
param_grid = [{'kernel':['rbf'],
"C":[0.001,0.01,0.1,1,10,100],
"gamma":[0.001,0.01,0.1,1,10,100]},
{'kernel':['linear'],
"C":[0.001,0.01,0.1,1,10,100]}
]

print("List of girds:\n{}".format(param_grid))

'''
```
List of girds:
[{'kernel': ['rbf'], 'C': [0.001, 0.01, 0.1, 1, 10, 100], 'gamma': [0.001, 0.01, 0.1, 1, 10, 100]}, {'kernel': ['linear'], 'C': [0.001, 0.01, 0.1, 1, 10, 100]}]
```
'''
#用这个更复杂的参数搜索

#实例化
grid_search = GridSearchCV(SVC(),param_grid,cv=5)

grid_search.fit(X_train,y_train)

#gird_search的最优参数保存在best_params_属性中
#交叉验证的最佳精度保存在best_score_属性中

print("Best parametes:{}".format(grid_search.best_params_))
print("Best cross validation scire:{}".format(grid_search.best_score_))

'''
```
Best parametes:{'C': 10, 'gamma': 0.1, 'kernel': 'rbf'}
Best cross validation scire:0.9731225296442687
```
'''
#查看这个更复杂的param_grid
results = pd.DataFrame(grid_search.cv_results_)
results.T

(3)使用不同的交叉验证策略进行网格搜索
1、嵌套交叉验证 2、交叉验证与网格搜索并行
#1、嵌套交叉验证
#在前面我们使用GridSearchCV时,将数据单次划分为训练集和测试集,可能导致结果不稳定
#嵌套交叉验证:将原始数据使用交叉验证进行多次划分

scores = cross_val_score(GridSearchCV(SVC(),param_grid,cv=5),iris.data,iris.target,cv=5)
print("Cross-Validation scores:",scores)
print("Mean cross-validation score:",scores.mean())

'''
```
Cross-Validation scores: [0.96666667 1.         0.9        0.96666667 1.        ]
Mean cross-validation score: 0.9666666666666668
```
'''
4、参考文献
《python机器学习基础教程》

相关文章推荐
- 如何使用网格搜索来优化深度学习模型中的超参数(Keras)
- 十、用scikit-learn的网格搜索快速找到最优模型参数
- 机器学习(四)——模型调参利器 gridSearchCV(网格搜索)
- 模型评估与改进(学习记录)
- 机器学习模型评估 过拟合与欠拟合的改进方案
- 时间序列预测基础教程系列(15)_如何网格搜索ARIMA模型超参数(Python)
- 【机器学习】网格搜索优化机器学习模型
- python 中bayes模型超参数并行网格搜索 程序分析
- 2.9 线性回归算法学习——kNN模型解决回归问题及网格搜索最优参数
- 模型评估与改进
- 【Scikit-Learn 中文文档】模型评估: 量化预测的质量 - 模型选择和评估 - 用户指南 | ApacheCN
- [CSP]201803-4 棋局评估 min-max搜索
- 第二章——模型评估与选择 Part 2
- 【Scikit-Learn 中文文档】模型评估: 量化预测的质量 - 模型选择和评估 - 用户指南 | ApacheCN
- 机器学习(九) - - 模型评估和选择④比较检验
- 【Scikit-Learn 中文文档】模型持久化 - 模型选择和评估 - 用户指南 | ApacheCN
- 线性模型如何预测趋势,如何评估线性模型的性能
- 机器学习算法 原理、实现与实战——模型评估与模型选择
- keras评估模型
- BitBucket支持Git V2,并改进了搜索功能