微服务生态组件之Spring Cloud OpenFeign详解和源码分析
Spring Cloud OpenFeign
概述
Spring Cloud OpenFeign 官网地址 https://spring.io/projects/spring-cloud-openfeign#overview 总体概览介绍,最新版本为3.1.2
Spring Cloud OpenFeign 文档地址 https://docs.spring.io/spring-cloud-openfeign/docs/current/reference/html/ 介绍OpenFeign的详细使用
在前面《SpringCloudAlibaba注册中心与配置中心之利器Nacos实战与源码分析(中)》文章中我们已简单接触Spring Cloud OpenFeign的使用,本篇我们将单独来学习OpenFeign。学习OpenFeign之前我们先来了解Feign,在没有Feign之前Java可以通过HttpClient、OkHttp、HttpURLConnection、RestTemplate、WebClient等来操作Http,而Feign是NetFlix公司开发的声明式、模板化的HTTP客户端,使得使用Http请求远程服务时就像调用本地方法一样的体验,Feign出现使得我们更加便捷、优雅的调用HTTP客户端,Feign支持多种注解例如自带的注解和JAX-RS注解。到此引出本篇主角OpenFeign也是一个声明式REST客户端,使用JAX-RS或Spring MVC注解,还支持可插拔编码器和解码器,集成Spring Cloud LoadBalancer,在使用Feign时提供一个负载均衡的http客户端。简单的说Spring Cloud OpenFeign是对Feign一个增强,使其支持Spring MVC注解,并与SpringCloud完成整合。
简单使用
前面的文章示例已简单介绍openfeign的使用,各位可再去看《SpringCloudAlibaba注册中心与配置中心之利器Nacos实战与源码分析(中)》文章中的内容,大致的步骤为Pom文件加spring-cloud-starter-openfeign启动器依赖、加注解加配置、最后SpringBoot启动类上加启用注解@EnableFeignClients就完成。而Spring MVC注解风格的不同类型请求方法使用示例如下:
@FeignClient("stores")
public interface StoreClient {
@RequestMapping(method = RequestMethod.GET, value = "/stores")
List<Store> getStores();

@RequestMapping(method = RequestMethod.GET, value = "/stores")
Page<Store> getStores(Pageable pageable);

@RequestMapping(method = RequestMethod.POST, value = "/stores/{storeId}", consumes = "application/json")
Store update(@PathVariable("storeId") Long storeId, Store store);

@RequestMapping(method = RequestMethod.DELETE, value = "/stores/{storeId:\\d+}")
void delete(@PathVariable Long storeId);
}
关于Spring Cloud OpenFeign配置属性的列表详细可查看附录页。而常见的配置属性如下:
feign:
client:
config:
feignName:
connectTimeout: 5000
readTimeout: 5000
loggerLevel: full
errorDecoder: com.example.SimpleErrorDecoder
retryer: com.example.SimpleRetryer
defaultQueryParameters:
query: queryValue
defaultRequestHeaders:
header: headerValue
requestInterceptors:
- com.example.FooRequestInterceptor
- com.example.BarRequestInterceptor
decode404: false
encoder: com.example.SimpleEncoder
decoder: com.example.SimpleDecoder
contract: com.example.SimpleContract
capabilities:
- com.example.FooCapability
- com.example.BarCapability
queryMapEncoder: com.example.SimpleQueryMapEncoder
metrics.enabled: false
契约配置
如果我们项目原来是使用NetFlix的原生Feign注解进行开发,在OpenFeign中可无需修改Feign原生注解,只需进行配置就可以轻易兼容原来代码无需整改。前面文章示例使用OpenFeign声明代码如下
package cn.itxs.ecom.commons.service.openfeign;

import org.springframework.cloud.openfeign.FeignClient;
import org.springframework.web.bind.annotation.PathVariable;
import org.springframework.web.bind.annotation.RequestMapping;

@FeignClient("ecom-storage-service")
public interface StorageFeignService {
@RequestMapping("/deduct/{commodityCode}/{count}")
String deduct(@PathVariable("commodityCode") String commodityCode, @PathVariable("count") int count);
}
- 修改契约配置,支持Feign原生注解(推荐)
创建FeignConfiguration配置类
@Configuration
public class FeignConfiguration {
@Bean
public Contract feignContract() {
return new feign.Contract.Default();
}
}
- 或者可以通过YAML文件配置契约,指定feign原生注解契约配置
feign:
client:
config:
ecom-order-service:
loggerLevel: basic
contract: feign.Contract.Default
- 配置中使用feign的原生注解
package cn.itxs.ecom.commons.service.openfeign;

import feign.Param;
import feign.RequestLine;
@FeignClient("ecom-storage-service")
public interface StorageFeignService {
@RequestLine("GET /deduct/{commodityCode}/{count}")
String deduct(@Param("commodityCode") String commodityCode, @Param("count") int count);
}
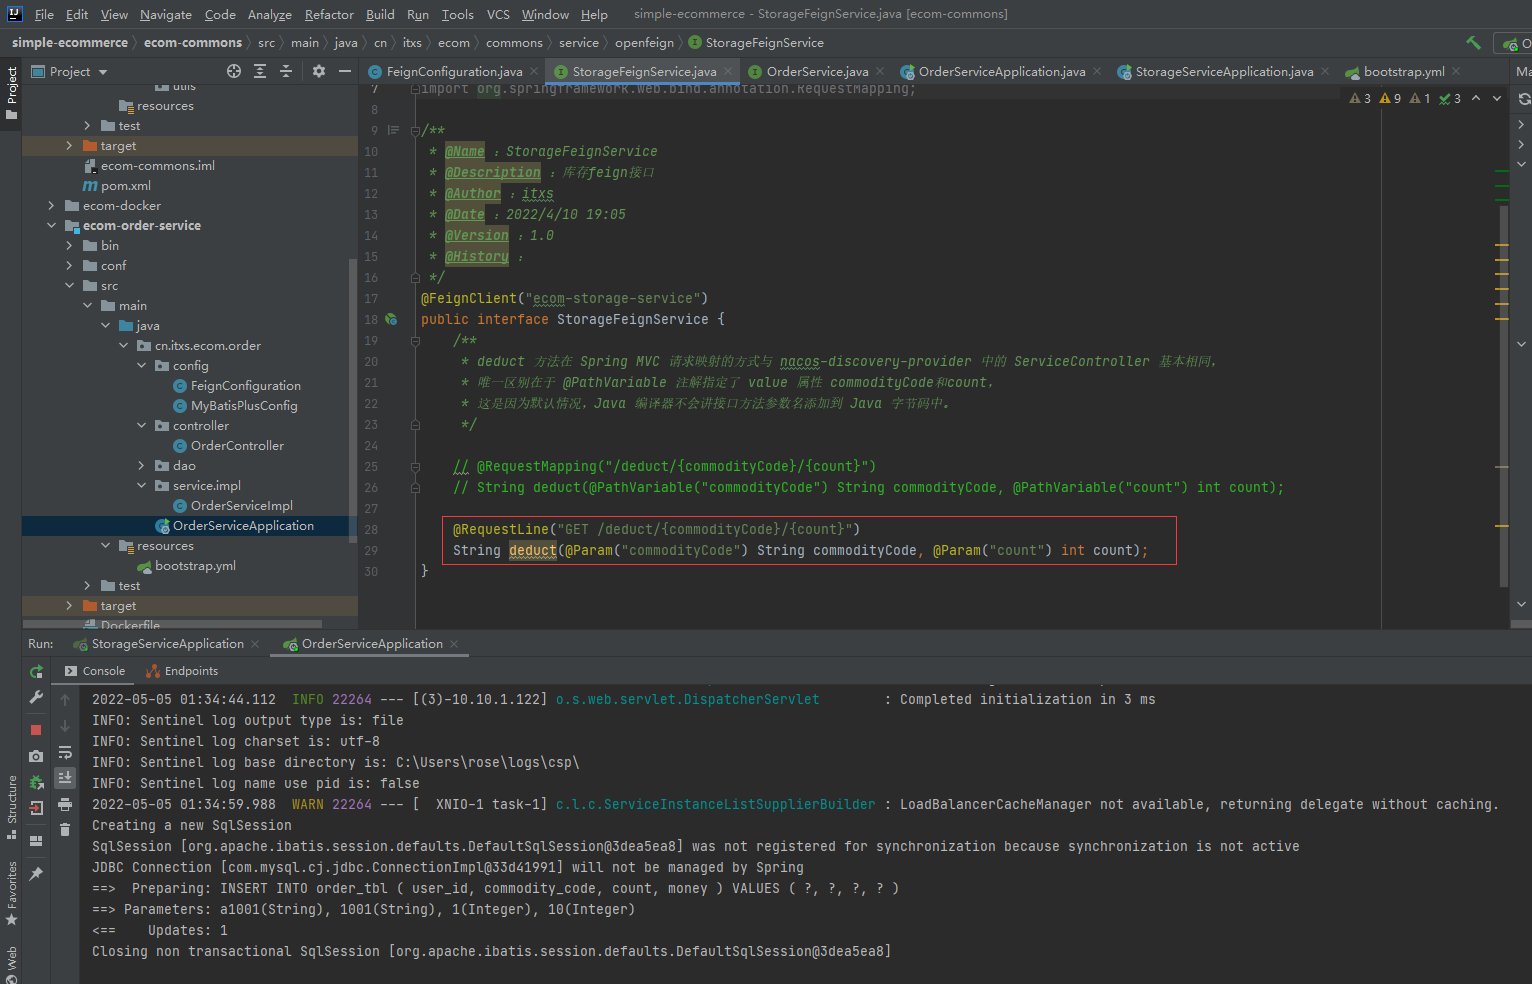
启动库存和订单微服务,访问订单服务接口,通过原生feign注解调用库存的服务

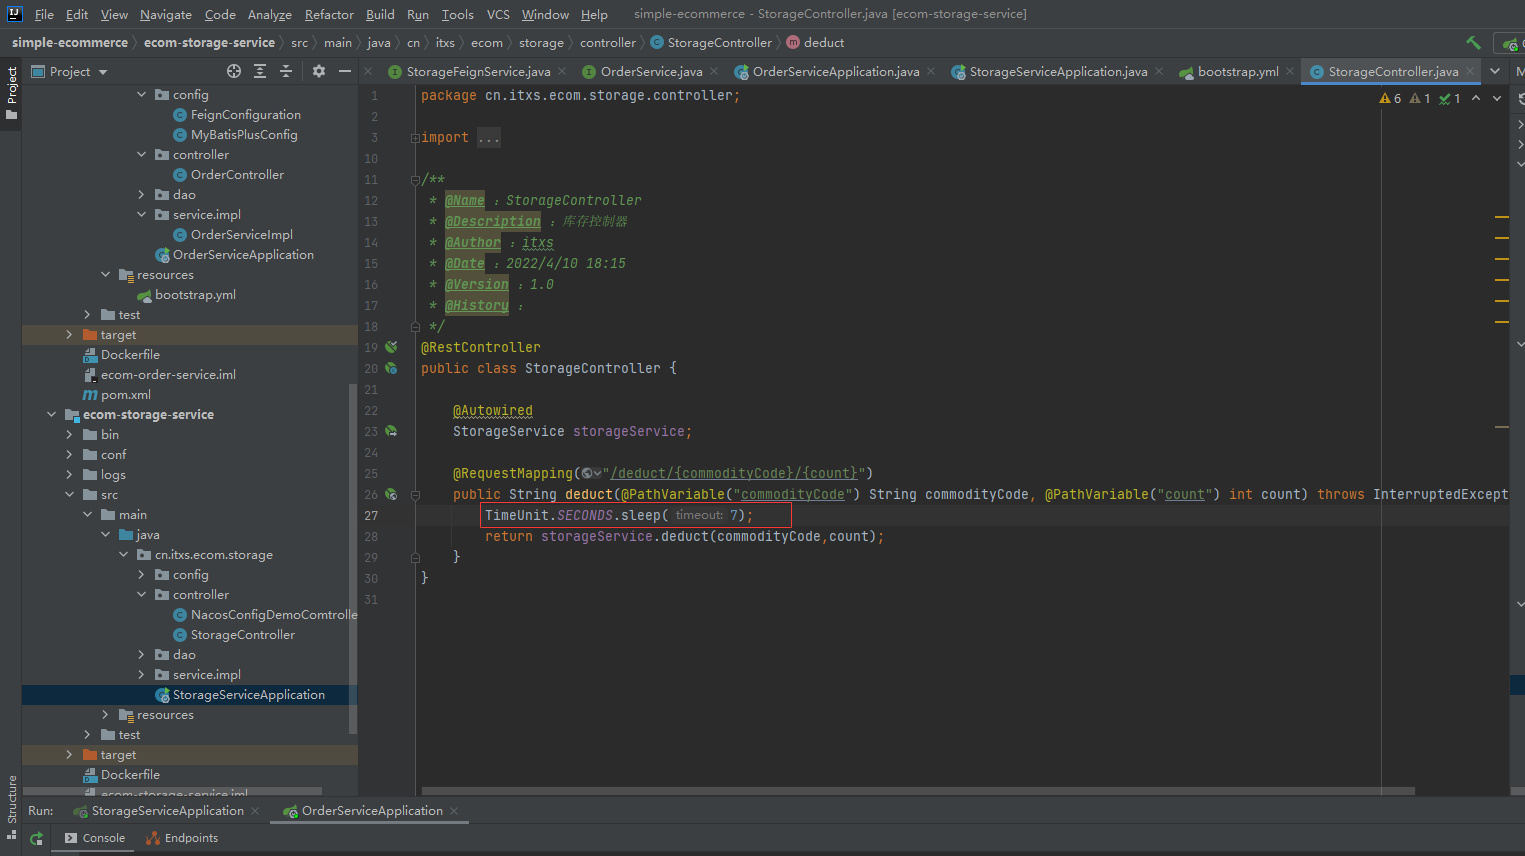
连接超时时间
在配置文件中设置连接超时时间如下
feign:
client:
config:
# feignName,feign名称
ecom-storage-service:
# 连接超时时间,防止由于服务器处理时间过长而阻塞调用方,默认2s
connectTimeout: 3000
# 请求处理超时时间,在建立连接时应用,并在返回响应时间过长时触发,默认5s
readTimeout: 5000
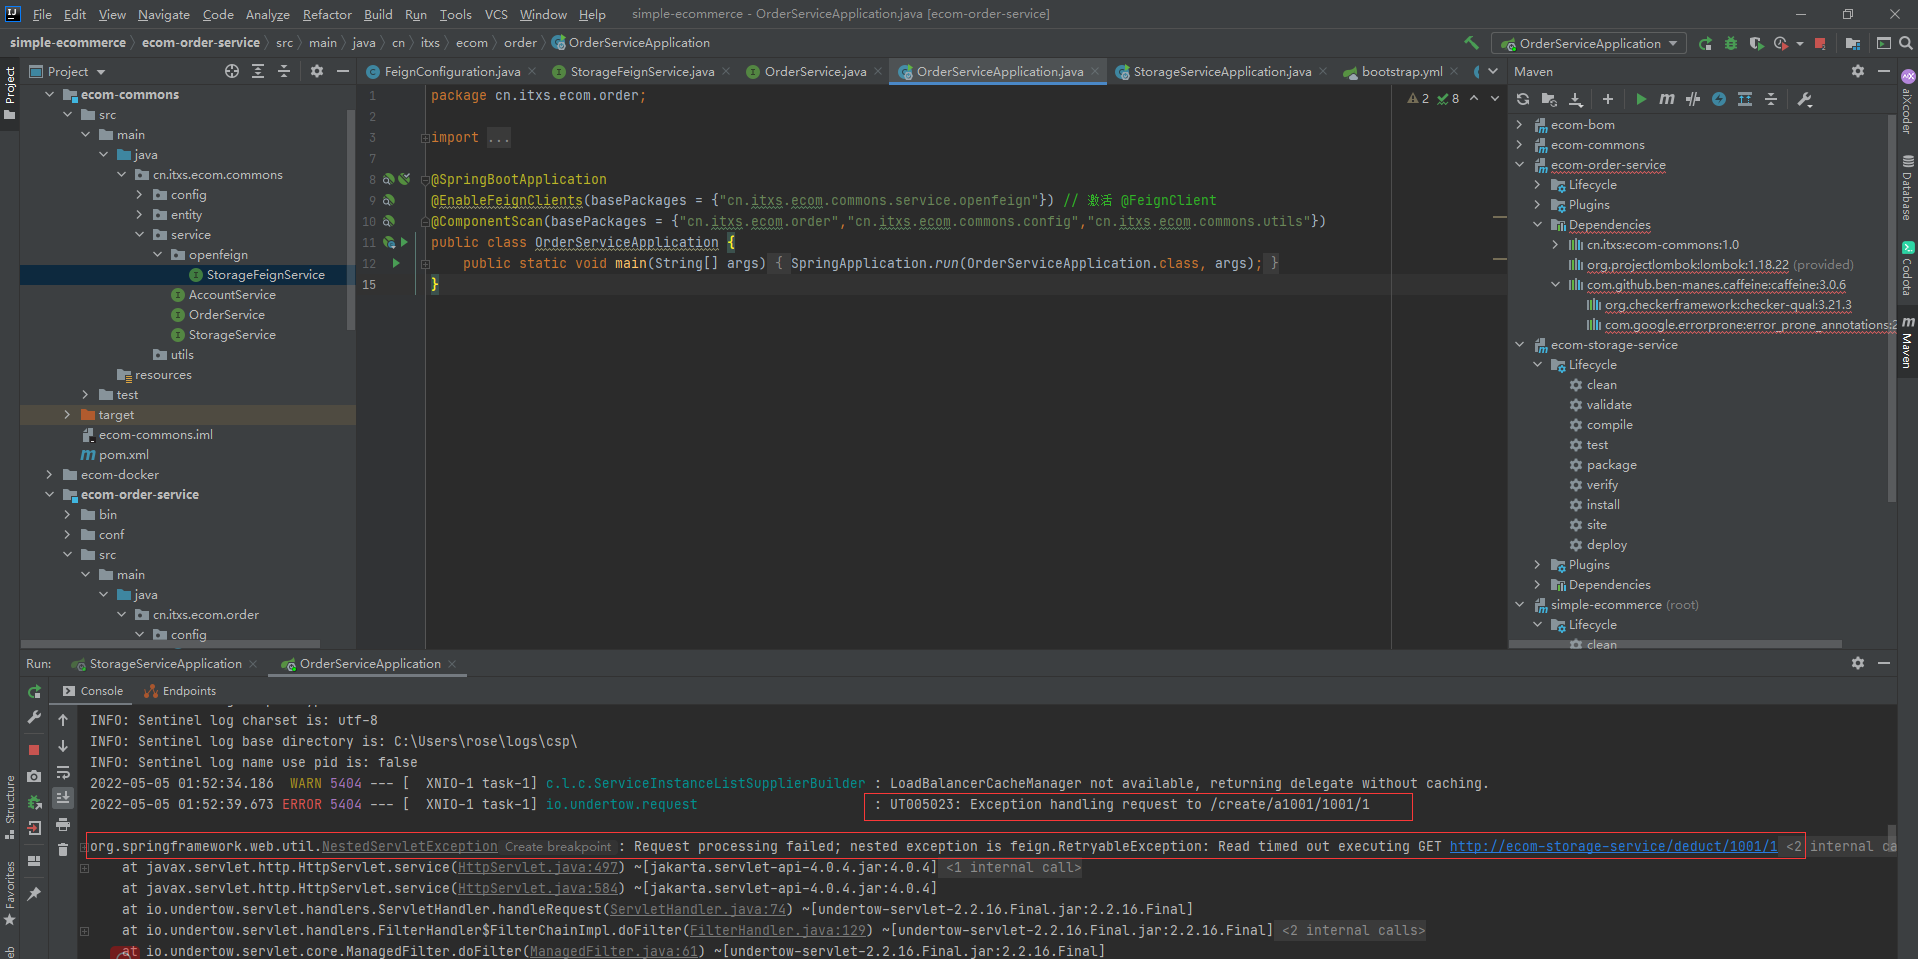
为了测试效果,我们在库存微服务的方法中添加睡眠7秒,超过超时时间
然后重新启动库存和订单微服务,访问订单服务创建订单接口后调用库存时出现了请求处理超时提示
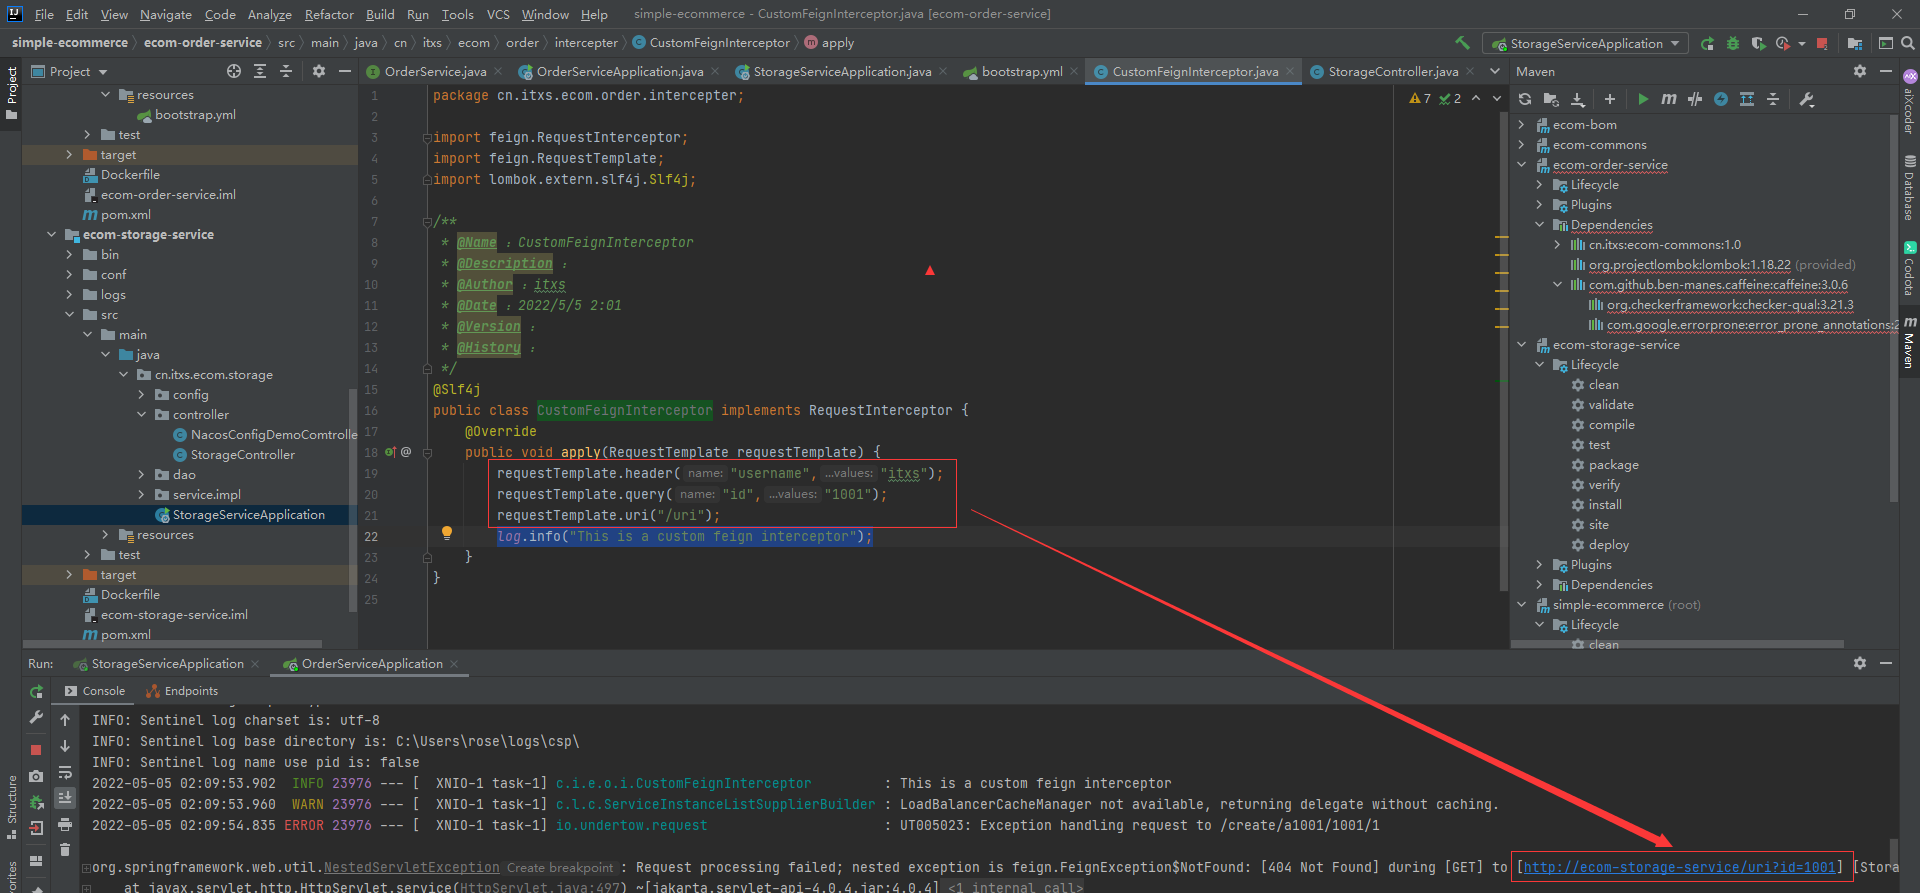
自定义拦截器
在订单微服务中增加自定义拦截器CustomFeignInterceptor
package cn.itxs.ecom.order.intercepter;

import feign.RequestInterceptor;
import feign.RequestTemplate;
import lombok.extern.slf4j.Slf4j;

@Slf4j
public class CustomFeignInterceptor implements RequestInterceptor {
@Override
public void apply(RequestTemplate requestTemplate) {
requestTemplate.header("username","itxs");
requestTemplate.query("id","1001");
requestTemplate.uri("/uri");
log.info("This is a custom feign interceptor");
}
}
可以在配置类中通过@Bean放在Spring容器中
@Configuration
public class FeignConfiguration {
@Bean
public Contract feignContract() {
return new feign.Contract.Default();
}

@Bean
public CustomFeignInterceptor customFeignInterceptor() {
return new CustomFeignInterceptor();
}
}
也可以直接在yaml文件配置如下:
feign:
client:
config:
requestInterceptors:
- cn.itxs.ecom.order.intercepter.CustomFeignInterceptor
启动订单和库存微服务,访问订单创建接口,订单微服务的日志中出现我们在拦截器中加入参数和uri地址。
Feign日志
- NONE,没有日志记录(默认)。
- BASIC,只记录请求方法和URL,以及响应状态码和执行时间。
- HEADERS:记录基本信息以及请求和响应头。
- FULL:记录请求和响应的头、正文和元数据。
记录日志形式同样可以通过配置类或者配置文件参数配置
@Configuration
public class FeignConfiguration {
@Bean
Logger.Level feignLoggerLevel() {
return Logger.Level.FULL;
}
}
源码分析
前面我们在订单微服务的SpringBoot启动类上加启用注解@EnableFeignClients,我们直接来看下这个注解的大致功能

容易看出@EnableFeignClients注解上会通过@Import引入FeignClientsRegistrar,这个类实现了ImportBeanDefinitionRegistrar,在Spring容器启动时会加载这个类中的registerBeanDefinitions方法,在这个方法里又调用了注册feign客户端的registerFeignClients方法:
public void registerBeanDefinitions(AnnotationMetadata metadata, BeanDefinitionRegistry registry) {
registerDefaultConfiguration(metadata, registry);
// 注册feign客户端
registerFeignClients(metadata, registry);
}

public void registerFeignClients(AnnotationMetadata metadata, BeanDefinitionRegistry registry) {

LinkedHashSet<BeanDefinition> candidateComponents = new LinkedHashSet<>();
// 获取标注为@EnableFeignClients注解的属性
Map<String, Object> attrs = metadata.getAnnotationAttributes(EnableFeignClients.class.getName());
// 获取clients属性中配置的类
final Class<?>[] clients = attrs == null ? null : (Class<?>[]) attrs.get("clients");
if (clients == null || clients.length == 0) {
// 获取需要扫描包路径下有FeignClient注解的类
ClassPathScanningCandidateComponentProvider scanner = getScanner();
scanner.setResourceLoader(this.resourceLoader);
scanner.addIncludeFilter(new AnnotationTypeFilter(FeignClient.class));
Set<String> basePackages = getBasePackages(metadata);
for (String basePackage : basePackages) {
candidateComponents.addAll(scanner.findCandidateComponents(basePackage));
}
}
else {
for (Class<?> clazz : clients) {
candidateComponents.add(new AnnotatedGenericBeanDefinition(clazz));
}
}

for (BeanDefinition candidateComponent : candidateComponents) {
if (candidateComponent instanceof AnnotatedBeanDefinition) {
// 验证带注释的类是一个接口
AnnotatedBeanDefinition beanDefinition = (AnnotatedBeanDefinition) candidateComponent;
AnnotationMetadata annotationMetadata = beanDefinition.getMetadata();
// 断言FeignClient修饰的类必须是接口
Assert.isTrue(annotationMetadata.isInterface(), "@FeignClient can only be specified on an interface");
// 获取FeignClient注解上的属性值
Map<String, Object> attributes = annotationMetadata
.getAnnotationAttributes(FeignClient.class.getCanonicalName());

String name = getClientName(attributes);
registerClientConfiguration(registry, name, attributes.get("configuration"));
// 注册feignClient
registerFeignClient(registry, annotationMetadata, attributes);
}
}
}
前面的代码逻辑主要是解析出项目可扫描路径下被@FeignClient修饰的接口,然后调用registerFeignClient方法注入到Spring容器中。registerFeignClient的代码逻辑较多,重点分支如下
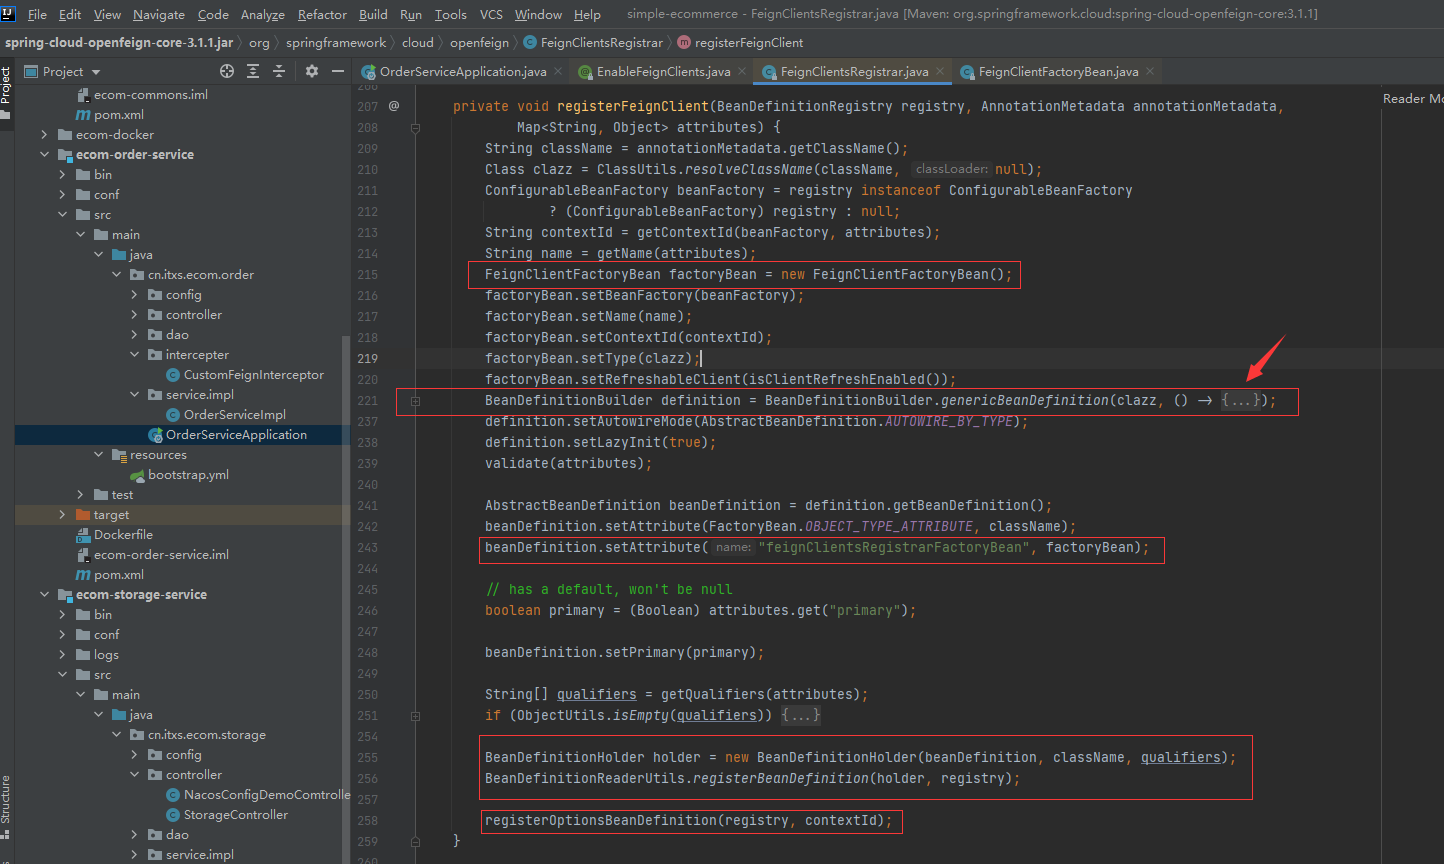
我们先抓住重点,在截图中代码段中光标+号收起部分代码内容如下:
BeanDefinitionBuilder definition = BeanDefinitionBuilder.genericBeanDefinition(clazz, () -> {
factoryBean.setUrl(getUrl(beanFactory, attributes));
factoryBean.setPath(getPath(beanFactory, attributes));
factoryBean.setDecode404(Boolean.parseBoolean(String.valueOf(attributes.get("decode404"))));
Object fallback = attributes.get("fallback");
if (fallback != null) {
factoryBean.setFallback(fallback instanceof Class ? (Class<?>) fallback
: ClassUtils.resolveClassName(fallback.toString(), null));
}
Object fallbackFactory = attributes.get("fallbackFactory");
if (fallbackFactory != null) {
factoryBean.setFallbackFactory(fallbackFactory instanceof Class ? (Class<?>) fallbackFactory
: ClassUtils.resolveClassName(fallbackFactory.toString(), null));
}
return factoryBean.getObject();
});
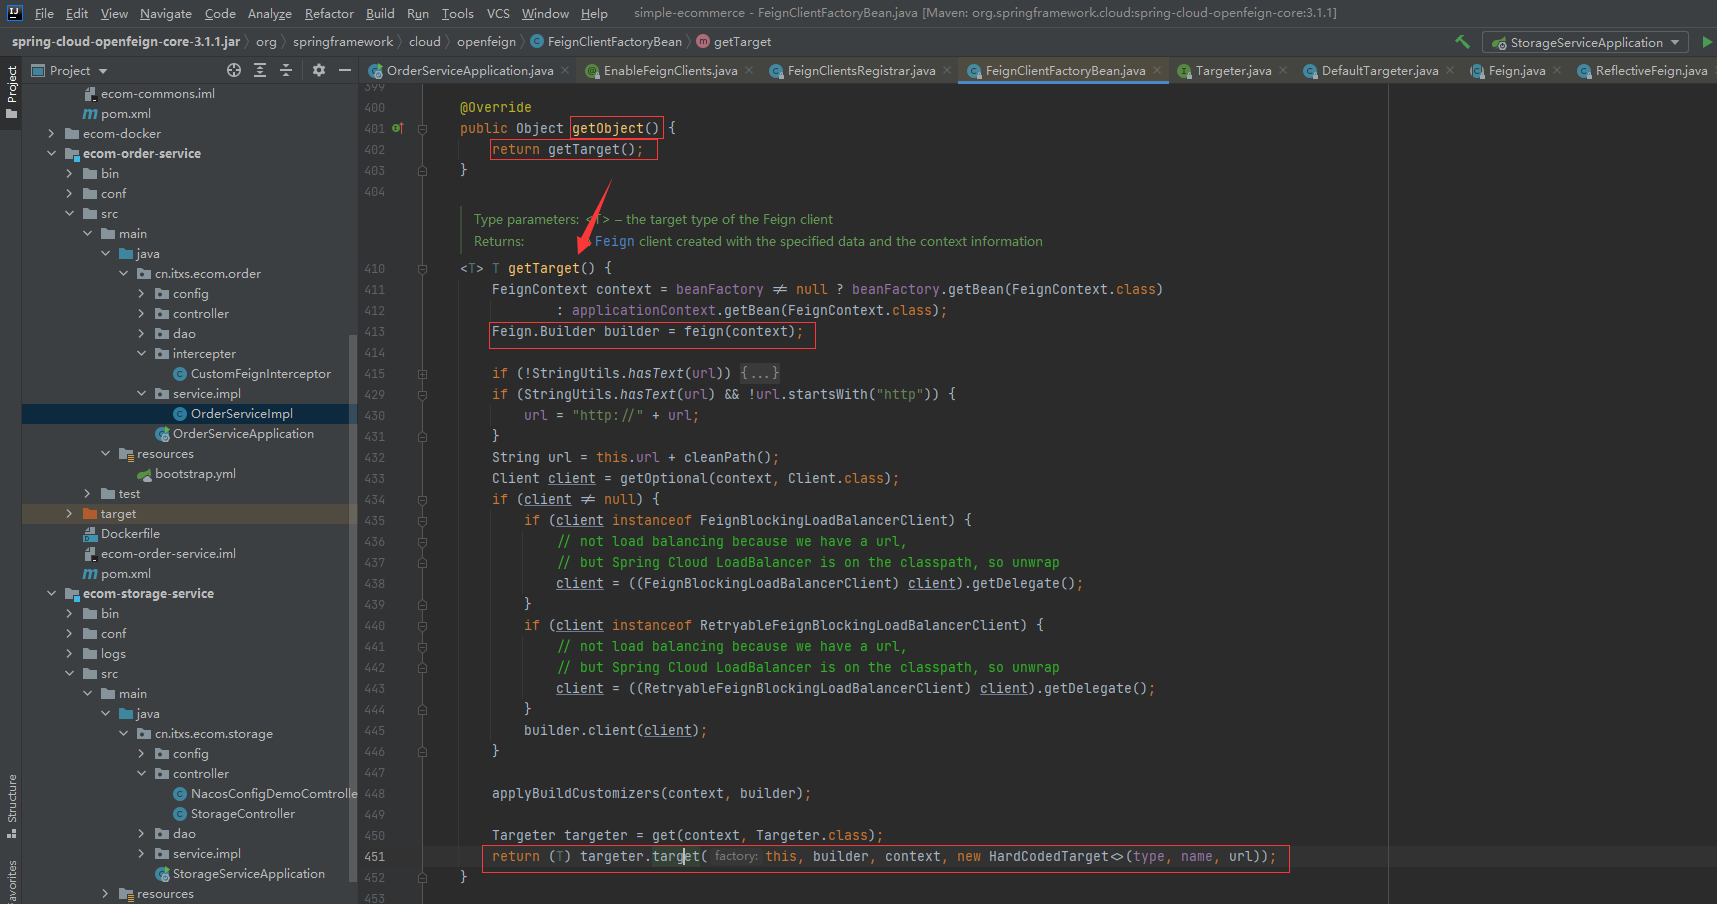
这里向容器里注册的是一个FeignClientFactoryBean,当我们从容器中获取对应对象时,会调用factoryBean这个类中的getObject()方法,
Feign是一个abstract抽象类,builder()返回的是一个内部类Builder,
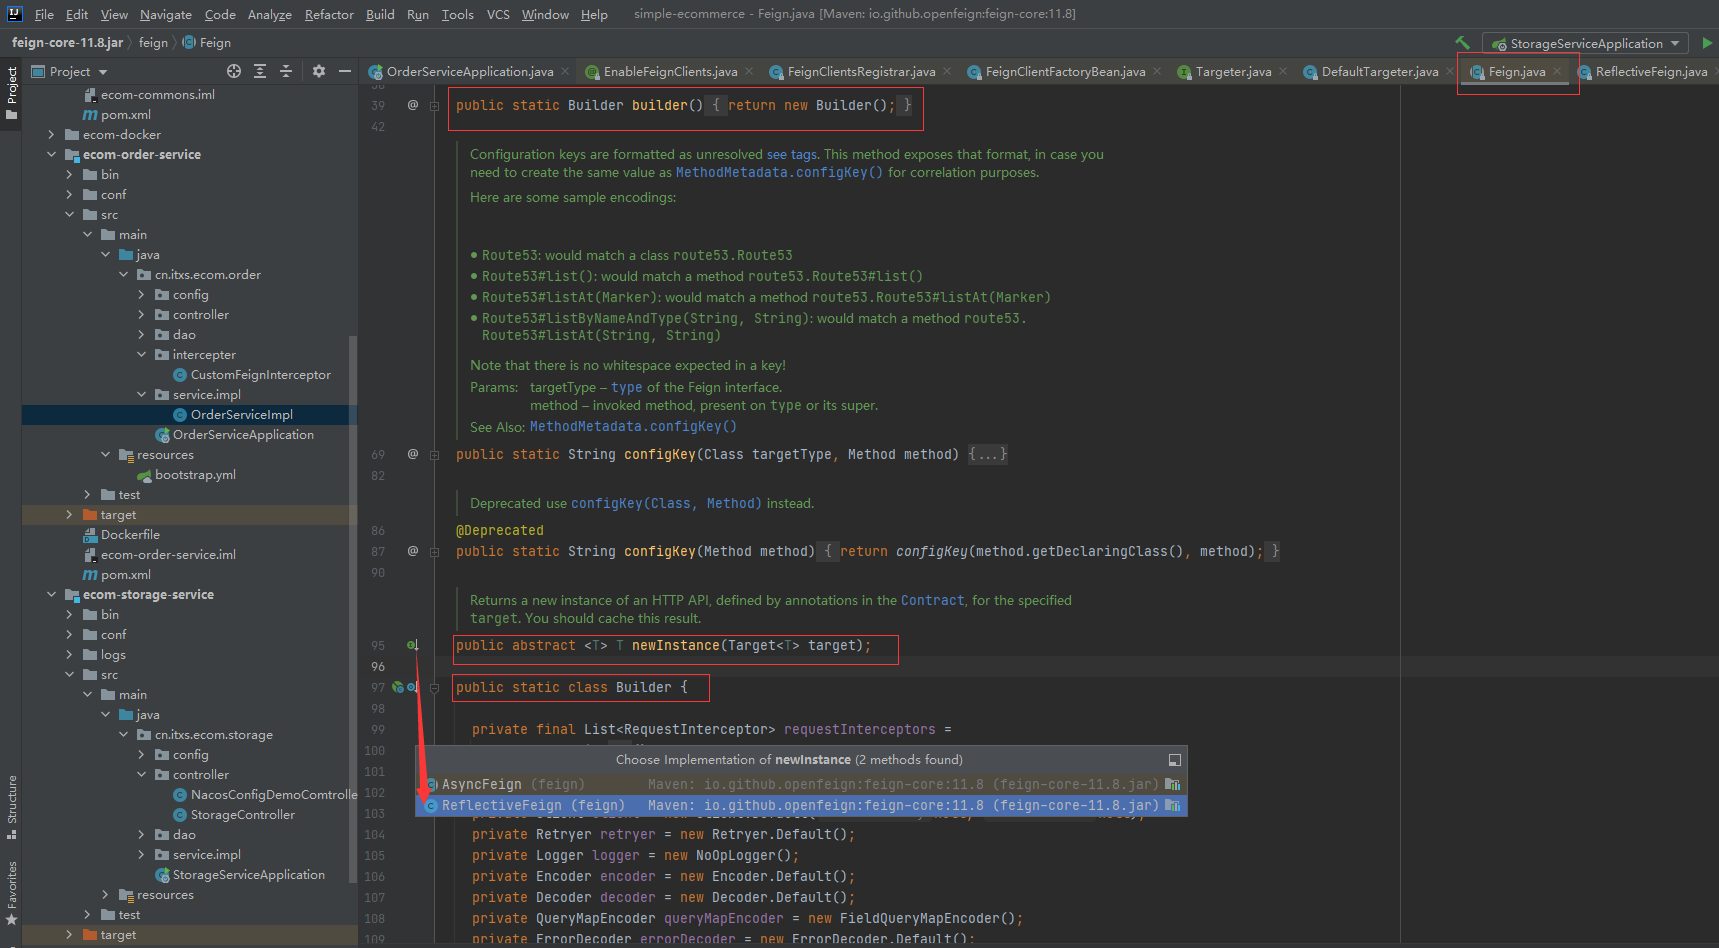
Feign的newInstance抽象方法有两个子类,分别是反射的ReflectiveFeign和异步的AsyncFeign。从抽象类Feign的静态内部类Builder中提供target方法
 在FeignClientFactoryBean的getTarget方法的最后一行调用target方法,而Targeter是一个接口,有默认实现类DefaultTargeter
return (T) targeter.target(this, builder, context, new HardCodedTarget<>(type, name, url));
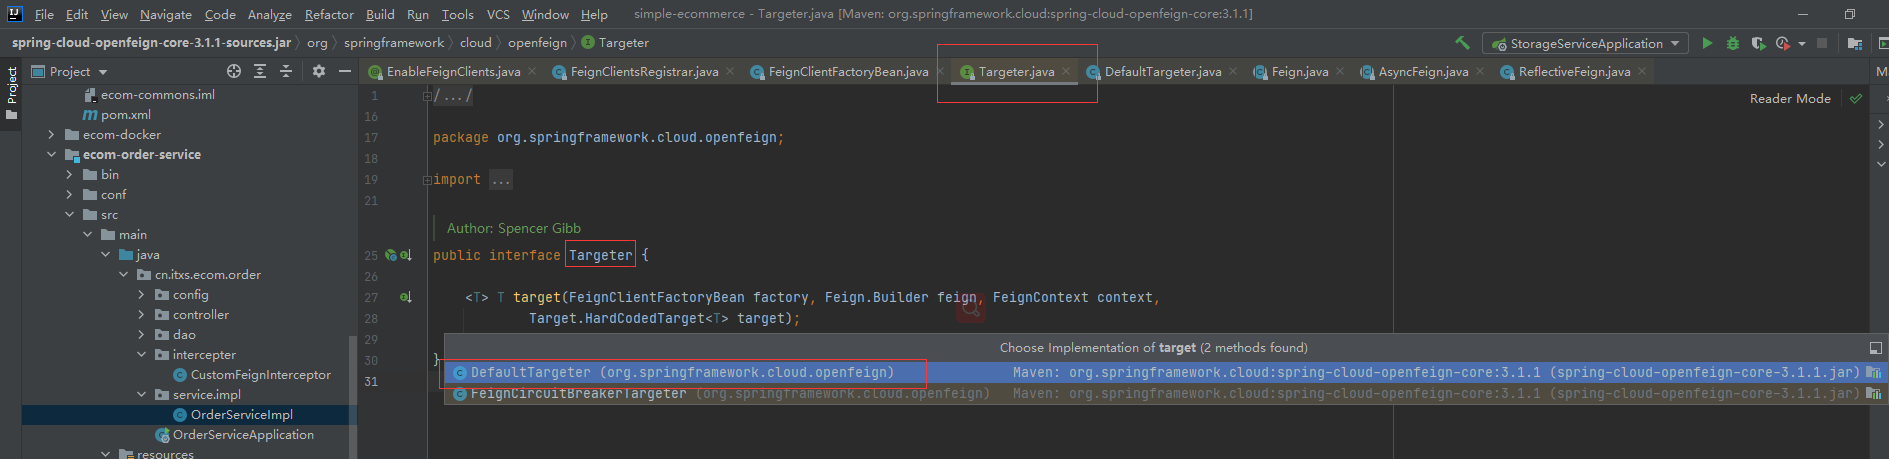
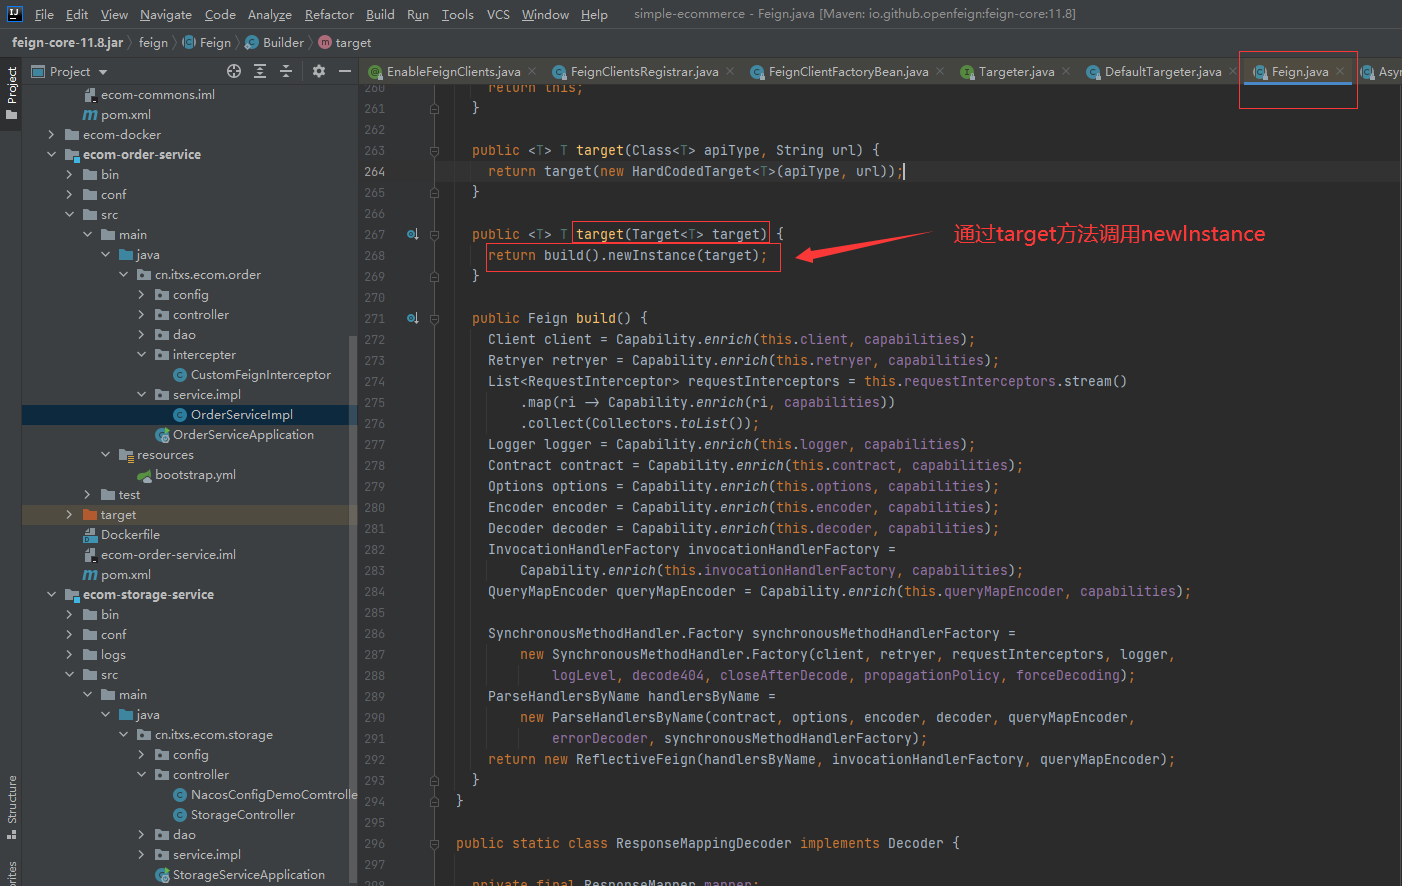
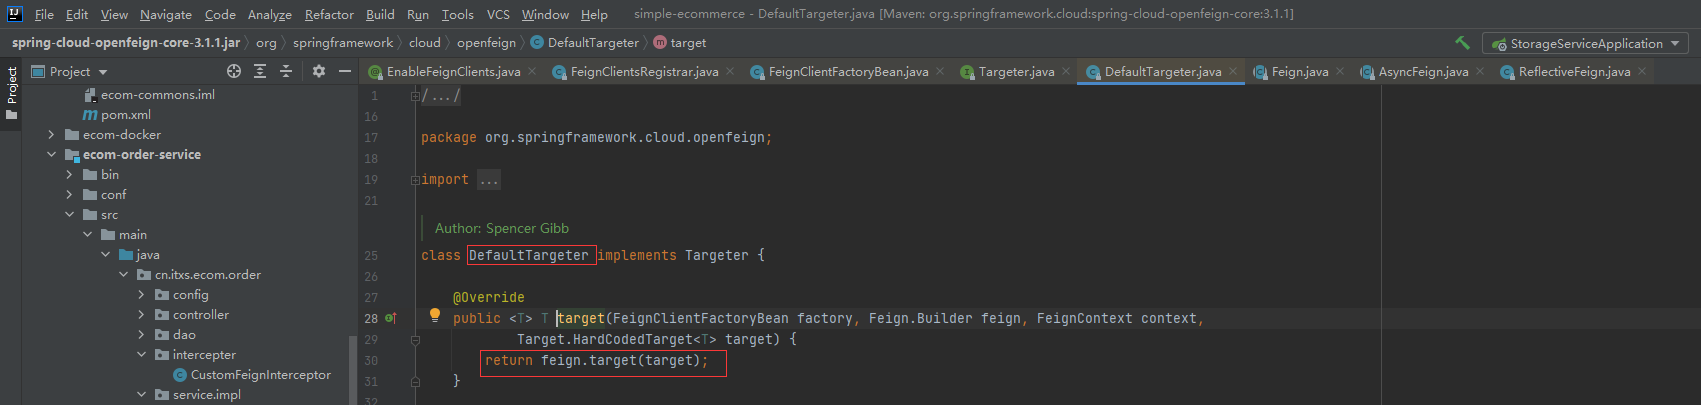
从DefaultTargeter实现类可以知道最终调用的是抽象类Feign静态内部类Builder的target()方法
回过头我们再来看下ReflectiveFeign的实现
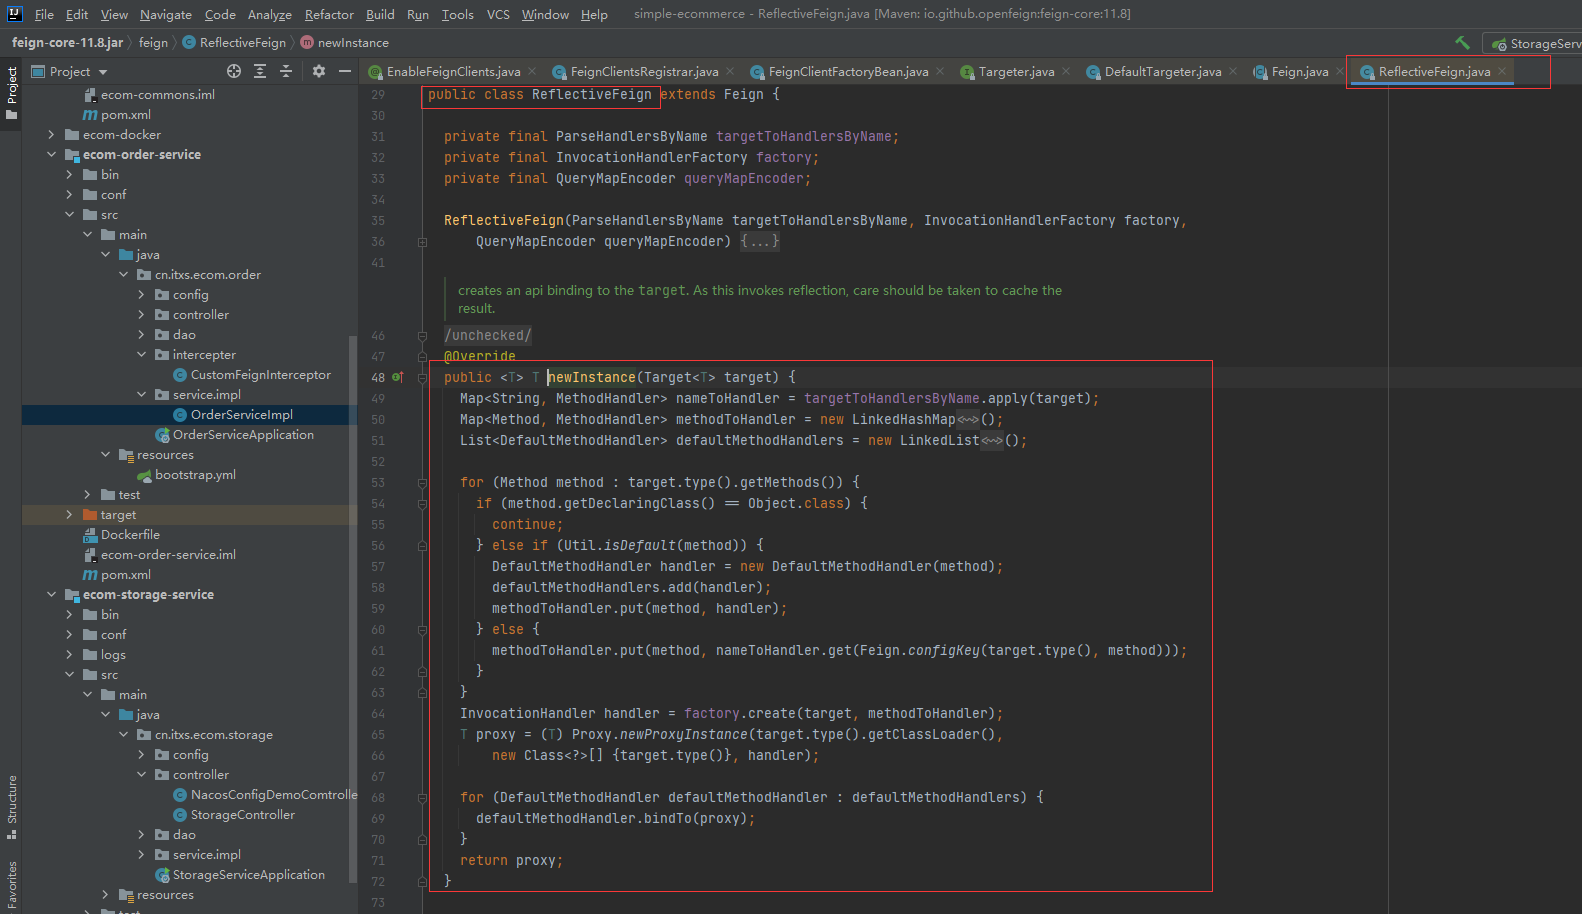
从里面关键的代码可以看到底层的核心是使用JDK动态代理机制来实现
InvocationHandler handler = factory.create(target, methodToHandler);
T proxy = (T) Proxy.newProxyInstance(target.type().getClassLoader(),
new Class<?>[] {target.type()}, handler);
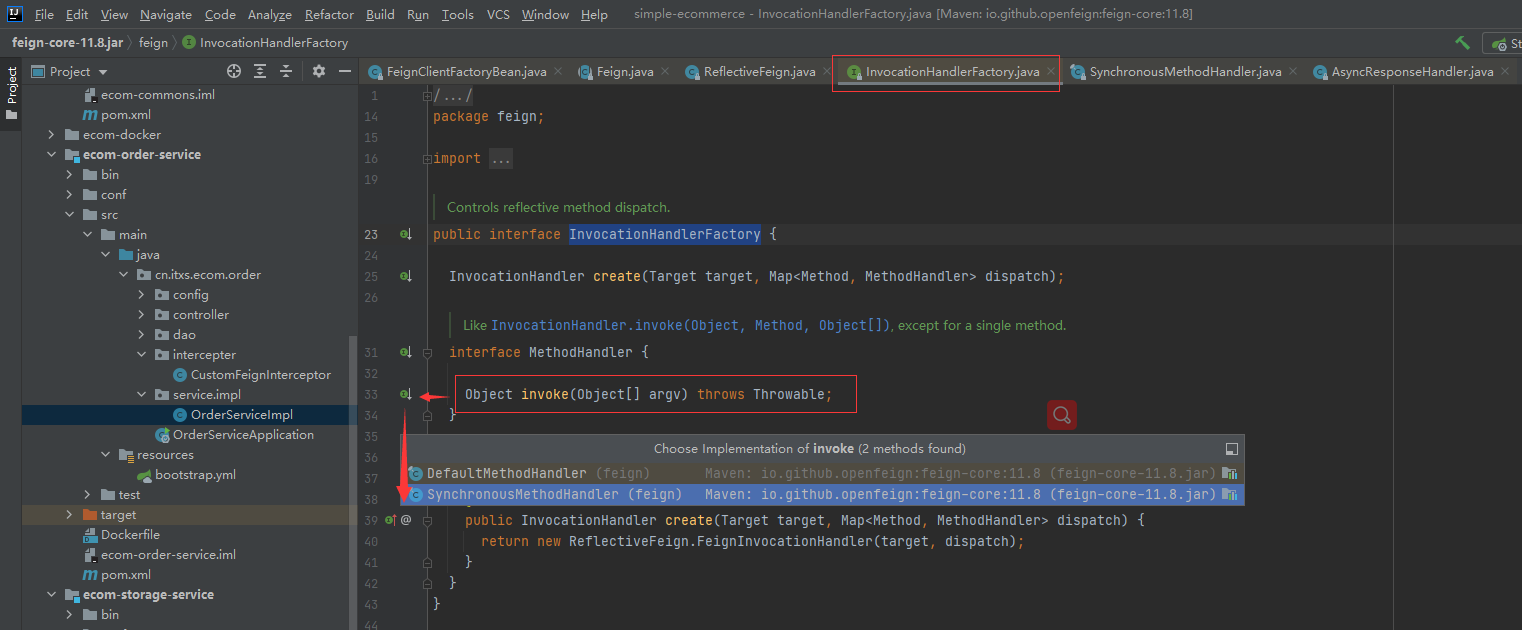
至此我们可以清楚知道使用的FeignClient对象是一个代理对象,当调用相应的方法时会调用到InvocationHandler.invoke方法中,也即是会调用 ReflectiveFeign.FeignInvocationHandler.invoke方法
@Override
public Object invoke(Object proxy, Method method, Object[] args) throws Throwable {
if ("equals".equals(method.getName())) {
try {
Object otherHandler =
args.length > 0 && args[0] != null ? Proxy.getInvocationHandler(args[0]) : null;
return equals(otherHandler);
} catch (IllegalArgumentException e) {
return false;
}
} else if ("hashCode".equals(method.getName())) {
return hashCode();
} else if ("toString".equals(method.getName())) {
return toString();
}

return dispatch.get(method).invoke(args);
}
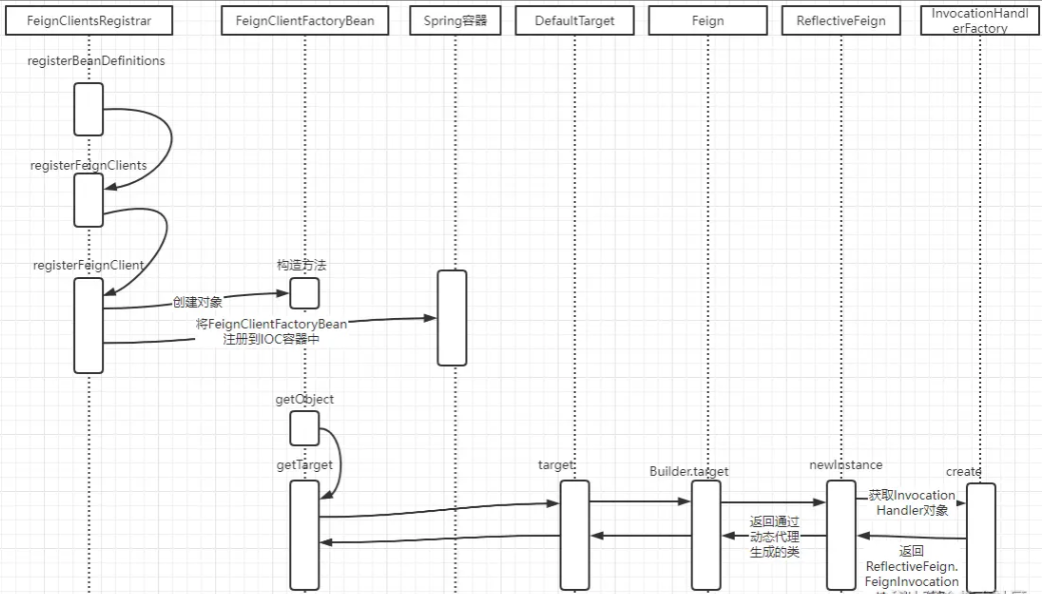
总体时序图如下:
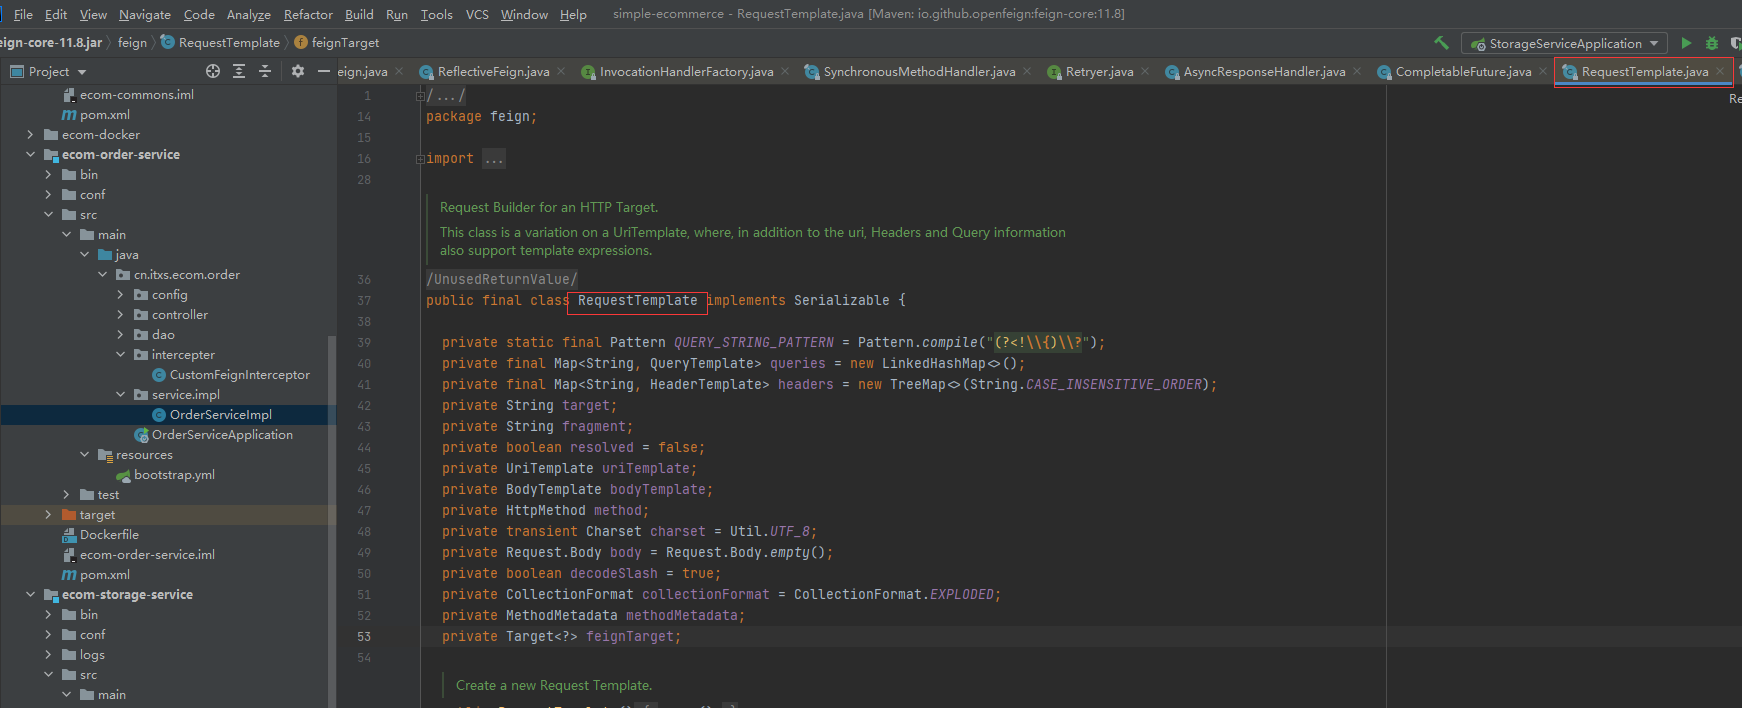
 invoke接口最后一行调用dispatch.get(method).invoke(args),往下调用SynchronousMethodHandler.invoke->SynchronousMethodHandler.executeAndDecode->client.execute
RequestTemplate用来封装HTTP全部内容
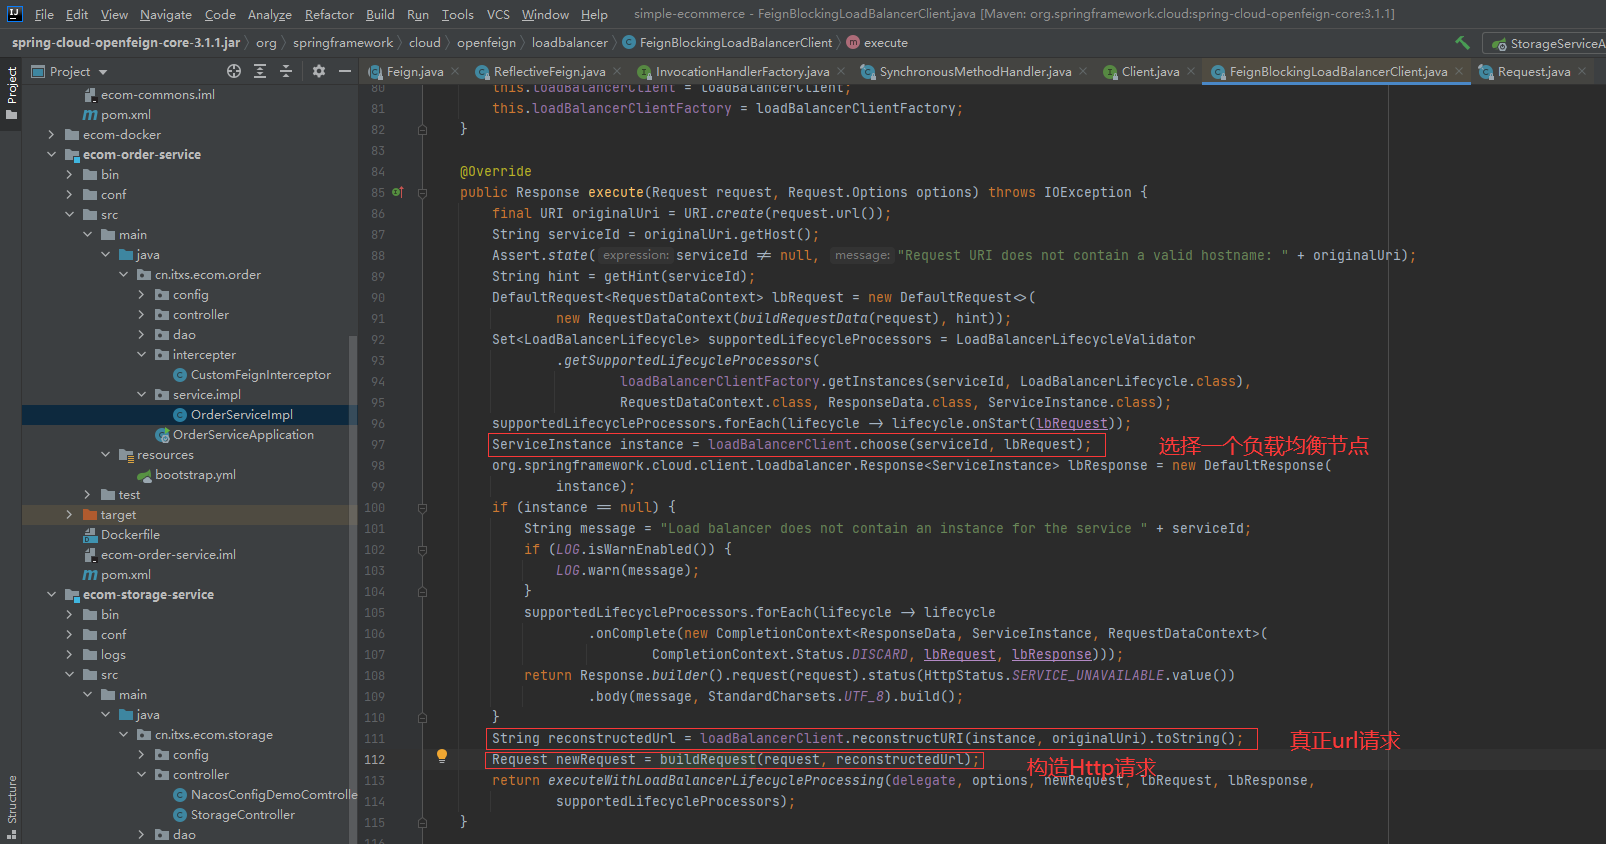
客户端client的execute方法有三个实现类,分别是FeignBlockingLoadBalancerClient、RetryableFeignBlockingLoadBalancerClient、Default。我们看下FeignBlockingLoadBalancerClient的execute方法的实现,往下的逻辑就是调用Feign封装的http请求
- 通过负载均衡器选择出一个服务节点
- 获取真正的请求地址
- 发起请求并返回结果
从前面分析代码我们总结下Spring Cloud OpenFeign原理重要流程如下:
- 通过@EnableFeignClients注解导入FeignClientsRegistrar对象,当Spring容器启动时会调用这个类中的registerBeanDefinitions方法,在这里会将@FeignClient修饰的类进行注册。
- 注册到Spring容器中的是一个FeignClientFactoryBean对象
- FeignClientFactoryBean实现了FactoryBean,当我们使用FeignClient时,会调用到这个类中的getObject方法,在这里是通过动态代理创建一个代理对象
- Spring Cloud OpenFeign集成了负载均衡器,发送请求前,会先通过负载均衡器选择出一个需要调用的实例
**本人博客网站 **IT小神 www.itxiaoshen.com

- 微服务生态组件之Spring Cloud LoadBalancer详解和源码分析
- SpringCloud组件 & 源码剖析:Eureka服务注册方式流程全面分析
- 【springcloud】1.微服务之springcloud-》eureka源码分析之请叫我灵魂画师。。。
- spring cloud openfeign 源码实例解析
- spring cloud 微服务的版本介绍与内部组件详解
- SpringCloud OpenFeign服务接口调用
- Spring Cloud部分源码分析Eureka,Ribbon,Feign,Zuul
- 详解springcloud 基于feign的服务接口的统一hystrix降级处理
- Spring Cloud分布式微服务云架构源码分析 — Eureka
- 详解Spring-Cloud2.0之Feign调用远程服务指南
- zookeeper服务发现实战及原理--spring-cloud-zookeeper源码分析
- 【微服务】之五:轻松搞定SpringCloud微服务-调用远程组件Feign
- 微服务之SpringCloud实战(四):SpringCloud Eureka源码分析
- SpringCloud 查找调用REST服务使用RestTemplate(ribbon负载)或feign模式 教程源码 火推
- spring cloud服务发现组件Eureka详解
- 06.Spring Cloud OpenFeign:基于 Ribbon 和 Hystrix 的声明式服务调用
- springcloud 入门 5 (feign源码分析)
- SpringCloud微服务如何优雅停机及源码分析 | 技术头条
- spring cloud zuul网关服务重试请求配置和源码分析
- spring cloud服务发现和注册源码分析