SpringCloud使用Eureka
2022-03-10 21:59
483 查看
基于springboot2.6.3,仅介绍单机版,分布式开发略有不同
大致步骤:
- 新建module A,选择eureka作为注册中心,启动类上添加@EnableEurekaServer,添加pom依赖
- 服务提供者module B(注册到注册中心的业务处理者)启动类添加@EnableEurekaClient与相关依赖
- 消费者module C(发现服务并消费的服务)启动类添加@EnableFeignClients、@EnableDiscoveryClient与相关依赖
- 消费者通过FeignClient进程服务间的调用

详细步骤:
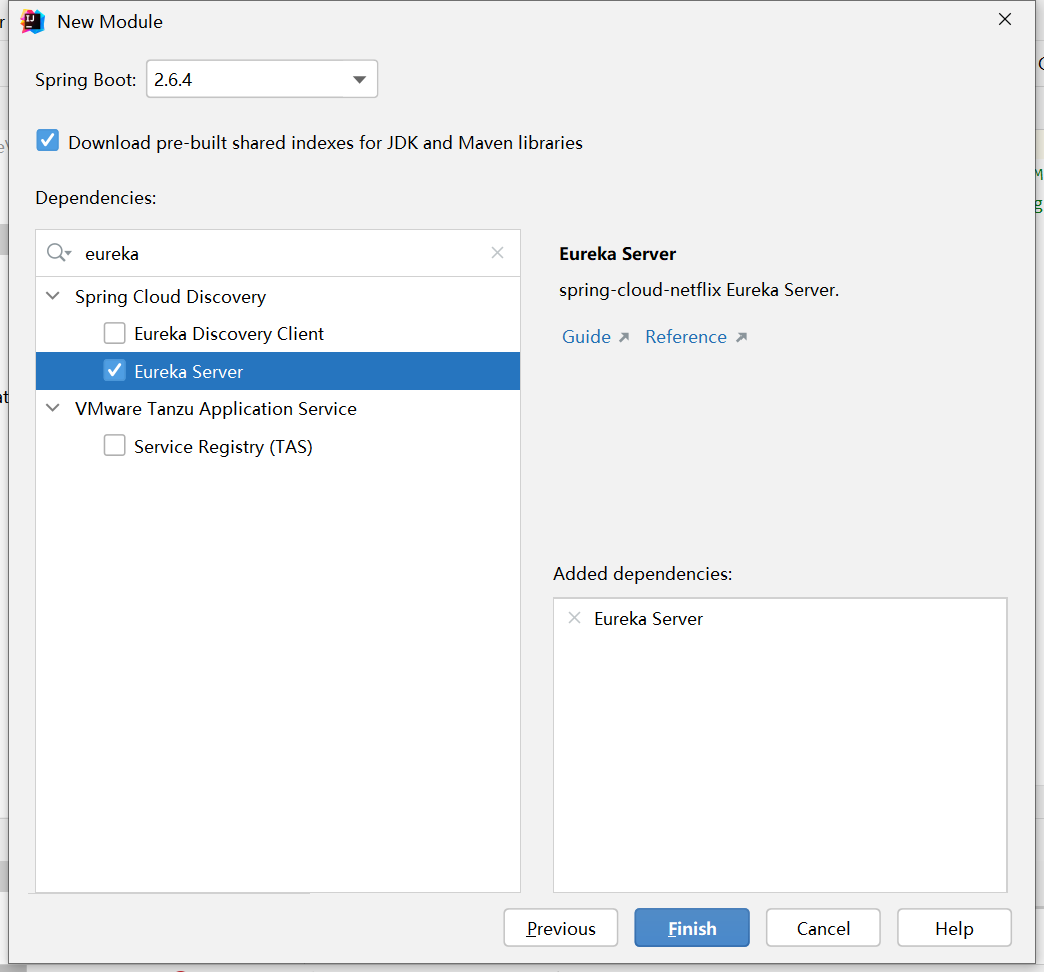
1、新建 module A 作为注册中心的服务
地址:localhost:8900
选择Eureka Server(不选择也行,手动在pom中添加依赖)

配置yml
server:
port: 8900
eureka:
instance:
hostname: localhost
client:
#单机版不用把本身注册进去
register-with-eureka: false
fetch-registry: false
service-url:
defaultZone: http://${eureka.instance.hostname}:${server.port}/eureka/
添加依赖
<properties>
<java.version>1.8</java.version>
<spring-cloud.version>2021.0.0</spring-cloud.version>
</properties>
<dependencies>
<dependency>
<groupId>org.springframework.cloud</groupId>
<artifactId>spring-cloud-starter-netflix-eureka-server</artifactId>
</dependency>
</dependencies>
<dependencyManagement>
<dependencies>
<dependency>
<groupId>org.springframework.cloud</groupId>
<artifactId>spring-cloud-dependencies</artifactId>
<version>${spring-cloud.version}</version>
<type>pom</type>
<scope>import</scope>
</dependency>
</dependencies>
</dependencyManagement>
启动类添加注解
@EnableEurekaServer
@SpringBootApplication
public class EurekaServerApplication {
public static void main(String[] args) {
SpringApplication.run(EurekaServerApplication.class, args);
}
}
2、处理服务提供者module B
地址:localhost:8086
yml配置
server:
port: 8086
spring:
datasource:
#mysql
driver-class-name: com.mysql.cj.jdbc.Driver
url: jdbc:mysql://localhost:3306/shop?useUnicode=true&characterEncoding=utf8&serverTimezone=GMT%2b8
username: root
password: root
application:
#定义应用程序的名称,注册中心使用
name: producer
eureka:
client:
service-url:
#注册中心地址
defaultZone: http://localhost:8900/eureka/
添加pom
<dependencies>
<!--  eureka客户端  -->
<dependency>
<groupId>org.springframework.cloud</groupId>
<artifactId>spring-cloud-starter-netflix-eureka-client</artifactId>
</dependency>
<!-- 其他依赖 -->
</dependencies>
<dependencyManagement>
<!-- 与注册中心版本保持一致 -->
<dependencies>
<dependency>
<groupId>org.springframework.cloud</groupId>
<artifactId>spring-cloud-dependencies</artifactId>
<version>2021.0.0</version>
<type>pom</type>
<scope>import</scope>
</dependency>
</dependencies>
</dependencyManagement>
启动类添加依赖
@EnableEurekaClient
@SpringBootApplication
public class ProducerApplication {
public static void main(String[] args) {
SpringApplication.run(ProducerApplication.class, args);
}
}
controller示例
@RestController
public class ProductController {
@RequestMapping(value = "select", method = RequestMethod.GET)
public String select(@RequestParam Long id) {
return "id===="+id;
}
}
3、消费者module C
服务地址:localhost:8088
配置yml
spring:
application:
name: consumer
server:
port: 8088

eureka:
client:
service-url:
defaultZone: http://localhost:8900/eureka/
添加pom
<dependencies>
<!-- Eureka客户端依赖 -->
<dependency>
<groupId>org.springframework.cloud</groupId>
<artifactId>spring-cloud-starter-netflix-eureka-client</artifactId>
</dependency>
<!-- 用来声明feign可以进行服务间调用 -->
<dependency>
<groupId>org.springframework.cloud</groupId>
<artifactId>spring-cloud-starter-feign</artifactId>
<version>1.4.7.RELEASE</version>
</dependency>
<!--其他依赖 -->
</dependencies>

<dependencyManagement>
<dependencies>
<dependency>
<groupId>org.springframework.cloud</groupId>
<artifactId>spring-cloud-dependencies</artifactId>
<version>2021.0.0</version>
<type>pom</type>
<scope>import</scope>
</dependency>
</dependencies>
</dependencyManagement>
启动类:
// 开启feign进行远程调用
@EnableFeignClients
// 开启发现其他服务
@EnableDiscoveryClient
@SpringBootApplication
public class ConsumerApplication {
public static void main(String[] args) {
SpringApplication.run(ConsumerApplication.class, args);
}
}
controller示例:
现在需要通过consumer去调用producer的select方法,在consumer中先定义一个controller接收请求
@RestController
public class ConsumerController {
@Autowired
ProducerService producerService;

@RequestMapping(value = "selectProducerById", method = RequestMethod.GET)
public String selectProducerById(@RequestParam Long id) {
return producerService.select(id);
}
}
ProducerService接口
上面producerService的定义
/**
value="需要远程调用的应用的名称"
这里对应提供者module A的应用名称producer
**/
@FeignClient(value = "producer")
public interface OrderService {
//对应于ProducerController中的select方法
@RequestMapping(value = "select", method = RequestMethod.GET)
String select(@RequestParam Long id);

}
通过调用消费者module C 的ConsumerController的selectProducerById方法
来请求提供者module A 的ProducerController中的select方法:
localost:8088/selectProducerById?id=1

返回结果: id====1
相关文章推荐
- SpringCloud(第 013 篇)电影微服务使用定制化 Feign 在客户端进行负载均衡调度并为 Feign 配置帐号密码登录认证 Eureka
- 萌新快速入门——SpringCloud-Eureka以及使用RestTemplate完成相互通信
- SpringCloud使用Nacos代替Eureka 简单版
- 使用SpringCloud搭建微服务<三>---------使用EureKa编写服务的注册中心
- 第四章 SpringCloud使用Eureka集群
- 使用eclipse一步一步创建SpringCloud项目(一)——创建项目父工程、Eureka
- springcloud-1.使用Eureka -robbon构建自动服务发现注册集群和消费者
- SpringCloud系列五:Ribbon 负载均衡(Ribbon 基本使用、Ribbon 负载均衡、自定义 Ribbon 配置、禁用 Eureka 实现 Ribbon 调用)
- SpringCloud(第 013 篇)电影微服务使用定制化 Feign 在客户端进行负载均衡调度并为 Feign 配置帐号密码登录认证 Eureka
- SpringCloud使用eureka注册服务(提供接口)
- springcloud 中使用eureka/ribbon/Hystrix负载均衡及断路器
- springcloud使用Eureka配置客户端
- SpringCloud(九):Ribbon脱离Eureka使用及原生api
- springcloud使用Eureka创建注册中心
- SpringCloud使用eureka(rest)和ribbon实现服务调用和负载均衡
- springcloud-05-ribbon中不使用eureka
- SpringCloud使用Feign文件上传、下载
- (转) 史上最简单的 SpringCloud 教程 | 第一篇: 服务的注册与发现(Eureka)
- SpringCloud系列九:SpringCloudConfig 基础配置(SpringCloudConfig 的基本概念、配置 SpringCloudConfig 服务端、抓取配置文件信息、客户端使用 SpringCloudConfig 进行配置、单仓库目录匹配、应用仓库自动选择、仓库匹配模式)
- 在spring cloud eureka中使用ip而不是hostname
