linux中网络存储与考试系统搭建(nfs实现多用户可以共享文件)
2021-12-30 21:25
856 查看
上期内容回顾
1.数据备份的方式有哪些
全量和增量

2.数据备份的命令有哪些 都有哪些优点缺点
cp :	本地复制,全量复制
scp :	远程复制,全量复制
rsync :	远程复制,增量复制

3.rsync的参数有哪些并解释
参考上期博客

4.rsync守护进程模式的步骤
服务端
客户端
参考上期博客

5.rsync实时同步的步骤
参考上期博客
本期内容概要
- NFS 网络存储
- 实现NFS多主机共享(以考试系统为例)
内容详细
1.NFS简介
NFS 是 Network File System的缩写 及网络文件系统

NFS主要功能是通过局域网络让不同的主机系统之间可以共享文件或目录

NFS系统和Windows网络共享、网络驱动器类似, 只不过windows用于局域网, NFS用于企业集群架构中, 如果是大型网站, 会用到更复杂的分布式文件系统FastDFS,glusterfs,HDFS,ceph
2.NFS应用
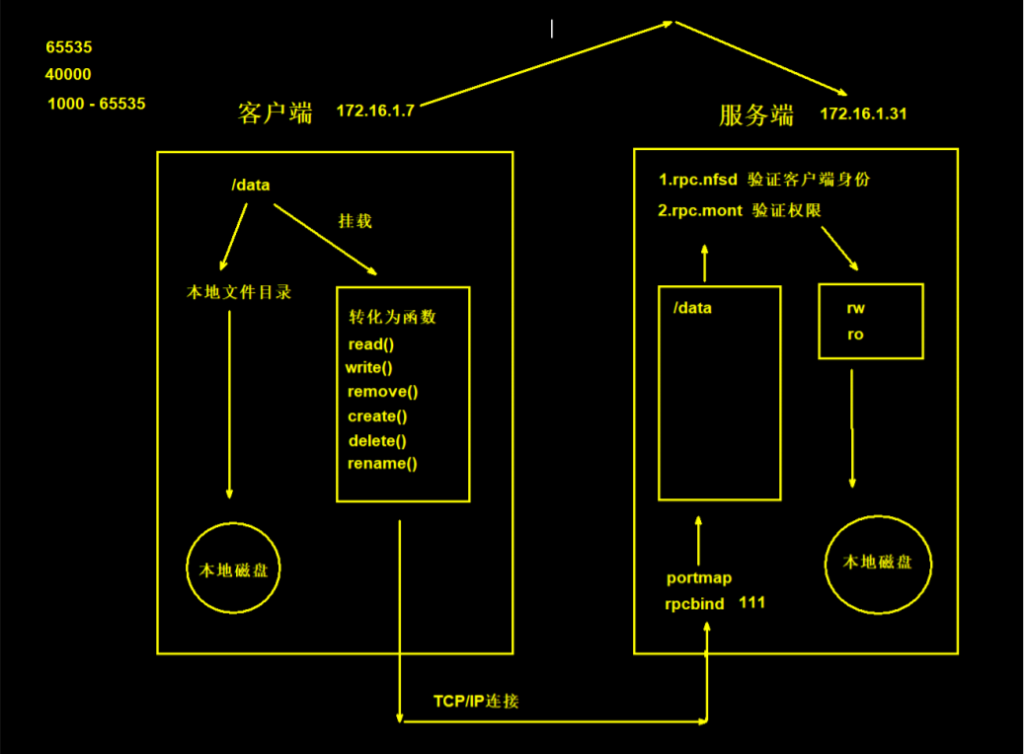
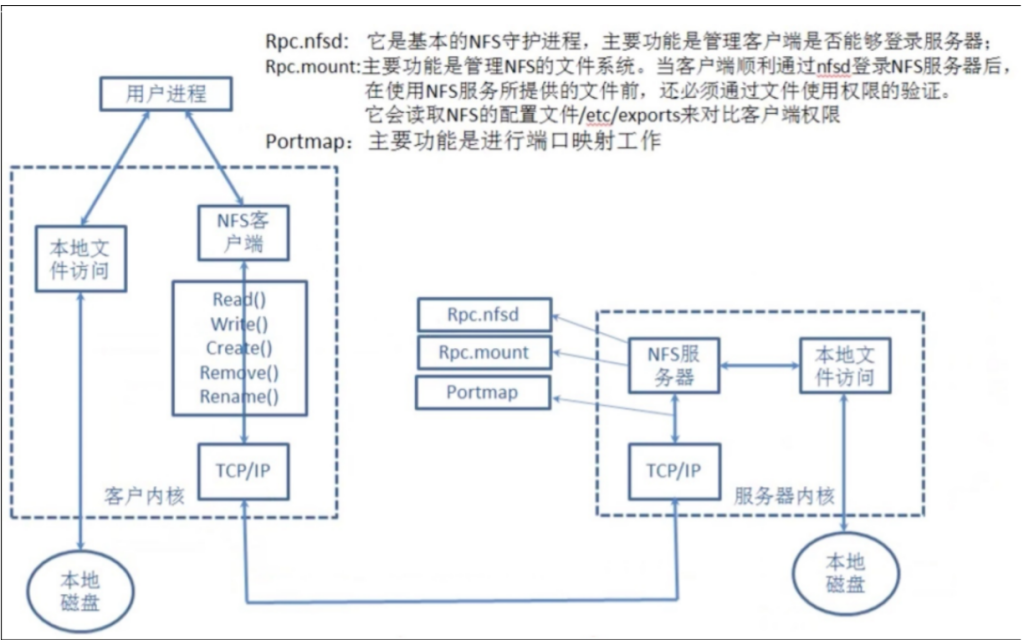
1.用户访问NFS客户端,将请求转化为函数

2.NFS通过TCP/IP连接服务端

3.NFS服务端接收请求,会先调用portmap进程进行端口映射

4.Rpc.nfsd进程用于判断NFS客户端能否连接服务端

5.Rpc.mount进程用于判断客户端对服务端的操作权限

6.如果通过权限验证,可以对服务端进行操作,修改或读取
3.实现NFS多主机共享
3.1服务端
'''
nfs 作为服务端 172.16.1.31
web01 web02 web03 作为客户端 172.16.1.7/172.16.1.8/172.16.1.9
'''

# 确保在服务端进行(nfs)
1. 安装NFS和rpcbind
[root@nfs ~]# yum install nfs-utils rpcbind -y

2. 创建挂载点
[root@nfs ~]# mkdir /web/
[root@nfs ~]# mkdir /web/nfs{1..9}

3. 配置挂载点
[root@nfs ~]# vim /etc/exports
格式:
[挂载点] [可以访问的IP]([权限])
/web/nfs1  172.16.1.0/20(rw,sync,all_squash)

4. 关闭selinux和防火墙
[root@nfs ~]# setenforce 0
[root@nfs ~]# systemctl disable --now firewalld

5. 启动Nfs和rpcbind服务
[root@nfs ~]# systemctl start nfs-server
[root@nfs ~]# systemctl start rpcbind

6. 检查服务端是否正常
格式:
showmount -e 服务端的地址(默认是本机地址)

[root@nfs ~]# showmount -e
返回以下结果就是正常了
Export list for nfs:
/web/nfs1 172.16.1.0/20

或者
[root@nfs ~]# showmount -e 172.16.1.31
返回同样结果也是正常
Export list for 172.16.1.31:
/web/nfs1 172.16.1.0/20

7. 给挂载点授权
[root@nfs ~]# chown -R nfsnobody.nfsnobody /web
3.2客户端
'''
以在 web01 客户端操作为例
其余的客户端同样操作即可
'''

# 确保在客户端进行(web01 web02 web03)
1. 安装NFS
[root@web01 opt]# yum install -y nfs-utils

2. 创建目录
[root@web01 opt]# mkdir /opt/nfs/

3. 挂载NFS
[root@web01 opt]# mount -t nfs 172.16.1.31:/web/nfs1  /opt/nfs/

4. 测试NFS文件同步功能
[root@web01 ~]# cd /opt/nfs

[root@web01 nfs]# touch 1.txt
[root@web01 nfs]# ll
total 0
-rw-r--r-- 1 nfsnobody nfsnobody 0 Dec 30 16:45 1.txt

到服务端查看:
[root@nfs ~]# ll /web/nfs1
total 0
-rw-r--r-- 1 nfsnobody nfsnobody 0 Dec 30 16:45 1.txt
发现服务端也自动同步创建了

到其他客户端查看:
[root@web02 nfs]# ll
total 0
-rw-r--r-- 1 nfsnobody nfsnobody 0 Dec 30 16:45 1.txt

[root@web03 nfs]# ll
total 0
-rw-r--r-- 1 nfsnobody nfsnobody 0 Dec 30 16:45 1.txt
所有客户端都自动同步了

此刻 NFS多主机共享 已经成功实现
| nfs共享参数 | 参数作用 |
|---|---|
| rw | 读写权限 (常用) |
| ro | 只读权限 (不常用) |
| root_squash | 当NFS客户端以root管理员访问时,映射为NFS服务器的匿名用户 (不常用) |
| no_root_squash | 当NFS客户端以root管理员访问时,映射为NFS服务器的root管理员 (不常用) |
| all_squash | 无论NFS客户端使用什么账户访问,均映射为NFS服务器的匿名用户 (常用) |
| no_all_squash | 无论NFS客户端使用什么账户访问,都不进行压缩 (不常用) |
| sync | 同时将数据写入到内存与硬盘中,保证不丢失数据 (常用) |
| async | 优先将数据保存到内存,然后再写入硬盘;这样效率更高,但可能会丢失数据 (不常用) |
| anonuid | 配置all_squash使用,指定NFS的用户UID,必须存在系统 (常用) |
| anongid | 配置all_squash使用,指定NFS的用户GID,必须存在系统 (常用) |
4.NFS配置详解
1. 控制读写
rw :	读写权限 (常用)

ro :	只读权限 (不常用)

可在服务端 vim /etc/exports
/web/nfs1  172.16.1.0/20(rw,sync,all_squash)
在括号内修改权限 每次修改完成都要重启 systemctl restart nfs-server rpcbind
到客户端操作文件测试

2. 控制文件权限
root_squash    :	当NFS客户端以root管理员访问时,映射为NFS服务器的匿名用户 (不常用)
no_root_squash :	当NFS客户端以root管理员访问时,映射为NFS服务器的root管理员 (不常用)

all_squash     :	无论NFS客户端使用什么账户访问,均映射为NFS服务器的匿名用户 (常用)
no_all_squash  :	无论NFS客户端使用什么账户访问,都不进行压缩 (不常用)

3. 控制写模式
sync  :	同时将数据写入到内存与硬盘中,保证不丢失数据 (常用)

async :	优先将数据保存到内存,然后再写入硬盘;这样效率更高,但可能会丢失数据 (不常用)

4. 控制用户(将所有客户端用户统一 便于操作文件)
anonuid :	配置all_squash使用,指定NFS的用户UID,必须存在系统 (常用)

anongid :	配置all_squash使用,指定NFS的用户GID,必须存在系统 (常用)
01 创建统一用户
[root@nfs ~]# groupadd www -g 666
[root@nfs ~]# useradd www -u 666 -g 666 -M -r -s /sbin/nologin

[root@web01 nfs]# groupadd www -g 666
[root@web01 nfs]# useradd www -u 666 -g 666 -M -r -s /sbin/nologin

[root@web02 nfs]# groupadd www -g 666
[root@web02 nfs]# useradd www -u 666 -g 666 -M -r -s /sbin/nologin

[root@web03 nfs]# groupadd www -g 666
[root@web03 nfs]# useradd www -u 666 -g 666 -M -r -s /sbin/nologin

02 配置挂载点文件(都要在服务端操作!!!)
[root@nfs ~]# vim /etc/exports
/web/nfs1  172.16.1.0/20(rw,sync,all_squash,anonuid=666,anongid=666)
重启
[root@nfs ~]# systemctl restart nfs-server rpcbind

03 修改挂载点权限(都要在服务端操作!!!)
[root@nfs ~]# chown -R www.www /web/

04 使用(客户端使用!!!)
如果创建的文件属主属组权限不是 WWW
可以重新挂载
[root@web01 opt]# umount /opt/nfs/
[root@web01 opt]# mount -t nfs 172.16.1.31:/web/nfs1 /opt/nfs/
5.搭建考试系统
5.1搭建WEB服务
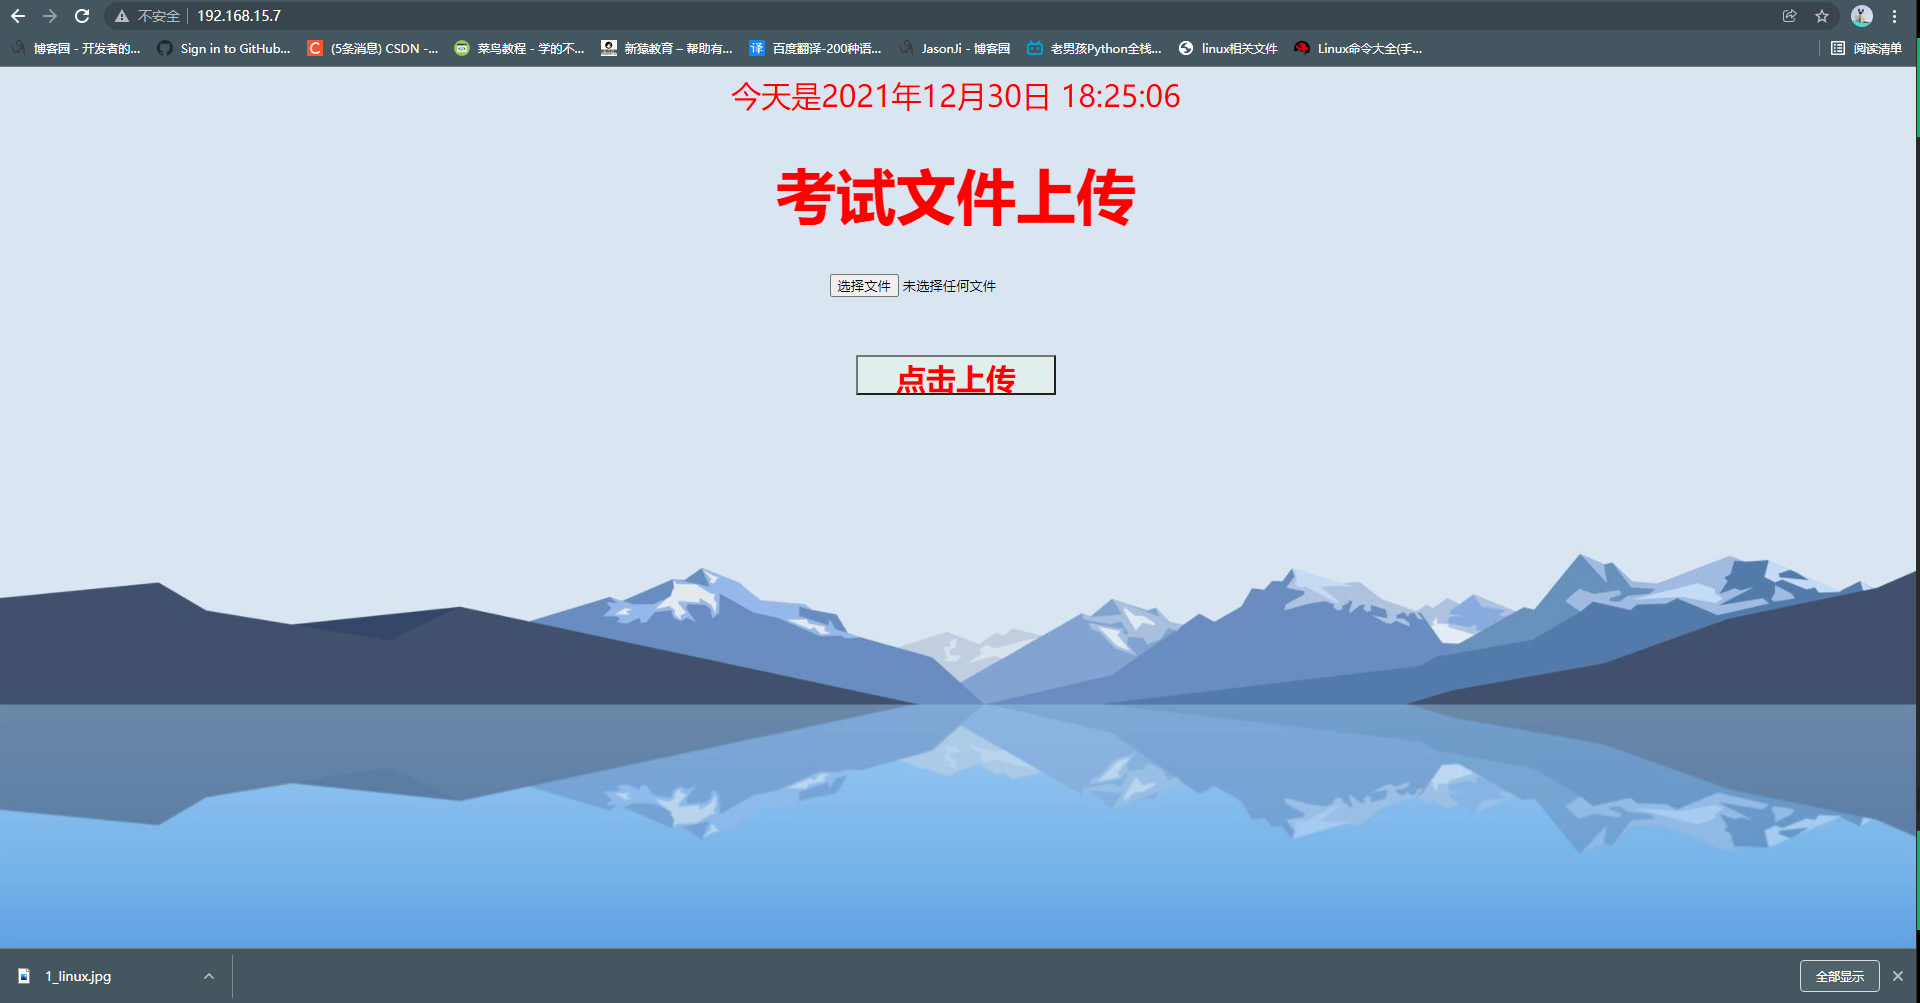
1. 安装web软件(客户端操作)
[root@web01 nfs]# yum install httpd php php-devel -y

2. 将考试系统代码放置于网站的根目录
[root@web01 nfs]# cd /var/www/html/
将代码压缩包拖进来 并解压
[root@web01 html]# unzip kaoshi.zip

3. 授权
[root@web01 html]# chown -R www.www /var/www/html

4. 关闭selinux和防火墙
[root@web01 html]# setenforce 0
[root@web01 html]# systemctl disable --now firewalld

5. 修改web软件的用户
[root@web01 html]# vim /etc/httpd/conf/httpd.conf
User www
Group www

6. 启动web软件
[root@web01 html]# systemctl start httpd

7. 测试
01 在浏览器上输入你的客户端IP进入前端
02 点击上传图片
03 访问http://192.168.15.7/upload/1_linux.jpg (图片名称:1_linux.jpg)
04 用web01 web02 web03客户端都上传 之后用 web01 查看 web03 上传的图片(会报错找不到 属于正常)
5.2配合NFS实现文件共享
'''
目的为了用一台客户端访问所有客户端上传的文件 实现文件共享
'''

1. 修改NFS配置文件(服务端执行)
[root@nfs ~]# vim /etc/exports
添加一行内容:
/web/nfs1  172.16.1.0/20(rw,sync,all_squash,anonuid=666,anongid=666)

2. 创建挂载点
[root@nfs ~]# mkdir /web/upload
[root@nfs ~]# chown www.www /web/upload

3. 重启NFS
[root@nfs ~]# systemctl restart nfs-server rpcbind
[root@nfs ~]# showmount -e
Export list for nfs:
/web/upload 172.16.1.0/20
/web/nfs1   172.16.1.0/20

4. 客户端安装NFS软件
[root@web01 html]# yum install nfs-utils -y
[root@web02 html]# yum install nfs-utils -y
[root@web03 html]# yum install nfs-utils -y

5.  挂载
[root@web01 html]# mount -t nfs 172.16.1.31:/web/upload /var/www/html/upload
[root@web02 html]# mount -t nfs 172.16.1.31:/web/upload /var/www/html/upload
[root@web03 html]# mount -t nfs 172.16.1.31:/web/upload /var/www/html/upload

6. 测试
web01 192.168.15.7上传 1_linux.jpg
web02 192.168.15.8上传 2_linux.jpg
web03 192.168.15.9上传 3_linux.jpg

然后用192.168.15.7 访问 3_linux.jpg
http://192.168.15.7/upload/3_linux.jpg

显示正常则实现了文件共享

"""
每次重启机器后 都要重新执行以下指令才可以:
服务端:
/web/
[root@nfs ~]# systemctl restart nfs-server rpcbind
[root@nfs ~]# showmount -e
Export list for nfs:
/web/upload 172.16.1.0/20
/web/nfs1   172.16.1.0/20

客户端:
/var/www/html/upload
/opt/nfs/
[root@web01 html]# systemctl start httpd
[root@web02 html]# systemctl start httpd
[root@web03 html]# systemctl start httpd

[root@web01 opt]# mount -t nfs 172.16.1.31:/web/nfs1  /opt/nfs/
[root@web02 opt]# mount -t nfs 172.16.1.31:/web/nfs1  /opt/nfs/
[root@web03 opt]# mount -t nfs 172.16.1.31:/web/nfs1  /opt/nfs/

[root@web01 html]# mount -t nfs 172.16.1.31:/web/upload /var/www/html/upload
[root@web02 html]# mount -t nfs 172.16.1.31:/web/upload /var/www/html/upload
[root@web03 html]# mount -t nfs 172.16.1.31:/web/upload /var/www/html/upload
"""

相关文章推荐
- 红帽GFS集群文件系统配置指南 linux搭建gfs系统--iscsi+GFS实现网络存储
- 最新Linux(CentOS5.5)搭建GFS系统--iSCSI+GFS实现网络存储
- NFS,两台linux设置网络共享文件系统
- linux搭建gfs系统--iscsi+GFS实现网络存储
- Linux 服务器之间如何进行文件目录共享NFS(网络文件系统)
- NFS 网络文件系统搭建及arm-linux交叉编译的应用
- linux下NFS网络文件系统的搭建
- linux上通过搭建nfs服务器来实现多台服务器之间文件共享
- linux下共享文件系统的服务NFS(Network File System)网络文件系统
- 不同系统平台之间(Linux与Linux、Linux与Unix)利用NFS实现文件共享方法
- linux--嵌入式网络文件系统(NFS)搭建原理
- 毕业设计----j2ee实现网络云盘系统(存储个人/共享文件/搜索文件/删除文件)
- linux系统中配置NFS实现文件共享
- Linux--CIFS多用户模式和NFS网络文件系统
- nfs实现开发板与虚拟机linux系统间文件共享
- 搭建nfs,实现linux之间共享存储
- 最新Linux(CentOS5.5)搭建GFS系统--iSCSI+GFS实现网络存储
- Linux网络服务:NFS网络文件系统与实现
- NFS(网络文件系统) Linux 系统上常用的文件共享方式
- 搭建NFS服务 实现Linux与Linux之间的文件共享