基于Unity调取摄像头方式的定时抓拍保存图像方法小结
2021-09-24 19:07
1186 查看
上一篇《Maxmspjitter实现实时抓取摄像头画面并制成序列图 (定时抓拍)》已讲到了定时抓拍的相关问题解决方案,这一篇继续,采用不同的方法,不同的平台----基于Unity。 目标明确:相隔一定时间抓拍一张实时图片。
开始
参考了thissky博主的文章【Unity 3D之调用摄像头并存储】,设立了一个协程执行的函数,如下:
IEnumerator OpenCamera()
{
//等待用户允许访问
yield return Application.RequestUserAuthorization(UserAuthorization.WebCam);
//如果用户允许访问,开始获取图像
if (Application.HasUserAuthorization(UserAuthorization.WebCam))
{
//先获取设备
WebCamDevice[] device = WebCamTexture.devices;

string deviceName = device[0].name;
//然后获取图像
tex = new WebCamTexture(deviceName,1920,1080,30); //采集1920*1080分辨率、30帧速率的相机
//将获取的图像赋值
ma.material.mainTexture = tex;
rawImage.texture = tex;
//开始实施获取
tex.Play();

}
}
然后在游戏刚开始时开启这个协程任务:
StartCoroutine(OpenCamera()); //开启一个协程任务
这样得到的结果是在Unity场景中可实时获得摄像头画面。
接下来
接下来的任务是要构建保存静帧的方法,如下:
public class CameraTextureSave : MonoBehaviour
{
public static void Save(WebCamTexture t,int frame)
{
Texture2D t2d = new Texture2D(t.width, t.height, TextureFormat.ARGB32, true);
//将WebCamTexture 的像素保存到texture2D中
t2d.SetPixels(t.GetPixels());
//t2d.ReadPixels(new Rect(200,200,200,200),0,0,false);
t2d.Apply();
//编码
byte[] imageTytes = t2d.EncodeToJPG();

//存储
//File.WriteAllBytes(Application.streamingAssetsPath + "/my1/" + Time.time + ".jpg", imageTytes);
string str =  string.Format("{0:D6}", frame);
File.WriteAllBytes(Application.streamingAssetsPath + "/my1/" + "image_" + str + ".jpg", imageTytes);

}
}
最后
相隔时间调用截图函数,这里就以最基本的基于游戏时间累计的方法来创建计时器,触发相应操作,参考如下:
timer -= Time.deltaTime;
if (timer <= 0)
{
TakePhoto();
timer = 2.0f; //相隔两秒触发一次
}
//抓拍序列图片方法
private void TakePhoto()
{
CameraTextureSave.Save(tex,framecount);
framecount++;
print("- saved - ");
}
完整的代码:
using System;
using System.Collections;
using System.Collections.Generic;
using System.IO;
using UnityEngine;
using UnityEngine.UI;

public class CameraTest : MonoBehaviour {

//摄像头图像类,继承自texture
WebCamTexture tex;
public Image WebCam;
public RawImage rawImage;
public MeshRenderer ma;

public float timer = 2.0f; // 定时2秒
public int framecount = 0; //序列计数
void Start()
{
//开启协程,获取摄像头图像数据
StartCoroutine(OpenCamera());
}

// Update is called once per frame
void Update()
{
timer -= Time.deltaTime;
if (timer <= 0)
{
TakePhoto();
timer = 2.0f;
}
}

private void TakePhoto()
{
CameraTextureSave.Save(tex,framecount);
framecount++;
print("- saved - ");
}

IEnumerator OpenCamera()
{
//等待用户允许访问
yield return Application.RequestUserAuthorization(UserAuthorization.WebCam);
//如果用户允许访问,开始获取图像
if (Application.HasUserAuthorization(UserAuthorization.WebCam))
{
//先获取设备
WebCamDevice[] device = WebCamTexture.devices;

string deviceName = device[0].name;
//然后获取图像
tex = new WebCamTexture(deviceName,1920,1080,30);
//将获取的图像赋值
ma.material.mainTexture = tex;
rawImage.texture = tex;
//开始实施获取
tex.Play();

}
}

public class CameraTextureSave : MonoBehaviour
{

public static void Save(WebCamTexture t,int frame)
{
Texture2D t2d = new Texture2D(t.width, t.height, TextureFormat.ARGB32, true);
//将WebCamTexture 的像素保存到texture2D中
t2d.SetPixels(t.GetPixels());
//t2d.ReadPixels(new Rect(200,200,200,200),0,0,false);
t2d.Apply();
//编码
byte[] imageTytes = t2d.EncodeToJPG();

//存储
//File.WriteAllBytes(Application.streamingAssetsPath + "/my1/" + Time.time + ".jpg", imageTytes);
string str =  string.Format("{0:D6}", frame); //定义序列图片命名,如 image_#####.jpg   000001    000002
File.WriteAllBytes(Application.streamingAssetsPath + "/my1/" + "image_" + str + ".jpg", imageTytes);

}
}

}
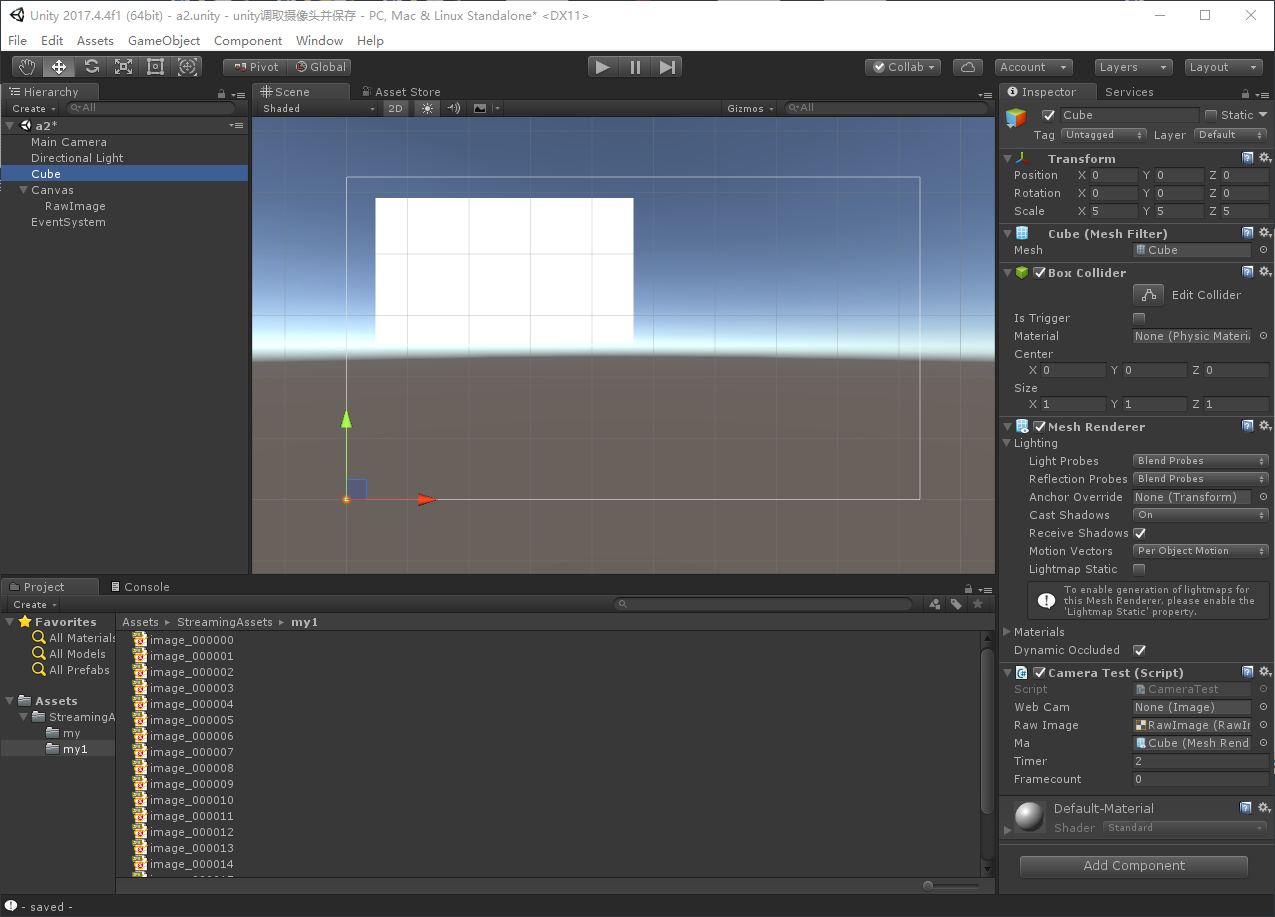
Unity场景中,添加一个
Cube,一个
RawImage,注意将
CameraTest脚本绑在任何一个
GameObject上,并赋予
ma、
rawimage对象,分别对应材质上显示图像和UI上显示图像,如下图:
结果
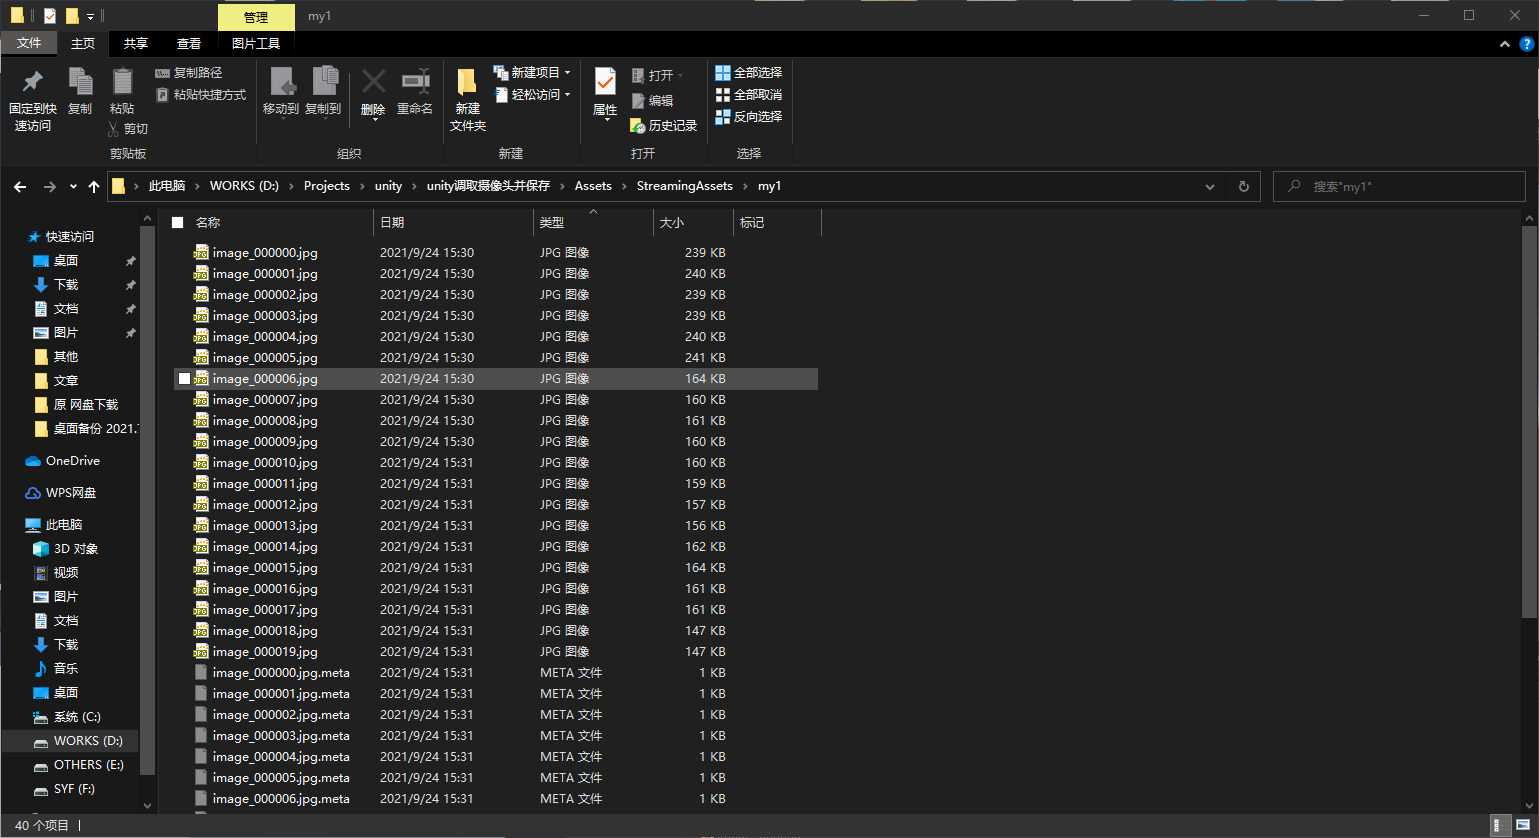
运行起来,在
StreamingAssets文件夹下会产生序列图片,即为要的实时抓拍的摄像头画面。
参考文献
[1] https://www.geek-share.com/detail/2711346682.html Unity 3D之调用摄像头并存储 [2] https://blog.csdn.net/u014361280/article/details/107374795 Unity 基础 之 WebCamTexture 获取设备摄像头(包括PC和移动端),简单渲染到 UGUI 或 游戏物体上

相关文章推荐
- PHP基于GD库的图像处理方法小结
- Unity之人脸识别对比(二)获取摄像头图像以及保存
- unity如何让某个物体永远显示在最前面(3D层)并保存成型后的图像(不显示UI层)(多个摄像头的用法、三种截图)
- 6a801-hdmi图像显示方式的保存方法
- 基于Boost方法的人脸检测(2):样本生成(切割图像、resize图像、灰度化图像、保存图片)
- Java 基于quartz实现定时 之一(注解方式配置)
- PHP实现将HTML5中Canvas图像保存到服务器的方法
- asp.net基于windows服务实现定时发送邮件的方法
- Android自定义相机方法及保存照片方式
- python+opencv打开摄像头,保存视频、拍照功能的实现方法
- 基于iCamera测试500w摄像头-mt9p001,mt9p031,mt9p001模块小结
- 改进的“以非泛型方式调用泛型方法”之基于DynamicMethod的实现
- 第121课:Spark Streaming性能优化:通过摄像头图像处理案例来说明Spark流处理性能评估新方法及性能调优参数调试
- 实战小项目之基于嵌入式的图像采集压缩保存
- 图像分析:二值图像连通域标记-基于行程的标记方法
- 基于iCamera测试500w摄像头-mt9p001,mt9p031,mt9p001模块小结 续2
- unity调用摄像头进行拍照和保存照片
- 一种基于局部最小代价分水岭变换的图像分割新方法 阅读笔记
- 两个usb摄像头的同时采集图像的一般方法。
- 第二十二章 基于XML配置方式实现对action的所有方法进行校验