超详细!Vuex手把手教程
2021-07-26 10:11
627 查看
1,前言
最近在重温vue全家桶,再看一遍感觉记忆更深刻,所以专门记录一下(本文vuex版本为v3.x)。
2,Vuex 是什么
Vuex是专为Vue.js开发的状态管理模式。它采用集中式存储,管理所有组件的状态,并以相应的规则保证状态以一种可预测的方式发生变化(我的理解就是全局变量)。
3,5大属性说明
state
对象类型,类似于实例的 data属性,存放数据
getters
对象类型,类似于实例的计算属性 computed
mutations
对象类型,类似于实例的 methods,但是不能处理异步方法
actions
对象类型,类似于实例的 methods,可以处理异步方法
modules
对象类型,当state内容比较多时,通过该属性分割成小模块,每个模块都拥有自己的 state、mutation、action、getter
4,state
存储在
state中的数据和
Vue实例中的
data遵循相同的规则,必须是纯粹的对象。
4.1 直接访问
this.$store.state.xxx
4.1 使用mapState映射
<template>
<div id="communication">
<p>计数:{{ getCount }}</p>
<p>学校:{{ getSchool('我是参数') }}</p>
</div>
</template>

<script>
import { mapState } from 'vuex'

export default {
name: 'Vuex',
data() {
return {
date: 1998
}
},
computed: {
...mapState({
// mapState默认会把state当第一个参数传进来
getCount: state => state.count,
getSchool(state) {
return (val) => {
return state.school + val + this.date
}
}
})
},
mounted() {
// 直接取值
console.log(this.$store.state.count)
}
}
</script>
5,getters
getter的返回值会根据它的依赖被缓存起来,且只有当它的依赖值发生了改变才会被重新计算,并且默认接受
state作为其第一个参数,也可以接受其他
getter作为第二个参数(如下例)
5.1 先在vuex中定义getters
export default new Vuex.Store({
state: {
count: 0,
school: '清华大学'
},
getters: {
// 返回处理后的state值
getValue(state) {
return state.count + '!'
},
// 返回调用自身getters处理后的state值
getGetters(state, getters) {
return state.school + getters.getValue
},
// 接受外部传参后处理的值(在通过方法访问时,每次都会去进行调用,而不会缓存结果)
getParam(state) {
return (param) => {
return state.school + param
}
}
},
mutations: {},
actions: {},
modules: {}
})
5.2 直接获取值
// 取值
console.log(this.$store.getters.getGetters)
// 传参取值
console.log(this.$store.getters.getParam('param'))
5.3 使用mapGetters映射
<template>
<div id="communication">
<p>计数:{{ getGetters }}</p>
<p>学校:{{ getParam(date) }}</p>
</div>
</template>

<script>
import { mapGetters } from 'vuex'

export default {
name: 'Vuex',
data() {
return {
date: 1998
}
},
computed: {
...mapGetters([
'getGetters',
'getParam'
])
},
mounted() {
// 直接取值
console.log(this.$store.getters.getGetters)
console.log(this.getParam(this.date))
}
}
</script>
6,Mutation
通过调用
this.$store.commit('xxx'),调用mutation中的方法,更改
store中的值
6.1,先在mutations中注册事件
export default new Vuex.Store({
state: {
count: 0,
school: '清华大学'
},
getters: {},
mutations: {
// 默认state作为第一个参数
handleAdd(state) {
state.count++
},
// 接受传参
handleChange(state, value) {
state.school = value
}
},
actions: {},
modules: {}
})
6.2,在组件中调用方法commit修改值
<template>
<div id="communication">
<p>计数:{{ count }}</p>
<el-button @click="handleStoreAdd">增加</el-button>
<el-button @click="handleStoreChange">传参</el-button>
</div>
</template>

<script>
import { mapState } from 'vuex'

export default {
name: 'Vuex',
data() {
return {
school: '武汉大学'
}
},
computed: {
...mapState([
'count'
])
},
methods: {
// 调用修改
handleStoreAdd() {
this.$store.commit('handleAdd')
},
// 传递参数修改
handleStoreChange() {
this.$store.commit('handleChange', this.school)
}
}
}
</script>
6.3,使用常量定义方法名
新建文件
mutation-types.js,定义方法名的常量,并导出
export const ADD_COUNT = 'ADD_COUNT'
export const CHANGE = 'CHANGE'
在store中
import Vue from 'vue'
import Vuex from 'vuex'
import * as MT from './mutation-types'

Vue.use(Vuex)

export default new Vuex.Store({
state: {
count: 0,
school: '清华大学'
},
getters: {},
mutations: {
// 默认state作为第一个参数
[MT.ADD_COUNT](state) {
state.count++
},
// 接受传参
[MT.CHANGE](state, value) {
state.school = value
}
},
actions: {},
modules: {}
})
在组件中
<template>
<div id="communication">
<p>计数:{{ count }}</p>
<el-button @click="handleStoreAdd">增加</el-button>
<el-button @click="handleStoreChange">传参</el-button>
</div>
</template>

<script>
import { mapState } from 'vuex'
import * as MT from '../../store/mutation-types'
export default {
name: 'Vuex',
data() {
return {
school: '武汉大学'
}
},
computed: {
...mapState([
'count'
])
},
methods: {
// 调用修改
handleStoreAdd() {
this.$store.commit(MT.ADD_COUNT)
},
// 传递参数修改
handleStoreChange() {
this.$store.commit(MT.CHANGE, this.school)
}
}
}
</script>
6.4,使用mapMutations映射
<template>
<div id="communication">
<p>计数:{{ count }}</p>
<p>计数:{{ school }}</p>
<el-button @click="handleStoreAdd">增加</el-button>
<el-button @click="handleStoreChange(schools)">传参</el-button>
</div>
</template>

<script>
import { mapState, mapMutations } from 'vuex'
import * as MT from '../../store/mutation-types'

export default {
name: 'Vuex',
data() {
return {
schools: '武汉大学'
}
},
computed: {
...mapState([
'count',
'school'
])
},
methods: {
...mapMutations({
handleStoreAdd: MT.ADD_COUNT,
handleStoreChange: MT.CHANGE
})
}
}
</script>
7,Action
注意,
Action提交的是
mutation,而不是直接变更状态,并且可以包含任意异步操作
7.1,在store中定义
import Vue from 'vue'
import Vuex from 'vuex'
import * as MT from './mutation-types'

Vue.use(Vuex)

export default new Vuex.Store({
state: {
count: 0,
school: '清华大学'
},
getters: {},
mutations: {
// 默认state作为第一个参数
[MT.ADD_COUNT](state) {
state.count++
},
// 接受传参
[MT.CHANGE](state, value) {
state.school = value
}
},
actions: {
add(context) {
context.commit(MT.ADD_COUNT)
}
},
modules: {}
})
7.2,在组件中使用
<template>
<div id="communication">
<p>计数:{{ count }}</p>
<el-button @click="actionAdd">增加</el-button>
</div>
</template>

<script>
import { mapState, mapMutations } from 'vuex'
import * as MT from '../../store/mutation-types'

export default {
name: 'Vuex',
data() {
return {
schools: '武汉大学'
}
},
computed: {
...mapState([
'count',
'school'
])
},
methods: {
...mapMutations({
handleStoreAdd: MT.ADD_COUNT,
handleStoreChange: MT.CHANGE
}),
// 调用action的方法,需要使用$store.dispatch
actionAdd() {
this.$store.dispatch('add')
}
}
}
</script>
7.3,使用mapActions映射
import { mapActions } from 'vuex'

methods: {
...mapActions([
'moduleFn'
])
}
或者
import { mapActions } from 'vuex'

methods: {
...mapActions([
fn: 'moduleFn'
])
}
7.4,简化写法
Action接受一个与
store实例具有相同方法和属性的
context参数对象,因此你可以调用
context.commit提交一个
mutation,或者通过
context.state和
context.getters来获取
state和
getters,利用
ES6的解构,可以简化写法。
actions: {
add({ commit, state }) {
commit(MT.CHANGE, state.school)
}
}
7.5,执行异步操作
在vuex中
import Vue from 'vue'
import Vuex from 'vuex'
import * as MT from './mutation-types'

Vue.use(Vuex)

export default new Vuex.Store({
state: {
count: 0
},
getters: {},
mutations: {
// 默认state作为第一个参数
[MT.ADD_COUNT](state) {
state.count++
}
},
actions: {
add({ commit }) {
return new Promise((resolve, reject) => {
setTimeout(() => {
commit(MT.ADD_COUNT)
resolve()
}, 1000)
})
}
},
modules: {}
})
在组件中使用
async / await或者
then / catch处理异步
<template>
<div id="communication">
<p>计数:{{ count }}</p>
<el-button @click="actionAdd">增加</el-button>
</div>
</template>

<script>
import { mapState, mapMutations } from 'vuex'
import * as MT from '../../store/mutation-types'

export default {
name: 'Vuex',
data() {
return {
schools: '武汉大学'
}
},
computed: {
...mapState([
'count',
'school'
])
},
methods: {
...mapMutations({
handleStoreAdd: MT.ADD_COUNT,
handleStoreChange: MT.CHANGE
}),
// 调用action的方法,需要使用$store.dispatch
async actionAdd() {
await this.$store.dispatch('add')
console.log(1998)
}
}
}
</script>
8,Modules
当应用变得非常复杂时,
store对象就可能变得相当臃肿。这时候可以将
store分割成模块,每个模块拥有自己的
state、
mutation、
action、
getter、甚至是嵌套子模块,从上至下进行同样方式的分割。
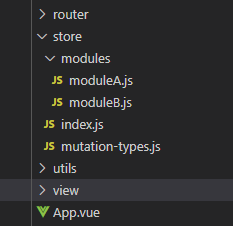
8.1,准备工作
在store目录下新建
Modules文件夹,在
Modules文件夹中新建
modulesA.js,
modulesB.js,如下图
在modulesA.js中写上局部模块的
state、
mutation、
action、
getter,并导出
const moduleA = {
state: () => ({
a: '我是moduleA'
}),
getters: {},
mutations: {},
actions: {}
}

export default moduleA
然后在
store的
index.js中引入,并丢进
modules对象里
import Vue from 'vue'
import Vuex from 'vuex'
import * as MT from './mutation-types'
import moduleA from './modules/moduleA'
import moduleB from './modules/moduleB'

Vue.use(Vuex)

export default new Vuex.Store({
state: {
count: 0
},
getters: {},
mutations: {},
actions: {},
modules: {
moduleA,
moduleB
}
})
8.2,使用modules中注入的模块的state
在组件中直接使用
this.$store.state.moduleA.xxx
在组件中使用
mapState映射
<span>{{ moduleA.xxx }}</span>

import { mapState } from 'vuex'

computed: {
...mapState([
'moduleA'
])
}
8.3,使用modules中注入模块的getters
在组件中直接使用
this.$store.getters.getModuleA
在组件中使用
mapState映射
<p>{{ getModuleA }}</p>

import { mapGetters } from 'vuex'

computed: {
...mapGetters([
'getModuleA'
])
}
模块内部的
getter,接受的参数
state和
getters是模块的局部状态对象,而根节点的状态会作为第三个参数
rootState暴露出来
const moduleA = {
getters: {
getModuleA(state, getters, rootState) {
return state.xxx + '---' + rootState.xxx
}
}
}
如果需要带参数
const moduleA = {
getters: {
getModuleA(state, getters, rootState) {
return (value) => {
return state.a + '---' + value
}
}
}
}
8.4,使用modules中注入模块的mutations
在组件中直接使用
this.$store.commit('setModuleA') || this.$store.commit('setModuleA', '参数')
在组件中使用
mapMutations映射
import { mapMutations } from 'vuex'

methods: {
...mapMutations([
openFn: 'setModuleA'
])
}
模块内部的
mutations,默认接受的第一个参数
state是模块的局部状态对象
const moduleA = {
mutations: {
setModuleA(state) {
state.xxx += 'xxx'
}
}
}
如果需要带参数
const moduleA = {
mutations: {
setModuleA(state, value) {
state.xxx += value
}
}
}
8.5,使用modules中注入模块的actions
在组件中直接使用
this.$store.dispatch('xxx')
在组件中使用
mapActions映射
import { mapActions } from 'vuex'

methods: {
...mapActions([
'moduleA'
])
}
或者重命名
import { mapActions } from 'vuex'

methods: {
...mapActions({
fn: 'moduleA'
})
}
对于模块内部的
action,局部状态通过
context.state暴露出来,根节点状态则为
context.rootState
const moduleA = {
// ...
actions: {
fn ({ state, commit, rootState }) {
if ((state.count + rootState.count) % 2 === 1) {
commit('increment')
}
}
}
}
8.6,命名空间
默认情况下,模块内部的
action、
mutation和
getter是注册在全局命名空间的,这样使得多个模块能够对同一
mutation或
action作出响应。如果希望模块具有更高的封装度和复用性,可以通过给模块添加
namespaced: true的方式使其成为带命名空间的模块。当模块被注册后,它的所有
getter、
action及
mutation都会自动根据模块注册的路径调整命名。
8.6.1,使用
先在模块
moduleB.js中添加
namespaced: true
const moduleB = {
namespaced: true,
state: () => ({
b: '我是moduleB'
}),
mutations: {},
actions: {},
getters: {}
}

export default moduleB
在
store的
index.js中
import moduleA from './modules/moduleA'
import moduleB from './modules/moduleB'

export default new Vuex.Store({
state: {},
getters: {},
mutations: {},
actions: {},
modules: {
moduleA,
moduleB
}
})
如果在组件中使用命名空间,需要带上空间名称,
mapState,
mapGetters,
mapMutations,
mapActions用法一样。
<script>
import { mapState, mapGetters, mapMutations } from 'vuex'

export default {
name: 'Vuex',
data() {
return {}
},
computed: {
// 此处注入的是moduleA模块的数据
...mapState('moduleA', [
'a'
]),
// 需要注入moduleB模块,就再写一个
...mapState('moduleB', [
'b'
])
},
mounted() {
// 直接使用
console.log(this.$store.state.moduleA.a)
console.log(this.$store.state.moduleB.b)
},
methods: {}
}
</script>
8.6.2 ,在带命名空间的模块中内访问全局内容
如果你希望使用全局的
state和
getter,
rootState和
rootGetters会作为第三和第四参数传入
getter,也会通过
context对象的属性传入
action。若需要在全局命名空间内分发
action或提交
mutation,将
{ root: true }作为第三参数传给dispatch或
commit即可
const moduleA = {
namespaced: true,
state: () => ({
a: '我是moduleA'
}),
getters: {
getModuleA(state, getters, rootState, rootGetters) {
// 使用全局命名空间的state或getters
return state.a + rootState.count
}
},
mutations: {
setModuleA(state) {
console.log(state.a)
}
},
actions: {
addM({ state, commit, dispatch, rootState, rootGetters }) {
console.log(rootState)
console.log(rootGetters)
// 调用全局命名空间的方法
dispatch('rootFunction', null, { root: true })
}
}
}

export default moduleA
8.6.3,在带命名空间的模块注册全局action
在带命名空间的模块注册全局
action,需要添加
root: true,并将这个
action的定义放在函数
handler中,其中,handler的第一个参数
namespacedContext就是
action中的
Context参数
const moduleA = {
namespaced: true,
state: () => ({
a: '我是moduleA'
}),
getters: {},
mutations: {},
actions: {
rootFn: {
root: true,
handler(namespacedContext, param) {
console.log(namespacedContext.state)
}
}
}
}

export default moduleA
如果看了觉得有帮助的,我是@鹏多多,欢迎 点赞 关注 评论;END

公众号
往期文章
个人主页

相关文章推荐
- vue入门 | 使用vue.js2.0 + ElementUI开发后台管理系统详细教程(一)
- 最详细的vue.js安装教程
- vue入门 | 使用vue.js2.0 + ElementUI开发后台管理系统详细教程
- 如何新建一个vue项目,超详细教程
- webpack构建vue项目的详细教程(配置篇)
- 惊!VUE居然数据不能驱动视图?$set详细教程
- 超详细!Vue-Router手把手教程
- 手把手教你如何创建vue脚手架项目(最详细!)
- 【vue element admin】服务端控制侧边栏显示权限详细教程
- 一份超级详细的Vue-cli3.0使用教程【推荐】
- vue的入门新建详细教程
- CentOS Linux release 7.3.1611安装vue.js包含npm和cnpm详细教程
- 安卓升级AndroidX手把手教程
- 手把手教你制作Google Sitemap(详细制作教程和协议讲解)
- 手把手教你安装win8系统(最详细的图文教程)
- 手把手教你用npm发布一个包,详细教程
- vue学习教程之带你一步步详细解析vue-cli
- 手把手教你制作GoogleSitemap(详细制作教程和协议讲解)
- VUE全网最详细安装教程
- Vue.js 2.x:组件的定义和注册(详细的图文教程)