【更新】不到90行代码,pygame从无到有教会你制作有趣的大小图全景效果,不看是你的损失!
2021-05-25 17:57
771 查看
pygame从无到有教会你制作有趣的大小图效果,不看是你的损失,
好的,马上开始。
文章目录
一、实现基本的功能
(一)先搭个架子
import pygame,sys

pygame.init()
screen = pygame.display.set_mode((500, 500))
pygame.display.set_caption('大小框展示')
fcclock = pygame.time.Clock()
while True:
for event in pygame.event.get():
if event.type == pygame.QUIT or event.type == pygame.K_F1:
pygame.quit()
sys.exit()
fcclock.tick(60)
pygame.display.flip()  # 刷新窗口
黑黑的框,不截图了。大家都懂。
(二)直接贴个图
1、代码如下:
import pygame,sys
pygame.init()
screen = pygame.display.set_mode((500, 500))
pygame.display.set_caption('大小框展示')
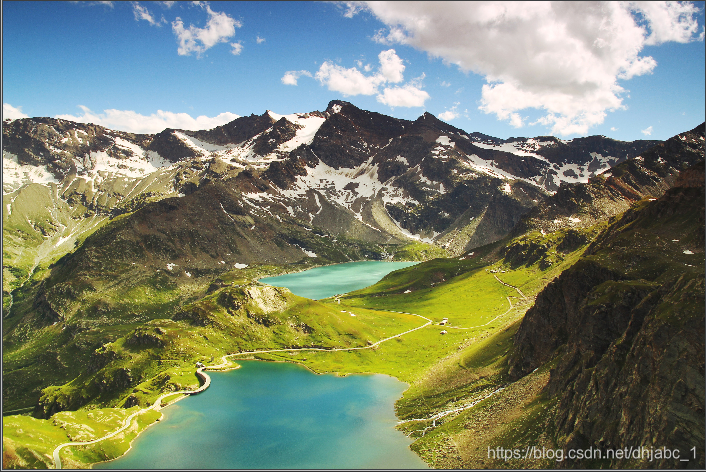
img = pygame.image.load('./image/aerial-alpine-ceresole-reale-desktop-backgrounds-1562.jpg').convert_alpha()
fcclock = pygame.time.Clock()
while True:
for event in pygame.event.get():
if event.type == pygame.QUIT or event.type == pygame.K_F1:
pygame.quit()
sys.exit()
screen.blit(img,(0,0))
fcclock.tick(60)
pygame.display.flip() # 刷新窗口
2、运行效果
(三)截取部分图
1、简单截取
screen.blit(img,(0,0),(1000,1000,500,500))

2、让部分截图动起来
# aerial-alpine-ceresole-reale-desktop-backgrounds-1562.jpg

import pygame,sys

pygame.init()
screen = pygame.display.set_mode((500, 500))
pygame.display.set_caption('大小框展示')
fcclock = pygame.time.Clock()
img = pygame.image.load('./image/aerial-alpine-ceresole-reale-desktop-backgrounds-1562.jpg').convert_alpha()
i = 0
while True:
for event in pygame.event.get():
if event.type == pygame.QUIT or event.type == pygame.K_F1:
pygame.quit()
sys.exit()
screen.blit(img,(0,0),(i,1000,500,500))
i += 1
fcclock.tick(60)
pygame.display.flip()  # 刷新窗口

3、显示个全图出来吧
import pygame,sys

pygame.init()
screen = pygame.display.set_mode((500, 500))
pygame.display.set_caption('大小框展示')
fcclock = pygame.time.Clock()
img = pygame.image.load('./image/aerial-alpine-ceresole-reale-desktop-backgrounds-1562.jpg').convert_alpha()
img = pygame.transform.scale(img, (500, 500))
while True:
for event in pygame.event.get():
if event.type == pygame.QUIT or event.type == pygame.K_F1:
pygame.quit()
sys.exit()
screen.blit(img,(0,0))
fcclock.tick(60)
pygame.display.flip()  # 刷新窗口

二、实现右下角半透明化小图
(一)初始化小图surface
img_small = pygame.transform.scale(img_big, (int(img_big.get_rect().width/flag), int(img_big.get_rect().height/flag)))
bgSurface = pygame.Surface((int(img_big.get_rect().width/flag), int(img_big.get_rect().height/flag)))
pygame.Surface.convert_alpha(bgSurface)
(二)循环过程中画小图
bgSurface.blit(img_small,(0,0))
screen.blit(bgSurface,(screen.get_rect().width - bgSurface.get_rect().width,screen.get_rect().height - bgSurface.get_rect().height))
(三)完整代码
import pygame,sys
flag = 20
pygame.init()
screen = pygame.display.set_mode((500, 500))
pygame.display.set_caption('大小框展示')
fcclock = pygame.time.Clock()
img_big = pygame.image.load('./image/aerial-alpine-ceresole-reale-desktop-backgrounds-1562.jpg').convert_alpha()
print(img_big.get_rect().width,img_big.get_rect().height)
img_small = pygame.transform.scale(img_big, (int(img_big.get_rect().width/flag), int(img_big.get_rect().height/flag)))
bgSurface = pygame.Surface((int(img_big.get_rect().width/flag), int(img_big.get_rect().height/flag)))
pygame.Surface.convert_alpha(bgSurface)i = 0
while True:
for event in pygame.event.get():
if event.type == pygame.QUIT or event.type == pygame.K_F1:
pygame.quit()
sys.exit()
screen.blit(img_big,(0,0),(i,1000,500,500))
bgSurface.set_alpha(220)
i += 1
bgSurface.blit(img_small,(0,0))
screen.blit(bgSurface,(screen.get_rect().width - bgSurface.get_rect().width,screen.get_rect().height - bgSurface.get_rect().height))fcclock.tick(60)
pygame.display.flip()  # 刷新窗口
(四)运行效果

三、增加小图的选择矩形框
(一)核心代码
bgx = screen.get_rect().width - bgSurface.get_rect().width
bgy = screen.get_rect().height - bgSurface.get_rect().height
posx = i / img_big.get_rect().width * bgSurface.get_rect().width+bgx
posy = j / img_big.get_rect().height * bgSurface.get_rect().height+bgy
rect_rect = (int(posx), int(posy), WIDTH / flag, HEIGHT / flag)
print(rect_rect)
pygame.draw.rect(screen,(255,0,0),rect_rect,2)
(二)完整代码
import pygame,sys
flag = 20
pygame.init()
WIDTH = 500
HEIGHT = 500
screen = pygame.display.set_mode((WIDTH, HEIGHT))
pygame.display.set_caption('大小框展示')
fcclock = pygame.time.Clock()
img_big = pygame.image.load('./image/aerial-alpine-ceresole-reale-desktop-backgrounds-1562.jpg')
print(img_big.get_rect().width,img_big.get_rect().height)
img_small = pygame.transform.scale(img_big, (int(img_big.get_rect().width/flag), int(img_big.get_rect().height/flag)))
bgSurface = pygame.Surface((int(img_big.get_rect().width/flag), int(img_big.get_rect().height/flag)))
pygame.Surface.convert_alpha(bgSurface)i = 0
j = 1000
bgx = screen.get_rect().width - bgSurface.get_rect().width
bgy = screen.get_rect().height - bgSurface.get_rect().height
# posx = i/img_big.get_rect().width*bgSurface.get_rect().width
# posy = j/img_big.get_rect().height*bgSurface.get_rect().height
# rect_rect = (posx,posy,WIDTH/flag,HEIGHT/flag)
while True:
for event in pygame.event.get():
if event.type == pygame.QUIT or event.type == pygame.K_F1:
pygame.quit()
sys.exit()
screen.blit(img_big,(0,0),(i,j,500,500))
bgSurface.set_alpha(230)
bgSurface.blit(img_small,(0,0))
screen.blit(bgSurface,(bgx,bgy))
posx = i / img_big.get_rect().width * bgSurface.get_rect().width+bgx
posy = j / img_big.get_rect().height * bgSurface.get_rect().height+bgy
rect_rect = (int(posx), int(posy), WIDTH / flag, HEIGHT / flag)
print(rect_rect)
pygame.draw.rect(screen,(255,0,0),rect_rect,2)
i += 1
fcclock.tick(60)
pygame.display.flip()  # 刷新窗口
(三)运行效果

上面的都是自动运动的,现在需要实现鼠标响应操作。
四、实现鼠标单击响应操作
(一)实现鼠标响应事件
if event.type == pygame.MOUSEBUTTONDOWN:
choose_rect = pygame.Rect(bgx,bgy,int(img_big.get_rect().width/flag), int(img_big.get_rect().height/flag))
pos = x, y = pygame.mouse.get_pos()  # 获取鼠标位置,鼠标就是需要打击的目标
if choose_rect.collidepoint(pos):
print('in')
else:
print('not in')
(二)实现矩形框点击响应函数
if event.type == pygame.MOUSEBUTTONDOWN:
choose_rect = pygame.Rect(bgx,bgy,int(img_big.get_rect().width/flag), int(img_big.get_rect().height/flag))
pos = x, y = pygame.mouse.get_pos()  # 获取鼠标位置,鼠标就是需要打击的目标
if choose_rect.collidepoint(pos):
select = True
print('in')
if x-12.5>0:
posx = x-12.5
else:
posx = 0
if y-12.5>0:
posy = y-12.5
else:
posy = 0
rect_rect = (int(posx), int(posy), WIDTH / flag, HEIGHT / flag)
i = (posx-bgx)*img_big.get_rect().width/bgSurface.get_rect().width
j = (posy-bgy)*img_big.get_rect().height/bgSurface.get_rect().height
pygame.draw.rect(screen, (255, 0, 0), rect_rect, 2)
else:
print('not in')
(三)实现效果

五、实现鼠标移动监听事件
初始化变量
select=False
(一)鼠标按下
if event.type == pygame.MOUSEBUTTONDOWN:
choose_rect = pygame.Rect(bgx,bgy,int(img_big.get_rect().width/flag), int(img_big.get_rect().height/flag))
pos = x, y = pygame.mouse.get_pos()  # 获取鼠标位置,鼠标就是需要打击的目标
if choose_rect.collidepoint(pos):
select = True
print('in')
if x-12.5>0:
posx = x-12.5
else:
posx = 0
if y-12.5>0:
posy = y-12.5
else:
posy = 0
rect_rect = (int(posx), int(posy), WIDTH / flag, HEIGHT / flag)
i = (posx-bgx)*img_big.get_rect().width/bgSurface.get_rect().width
j = (posy-bgy)*img_big.get_rect().height/bgSurface.get_rect().height
pygame.draw.rect(screen, (255, 0, 0), rect_rect, 2)
else:
print('not in')
(二)鼠标移动
if event.type == pygame.MOUSEMOTION:
if select:
choose_rect = pygame.Rect(bgx,bgy,int(img_big.get_rect().width/flag), int(img_big.get_rect().height/flag))
pos = x, y = pygame.mouse.get_pos()  # 获取鼠标位置,鼠标就是需要打击的目标
if choose_rect.collidepoint(pos):
print('in')
if x-12.5>0:
posx = x-12.5
else:
posx = 0
if y-12.5>0:
posy = y-12.5
else:
posy = 0
rect_rect = (int(posx), int(posy), WIDTH / flag, HEIGHT / flag)
i = (posx-bgx)*img_big.get_rect().width/bgSurface.get_rect().width
j = (posy-bgy)*img_big.get_rect().height/bgSurface.get_rect().height
pygame.draw.rect(screen, (255, 0, 0), rect_rect, 2)
else:
print('not in')
(三)鼠标松开
if event.type == pygame.MOUSEBUTTONUP:
select = False
(四)完整代码
import pygame,sys
flag = 20
pygame.init()
WIDTH = 500
HEIGHT = 500
screen = pygame.display.set_mode((WIDTH, HEIGHT))
pygame.display.set_caption('大小框展示')
fcclock = pygame.time.Clock()
img_big = pygame.image.load('./image/aerial-alpine-ceresole-reale-desktop-backgrounds-1562.jpg')
print(img_big.get_rect().width,img_big.get_rect().height)
img_small = pygame.transform.scale(img_big, (int(img_big.get_rect().width/flag), int(img_big.get_rect().height/flag)))
bgSurface = pygame.Surface((int(img_big.get_rect().width/flag), int(img_big.get_rect().height/flag)))
pygame.Surface.convert_alpha(bgSurface)i = 0
j = 1000
bgx = screen.get_rect().width - bgSurface.get_rect().width
bgy = screen.get_rect().height - bgSurface.get_rect().height
posx = i/img_big.get_rect().width*bgSurface.get_rect().width+bgx
posy = j/img_big.get_rect().height*bgSurface.get_rect().height+bgy
select = False
# rect_rect = (posx,posy,WIDTH/flag,HEIGHT/flag)
while True:
for event in pygame.event.get():
if event.type == pygame.QUIT or event.type == pygame.K_F1:
pygame.quit()
sys.exit()
if event.type == pygame.MOUSEBUTTONDOWN:
choose_rect = pygame.Rect(bgx,bgy,int(img_big.get_rect().width/flag), int(img_big.get_rect().height/flag))
pos = x, y = pygame.mouse.get_pos()  # 获取鼠标位置,鼠标就是需要打击的目标
if choose_rect.collidepoint(pos):
select = True
print('in')
if x-12.5>0:
posx = x-12.5
else:
posx = 0
if y-12.5>0:
posy = y-12.5
else:
posy = 0
rect_rect = (int(posx), int(posy), WIDTH / flag, HEIGHT / flag)
i = (posx-bgx)*img_big.get_rect().width/bgSurface.get_rect().width
j = (posy-bgy)*img_big.get_rect().height/bgSurface.get_rect().height
pygame.draw.rect(screen, (255, 0, 0), rect_rect, 2)
else:
print('not in')
if event.type == pygame.MOUSEBUTTONUP:
select = False
if event.type == pygame.MOUSEMOTION:
if select:
choose_rect = pygame.Rect(bgx,bgy,int(img_big.get_rect().width/flag), int(img_big.get_rect().height/flag))
pos = x, y = pygame.mouse.get_pos()  # 获取鼠标位置,鼠标就是需要打击的目标
if choose_rect.collidepoint(pos):
print('in')
if x-12.5>0:
posx = x-12.5
else:
posx = 0
if y-12.5>0:
posy = y-12.5
else:
posy = 0
rect_rect = (int(posx), int(posy), WIDTH / flag, HEIGHT / flag)
i = (posx-bgx)*img_big.get_rect().width/bgSurface.get_rect().width
j = (posy-bgy)*img_big.get_rect().height/bgSurface.get_rect().height
pygame.draw.rect(screen, (255, 0, 0), rect_rect, 2)
else:
print('not in')

screen.blit(img_big,(0,0),(i,j,500,500))
bgSurface.set_alpha(230)
bgSurface.blit(img_small,(0,0))
screen.blit(bgSurface,(bgx,bgy))

rect_rect = (int(posx), int(posy), WIDTH / flag, HEIGHT / flag)
i = (posx - bgx) * img_big.get_rect().width / bgSurface.get_rect().width
j = (posy - bgy) * img_big.get_rect().height / bgSurface.get_rect().height
pygame.draw.rect(screen, (255, 0, 0), rect_rect, 2)
# posx = i / img_big.get_rect().width * bgSurface.get_rect().width+bgx
# posy = j / img_big.get_rect().height * bgSurface.get_rect().height+bgy
# rect_rect = (int(posx), int(posy), WIDTH / flag, HEIGHT / flag)
# # print(rect_rect)
# pygame.draw.rect(screen,(255,0,0),rect_rect,2)
# i += 1
fcclock.tick(60)
pygame.display.flip()  # 刷新窗口
六、完整实现效果

可点击、可拖动查看大小图,任君选择,喜欢就好!
比心,感谢!

相关文章推荐
- vue框架制作购物车小球动画效果实例代码
- 基于jquery实现的上传图片及图片大小验证、图片预览效果代码!
- vs2013更新了代码,但是运行没效果
- 用css3,transform3d制作房屋全景展示效果(一)
- jquery javascript 实现上传图片及图片大小验证、图片预览效果代码
- 一个非常非常非常简单的代码,但不知道为什么达不到效果
- 纯css制作九宫格色块翻转效果,代码只需100行
- 基于jquery实现的上传图片及图片大小验证、图片预览效果代码
- css 制作有趣、简单的动态效果
- 同样的页面代码火狐浏览器和chrome文字大小显示的效果不同
- web前端案例-纯css代码制作吃豆豆加载效果
- CSS Animatie是一款在线制作CSS3动画的工具,可以在线直接制作CSS3动画效果,生成代码
- 网页制作--滚动新闻代码(用iframe即时更新网上的新闻)
- Html5Video标签和Source标签制作视频播放器及画面大小切换和简单弹幕效果
- 用Dreamweaver制作有趣的图片探照灯效果
- !HTML制作APP注册页面,利用form等标签,达到想要的结果,以帮助自己了解html的排版和页面的问题,我们的css中的代码。对于页面有着至关重要的效果,如果出现问题,就要更加小心,其中的问题,
- php点赞效果的制作代码+解析(jQuery+Ajax+PHP实现“赞”)
- 网页制作效果常用代码
- wpf制作毛玻璃效果按钮的代码
- Android应用中制作选中后图标变大浮动效果的代码分享