MySQL所有的主从同步架构搭建方式
一.前言
本文将指导搭建所有的MySQL主从同步架构方案:
- 一主多从架构
- 主主双向同步架构
- M-S-S三级级联同步架构
- 多主多从架构
二.关于MySQL主从同步
MySQL主从同步是构建大型,高性能应用的基础,MySQL主从同步可以实现在从服务器可以执行查询工作(即我们常说的读功能),降低主服务器压力(主库写,从库读,降压),在从主服务器进行备份,避免备份期间影响主服务器服务(确保数据安全),当主服务器出现问题时,可以切换到从服务器(提升性能)。
三.部署规划
3.1 服务器规划
| 服务器 | 操作系统版本 | CPU架构 | MySQL版本 |
|---|---|---|---|
| node6 | CentOS Linux release 7.4.1708 | x86_64 | 5.7.26 |
| node7 | CentOS Linux release 7.4.1708 | x86_64 | 5.7.26 |
| node8 | CentOS Linux release 7.4.1708 | x86_64 | 5.7.26 |
| node9 | CentOS Linux release 7.4.1708 | x86_64 | 5.7.26 |
3.2 数据库目录规划
| 文件类型 | 文件部署位置 |
|---|---|
| 数据目录datadir | /data/data(/data目录请确保足够大) |
| 配置文件my.cnf | /etc/my.cnf |
| 错误日志log-error | /data/log/mysql_error.log |
| 二进制日志log-bin | /data/binlogs/mysql-bin(用于数据库恢复和主从复制,以及审计(audit)操作) |
| 慢查询日志slow_query_log_file | /data/log/mysql_slow_query.log |
| 套接字文件socket | /data/run/mysql.sock |
| 进程ID文件mysql.pid | /data/run/mysql.pid |
四.准备工具
1.MySQL通用二进制包:mysql-5.7.26-linux-glibc2.12-x86_64.tar.gz
下载地址:https://dev.mysql.com/downloads/mysql/5.7.html#downloads
五.四台机器上使用通用二进制包安装MySQL(以node7为例)
5.1 上传MySQL通用二进制安装包到node7的/usr/local/src目录下
[root@node7 src]# pwd
/usr/local/src
[root@node7 src]# ls
mysql-5.7.26-linux-glibc2.12-x86_64.tar.gz
5.2 解压MySQL到指定目录并改名
[root@node7 src]# tar -zxf mysql-5.7.26-linux-glibc2.12-x86_64.tar.gz -C /usr/local/
[root@node7 src]# cd /usr/local/
[root@node7 local]# ls
bin  etc  games  include  lib  lib64  libexec  mysql-5.7.26-linux-glibc2.12-x86_64  sbin  share  src
[root@node7 local]# mv mysql-5.7.26-linux-glibc2.12-x86_64 mysql
[root@node7 local]# ls
bin  etc  games  include  lib  lib64  libexec  mysql  sbin  share  src
5.3 创建MySQL用户和用户组
[root@node7 local]# groupadd -g 1111 mysql
[root@node7 local]# useradd -g mysql -u 1111 -s /sbin/nologin mysql
[root@node7 local]# id mysql    #查看用户信息
uid=1111(mysql) gid=1111(mysql) groups=1111(mysql)
5.4 配置MySQL的bin目录到PATH路径
[root@node7 local]# echo "export PATH=$PATH:/usr/local/mysql/bin" >> /etc/profile
[root@node7 local]# source /etc/profile
[root@node7 local]# mysql    #输入MySQL之后双击tab键,即可列出候选MySQL命令
mysql                       mysql_client_test_embedded  mysqld-debug                mysqldumpslow               mysql_plugin                mysqlslap                   mysql_upgrade
mysqladmin                  mysql_config                mysqld_multi                mysql_embedded              mysqlpump                   mysql_ssl_rsa_setup         mysqlxtest
mysqlbinlog                 mysql_config_editor         mysqld_safe                 mysqlimport                 mysql_secure_installation   mysqltest_embedded
mysqlcheck                  mysqld                      mysqldump                   mysql_install_db            mysqlshow                   mysql_tzinfo_to_sql
5.5 创建MySQL数据存放目录
[root@node7 ~]# mkdir -p /data/{data,log,binlogs,run}
[root@node7 ~]# tree /data    #如果没有tree命令,则yum -y install tree安装
/data
├── binlogs
├── data
├── log
└── run

4 directories, 0 files
[root@node7 ~]# chown -R mysql:mysql /data
[root@node7 ~]# ll /data/
total 0
drwxr-xr-x 2 mysql mysql 6 Dec  3 11:07 binlogs
drwxr-xr-x 2 mysql mysql 6 Dec  3 11:07 data
drwxr-xr-x 2 mysql mysql 6 Dec  3 11:07 log
drwxr-xr-x 2 mysql mysql 6 Dec  3 11:07 run
5.6 配置MySQL配置文件
[root@node7 mysql]# rm -rf /etc/my.cnf
[root@node7 mysql]# touch /etc/my.cnf#my.cnf配置文件详解,请查看我上一篇blog的#https://www.cnblogs.com/renshengdezheli/p/11913248.html的“MySQL配置文件优化参考”[root@node7 mysql]# cat /etc/my.cnf
[client]
port=3306
socket=/data/run/mysql.sock

[mysqld]
port=3306
socket=/data/run/mysql.sock
pid_file=/data/run/mysql.pid
datadir=/data/data
default_storage_engine=InnoDB
max_allowed_packet=512M
max_connections=2048
open_files_limit=65535

skip-name-resolve
lower_case_table_names=1

character-set-server=utf8mb4
collation-server=utf8mb4_unicode_ci
init_connect='SET NAMES utf8mb4'

innodb_buffer_pool_size=1024M
innodb_log_file_size=2048M
innodb_file_per_table=1
innodb_flush_log_at_trx_commit=0

key_buffer_size=64M

log-error=/data/log/mysql_error.log
log-bin=/data/binlogs/mysql-bin
slow_query_log=1
slow_query_log_file=/data/log/mysql_slow_query.log
long_query_time=5

tmp_table_size=32M
max_heap_table_size=32M
query_cache_type=0
query_cache_size=0

server-id=1
5.7 初始化MySQL数据库
[root@node7 mysql]# mysqld --initialize --user=mysql --basedir=/usr/local/mysql --datadir=/data/data
[root@node7 mysql]# echo $?
0
[root@node7 mysql]# grep 'temporary password' /data/log/mysql_error.log    #查看MySQL初始化密码
2019-12-03T03:47:42.639938Z 1 [Note] A temporary password is generated for root@localhost: lhrh>J,p<8gw
5.8 生成ssl(可选)
#关于MySQL开启ssl查看https://www.cnblogs.com/mysql-dba/p/7061300.html[root@node7 mysql]# mysql_ssl_rsa_setup --basedir=/usr/local/mysql --datadir=/data/data
Generating a 2048 bit RSA private key
......................................+++
.+++
writing new private key to 'ca-key.pem'
-----
Generating a 2048 bit RSA private key
....................................+++
............................+++
writing new private key to 'server-key.pem'
-----
Generating a 2048 bit RSA private key
.....................................................................................+++
..............................................+++
writing new private key to 'client-key.pem'
-----#执行完成之后,会有在datadir目录生成*.pem文件[root@node7 mysql]# ls /data/data/
auto.cnf    client-cert.pem  ibdata1      mysql               public_key.pem   sys
ca-key.pem  client-key.pem   ib_logfile0  performance_schema  server-cert.pem
ca.pem      ib_buffer_pool   ib_logfile1  private_key.pem     server-key.pem
5.9 配置MySQL启动项并设置开机自启动
5.9.1 centos6版本
cd /usr/local/mysql
cp support-files/mysql.server /etc/init.d/mysql.server
chkconfig --add mysql.server
chkconfig  mysql.server on
chkconfig --list
5.9.2 centos7版本
[root@node7 system]# cd /usr/lib/systemd/system
[root@node7 system]# touch mysqld.service
[root@node7 system]# vim mysqld.service
[root@node7 system]# cat mysqld.service
# Copyright (c) 2015, 2016, Oracle and/or its affiliates. All rights reserved.## This program is free software; you can redistribute it and/or modify# it under the terms of the GNU General Public License as published by# the Free Software Foundation; version 2 of the License.## This program is distributed in the hope that it will be useful,# but WITHOUT ANY WARRANTY; without even the implied warranty of# MERCHANTABILITY or FITNESS FOR A PARTICULAR PURPOSE.  See the# GNU General Public License for more details.## You should have received a copy of the GNU General Public License# along with this program; if not, write to the Free Software# Foundation, Inc., 51 Franklin St, Fifth Floor, Boston, MA  02110-1301 USA## systemd service file for MySQL forking server#[Unit]
Description=MySQL Server
Documentation=man:mysqld(5.7)
Documentation=http://dev.mysql.com/doc/refman/en/using-systemd.html
After=network.target
After=syslog.target

[Install]
WantedBy=multi-user.target

[Service]
User=mysql
Group=mysql

Type=forking

PIDFile=/data/run/mysql.pid# Disable service start and stop timeout logic of systemd for mysqld service.TimeoutSec=0# Execute pre and post scripts as rootPermissionsStartOnly=true# Needed to create system tables#ExecStartPre=/usr/bin/mysqld_pre_systemd# Start main serviceExecStart=/usr/local/mysql/bin/mysqld --daemonize --pid-file=/data/run/mysql.pid $MYSQLD_OPTS# Use this to switch malloc implementationEnvironmentFile=-/etc/sysconfig/mysql# Sets open_files_limitLimitNOFILE = 65535

Restart=on-failure

RestartPreventExitStatus=1

PrivateTmp=false

[root@node7 system]# systemctl daemon-reload    #重新加载服务配置文件
[root@node7 system]# systemctl enable mysqld    #设置MySQL开机自启动
Created symlink from /etc/systemd/system/multi-user.target.wants/mysqld.service to /usr/lib/systemd/system/mysqld.service.
[root@node7 system]# systemctl is-enabled mysqld   #查看MySQL开机自启动是否设置成功
enabled
5.10 启动MySQL
[root@node7 system]# systemctl start mysqld
[root@node7 system]# systemctl status mysqld    #查看MySQL启动状态
● mysqld.service - MySQL Server
   Loaded: loaded (/usr/lib/systemd/system/mysqld.service; enabled; vendor preset: disabled)
   Active: active (running) since Tue 2019-12-03 14:42:14 CST; 9s ago
     Docs: man:mysqld(5.7)
           http://dev.mysql.com/doc/refman/en/using-systemd.html
  Process: 2905 ExecStart=/usr/local/mysql/bin/mysqld --daemonize --pid-file=/data/run/mysql.pid $MYSQLD_OPTS (code=exited, status=0/SUCCESS)
 Main PID: 2907 (mysqld)
   CGroup: /system.slice/mysqld.service
           └─2907 /usr/local/mysql/bin/mysqld --daemonize --pid-file=/data/run/mysql.pid

Dec 03 14:42:13 node7 systemd[1]: Starting MySQL Server...
Dec 03 14:42:14 node7 systemd[1]: Started MySQL Server.
[root@node7 system]# ps -ef | grep mysql         #查看MySQL进程
mysql      2907      1  2 14:42 ?        00:00:00 /usr/local/mysql/bin/mysqld --daemonize --pid-file=/data/run/mysql.pid
root       2942   2576  0 14:42 pts/0    00:00:00 grep --color=auto mysql
5.11 进行MySQL安全初始化(可选)
[root@node7 system]# mysql_secure_installation

Securing the MySQL server deployment.

Enter password for user root:    #这里输入MySQL初始化时生成的密码(grep 'temporary password' /data/log/mysql_error.log)

The existing password for the user account root has expired. Please set a new password.

New password:   #输入新密码

Re-enter new password:

VALIDATE PASSWORD PLUGIN can be used to test passwords
and improve security. It checks the strength of password
and allows the users to set only those passwords which are
secure enough. Would you like to setup VALIDATE PASSWORD plugin?

Press y|Y for Yes, any other key for No: n   #y安装MySQL密码插件
Using existing password for root.
Change the password for root ? ((Press y|Y for Yes, any other key for No) : n

 ... skipping.
By default, a MySQL installation has an anonymous user,
allowing anyone to log into MySQL without having to have
a user account created for them. This is intended only for
testing, and to make the installation go a bit smoother.
You should remove them before moving into a production
environment.

Remove anonymous users? (Press y|Y for Yes, any other key for No) : y  #y移除匿名用户
Success.

Normally, root should only be allowed to connect from
'localhost'. This ensures that someone cannot guess at
the root password from the network.

Disallow root login remotely? (Press y|Y for Yes, any other key for No) : n  #是否允许root远程登录

 ... skipping.
By default, MySQL comes with a database named 'test' that
anyone can access. This is also intended only for testing,
and should be removed before moving into a production
environment.

Remove test database and access to it? (Press y|Y for Yes, any other key for No) : y  #是否移除test数据库
 - Dropping test database...
Success.

 - Removing privileges on test database...
Success.

Reloading the privilege tables will ensure that all changes
made so far will take effect immediately.

Reload privilege tables now? (Press y|Y for Yes, any other key for No) : y  #刷新权限表
Success.

All done!
5.12 修改密码,给用户赋权限(根据自己情况赋权限)
[root@node7 ~]# mysql -uroot -p123456mysql> SET PASSWORD = PASSWORD('123456');#修改root密码为123456,如果提示ERROR 1819 (HY000): Your password does not satisfy the current policy requirements,则说明密码设置太简单,如果想设置123456这样的简单密码,可在SQL中执行:	#mysql> set global validate_password_policy=0;	#mysql> set global validate_password_length=1;	#这样再次执行SET PASSWORD = PASSWORD('123456')就可成功。Query OK, 0 rows affected, 1 warning (0.01 sec)mysql> UPDATE mysql.user SET authentication_string =PASSWORD('123456') WHERE User='mysql';    #修改MySQL的mysql用户的密码为123456Query OK, 0 rows affected, 1 warning (0.00 sec)
Rows matched: 0  Changed: 0  Warnings: 1mysql> GRANT ALL PRIVILEGES ON *.* TO mysql@localhost IDENTIFIED BY '123456' WITH GRANT OPTION;   Query OK, 0 rows affected, 2 warnings (0.00 sec)mysql> GRANT ALL PRIVILEGES ON *.* TO mysql@"%" IDENTIFIED BY '123456' WITH GRANT OPTION;   #赋予mysql用户可以在任何机器上登录,并拥有所有表的所有权限Query OK, 0 rows affected, 1 warning (0.00 sec)mysql> GRANT ALL PRIVILEGES ON *.* TO root@localhost IDENTIFIED BY '123456' WITH GRANT OPTION;Query OK, 0 rows affected, 2 warnings (0.00 sec)mysql> GRANT ALL PRIVILEGES ON *.* TO root@"%" IDENTIFIED BY '123456' WITH GRANT OPTION;Query OK, 0 rows affected, 1 warning (0.07 sec)mysql> FLUSH PRIVILEGES ;   #刷新权限,让修改立即生效Query OK, 0 rows affected (0.00 sec)mysql> exit;Bye

--------------------------------------------------------------------------------------
--------------------------------------------------------------------------------------#以下是为MySQL赋权限的介绍mysql> grant 权限1,权限2,…权限n on 数据库名称.表名称 to 用户名@用户地址 identified by ‘连接口令’;权限1,权限2,…权限n代表select,insert,update,delete,create,drop,index,alter,grant,references,reload,shutdown,process,file等14个权限。
当权限1,权限2,…权限n被all privileges或者all代替,表示赋予用户全部权限。
当数据库名称.表名称被*.*代替,表示赋予用户操作服务器上所有数据库所有表的权限。
用户地址可以是localhost,也可以是ip地址、机器名字、域名。也可以用’%'表示从任何地址连接。
‘连接口令’不能为空,否则创建失败。
比如:mysql>grant select,insert,update,delete,create,drop on vtdc.employee to joe@10.163.225.87 identified by ‘123′;给来自10.163.225.87的用户joe分配可对数据库vtdc的employee表进行select,insert,update,delete,create,drop等操作的权限,并设定口令为123。 mysql>grant all privileges on vtdc.* to joe@10.163.225.87 identified by ‘123′;给来自10.163.225.87的用户joe分配可对数据库vtdc所有表进行所有操作的权限,并设定口令为123。
--------------------------------------------------------------------------------------
--------------------------------------------------------------------------------------
5.13 导入时区信息到MySQL库
[root@node7 system]# mysql_tzinfo_to_sql /usr/share/zoneinfo | mysql -uroot -p123456 mysql#执行上述操作之后,time_zone,time_zone_leap_second,time_zone_name,time_zone_transition   ,time_zone_transition_type表就有时区数据了[root@node7 system]# mysql -uroot -p123456 mysqlmysql> show tables;+---------------------------+
| Tables_in_mysql           |
+---------------------------+
| columns_priv              |
| db                        |
| engine_cost               |
| event                     |
| func                      |
| general_log               |
| gtid_executed             |
| help_category             |
| help_keyword              |
| help_relation             |
| help_topic                |
| innodb_index_stats        |
| innodb_table_stats        |
| ndb_binlog_index          |
| plugin                    |
| proc                      |
| procs_priv                |
| proxies_priv              |
| server_cost               |
| servers                   |
| slave_master_info         |
| slave_relay_log_info      |
| slave_worker_info         |
| slow_log                  |
| tables_priv               |
| time_zone                 |
| time_zone_leap_second     |
| time_zone_name            |
| time_zone_transition      |
| time_zone_transition_type |
| user                      |
+---------------------------+
31 rows in set (0.00 sec)
5.14 查看MySQL版本信息
[root@node7 system]# mysql -V
mysql  Ver 14.14 Distrib 5.7.26, for linux-glibc2.12 (x86_64) using  EditLine wrapper
[root@node7 system]# mysqladmin version -uroot -p123456
mysqladmin: [Warning] Using a password on the command line interface can be insecure.
mysqladmin  Ver 8.42 Distrib 5.7.26, for linux-glibc2.12 on x86_64
Copyright (c) 2000, 2019, Oracle and/or its affiliates. All rights reserved.

Oracle is a registered trademark of Oracle Corporation and/or its
affiliates. Other names may be trademarks of their respective
owners.

Server version		5.7.26-log
Protocol version	10
Connection		Localhost via UNIX socket
UNIX socket		/data/run/mysql.sock
Uptime:			31 min 53 sec

Threads: 1  Questions: 8855  Slow queries: 0  Opens: 214  Flush tables: 1  Open tables: 203  Queries per second avg: 4.628
5.15 如果防火墙开着,则需要开放3306端口
[root@node7 system]# systemctl status firewalld
● firewalld.service - firewalld - dynamic firewall daemon
   Loaded: loaded (/usr/lib/systemd/system/firewalld.service; disabled; vendor preset: enabled)
   Active: active (running) since Tue 2019-12-03 15:22:18 CST; 3s ago
     Docs: man:firewalld(1)
 Main PID: 3343 (firewalld)
   CGroup: /system.slice/firewalld.service
           └─3343 /usr/bin/python -Es /usr/sbin/firewalld --nofork --nopid

Dec 03 15:22:17 node7 systemd[1]: Starting firewalld - dynamic firewall daemon...
Dec 03 15:22:18 node7 systemd[1]: Started firewalld - dynamic firewall daemon.
Dec 03 15:22:18 node7 firewalld[3343]: WARNING: ICMP type 'beyond-scope' is not supported by the kernel for ipv6.
Dec 03 15:22:18 node7 firewalld[3343]: WARNING: beyond-scope: INVALID_ICMPTYPE: No supported ICMP type., ignoring...-time.
Dec 03 15:22:18 node7 firewalld[3343]: WARNING: ICMP type 'failed-policy' is not supported by the kernel for ipv6.
Dec 03 15:22:18 node7 firewalld[3343]: WARNING: failed-policy: INVALID_ICMPTYPE: No supported ICMP type., ignorin...-time.
Dec 03 15:22:18 node7 firewalld[3343]: WARNING: ICMP type 'reject-route' is not supported by the kernel for ipv6.
Dec 03 15:22:18 node7 firewalld[3343]: WARNING: reject-route: INVALID_ICMPTYPE: No supported ICMP type., ignoring...-time.
Hint: Some lines were ellipsized, use -l to show in full.#添加防火墙规则[root@node7 system]# firewall-cmd --permanent --zone=public --add-port=3306/tcp
success#重新加载防火墙规则[root@node7 system]# firewall-cmd --reload
success#检查规则是否设置生效[root@node7 system]# firewall-cmd --zone=public --query-port=3306/tcp
yes#列出防火墙所有开放的端口[root@node7 system]# firewall-cmd --list-all
public (active)
  target: default
  icmp-block-inversion: no
  interfaces: ens33
  sources:
  services: ssh dhcpv6-client
  ports: 3306/tcp
  protocols:
  masquerade: no
  forward-ports:
  source-ports:
  icmp-blocks:
  rich rules:
5.16 利用logrotate对MySQL日志进行轮转(日志自动备份切割)
#logrotate配置详解请查看:https://www.linuxidc.com/Linux/2019-02/157099.htm[root@node7 ~]# touch /root/.my.cnf
[root@node7 ~]# vim /root/.my.cnf
[root@node7 ~]# cat /root/.my.cnf
[mysqladmin]
password=123456
user=root
[root@node7 ~]# chmod 600 /root/.my.cnf
[root@node7 ~]# cp /usr/local/mysql/support-files/mysql-log-rotate /etc/logrotate.d/
[root@node7 ~]# chmod 644 /etc/logrotate.d/mysql-log-rotate
[root@node7 ~]# vim /etc/logrotate.d/mysql-log-rotate
[root@node7 ~]# cat /etc/logrotate.d/mysql-log-rotate
# The log file name and location can be set in# /etc/my.cnf by setting the "log-error" option# in either [mysqld] or [mysqld_safe] section as# follows:## [mysqld]# log-error=/usr/local/mysql/data/mysqld.log## In case the root user has a password, then you# have to create a /root/.my.cnf configuration file# with the following content:## [mysqladmin]# password = <secret> # user= root## where "<secret>" is the password. ## ATTENTION: The /root/.my.cnf file should be readable# _ONLY_ by root !/data/log/mysql_*.log {
        # create 600 mysql mysql
        notifempty  #当日志文件为空时,不进行轮转
        daily  #默认每一天执行一次rotate轮转工作
        rotate 52  #保留多少个日志文件(轮转几次).默认保留四个.就是指定日志文件删除之前轮转的次数,0 指没有备份,此处表示保留52天的日志
        missingok   #如果日志文件丢失,不要显示错误
        compress    #通过gzip 压缩转储以后的日志
    postrotate   #执行的指令	# just if mysqld is really running
if test -x /usr/local/mysql/bin/mysqladmin && \
   /usr/local/mysql/bin/mysqladmin ping &>/dev/null
then
   /usr/local/mysql/bin/mysqladmin flush-logs
fi
    endscript
}
[root@node7 ~]#
[root@node7 ~]# logrotate -fv /etc/logrotate.d/mysql-log-rotate #强制进行日志轮转
reading config file /etc/logrotate.d/mysql-log-rotate
Allocating hash table for state file, size 15360 B

Handling 1 logs

rotating pattern: /data/log/mysql_*.log  forced from command line (52 rotations)
empty log files are not rotated, old logs are removed
considering log /data/log/mysql_error.log
  log needs rotating
considering log /data/log/mysql_slow_query.log
  log needs rotating
rotating log /data/log/mysql_error.log, log->rotateCount is 52
dateext suffix '-20191203'
glob pattern '-[0-9][0-9][0-9][0-9][0-9][0-9][0-9][0-9]'
renaming /data/log/mysql_error.log.52.gz to /data/log/mysql_error.log.53.gz
(t -- won't try to dispose of it
.................
renaming /data/log/mysql_slow_query.log to /data/log/mysql_slow_query.log.1
running postrotate script
compressing log with: /bin/gzip
[root@node7 ~]#
[root@node7 ~]# echo $?
0#此时查看日志目录,发现日志已经进行轮转,并压缩[root@node7 ~]# ls /data/log/
mysql_error.log  mysql_error.log.1.gz  mysql_slow_query.log  mysql_slow_query.log.1.gz
自此,node7上MySQL安装完毕,node6,node8,node9上的MySQL也按照此方法安装。
安装MySQL是进行主从同步,读写分离,分表分库配置的基础,只有安装了MySQL才能进行接下来的操作。
六.MySQL主从同步之一主多从架构
6.1 服务器规划
| 主机名 | IP | 操作系统版本 | MySQL版本 | 角色 |
|---|---|---|---|---|
| node7 | 192.168.110.188 | CentOS 7.4.1708 | 5.7.26 | master(主) |
| node8 | 192.168.110.186 | CentOS 7.4.1708 | 5.7.26 | slave(从) |
| node9 | 192.168.110.187 | CentOS 7.4.1708 | 5.7.26 | slave(从) |
6.2 主从同步的原理
master将改变记录到二进制日志(binary log)中,slave将master的binary log events拷贝到它的中继日志(relay log),slave重做中继日志中的事件,修改salve上的数据。
6.3 部署MySQL主从同步之一主多从
6.3.1 配置主数据库服务器node7
6.3.1.1 创建需要同步的数据库及其表
[root@node7 ~]# mysql -uroot -p123456

mysql> create database hotdata;     #创建热点数据库
Query OK, 1 row affected (0.70 sec)

mysql> use hotdata;
Database changed
#创建顾客表
mysql> create table customers(cust_id int,cust_name varchar(30),cust_address varchar(50),cust_city varchar(30),cust_state varchar(50),cust_email varchar(30),cust_country varchar(50));
Query OK, 0 rows affected (0.44 sec)

mysql> desc customers;   #查看表结构
+--------------+-------------+------+-----+---------+-------+
| Field        | Type        | Null | Key | Default | Extra |
+--------------+-------------+------+-----+---------+-------+
| cust_id      | int(11)     | YES  |     | NULL    |       |
| cust_name    | varchar(30) | YES  |     | NULL    |       |
| cust_address | varchar(50) | YES  |     | NULL    |       |
| cust_city    | varchar(30) | YES  |     | NULL    |       |
| cust_state   | varchar(50) | YES  |     | NULL    |       |
| cust_email   | varchar(30) | YES  |     | NULL    |       |
| cust_country | varchar(50) | YES  |     | NULL    |       |
+--------------+-------------+------+-----+---------+-------+
7 rows in set (0.36 sec)

mysql> exit
Bye
6.3.1.2 修改MySQL配置文件
#先关闭数据库再修改MySQL配置文件[root@node7 ~]# systemctl stop mysqld
[root@node7 ~]# systemctl status mysqld
● mysqld.service - MySQL Server
   Loaded: loaded (/usr/lib/systemd/system/mysqld.service; enabled; vendor preset: disabled)
   Active: inactive (dead) since Thu 2019-12-05 10:59:38 CST; 8s ago
     Docs: man:mysqld(5.7)
           http://dev.mysql.com/doc/refman/en/using-systemd.html
  Process: 6777 ExecStart=/usr/local/mysql/bin/mysqld --daemonize --pid-file=/data/run/mysql.pid $MYSQLD_OPTS (code=exited, status=0/SUCCESS)
 Main PID: 6779 (code=exited, status=0/SUCCESS)

Dec 05 10:35:44 node7 systemd[1]: Starting MySQL Server...
Dec 05 10:36:07 node7 systemd[1]: Started MySQL Server.
Dec 05 10:59:36 node7 systemd[1]: Stopping MySQL Server...
Dec 05 10:59:38 node7 systemd[1]: Stopped MySQL Server.#修改好的配置文件如下,主从同步相关的配置都放在“#mysql replication”下面[root@node7 ~]# vim /etc/my.cnf
[root@node7 ~]# cat /etc/my.cnf
[client]
port=3306
socket=/data/run/mysql.sock

[mysqld]
port=3306
socket=/data/run/mysql.sock
pid_file=/data/run/mysql.pid
datadir=/data/data
default_storage_engine=InnoDB
max_allowed_packet=512M
max_connections=2048
open_files_limit=65535

skip-name-resolve
lower_case_table_names=1

character-set-server=utf8mb4
collation-server=utf8mb4_unicode_ci
init_connect='SET NAMES utf8mb4'

innodb_buffer_pool_size=1024M
innodb_log_file_size=2048M
innodb_file_per_table=1
innodb_flush_log_at_trx_commit=0

key_buffer_size=64M

log-error=/data/log/mysql_error.log

slow_query_log=1
slow_query_log_file=/data/log/mysql_slow_query.log
long_query_time=5

tmp_table_size=32M
max_heap_table_size=32M
query_cache_type=0
query_cache_size=0

skip_ssl#mysql replication,主从同步配置#logbin参数启用二进制日志,并把二进制日志放在/data/binlogs目录下log-bin=/data/binlogs/mysql-bin
#数据库标志ID,唯一server-id=1#binlog-do-db可以被从服务器复制的库binlog-do-db=hotdata#binlog-ignore-db不可以被从服务器复制的库binlog-ignore-db=mysql

[root@node7 ~]# systemctl restart mysqld   #重启MySQL数据库
6.3.1.3 主库给从库授予replication权限
[root@node7 ~]# mysql -uroot -p123456

#授予node8从库replication权限
mysql> grant replication slave on *.* to slave@192.168.110.186 identified by "123456";
Query OK, 0 rows affected, 1 warning (0.11 sec)

#授予node9从库replication权限
mysql> grant replication slave on *.* to slave@192.168.110.187 identified by "123456";
Query OK, 0 rows affected, 1 warning (0.01 sec)

#刷新权限
mysql> flush privileges;
Query OK, 0 rows affected (0.00 sec)

#查看master状态信息
mysql> show master status;
+------------------+----------+--------------+------------------+-------------------+
| File             | Position | Binlog_Do_DB | Binlog_Ignore_DB | Executed_Gtid_Set |
+------------------+----------+--------------+------------------+-------------------+
| mysql-bin.000012 |      902 | hotdata      | mysql            |                   |
+------------------+----------+--------------+------------------+-------------------+
1 row in set (0.00 sec)

mysql> exit
Bye

#查看二进制日志
[root@node7 ~]# ll /data/binlogs/
total 2896
-rw-r----- 1 mysql mysql     177 Dec  3 11:47 mysql-bin.000001
-rw-r----- 1 mysql mysql 2915818 Dec  3 16:38 mysql-bin.000002
-rw-r----- 1 mysql mysql     201 Dec  3 16:38 mysql-bin.000003
-rw-r----- 1 mysql mysql     177 Dec  3 17:09 mysql-bin.000004
-rw-r----- 1 mysql mysql     177 Dec  3 17:14 mysql-bin.000005
-rw-r----- 1 mysql mysql     177 Dec  3 17:25 mysql-bin.000006
-rw-r----- 1 mysql mysql    1220 Dec  4 03:12 mysql-bin.000007
-rw-r----- 1 mysql mysql     201 Dec  4 03:12 mysql-bin.000008
-rw-r----- 1 mysql mysql     177 Dec  4 10:49 mysql-bin.000009
-rw-r----- 1 mysql mysql    1743 Dec  5 10:35 mysql-bin.000010
-rw-r----- 1 mysql mysql     665 Dec  5 10:59 mysql-bin.000011
-rw-r----- 1 mysql mysql     902 Dec  5 11:47 mysql-bin.000012
-rw-r----- 1 mysql mysql     372 Dec  5 11:40 mysql-bin.index
[root@node7 ~]# mysql -uroot -p123456

##查看二进制日志事件
mysql> show binlog events\G
*************************** 1. row ***************************
   Log_name: mysql-bin.000001
        Pos: 4
 Event_type: Format_desc
  Server_id: 1
End_log_pos: 123
       Info: Server ver: 5.7.26-log, Binlog ver: 4
*************************** 2. row ***************************
   Log_name: mysql-bin.000001
        Pos: 123
 Event_type: Previous_gtids
  Server_id: 1
End_log_pos: 154
       Info:
*************************** 3. row ***************************
   Log_name: mysql-bin.000001
        Pos: 154
 Event_type: Stop
  Server_id: 1
End_log_pos: 177
       Info:
3 rows in set (0.00 sec)

mysql> exit
Bye
6.3.1.4 备份主库需要从库同步的数据库hotdata
#备份数据库hotdata[root@node7 ~]# mysqldump -uroot -p123456 hotdata >hotdata.sql
mysqldump: [Warning] Using a password on the command line interface can be insecure.#给从库分发备份好的数据库[root@node7 ~]# scp hotdata.sql root@192.168.110.186:~/
hotdata.sql                                        100% 2239   510.9KB/s   00:00
[root@node7 ~]# scp hotdata.sql root@192.168.110.187:~/
hotdata.sql                                        100% 2239   382.8KB/s   00:00
6.3.2 配置从数据库服务器node8
6.3.2.1 检查数据库版本
#主从数据库版本不一致的话会出现问题
[root@node8 ~]# mysql -uroot -p123456
mysql> show variables like "%version%";
+-------------------------+------------------------------+
| Variable_name           | Value                        |
+-------------------------+------------------------------+
| innodb_version          | 5.7.26                       |
| protocol_version        | 10                           |
| slave_type_conversions  |                              |
| tls_version             | TLSv1,TLSv1.1                |
| version                 | 5.7.26-log                   |
| version_comment         | MySQL Community Server (GPL) |
| version_compile_machine | x86_64                       |
| version_compile_os      | linux-glibc2.12              |
+-------------------------+------------------------------+
8 rows in set (0.01 sec)

mysql> quit
Bye
6.3.2.2 测试连接到主服务器是否成功
[root@node8 ~]# mysql -uslave -p123456 -h 192.168.110.188#只有复制的权限, 是看不到其他库的。mysql> show databases;+--------------------+
| Database           |
+--------------------+
| information_schema |
+--------------------+
1 row in set (0.00 sec)mysql> exitBye
6.3.2.3 导入hotdata数据库,和主数据库保持一致
[root@node8 ~]# mysql -uroot -p123456mysql> create database hotdata;Query OK, 1 row affected (0.00 sec)mysql> exitBye#导入hotdata表[root@node8 ~]# mysql -uroot -p123456 hotdata<hotdata.sql
mysql: [Warning] Using a password on the command line interface can be insecure.
6.3.2.4 修改配置文件
[root@node8 ~]# systemctl stop mysqld
[root@node8 ~]# vim /etc/my.cnf
[root@node8 ~]# cat /etc/my.cnf
[client]
port=3306
socket=/data/run/mysql.sock

[mysqld]
port=3306
socket=/data/run/mysql.sock
pid_file=/data/run/mysql.pid
datadir=/data/data
default_storage_engine=InnoDB
max_allowed_packet=512M
max_connections=2048
open_files_limit=65535

skip-name-resolve
lower_case_table_names=1

character-set-server=utf8mb4
collation-server=utf8mb4_unicode_ci
init_connect='SET NAMES utf8mb4'

innodb_buffer_pool_size=1024M
innodb_log_file_size=2048M
innodb_file_per_table=1
innodb_flush_log_at_trx_commit=0

key_buffer_size=64M

log-error=/data/log/mysql_error.log

slow_query_log=1
slow_query_log_file=/data/log/mysql_slow_query.log
long_query_time=5

tmp_table_size=32M
max_heap_table_size=32M
query_cache_type=0
query_cache_size=0#mysql replication配置#server-id必须唯一server-id=2#下面log-bin,binlog-do-db,binlog-ignore-db这三个参数都不是必须的log-bin=/data/binlogs/mysql-bin
binlog-do-db=hotdata
binlog-ignore-db=mysql
[root@node8 ~]#
[root@node8 ~]# systemctl restart mysqld
6.3.2.5 从库设置slave复制主库数据
[root@node8 ~]# mysql -uroot -p123456
mysql> stop slave;    #停止slave
Query OK, 0 rows affected, 1 warning (0.00 sec)

mysql> change master to master_host='192.168.110.188',master_user='slave',master_password='123456';
Query OK, 0 rows affected, 2 warnings (0.02 sec)

#释义:
#change master to #master_host='192.168.0.68',master_user='root',master_password='root',master_log_file='#mysql-bin.000004', master_log_pos=28125;
#上面的master_log_file是在Master中show master status显示的File,而master_log_pos是在Master中#show master status显示的Position。
#也可以通过show slave status查看配置信息,如果没有同步成功,比对show slave status中的position和#file是否和show master status中的对应。

mysql> start slave;   #启动slave
Query OK, 0 rows affected (0.01 sec)
#查看slave状态
mysql> show slave status\G
*************************** 1. row ***************************
               Slave_IO_State: Waiting for master to send event
                  Master_Host: 192.168.110.188
                  Master_User: slave
                  Master_Port: 3306
                Connect_Retry: 60
              Master_Log_File: mysql-bin.000012
          Read_Master_Log_Pos: 902
               Relay_Log_File: node8-relay-bin.000010
                Relay_Log_Pos: 519
        Relay_Master_Log_File: mysql-bin.000007
             Slave_IO_Running: Yes
            Slave_SQL_Running: No
              Replicate_Do_DB:
          Replicate_Ignore_DB:
           Replicate_Do_Table:
       Replicate_Ignore_Table:
      Replicate_Wild_Do_Table:
  Replicate_Wild_Ignore_Table:
                   Last_Errno: 1062
                   Last_Error: Could not execute Update_rows event on table mysql.user; Duplicate entry '%-root' for key 'PRIMARY', Error_code: 1062; handler error HA_ERR_FOUND_DUPP_KEY; the event's master log mysql-bin.000007, end_log_pos 942
                 Skip_Counter: 0
          Exec_Master_Log_Pos: 306
              Relay_Log_Space: 7216
              Until_Condition: None
               Until_Log_File:
                Until_Log_Pos: 0
           Master_SSL_Allowed: No
           Master_SSL_CA_File:
           Master_SSL_CA_Path:
              Master_SSL_Cert:
            Master_SSL_Cipher:
               Master_SSL_Key:
        Seconds_Behind_Master: NULL
Master_SSL_Verify_Server_Cert: No
                Last_IO_Errno: 0
                Last_IO_Error:
               Last_SQL_Errno: 1062
               Last_SQL_Error: Could not execute Update_rows event on table mysql.user; Duplicate entry '%-root' for key 'PRIMARY', Error_code: 1062; handler error HA_ERR_FOUND_DUPP_KEY; the event's master log mysql-bin.000007, end_log_pos 942
  Replicate_Ignore_Server_Ids:
             Master_Server_Id: 1
                  Master_UUID: a8da7421-157f-11ea-b1bf-000c297c0226
             Master_Info_File: /data/data/master.info
                    SQL_Delay: 0
          SQL_Remaining_Delay: NULL
      Slave_SQL_Running_State:
           Master_Retry_Count: 86400
                  Master_Bind:
      Last_IO_Error_Timestamp:
     Last_SQL_Error_Timestamp: 191205 15:18:40
               Master_SSL_Crl:
           Master_SSL_Crlpath:
           Retrieved_Gtid_Set:
            Executed_Gtid_Set:
                Auto_Position: 0
         Replicate_Rewrite_DB:
                 Channel_Name:
           Master_TLS_Version:
1 row in set (0.00 sec)

#可以看到Last_Error报错了,是因为主键重复了,按照下面操作即可
mysql> stop slave;
Query OK, 0 rows affected (0.00 sec)

mysql> SET GLOBAL sql_slave_skip_counter =1;
Query OK, 0 rows affected (0.00 sec)

mysql> start slave;
Query OK, 0 rows affected (0.00 sec)

#再次查看slave状态,如果Last_Error没报错,并且Slave_IO_Running和Slave_SQL_Running都为yes则说明#配置成功了
#Slave_IO_Running :负责与主机的IO通信
#Slave_SQL_Running:负责自己的slave mysql进程
#如果执行了stop slave,SET GLOBAL sql_slave_skip_counter =1,start slave之后,show slave #status\G还是报错,则再次执行一遍stop slave,SET GLOBAL sql_slave_skip_counter =1,start #slave即可,最多执行3遍,即可消除所有错误。
mysql> show slave status\G
*************************** 1. row ***************************
               Slave_IO_State: Waiting for master to send event
                  Master_Host: 192.168.110.188
                  Master_User: slave
                  Master_Port: 3306
                Connect_Retry: 60
              Master_Log_File: mysql-bin.000013
          Read_Master_Log_Pos: 154
               Relay_Log_File: node8-relay-bin.000037
                Relay_Log_Pos: 320
        Relay_Master_Log_File: mysql-bin.000013
             Slave_IO_Running: Yes
            Slave_SQL_Running: Yes
              Replicate_Do_DB:
          Replicate_Ignore_DB:
           Replicate_Do_Table:
       Replicate_Ignore_Table:
      Replicate_Wild_Do_Table:
  Replicate_Wild_Ignore_Table:
                   Last_Errno: 0
                   Last_Error:
                 Skip_Counter: 0
          Exec_Master_Log_Pos: 154
              Relay_Log_Space: 693
              Until_Condition: None
               Until_Log_File:
                Until_Log_Pos: 0
           Master_SSL_Allowed: No
           Master_SSL_CA_File:
           Master_SSL_CA_Path:
              Master_SSL_Cert:
            Master_SSL_Cipher:
               Master_SSL_Key:
        Seconds_Behind_Master: 0
Master_SSL_Verify_Server_Cert: No
                Last_IO_Errno: 0
                Last_IO_Error:
               Last_SQL_Errno: 0
               Last_SQL_Error:
  Replicate_Ignore_Server_Ids:
             Master_Server_Id: 1
                  Master_UUID: a8da7421-157f-11ea-b1bf-000c297c0226
             Master_Info_File: /data/data/master.info
                    SQL_Delay: 0
          SQL_Remaining_Delay: NULL
      Slave_SQL_Running_State: Slave has read all relay log; waiting for more updates
           Master_Retry_Count: 86400
                  Master_Bind:
      Last_IO_Error_Timestamp:
     Last_SQL_Error_Timestamp:
               Master_SSL_Crl:
           Master_SSL_Crlpath:
           Retrieved_Gtid_Set:
            Executed_Gtid_Set:
                Auto_Position: 0
         Replicate_Rewrite_DB:
                 Channel_Name:
           Master_TLS_Version:
1 row in set (0.00 sec)

#查看数据目录,可以发现Relay_Log_File
[root@node8 ~]# ls /data/data/
auto.cnf        ibdata1      ibtmp1       node8-relay-bin.000036  performance_schema
hotdata         ib_logfile0  master.info  node8-relay-bin.000037  relay-log.info
ib_buffer_pool  ib_logfile1  mysql        node8-relay-bin.index   sys
6.3.3 配置从数据库服务器node9
node9的配置和node8一样,要注意的是配置文件my.cnf里server-id必须唯一,不能和node7,node8相同。
6.3.4 在主服务器上查看状态
[root@node7 ~]# mysql -uroot -p123456
#可以看到有两个slave
mysql> show processlist\G
*************************** 1. row ***************************
     Id: 8
   User: slave
   Host: 192.168.110.186:49414
     db: NULL
Command: Binlog Dump
   Time: 4313
  State: Master has sent all binlog to slave; waiting for more updates
   Info: NULL
*************************** 2. row ***************************
     Id: 10
   User: slave
   Host: 192.168.110.187:33510
     db: NULL
Command: Binlog Dump
   Time: 4208
  State: Master has sent all binlog to slave; waiting for more updates
   Info: NULL
*************************** 3. row ***************************
     Id: 11
   User: root
   Host: localhost
     db: NULL
Command: Query
   Time: 0
  State: starting
   Info: show processlist
3 rows in set (0.00 sec)
6.3.5 插入数据测试主从同步
#在主服务器上插入数据
mysql> use hotdata;
Reading table information for completion of table and column names
You can turn off this feature to get a quicker startup with -A

Database changed
mysql> insert into customers values (1,'张三','珠江新城','广州','广东省','1234567890@qq.com','china');
Query OK, 1 row affected (0.10 sec)

mysql> insert into customers values (2,'李四','天安门','北京','北京市','1234127890@qq.com','china');
Query OK, 1 row affected (0.04 sec)

mysql> insert into customers values (3,'王二麻子','钟鼓楼','昆明','云南省','1234567870@qq.com','china');
Query OK, 1 row affected (0.01 sec)

mysql> insert into customers values (4,'赵四','百花广场','佛山','广东省','1239867890@qq.com','china');
Query OK, 1 row affected (0.00 sec)

mysql> insert into customers values (5,'刘能','体育中心','广州','广东省','1234512890@qq.com','china');
Query OK, 1 row affected (0.00 sec)

mysql> insert into customers values (6,'谢广坤','体育西路','广州','广东省','1364567890@qq.com','china');
Query OK, 1 row affected (0.00 sec)

mysql> select * from customers;   #查看数据
+---------+--------------+--------------+-----------+------------+-------------------+--------------+
| cust_id | cust_name    | cust_address | cust_city | cust_state | cust_email        | cust_country |
+---------+--------------+--------------+-----------+------------+-------------------+--------------+
|       1 | 张三         | 珠江新城     | 广州      | 广东省     | 1234567890@qq.com | china        |
|       2 | 李四         | 天安门       | 北京      | 北京市     | 1234127890@qq.com | china        |
|       3 | 王二麻子     | 钟鼓楼       | 昆明      | 云南省     | 1234567870@qq.com | china        |
|       4 | 赵四         | 百花广场     | 佛山      | 广东省     | 1239867890@qq.com | china        |
|       5 | 刘能         | 体育中心     | 广州      | 广东省     | 1234512890@qq.com | china        |
|       6 | 谢广坤       | 体育西路     | 广州      | 广东省     | 1364567890@qq.com | china        |
+---------+--------------+--------------+-----------+------------+-------------------+--------------+
6 rows in set (0.01 sec)

mysql> exit
Bye

#在两个slave上查看数据
[root@node8 ~]# mysql -uroot -p123456
#在node8上查看数据,发现数据已经同步
mysql> select * from hotdata.customers;
+---------+--------------+--------------+-----------+------------+-------------------+--------------+
| cust_id | cust_name    | cust_address | cust_city | cust_state | cust_email        | cust_country |
+---------+--------------+--------------+-----------+------------+-------------------+--------------+
|       1 | 张三         | 珠江新城     | 广州      | 广东省     | 1234567890@qq.com | china        |
|       2 | 李四         | 天安门       | 北京      | 北京市     | 1234127890@qq.com | china        |
|       3 | 王二麻子     | 钟鼓楼       | 昆明      | 云南省     | 1234567870@qq.com | china        |
|       4 | 赵四         | 百花广场     | 佛山      | 广东省     | 1239867890@qq.com | china        |
|       5 | 刘能         | 体育中心     | 广州      | 广东省     | 1234512890@qq.com | china        |
|       6 | 谢广坤       | 体育西路     | 广州      | 广东省     | 1364567890@qq.com | china        |
+---------+--------------+--------------+-----------+------------+-------------------+--------------+
6 rows in set (0.00 sec)

mysql> exit
Bye

[root@node9 ~]# mysql -uroot -p123456
#在node9上查看数据,发现数据已经同步
mysql> select * from hotdata.customers;
+---------+--------------+--------------+-----------+------------+-------------------+--------------+
| cust_id | cust_name    | cust_address | cust_city | cust_state | cust_email        | cust_country |
+---------+--------------+--------------+-----------+------------+-------------------+--------------+
|       1 | 张三         | 珠江新城     | 广州      | 广东省     | 1234567890@qq.com | china        |
|       2 | 李四         | 天安门       | 北京      | 北京市     | 1234127890@qq.com | china        |
|       3 | 王二麻子     | 钟鼓楼       | 昆明      | 云南省     | 1234567870@qq.com | china        |
|       4 | 赵四         | 百花广场     | 佛山      | 广东省     | 1239867890@qq.com | china        |
|       5 | 刘能         | 体育中心     | 广州      | 广东省     | 1234512890@qq.com | china        |
|       6 | 谢广坤       | 体育西路     | 广州      | 广东省     | 1364567890@qq.com | china        |
+---------+--------------+--------------+-----------+------------+-------------------+--------------+
6 rows in set (0.00 sec)

mysql> exit
Bye
注意:
- 主从同步,主数据库上添加数据,从数据库上同步,但是从数据库添加数据,主不同步
- 由于是主从同步,如果主上删除了数据,那么从上的数据也就没了,因此建议在主上做定期备份(mysqldump)
自此,MySQL主从同步之一主多从架构已经搭建完毕。
6.3.6 彻底取消主从同步
既然有搭建主从同步就有撤销主从同步,如果有撤销主从同步的需求,请看下文。
#在主库上执行
#重置主记录信息
mysql> reset master;
Query OK, 0 rows affected (0.00 sec)

mysql> show master status\G
*************************** 1. row ***************************
             File: mysql-bin.000001
         Position: 154
     Binlog_Do_DB: hotdata
 Binlog_Ignore_DB: mysql
Executed_Gtid_Set:
1 row in set (0.00 sec)

#在两个从库上执行
mysql> stop slave;
Query OK, 0 rows affected (0.00 sec)

#清空从所有连接、信息记录
mysql> reset slave all;
Query OK, 0 rows affected (0.00 sec)

mysql> show slave status\G
Empty set (0.00 sec)
可见主库和从库都已经解除了主从关系,最后把配置文件中与主从相关的配置删除即可。
6.4 总结
MySQL主从同步之一主多从架构,一般用来做读写分离的,master负责写入数据,其他slave负责读取数据,这种架构最大问题I/O压力集中,在Master上多台同步影响IO
七.MySQL主从同步之主主双向同步架构
7.1 服务器规划
| 主机名 | IP | 操作系统版本 | MySQL版本 | 角色 |
|---|---|---|---|---|
| node7 | 192.168.110.188 | CentOS 7.4.1708 | 5.7.26 | master,slave(既是主也是从) |
| node8 | 192.168.110.186 | CentOS 7.4.1708 | 5.7.26 | master,slave(既是主也是从) |
7.2 主从同步的原理
master将改变记录到二进制日志(binary log)中,slave将master的binary log events拷贝到它的中继日志(relay log),slave重做中继日志中的事件,修改salve上的数据。
7.3 部署MySQL主从同步之主主双向同步
7.3.1 配置数据库服务器node7
node7有双重身份,既是node8的主,也是node8的从。
7.3.1.1 创建需要同步的数据库及其表
[root@node7 ~]# mysql -uroot -p123456

mysql> create database hotdata;     #创建热点数据库
Query OK, 1 row affected (0.70 sec)

mysql> use hotdata;
Database changed
#创建顾客表
mysql> create table customers(cust_id int,cust_name varchar(30),cust_address varchar(50),cust_city varchar(30),cust_state varchar(50),cust_email varchar(30),cust_country varchar(50));
Query OK, 0 rows affected (0.44 sec)

mysql> desc customers;   #查看表结构
+--------------+-------------+------+-----+---------+-------+
| Field        | Type        | Null | Key | Default | Extra |
+--------------+-------------+------+-----+---------+-------+
| cust_id      | int(11)     | YES  |     | NULL    |       |
| cust_name    | varchar(30) | YES  |     | NULL    |       |
| cust_address | varchar(50) | YES  |     | NULL    |       |
| cust_city    | varchar(30) | YES  |     | NULL    |       |
| cust_state   | varchar(50) | YES  |     | NULL    |       |
| cust_email   | varchar(30) | YES  |     | NULL    |       |
| cust_country | varchar(50) | YES  |     | NULL    |       |
+--------------+-------------+------+-----+---------+-------+
7 rows in set (0.36 sec)

mysql> exit
Bye
7.3.1.2 修改MySQL配置文件
[root@node7 ~]# vim /etc/my.cnf#与主从同步相关的配置在#mysql replication下面[root@node7 ~]# cat /etc/my.cnf
[client]
port=3306
socket=/data/run/mysql.sock

[mysqld]
port=3306
socket=/data/run/mysql.sock
pid_file=/data/run/mysql.pid
datadir=/data/data
default_storage_engine=InnoDB
max_allowed_packet=512M
max_connections=2048
open_files_limit=65535

skip-name-resolve
lower_case_table_names=1

character-set-server=utf8mb4
collation-server=utf8mb4_unicode_ci
init_connect='SET NAMES utf8mb4'

innodb_buffer_pool_size=1024M
innodb_log_file_size=2048M
innodb_file_per_table=1
innodb_flush_log_at_trx_commit=0

key_buffer_size=64M

log-error=/data/log/mysql_error.log

slow_query_log=1
slow_query_log_file=/data/log/mysql_slow_query.log
long_query_time=5

tmp_table_size=32M
max_heap_table_size=32M
query_cache_type=0
query_cache_size=0

skip_ssl#mysql replication#logbin参数启用二进制日志,并把二进制日志放在/data/binlogs目录下log-bin=/data/binlogs/mysql-bin#数据库标志ID,唯一server-id=1#binlog-do-db可以被从服务器复制的库binlog-do-db=hotdata#binlog-ignore-db不可以被从服务器复制的库binlog-ignore-db=mysql
7.3.1.3 给node8授予replication的权限
#重启MySQL
[root@node7 ~]# systemctl restart mysqld
[root@node7 ~]# mysql -uroot -p123456

#查看master状态
mysql> show master status;
+------------------+----------+--------------+------------------+-------------------+
| File             | Position | Binlog_Do_DB | Binlog_Ignore_DB | Executed_Gtid_Set |
+------------------+----------+--------------+------------------+-------------------+
| mysql-bin.000001 |      154 | hotdata      | mysql            |                   |
+------------------+----------+--------------+------------------+-------------------+
1 row in set (0.01 sec)

mysql> grant replication slave on *.* to slave@'192.168.110.186' identified by '123456';
Query OK, 0 rows affected, 1 warning (0.00 sec)

#刷新权限
mysql> flush privileges;
Query OK, 0 rows affected (0.00 sec)

mysql> exit
Bye
7.3.2 配置数据库服务器node8
node8有双重身份,既是node7的主,也是node7的从。
7.3.2.1 创建需要同步的数据库及其表
[root@node8 ~]# mysql -uroot -p123456

mysql> create database hotdata;     #创建热点数据库
Query OK, 1 row affected (0.70 sec)

mysql> use hotdata;
Database changed
#创建顾客表
mysql> create table customers(cust_id int,cust_name varchar(30),cust_address varchar(50),cust_city varchar(30),cust_state varchar(50),cust_email varchar(30),cust_country varchar(50));
Query OK, 0 rows affected (0.44 sec)

mysql> desc customers;   #查看表结构
+--------------+-------------+------+-----+---------+-------+
| Field        | Type        | Null | Key | Default | Extra |
+--------------+-------------+------+-----+---------+-------+
| cust_id      | int(11)     | YES  |     | NULL    |       |
| cust_name    | varchar(30) | YES  |     | NULL    |       |
| cust_address | varchar(50) | YES  |     | NULL    |       |
| cust_city    | varchar(30) | YES  |     | NULL    |       |
| cust_state   | varchar(50) | YES  |     | NULL    |       |
| cust_email   | varchar(30) | YES  |     | NULL    |       |
| cust_country | varchar(50) | YES  |     | NULL    |       |
+--------------+-------------+------+-----+---------+-------+
7 rows in set (0.36 sec)

mysql> exit
Bye
7.3.2.2 修改MySQL配置文件
[root@node8 ~]# vim /etc/my.cnf#主从同步相关的配置在#mysql replication配置下面[root@node8 ~]# cat /etc/my.cnf
[client]
port=3306
socket=/data/run/mysql.sock

[mysqld]
port=3306
socket=/data/run/mysql.sock
pid_file=/data/run/mysql.pid
datadir=/data/data
default_storage_engine=InnoDB
max_allowed_packet=512M
max_connections=2048
open_files_limit=65535

skip-name-resolve
lower_case_table_names=1

character-set-server=utf8mb4
collation-server=utf8mb4_unicode_ci
init_connect='SET NAMES utf8mb4'

innodb_buffer_pool_size=1024M
innodb_log_file_size=2048M
innodb_file_per_table=1
innodb_flush_log_at_trx_commit=0

key_buffer_size=64M

log-error=/data/log/mysql_error.log

slow_query_log=1
slow_query_log_file=/data/log/mysql_slow_query.log
long_query_time=5

tmp_table_size=32M
max_heap_table_size=32M
query_cache_type=0
query_cache_size=0#mysql replication配置log-bin=/data/binlogs/mysql-bin
server-id=2
binlog-do-db=hotdata
binlog-ignore-db=mysql
[root@node8 ~]#
重启MySQL
[root@node8 ~]# systemctl restart mysqld
7.3.2.3 测试从账号slave能否登陆node7
[root@node8 ~]# mysql -uslave -p123456 -h 192.168.110.188#可以看到成功登陆node7mysql> show databases;+--------------------+
| Database           |
+--------------------+
| information_schema |
+--------------------+
1 row in set (0.00 sec)mysql> exitBye
7.3.2.4 给node7赋予replication权限,并设置node8复制node7
[root@node8 ~]# mysql -uroot -p123456

mysql> grant replication slave on *.* to slave@'192.168.110.188' identified by '123456';
Query OK, 0 rows affected, 1 warning (0.01 sec)

mysql> flush privileges;
Query OK, 0 rows affected (0.01 sec)

mysql> stop slave;
Query OK, 0 rows affected, 1 warning (0.00 sec)

mysql> change master to master_host='192.168.110.188',master_user='slave',master_password='123456';
Query OK, 0 rows affected, 2 warnings (0.01 sec)

mysql> start slave;
Query OK, 0 rows affected (0.36 sec)

#查看slave状态,如果Slave_IO_Running,Slave_SQL_Running都为yes,就表示ok
mysql> show slave status\G
*************************** 1. row ***************************
               Slave_IO_State: Waiting for master to send event
                  Master_Host: 192.168.110.188
                  Master_User: slave
                  Master_Port: 3306
                Connect_Retry: 60
              Master_Log_File: mysql-bin.000001
          Read_Master_Log_Pos: 604
               Relay_Log_File: node8-relay-bin.000002
                Relay_Log_Pos: 817
        Relay_Master_Log_File: mysql-bin.000001
             Slave_IO_Running: Yes
            Slave_SQL_Running: Yes
              Replicate_Do_DB:
          Replicate_Ignore_DB:
           Replicate_Do_Table:
       Replicate_Ignore_Table:
      Replicate_Wild_Do_Table:
  Replicate_Wild_Ignore_Table:
                   Last_Errno: 0
                   Last_Error:
                 Skip_Counter: 0
          Exec_Master_Log_Pos: 604
              Relay_Log_Space: 1024
              Until_Condition: None
               Until_Log_File:
                Until_Log_Pos: 0
           Master_SSL_Allowed: No
           Master_SSL_CA_File:
           Master_SSL_CA_Path:
              Master_SSL_Cert:
            Master_SSL_Cipher:
               Master_SSL_Key:
        Seconds_Behind_Master: 0
Master_SSL_Verify_Server_Cert: No
                Last_IO_Errno: 0
                Last_IO_Error:
               Last_SQL_Errno: 0
               Last_SQL_Error:
  Replicate_Ignore_Server_Ids:
             Master_Server_Id: 1
                  Master_UUID: a8da7421-157f-11ea-b1bf-000c297c0226
             Master_Info_File: /data/data/master.info
                    SQL_Delay: 0
          SQL_Remaining_Delay: NULL
      Slave_SQL_Running_State: Slave has read all relay log; waiting for more updates
           Master_Retry_Count: 86400
                  Master_Bind:
      Last_IO_Error_Timestamp:
     Last_SQL_Error_Timestamp:
               Master_SSL_Crl:
           Master_SSL_Crlpath:
           Retrieved_Gtid_Set:
            Executed_Gtid_Set:
                Auto_Position: 0
         Replicate_Rewrite_DB:
                 Channel_Name:
           Master_TLS_Version:
1 row in set (0.00 sec)

mysql> exit
Bye
7.3.3 配置数据库服务器node7
7.3.3.1 测试从账号slave能否登陆node8
[root@node7 ~]# mysql -uslave -p123456 -h 192.168.110.186#可以看到成功使用slave账号登录node8mysql> show databases;+--------------------+
| Database           |
+--------------------+
| information_schema |
+--------------------+
1 row in set (0.00 sec)mysql> exitBye
7.3.3.2 设置node7复制node8
[root@node7 ~]# mysql -uroot -p123456

mysql> change master to master_host='192.168.110.186',master_user='slave',master_password='123456';
Query OK, 0 rows affected, 2 warnings (0.01 sec)

mysql> start slave;
Query OK, 0 rows affected (0.10 sec)

#查看slave状态,如果Slave_IO_Running,Slave_SQL_Running都为yes,就表示ok
mysql> show slave status\G
*************************** 1. row ***************************
               Slave_IO_State: Waiting for master to send event
                  Master_Host: 192.168.110.186
                  Master_User: slave
                  Master_Port: 3306
                Connect_Retry: 60
              Master_Log_File: mysql-bin.000002
          Read_Master_Log_Pos: 604
               Relay_Log_File: node7-relay-bin.000003
                Relay_Log_Pos: 817
        Relay_Master_Log_File: mysql-bin.000002
             Slave_IO_Running: Yes
            Slave_SQL_Running: Yes
              Replicate_Do_DB:
          Replicate_Ignore_DB:
           Replicate_Do_Table:
       Replicate_Ignore_Table:
      Replicate_Wild_Do_Table:
  Replicate_Wild_Ignore_Table:
                   Last_Errno: 0
                   Last_Error:
                 Skip_Counter: 0
          Exec_Master_Log_Pos: 604
              Relay_Log_Space: 1391
              Until_Condition: None
               Until_Log_File:
                Until_Log_Pos: 0
           Master_SSL_Allowed: No
           Master_SSL_CA_File:
           Master_SSL_CA_Path:
              Master_SSL_Cert:
            Master_SSL_Cipher:
               Master_SSL_Key:
        Seconds_Behind_Master: 0
Master_SSL_Verify_Server_Cert: No
                Last_IO_Errno: 0
                Last_IO_Error:
               Last_SQL_Errno: 0
               Last_SQL_Error:
  Replicate_Ignore_Server_Ids:
             Master_Server_Id: 2
                  Master_UUID: f083c41e-1671-11ea-8342-000c29f7e789
             Master_Info_File: /data/data/master.info
                    SQL_Delay: 0
          SQL_Remaining_Delay: NULL
      Slave_SQL_Running_State: Slave has read all relay log; waiting for more updates
           Master_Retry_Count: 86400
                  Master_Bind:
      Last_IO_Error_Timestamp:
     Last_SQL_Error_Timestamp:
               Master_SSL_Crl:
           Master_SSL_Crlpath:
           Retrieved_Gtid_Set:
            Executed_Gtid_Set:
                Auto_Position: 0
         Replicate_Rewrite_DB:
                 Channel_Name:
           Master_TLS_Version:
1 row in set (0.01 sec)

mysql> show master status\G
*************************** 1. row ***************************
             File: mysql-bin.000001
         Position: 604
     Binlog_Do_DB: hotdata
 Binlog_Ignore_DB: mysql
Executed_Gtid_Set:
1 row in set (0.00 sec)
7.3.4 插入数据测试主从是否同步
7.3.4.1 在node7上插入数据,查看node8 上有没有同步数据
#node7上插入数据
mysql> insert into hotdata.customers values (1,'张三','珠江新城','广州','广东省','1234567890@qq.com','china');
Query OK, 1 row affected (0.01 sec)

mysql> insert into hotdata.customers values (2,'李四','天安门','北京','北京市','1234127890@qq.com','china');
Query OK, 1 row affected (0.00 sec)

mysql> insert into hotdata.customers values (3,'王二麻子','钟鼓楼','昆明','云南省','1234567870@qq.com','china');
Query OK, 1 row affected (0.01 sec)

mysql> insert into hotdata.customers values (4,'赵四','百花广场','佛山','广东省','1239867890@qq.com','china');
Query OK, 1 row affected (0.01 sec)

mysql> insert into hotdata.customers values (2,'李四','天安门','北京','北京市','1234127890@qq.com','china');
 values (3,'王二麻子','钟鼓楼','昆明','云南省','1234567870@qq.com','china');
insert into hotdata.customers values (4,'赵四','百花广场','佛山','广东省','1239867890@qq.com','china');Query OK, 1 row affected (0.00 sec)

mysql> insert into hotdata.customers values (3,'王二麻子','钟鼓楼','昆明','云南省','1234567870@qq.com','china');
Query OK, 1 row affected (0.00 sec)

mysql> insert into hotdata.customers values (4,'赵四','百花广场','佛山','广东省','1239867890@qq.com','china');
Query OK, 1 row affected (0.00 sec)

mysql> select * from hotdata.customers;
+---------+--------------+--------------+-----------+------------+-------------------+--------------+
| cust_id | cust_name    | cust_address | cust_city | cust_state | cust_email        | cust_country |
+---------+--------------+--------------+-----------+------------+-------------------+--------------+
|       1 | 张三         | 珠江新城     | 广州      | 广东省     | 1234567890@qq.com | china        |
|       2 | 李四         | 天安门       | 北京      | 北京市     | 1234127890@qq.com | china        |
|       3 | 王二麻子     | 钟鼓楼       | 昆明      | 云南省     | 1234567870@qq.com | china        |
|       4 | 赵四         | 百花广场     | 佛山      | 广东省     | 1239867890@qq.com | china        |
|       2 | 李四         | 天安门       | 北京      | 北京市     | 1234127890@qq.com | china        |
|       3 | 王二麻子     | 钟鼓楼       | 昆明      | 云南省     | 1234567870@qq.com | china        |
|       4 | 赵四         | 百花广场     | 佛山      | 广东省     | 1239867890@qq.com | china        |
+---------+--------------+--------------+-----------+------------+-------------------+--------------+
7 rows in set (0.00 sec)

#在node8上查询数据
mysql> select * from hotdata.customers;
+---------+--------------+--------------+-----------+------------+-------------------+--------------+
| cust_id | cust_name    | cust_address | cust_city | cust_state | cust_email        | cust_country |
+---------+--------------+--------------+-----------+------------+-------------------+--------------+
|       1 | 张三         | 珠江新城     | 广州      | 广东省     | 1234567890@qq.com | china        |
|       2 | 李四         | 天安门       | 北京      | 北京市     | 1234127890@qq.com | china        |
|       3 | 王二麻子     | 钟鼓楼       | 昆明      | 云南省     | 1234567870@qq.com | china        |
|       4 | 赵四         | 百花广场     | 佛山      | 广东省     | 1239867890@qq.com | china        |
|       2 | 李四         | 天安门       | 北京      | 北京市     | 1234127890@qq.com | china        |
|       3 | 王二麻子     | 钟鼓楼       | 昆明      | 云南省     | 1234567870@qq.com | china        |
|       4 | 赵四         | 百花广场     | 佛山      | 广东省     | 1239867890@qq.com | china        |
+---------+--------------+--------------+-----------+------------+-------------------+--------------+
7 rows in set (0.00 sec)
7.3.4.2 在node8上插入数据,查看node7 上有没有同步数据
#node8上插入数据
mysql> insert into hotdata.customers values (5,'刘能','体育中心','广州','广东省','1234512890@qq.com','china');
tomers values (7,'人生的哲理','塔坡山','大理','云南省','2489567890@qq.com','china');
insert into hotdata.customers values (8,'美剧','美剧','美国','美国','2489567890@qq.com','usa');Query OK, 1 row affected (0.01 sec)

mysql> insert into hotdata.customers values (6,'谢广坤','体育西路','广州','广东省','1364567890@qq.com','china');
Query OK, 1 row affected (0.00 sec)

mysql> insert into hotdata.customers values (7,'人生的哲理','塔坡山','大理','云南省','2489567890@qq.com','china');
Query OK, 1 row affected (0.00 sec)

mysql> insert into hotdata.customers values (8,'美剧','美剧','美国','美国','2489567890@qq.com','usa');
Query OK, 1 row affected (0.00 sec)

mysql> select * from hotdata.customers;
+---------+-----------------+--------------+-----------+------------+-------------------+--------------+
| cust_id | cust_name       | cust_address | cust_city | cust_state | cust_email        | cust_country |
+---------+-----------------+--------------+-----------+------------+-------------------+--------------+
|       1 | 张三            | 珠江新城     | 广州      | 广东省     | 1234567890@qq.com | china        |
|       2 | 李四            | 天安门       | 北京      | 北京市     | 1234127890@qq.com | china        |
|       3 | 王二麻子        | 钟鼓楼       | 昆明      | 云南省     | 1234567870@qq.com | china        |
|       4 | 赵四            | 百花广场     | 佛山      | 广东省     | 1239867890@qq.com | china        |
|       2 | 李四            | 天安门       | 北京      | 北京市     | 1234127890@qq.com | china        |
|       3 | 王二麻子        | 钟鼓楼       | 昆明      | 云南省     | 1234567870@qq.com | china        |
|       4 | 赵四            | 百花广场     | 佛山      | 广东省     | 1239867890@qq.com | china        |
|       5 | 刘能            | 体育中心     | 广州      | 广东省     | 1234512890@qq.com | china        |
|       6 | 谢广坤          | 体育西路     | 广州      | 广东省     | 1364567890@qq.com | china        |
|       7 | 人生的哲理      | 塔坡山       | 大理      | 云南省     | 2489567890@qq.com | china        |
|       8 | 美剧            | 美剧         | 美国      | 美国       | 2489567890@qq.com | usa          |
+---------+-----------------+--------------+-----------+------------+-------------------+--------------+
11 rows in set (0.00 sec)

#node7查询数据
mysql> select * from hotdata.customers;
+---------+-----------------+--------------+-----------+------------+-------------------+--------------+
| cust_id | cust_name       | cust_address | cust_city | cust_state | cust_email        | cust_country |
+---------+-----------------+--------------+-----------+------------+-------------------+--------------+
|       1 | 张三            | 珠江新城     | 广州      | 广东省     | 1234567890@qq.com | china        |
|       2 | 李四            | 天安门       | 北京      | 北京市     | 1234127890@qq.com | china        |
|       3 | 王二麻子        | 钟鼓楼       | 昆明      | 云南省     | 1234567870@qq.com | china        |
|       4 | 赵四            | 百花广场     | 佛山      | 广东省     | 1239867890@qq.com | china        |
|       2 | 李四            | 天安门       | 北京      | 北京市     | 1234127890@qq.com | china        |
|       3 | 王二麻子        | 钟鼓楼       | 昆明      | 云南省     | 1234567870@qq.com | china        |
|       4 | 赵四            | 百花广场     | 佛山      | 广东省     | 1239867890@qq.com | china        |
|       5 | 刘能            | 体育中心     | 广州      | 广东省     | 1234512890@qq.com | china        |
|       6 | 谢广坤          | 体育西路     | 广州      | 广东省     | 1364567890@qq.com | china        |
|       7 | 人生的哲理      | 塔坡山       | 大理      | 云南省     | 2489567890@qq.com | china        |
|       8 | 美剧            | 美剧         | 美国      | 美国       | 2489567890@qq.com | usa          |
+---------+-----------------+--------------+-----------+------------+-------------------+--------------+
11 rows in set (0.01 sec)
由此可就主主双向同步搭建完毕。
7.3.5 彻底取消主从同步
既然有搭建主从同步就有撤销主从同步,如果有撤销主从同步的需求,请看下文。
由于是主主双向同步,所以两个mysql服务器都要清除matser和slave的配置。
#在两个MySQL上都执行如下操作,以node7为例
#清除master配置
mysql> reset master;
Query OK, 0 rows affected (0.01 sec)

mysql> show master status\G
*************************** 1. row ***************************
             File: mysql-bin.000001
         Position: 154
     Binlog_Do_DB: hotdata
 Binlog_Ignore_DB: mysql
Executed_Gtid_Set:
1 row in set (0.00 sec)

mysql> stop slave;
Query OK, 0 rows affected (0.88 sec)

mysql> reset slave all;
Query OK, 0 rows affected (0.12 sec)

#清除slave配置
mysql> show slave status\G
Empty set (0.00 sec)
可见主库和从库都已经解除了主从关系,最后把配置文件中与主从相关的配置删除即可。
7.4 总结
对于MySQL主从同步之主主双向同步架构,很多人误以为这样可以做到MySQL负载均衡,实际上非常不好,每个服务器需要做同样的同步更新,破坏了事物的隔离性和数据的一致性,不推荐。
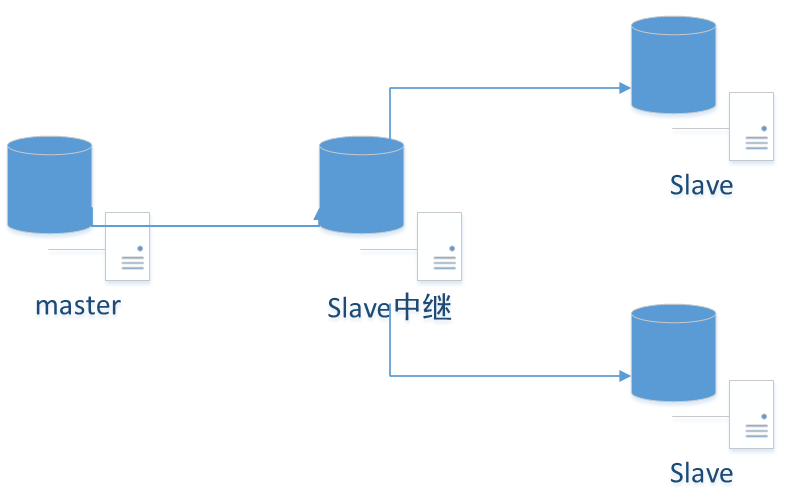
八.MySQL主从同步之M-S-S架构
8.1 服务器规划
| 主机名 | IP | 操作系统版本 | MySQL版本 | 角色 |
|---|---|---|---|---|
| node7 | 192.168.110.188 | CentOS 7.4.1708 | 5.7.26 | master(主) |
| node8 | 192.168.110.186 | CentOS 7.4.1708 | 5.7.26 | slave中继(中继) |
| node9 | 192.168.110.187 | CentOS 7.4.1708 | 5.7.26 | slave(从) |
8.2 主从同步的原理
master将改变记录到二进制日志(binary log)中,slave将master的binary log events拷贝到它的中继日志(relay log),slave重做中继日志中的事件,修改salve上的数据。
由于一主多从的结构IO压力集中在master上,所以使用一台slave作为中继,分担Master的压力,slave中继需要开启bin-log,并配置log-slave-updates,Slave中继可使用Black-hole存储引擎,不会把数据存储到磁盘,只记录二进制日志。
8.3 部署MySQL主从同步之M-S-S
8.3.1 配置主数据库服务器node7
8.3.1.1 创建需要同步的数据库及其表
[root@node7 ~]# mysql -uroot -p123456

mysql> create database hotdata;     #创建热点数据库
Query OK, 1 row affected (0.70 sec)

mysql> use hotdata;
Database changed
#创建顾客表
mysql> create table customers(cust_id int,cust_name varchar(30),cust_address varchar(50),cust_city varchar(30),cust_state varchar(50),cust_email varchar(30),cust_country varchar(50));
Query OK, 0 rows affected (0.44 sec)

mysql> desc customers;   #查看表结构
+--------------+-------------+------+-----+---------+-------+
| Field        | Type        | Null | Key | Default | Extra |
+--------------+-------------+------+-----+---------+-------+
| cust_id      | int(11)     | YES  |     | NULL    |       |
| cust_name    | varchar(30) | YES  |     | NULL    |       |
| cust_address | varchar(50) | YES  |     | NULL    |       |
| cust_city    | varchar(30) | YES  |     | NULL    |       |
| cust_state   | varchar(50) | YES  |     | NULL    |       |
| cust_email   | varchar(30) | YES  |     | NULL    |       |
| cust_country | varchar(50) | YES  |     | NULL    |       |
+--------------+-------------+------+-----+---------+-------+
7 rows in set (0.36 sec)

mysql> exit
Bye
8.3.1.2 授予node8 replication的权限
[root@node7 ~]# mysql -uroot -p123456

mysql> grant replication slave on *.* to repl@'192.168.110.186' identified by '123456';
Query OK, 0 rows affected, 1 warning (0.36 sec)

mysql>  flush privileges;
Query OK, 0 rows affected (0.14 sec)

mysql> exit
Bye
8.3.1.3 修改配置文件并重启
[root@node7 ~]# vim /etc/my.cnf#与主从同步相关的配置在#mysql replication下面[root@node7 ~]# cat /etc/my.cnf
[client]
port=3306
socket=/data/run/mysql.sock

[mysqld]
port=3306
socket=/data/run/mysql.sock
pid_file=/data/run/mysql.pid
datadir=/data/data
default_storage_engine=InnoDB
max_allowed_packet=512M
max_connections=2048
open_files_limit=65535

skip-name-resolve
lower_case_table_names=1

character-set-server=utf8mb4
collation-server=utf8mb4_unicode_ci
init_connect='SET NAMES utf8mb4'

innodb_buffer_pool_size=1024M
innodb_log_file_size=2048M
innodb_file_per_table=1
innodb_flush_log_at_trx_commit=0

key_buffer_size=64M

log-error=/data/log/mysql_error.log

slow_query_log=1
slow_query_log_file=/data/log/mysql_slow_query.log
long_query_time=5

tmp_table_size=32M
max_heap_table_size=32M
query_cache_type=0
query_cache_size=0

skip_ssl#mysql replicationlog-bin=/data/binlogs/mysql-bin#server-id=1必须唯一server-id=1
binlog-do-db=hotdata
binlog-ignore-db=mysql#当每进行1次事务提交之后,MySQL将进行一次fsync之类的磁盘同步指令来将binlog_cache中的数据强制写入磁盘#sync-binlog具体解释请看:https://www.cnblogs.com/wt645631686/p/8109002.htmlsync-binlog=1#ROW模式(RBR):不记录每条sql语句的上下文信息,仅需记录哪条数据被修改了,修改成什么样了#具体解释查看:https://www.cnblogs.com/xingyunfashi/p/8431780.htmlbinlog-format=row
[root@node7 ~]# systemctl restart mysqld
8.3.2 配置slave中继node8
8.3.2.1 创建需要同步的数据库及其表
[root@node8 ~]# mysql -uroot -p123456

mysql> create database hotdata;     #创建热点数据库
Query OK, 1 row affected (0.70 sec)

mysql> use hotdata;
Database changed
#创建顾客表
mysql> create table customers(cust_id int,cust_name varchar(30),cust_address varchar(50),cust_city varchar(30),cust_state varchar(50),cust_email varchar(30),cust_country varchar(50));
Query OK, 0 rows affected (0.44 sec)

mysql> desc customers;   #查看表结构
+--------------+-------------+------+-----+---------+-------+
| Field        | Type        | Null | Key | Default | Extra |
+--------------+-------------+------+-----+---------+-------+
| cust_id      | int(11)     | YES  |     | NULL    |       |
| cust_name    | varchar(30) | YES  |     | NULL    |       |
| cust_address | varchar(50) | YES  |     | NULL    |       |
| cust_city    | varchar(30) | YES  |     | NULL    |       |
| cust_state   | varchar(50) | YES  |     | NULL    |       |
| cust_email   | varchar(30) | YES  |     | NULL    |       |
| cust_country | varchar(50) | YES  |     | NULL    |       |
+--------------+-------------+------+-----+---------+-------+
7 rows in set (0.36 sec)

mysql> exit
Bye
8.3.2.2 修改配置文件并重启
##与主从同步相关的配置在#mysql replication下面[root@node8 ~]# cat /etc/my.cnf
[client]
port=3306
socket=/data/run/mysql.sock

[mysqld]
port=3306
socket=/data/run/mysql.sock
pid_file=/data/run/mysql.pid
datadir=/data/data
default_storage_engine=InnoDB
max_allowed_packet=512M
max_connections=2048
open_files_limit=65535

skip-name-resolve
lower_case_table_names=1

character-set-server=utf8mb4
collation-server=utf8mb4_unicode_ci
init_connect='SET NAMES utf8mb4'

innodb_buffer_pool_size=1024M
innodb_log_file_size=2048M
innodb_file_per_table=1
innodb_flush_log_at_trx_commit=0

key_buffer_size=64M

log-error=/data/log/mysql_error.log

slow_query_log=1
slow_query_log_file=/data/log/mysql_slow_query.log
long_query_time=5

tmp_table_size=32M
max_heap_table_size=32M
query_cache_type=0
query_cache_size=0#mysql replication配置log-bin=/data/binlogs/mysql-bin
server-id=2#log-slave-updates参数默认是关闭的状态,如果不手动设置,那么bin-log只会记录直接在该库上执行的SQL语##句,由replication机制的SQL线程读取relay-log而执行的SQL语句并不会记录到bin-log,那么就无法实现上#述的三级级联同步。log-slave-updates=1
binlog-format=row
relay-log=/data/data/relay-log.info
[root@node8 ~]#

[root@node8 ~]# systemctl restart mysqld
8.3.2.3 授权node8复制node7,并授予node9 replication的权限
[root@node8 ~]# mysql -uroot -p123456

mysql> stop slave;
Query OK, 0 rows affected, 1 warning (0.00 sec)

mysql> change master to master_host='192.168.110.188',master_user='repl',master_password='123456';
Query OK, 0 rows affected, 2 warnings (0.01 sec)

mysql>  start slave;
Query OK, 0 rows affected (0.00 sec)

mysql> show slave status \G
*************************** 1. row ***************************
               Slave_IO_State: Waiting for master to send event
                  Master_Host: 192.168.110.188
                  Master_User: repl
                  Master_Port: 3306
                Connect_Retry: 60
              Master_Log_File: mysql-bin.000002
          Read_Master_Log_Pos: 154
               Relay_Log_File: relay-log.000003
                Relay_Log_Pos: 367
        Relay_Master_Log_File: mysql-bin.000002
             Slave_IO_Running: Yes
            Slave_SQL_Running: Yes
              Replicate_Do_DB:
          Replicate_Ignore_DB:
           Replicate_Do_Table:
       Replicate_Ignore_Table:
      Replicate_Wild_Do_Table:
  Replicate_Wild_Ignore_Table:
                   Last_Errno: 0
                   Last_Error:
                 Skip_Counter: 0
          Exec_Master_Log_Pos: 154
              Relay_Log_Space: 1230
              Until_Condition: None
               Until_Log_File:
                Until_Log_Pos: 0
           Master_SSL_Allowed: No
           Master_SSL_CA_File:
           Master_SSL_CA_Path:
              Master_SSL_Cert:
            Master_SSL_Cipher:
               Master_SSL_Key:
        Seconds_Behind_Master: 0
Master_SSL_Verify_Server_Cert: No
                Last_IO_Errno: 0
                Last_IO_Error:
               Last_SQL_Errno: 0
               Last_SQL_Error:
  Replicate_Ignore_Server_Ids:
             Master_Server_Id: 1
                  Master_UUID: a8da7421-157f-11ea-b1bf-000c297c0226
             Master_Info_File: /data/data/master.info
                    SQL_Delay: 0
          SQL_Remaining_Delay: NULL
      Slave_SQL_Running_State: Slave has read all relay log; waiting for more updates
           Master_Retry_Count: 86400
                  Master_Bind:
      Last_IO_Error_Timestamp:
     Last_SQL_Error_Timestamp:
               Master_SSL_Crl:
           Master_SSL_Crlpath:
           Retrieved_Gtid_Set:
            Executed_Gtid_Set:
                Auto_Position: 0
         Replicate_Rewrite_DB:
                 Channel_Name:
           Master_TLS_Version:
1 row in set (0.00 sec)

mysql> grant replication slave on *.* to 'repl'@'192.168.110.187' identified by '123456';
Query OK, 0 rows affected, 1 warning (0.00 sec)

mysql> flush privileges;
Query OK, 0 rows affected (0.00 sec)

mysql> exit
Bye
8.3.3 配置从服务器node9
8.3.3.1 创建需要同步的数据库及其表
[root@node9 ~]# mysql -uroot -p123456

mysql> create database hotdata;     #创建热点数据库
Query OK, 1 row affected (0.70 sec)

mysql> use hotdata;
Database changed
#创建顾客表
mysql> create table customers(cust_id int,cust_name varchar(30),cust_address varchar(50),cust_city varchar(30),cust_state varchar(50),cust_email varchar(30),cust_country varchar(50));
Query OK, 0 rows affected (0.44 sec)

mysql> desc customers;   #查看表结构
+--------------+-------------+------+-----+---------+-------+
| Field        | Type        | Null | Key | Default | Extra |
+--------------+-------------+------+-----+---------+-------+
| cust_id      | int(11)     | YES  |     | NULL    |       |
| cust_name    | varchar(30) | YES  |     | NULL    |       |
| cust_address | varchar(50) | YES  |     | NULL    |       |
| cust_city    | varchar(30) | YES  |     | NULL    |       |
| cust_state   | varchar(50) | YES  |     | NULL    |       |
| cust_email   | varchar(30) | YES  |     | NULL    |       |
| cust_country | varchar(50) | YES  |     | NULL    |       |
+--------------+-------------+------+-----+---------+-------+
7 rows in set (0.36 sec)

mysql> exit
Bye
8.3.3.2 修改配置文件并重启
[root@node9 ~]# vim /etc/my.cnf
[root@node9 ~]# cat /etc/my.cnf
[client]
port=3306
socket=/data/run/mysql.sock

[mysqld]
port=3306
socket=/data/run/mysql.sock
pid_file=/data/run/mysql.pid
datadir=/data/data
default_storage_engine=InnoDB
max_allowed_packet=512M
max_connections=2048
open_files_limit=65535

skip-name-resolve
lower_case_table_names=1

character-set-server=utf8mb4
collation-server=utf8mb4_unicode_ci
init_connect='SET NAMES utf8mb4'

innodb_buffer_pool_size=1024M
innodb_log_file_size=2048M
innodb_file_per_table=1
innodb_flush_log_at_trx_commit=0

key_buffer_size=64M

log-error=/data/log/mysql_error.log

slow_query_log=1
slow_query_log_file=/data/log/mysql_slow_query.log
long_query_time=5

tmp_table_size=32M
max_heap_table_size=32M
query_cache_type=0
query_cache_size=0#mysql replication配置server-id=3
log-bin=/data/binlogs/mysql-bin
binlog-format=row#relay-log=/data/relaylog/relay.logrelay-log=/data/data/relay-log.info
[root@node9 ~]#

[root@node9 ~]#  systemctl restart mysqld
8.3.3.3 指定node8为node9的主
[root@node9 ~]# mysql -uroot -p123456

mysql> stop slave;
Query OK, 0 rows affected, 1 warning (0.00 sec)

mysql> change master to master_host='192.168.110.186',master_user='repl',master_password='123456';
Query OK, 0 rows affected, 2 warnings (0.01 sec)

mysql> flush privileges;
Query OK, 0 rows affected (0.00 sec)

mysql> start slave;
Query OK, 0 rows affected (0.00 sec)

mysql>  show slave status \G
*************************** 1. row ***************************
               Slave_IO_State: Waiting for master to send event
                  Master_Host: 192.168.110.186
                  Master_User: repl
                  Master_Port: 3306
                Connect_Retry: 60
              Master_Log_File: mysql-bin.000002
          Read_Master_Log_Pos: 1052
               Relay_Log_File: relay-log.000003
                Relay_Log_Pos: 1265
        Relay_Master_Log_File: mysql-bin.000002
             Slave_IO_Running: Yes
            Slave_SQL_Running: Yes
              Replicate_Do_DB:
          Replicate_Ignore_DB:
           Replicate_Do_Table:
       Replicate_Ignore_Table:
      Replicate_Wild_Do_Table:
  Replicate_Wild_Ignore_Table:
                   Last_Errno: 0
                   Last_Error:
                 Skip_Counter: 0
          Exec_Master_Log_Pos: 1052
              Relay_Log_Space: 1679
              Until_Condition: None
               Until_Log_File:
                Until_Log_Pos: 0
           Master_SSL_Allowed: No
           Master_SSL_CA_File:
           Master_SSL_CA_Path:
              Master_SSL_Cert:
            Master_SSL_Cipher:
               Master_SSL_Key:
        Seconds_Behind_Master: 0
Master_SSL_Verify_Server_Cert: No
                Last_IO_Errno: 0
                Last_IO_Error:
               Last_SQL_Errno: 0
               Last_SQL_Error:
  Replicate_Ignore_Server_Ids:
             Master_Server_Id: 2
                  Master_UUID: f083c41e-1671-11ea-8342-000c29f7e789
             Master_Info_File: /data/data/master.info
                    SQL_Delay: 0
          SQL_Remaining_Delay: NULL
      Slave_SQL_Running_State: Slave has read all relay log; waiting for more updates
           Master_Retry_Count: 86400
                  Master_Bind:
      Last_IO_Error_Timestamp:
     Last_SQL_Error_Timestamp:
               Master_SSL_Crl:
           Master_SSL_Crlpath:
           Retrieved_Gtid_Set:
            Executed_Gtid_Set:
                Auto_Position: 0
         Replicate_Rewrite_DB:
                 Channel_Name:
           Master_TLS_Version:
1 row in set (0.01 sec)

mysql> exit
Bye
8.3.4 插入数据测试
#在node7上插入数据,查看node8和node9是否同步了数据

#先在node7上插入数据
[root@node7 ~]# mysql -uroot -p123456

mysql> insert into hotdata.customers values (1,'张三','珠江新城','广州','广东省','1234567890@qq.com','china');

mysql> insert into hotdata.customers values (2,'李四','天安门','北京','北京市','1234127890@qq.com','china');
Query OK, 1 row affected (0.01 sec)

mysql> insert into hotdata.customers values (3,'王二麻子','钟鼓楼','昆明','云南省','1234567870@qq.com','china');
','云南省','2489567890@qq.com','china');Query OK, 1 row affected (0.09 sec)

mysql> insert into hotdata.customers values (4,'赵四','百花广场','佛山','广东省','1239867890@qq.com','china');
Query OK, 1 row affected (0.00 sec)

mysql> insert into hotdata.customers values (5,'刘能','体育中心','广州','广东省','1234512890@qq.com','china');
Query OK, 1 row affected (0.02 sec)

mysql> insert into hotdata.customers values (6,'谢广坤','体育西路','广州','广东省','1364567890@qq.com','china');
Query OK, 1 row affected (0.01 sec)

mysql> insert into hotdata.customers values (7,'人生的哲理','塔坡山','大理','云南省','2489567890@qq.com','china');
Query OK, 1 row affected (0.00 sec)

mysql>
mysql>
mysql> select * from hotdata.customers;
+---------+-----------------+--------------+-----------+------------+-------------------+--------------+
| cust_id | cust_name       | cust_address | cust_city | cust_state | cust_email        | cust_country |
+---------+-----------------+--------------+-----------+------------+-------------------+--------------+
|       1 | 张三            | 珠江新城     | 广州      | 广东省     | 1234567890@qq.com | china        |
|       2 | 李四            | 天安门       | 北京      | 北京市     | 1234127890@qq.com | china        |
|       3 | 王二麻子        | 钟鼓楼       | 昆明      | 云南省     | 1234567870@qq.com | china        |
|       4 | 赵四            | 百花广场     | 佛山      | 广东省     | 1239867890@qq.com | china        |
|       5 | 刘能            | 体育中心     | 广州      | 广东省     | 1234512890@qq.com | china        |
|       6 | 谢广坤          | 体育西路     | 广州      | 广东省     | 1364567890@qq.com | china        |
|       7 | 人生的哲理      | 塔坡山       | 大理      | 云南省     | 2489567890@qq.com | china        |
+---------+-----------------+--------------+-----------+------------+-------------------+--------------+
7 rows in set (0.00 sec)

#在node8上查看数据
[root@node8 ~]# mysql -uroot -p123456

mysql> select * from hotdata.customers;
+---------+-----------------+--------------+-----------+------------+-------------------+--------------+
| cust_id | cust_name       | cust_address | cust_city | cust_state | cust_email        | cust_country |
+---------+-----------------+--------------+-----------+------------+-------------------+--------------+
|       1 | 张三            | 珠江新城     | 广州      | 广东省     | 1234567890@qq.com | china        |
|       2 | 李四            | 天安门       | 北京      | 北京市     | 1234127890@qq.com | china        |
|       3 | 王二麻子        | 钟鼓楼       | 昆明      | 云南省     | 1234567870@qq.com | china        |
|       4 | 赵四            | 百花广场     | 佛山      | 广东省     | 1239867890@qq.com | china        |
|       5 | 刘能            | 体育中心     | 广州      | 广东省     | 1234512890@qq.com | china        |
|       6 | 谢广坤          | 体育西路     | 广州      | 广东省     | 1364567890@qq.com | china        |
|       7 | 人生的哲理      | 塔坡山       | 大理      | 云南省     | 2489567890@qq.com | china        |
+---------+-----------------+--------------+-----------+------------+-------------------+--------------+
7 rows in set (0.00 sec)

#在node9上查看数据
[root@node9 ~]# mysql -uroot -p123456

mysql> select * from hotdata.customers;
+---------+-----------------+--------------+-----------+------------+-------------------+--------------+
| cust_id | cust_name       | cust_address | cust_city | cust_state | cust_email        | cust_country |
+---------+-----------------+--------------+-----------+------------+-------------------+--------------+
|       1 | 张三            | 珠江新城     | 广州      | 广东省     | 1234567890@qq.com | china        |
|       2 | 李四            | 天安门       | 北京      | 北京市     | 1234127890@qq.com | china        |
|       3 | 王二麻子        | 钟鼓楼       | 昆明      | 云南省     | 1234567870@qq.com | china        |
|       4 | 赵四            | 百花广场     | 佛山      | 广东省     | 1239867890@qq.com | china        |
|       5 | 刘能            | 体育中心     | 广州      | 广东省     | 1234512890@qq.com | china        |
|       6 | 谢广坤          | 体育西路     | 广州      | 广东省     | 1364567890@qq.com | china        |
|       7 | 人生的哲理      | 塔坡山       | 大理      | 云南省     | 2489567890@qq.com | china        |
+---------+-----------------+--------------+-----------+------------+-------------------+--------------+
7 rows in set (0.00 sec)
可以发现现在数据都已经同步了,但是有一个问题,slave中继node8也查到了数据,不符合需求。
设置node8需要同步的表hotdata.customers的存储引擎为blackhole
#关闭日志记录
mysql> set sql_log_bin=off;
Query OK, 0 rows affected (0.01 sec)

#Blackhole引擎–“黑洞”. 其作用正如其名字一样:任何写入到此引擎的数据均会被丢弃掉,不做实际存储;#Select语句的内容永远是空。 和Linux中的 /dev/null 文件完成的作用完全一致。
mysql> alter table hotdata.customers ENGINE=blackhole;
Query OK, 8 rows affected (0.01 sec)
Records: 8  Duplicates: 0  Warnings: 0

mysql> select * from hotdata.customers;
Empty set (0.00 sec)
此时,node7上插入数据,node9同步数据,node8只分担node7的IO压力,不存储数据。
自此,MySQL主从同步之M-S-S架构搭建完毕。
8.4 总结
MySQL主从同步之M-S-S架构的好处是可以极大的减轻主节点的压力。
MySQL级联复制的另一用途是进行数据迁移。 比如新上的两台服务器B和C,要替换掉之前旧的服务器A,同时B和C是新的主从关系。因此,配置成级联复制,来迁移数据,也方便切换。
转换流程如下:
master A ------> slave B ------> slave C =转换为===> matser B ------> slave C
九.MySQL主从同步之多主多从架构
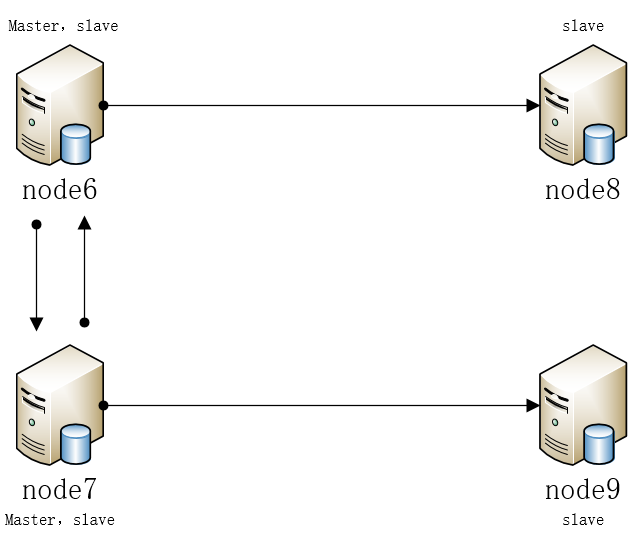
9.1 服务器规划
| 主机名 | IP | 操作系统版本 | MySQL版本 | 角色 |
|---|---|---|---|---|
| node6 | 192.168.110.185 | CentOS 7.4.1708 | 5.7.26 | master,slave |
| node7 | 192.168.110.188 | CentOS 7.4.1708 | 5.7.26 | master,slave |
| node8 | 192.168.110.186 | CentOS 7.4.1708 | 5.7.26 | slave |
| node9 | 192.168.110.187 | CentOS 7.4.1708 | 5.7.26 | slave |
9.2 MySQL多主多从架构图
架构图说明:node6和node8,node7和node9为一主一从架构,node6和node7为主主双向同步。
9.3 主从同步的原理
master将改变记录到二进制日志(binary log)中,slave将master的binary log events拷贝到它的中继日志(relay log),slave重做中继日志中的事件,修改salve上的数据。
一主多从架构可以缓解读的压力,但是一旦主数据库宕机了,就不能写了,使用双主双从架构的话,一个主数据库宕机了,使用另一个主数据库替代即可。
9.4 部署MySQL主从同步之双主双从
9.4.1 配置主数据库服务器node6
9.4.1.1 创建需要同步的数据库及其表
[root@node6 ~]# mysql -uroot -p123456

mysql> create database hotdata;     #创建热点数据库
Query OK, 1 row affected (0.70 sec)

mysql> use hotdata;
Database changed
#创建顾客表
mysql> create table customers(cust_id int,cust_name varchar(30),cust_address varchar(50),cust_city varchar(30),cust_state varchar(50),cust_email varchar(30),cust_country varchar(50));
Query OK, 0 rows affected (0.44 sec)

mysql> desc customers;   #查看表结构
+--------------+-------------+------+-----+---------+-------+
| Field        | Type        | Null | Key | Default | Extra |
+--------------+-------------+------+-----+---------+-------+
| cust_id      | int(11)     | YES  |     | NULL    |       |
| cust_name    | varchar(30) | YES  |     | NULL    |       |
| cust_address | varchar(50) | YES  |     | NULL    |       |
| cust_city    | varchar(30) | YES  |     | NULL    |       |
| cust_state   | varchar(50) | YES  |     | NULL    |       |
| cust_email   | varchar(30) | YES  |     | NULL    |       |
| cust_country | varchar(50) | YES  |     | NULL    |       |
+--------------+-------------+------+-----+---------+-------+
7 rows in set (0.36 sec)

mysql> exit
Bye
9.4.1.2 修改node6的MySQL配置文件
[root@node6 ~]# vim /etc/my.cnf#MySQL主从同步的配置在#mysql replication下[root@node6 ~]# cat /etc/my.cnf
[client]
port=3306
socket=/data/run/mysql.sock
default-character-set=utf8

[mysqld]
port=3306
socket=/data/run/mysql.sock
pid_file=/data/run/mysql.pid
datadir=/data/data
default_storage_engine=InnoDB
max_allowed_packet=512M
max_connections=2048
open_files_limit=65535

skip-name-resolve
lower_case_table_names=1

character-set-server=utf8mb4
collation-server=utf8mb4_unicode_ci
init_connect='SET NAMES utf8mb4'

innodb_buffer_pool_size=1024M
innodb_log_file_size=2048M
innodb_file_per_table=1
innodb_flush_log_at_trx_commit=0

key_buffer_size=64M

log-error=/data/log/mysql_error.log
slow_query_log=1
slow_query_log_file=/data/log/mysql_slow_query.log
long_query_time=5

tmp_table_size=32M
max_heap_table_size=32M
query_cache_type=0
query_cache_size=0#mysql replication#server-id必须唯一server-id=4#logbin参数启用二进制日志,并把二进制日志放在/data/binlogs目录下log-bin=/data/binlogs/mysql-bin#binlog-do-db可以被从服务器复制的库binlog-do-db=hotdata#binlog-ignore-db不可以被从服务器复制的库binlog-ignore-db=mysql##auto_increment_increment,控制主键自增的自增步长,用于防止Master与Master之间复制出现重复自增字##段值,通常auto_increment_increment=n,有多少台主服务器,n 就设置为多少;auto_increment_increment=2#auto_increment_offset=1设置自增起始值,这里设置为1,这样Master的auto_increment字段产生的数值##是:1, 3, 5, 7, …等奇数ID,注意auto_increment_offset的设置,不同的master设置不应该一样,否则就##容易引起主键冲突,比如master1的offset=1,则master2的offset=2,master3的offset=3auto_increment_offset=1#在双主模式中,log-slave-updates 配置项一定要配置,否则在node6上进行了更新数据,在#node7和node8上会更新,但是在node9上不会更新log-slave-updates#sync_binlog表示每几次事务提交,MySQL把binlog缓存刷进日志文件中,默认是0,最安全的是设置为1;sync_binlog=1#重启MySQL[root@node6 ~]# systemctl restart mysqld
[root@node6 ~]# systemctl status mysqld
● mysqld.service - MySQL Server
   Loaded: loaded (/usr/lib/systemd/system/mysqld.service; enabled; vendor preset: disabled)
   Active: active (running) since Thu 2019-12-12 15:02:26 CST; 28s ago
     Docs: man:mysqld(5.7)
           http://dev.mysql.com/doc/refman/en/using-systemd.html
  Process: 3753 ExecStart=/usr/local/mysql/bin/mysqld --daemonize --pid-file=/data/run/mysql.pid $MYSQLD_OPTS (code=exited, status=0/SUCCESS)
 Main PID: 3755 (mysqld)
   CGroup: /system.slice/mysqld.service
           └─3755 /usr/local/mysql/bin/mysqld --daemonize --pid-file=/data/run/mysql.pid

Dec 12 15:02:25 node6 systemd[1]: Starting MySQL Server...
Dec 12 15:02:26 node6 systemd[1]: Started MySQL Server.
9.4.1.3 node6创建复制账号并授权给node7和node8
[root@node6 ~]# mysql -uroot -p123456

mysql> grant replication slave on *.* to 'copy'@'192.168.110.188' identified by '123456';
Query OK, 0 rows affected, 1 warning (0.01 sec)

mysql> grant replication slave on *.* to 'copy'@'192.168.110.186' identified by '123456';
Query OK, 0 rows affected, 1 warning (0.00 sec)

mysql> flush privileges;
Query OK, 0 rows affected (0.00 sec)
9.4.2 配置主数据库服务器node7
9.4.2.1 创建需要同步的数据库及其表
[root@node7 ~]# mysql -uroot -p123456

mysql> create database hotdata;     #创建热点数据库
Query OK, 1 row affected (0.70 sec)

mysql> use hotdata;
Database changed
#创建顾客表
mysql> create table customers(cust_id int,cust_name varchar(30),cust_address varchar(50),cust_city varchar(30),cust_state varchar(50),cust_email varchar(30),cust_country varchar(50));
Query OK, 0 rows affected (0.44 sec)

mysql> desc customers;   #查看表结构
+--------------+-------------+------+-----+---------+-------+
| Field        | Type        | Null | Key | Default | Extra |
+--------------+-------------+------+-----+---------+-------+
| cust_id      | int(11)     | YES  |     | NULL    |       |
| cust_name    | varchar(30) | YES  |     | NULL    |       |
| cust_address | varchar(50) | YES  |     | NULL    |       |
| cust_city    | varchar(30) | YES  |     | NULL    |       |
| cust_state   | varchar(50) | YES  |     | NULL    |       |
| cust_email   | varchar(30) | YES  |     | NULL    |       |
| cust_country | varchar(50) | YES  |     | NULL    |       |
+--------------+-------------+------+-----+---------+-------+
7 rows in set (0.36 sec)

mysql> exit
Bye
9.4.2.2 修改node7的MySQL配置文件
[root@node7 ~]# vim /etc/my.cnf
[root@node7 ~]# cat /etc/my.cnf
[client]
port=3306
socket=/data/run/mysql.sock
default-character-set=utf8

[mysqld]
port=3306
socket=/data/run/mysql.sock
pid_file=/data/run/mysql.pid
datadir=/data/data
default_storage_engine=InnoDB
max_allowed_packet=512M
max_connections=2048
open_files_limit=65535

skip-name-resolve
lower_case_table_names=1

character-set-server=utf8mb4
collation-server=utf8mb4_unicode_ci
init_connect='SET NAMES utf8mb4'

innodb_buffer_pool_size=1024M
innodb_log_file_size=2048M
innodb_file_per_table=1
innodb_flush_log_at_trx_commit=0

key_buffer_size=64M

log-error=/data/log/mysql_error.log

slow_query_log=1
slow_query_log_file=/data/log/mysql_slow_query.log
long_query_time=5

tmp_table_size=32M
max_heap_table_size=32M
query_cache_type=0
query_cache_size=0

skip_ssl#mysql replicationlog-bin=/data/binlogs/mysql-bin
server-id=1
binlog-do-db=hotdata
binlog-ignore-db=mysql
auto_increment_increment=2
auto_increment_offset=2
log-slave-updates
sync_binlog=1

[root@node7 ~]# systemctl restart mysqld
[root@node7 ~]# systemctl status mysqld
● mysqld.service - MySQL Server
   Loaded: loaded (/usr/lib/systemd/system/mysqld.service; enabled; vendor preset: disabled)
   Active: active (running) since Thu 2019-12-12 15:02:29 CST; 26s ago
     Docs: man:mysqld(5.7)
           http://dev.mysql.com/doc/refman/en/using-systemd.html
  Process: 14635 ExecStart=/usr/local/mysql/bin/mysqld --daemonize --pid-file=/data/run/mysql.pid $MYSQLD_OPTS (code=exited, status=0/SUCCESS)
 Main PID: 14637 (mysqld)
   CGroup: /system.slice/mysqld.service
           └─14637 /usr/local/mysql/bin/mysqld --daemonize --pid-file=/data/run/mysql.pid

Dec 12 15:02:25 node7 systemd[1]: Starting MySQL Server...
Dec 12 15:02:29 node7 systemd[1]: Started MySQL Server.
9.4.2.3 node7创建复制账号并授权给node6和node9
[root@node7 ~]# mysql -uroot -p123456

mysql> grant replication slave on *.* to 'copy'@'192.168.110.185' identified by '123456';
Query OK, 0 rows affected, 1 warning (0.12 sec)

mysql> grant replication slave on *.* to 'copy'@'192.168.110.187' identified by '123456';
Query OK, 0 rows affected, 1 warning (0.00 sec)

mysql> flush privileges;
Query OK, 0 rows affected (0.01 sec)
9.4.3 配置从数据库服务器node8
9.4.3.1 创建需要同步的数据库及其表
[root@node8 ~]# mysql -uroot -p123456

mysql> create database hotdata;     #创建热点数据库
Query OK, 1 row affected (0.70 sec)

mysql> use hotdata;
Database changed
#创建顾客表
mysql> create table customers(cust_id int,cust_name varchar(30),cust_address varchar(50),cust_city varchar(30),cust_state varchar(50),cust_email varchar(30),cust_country varchar(50));
Query OK, 0 rows affected (0.44 sec)

mysql> desc customers;   #查看表结构
+--------------+-------------+------+-----+---------+-------+
| Field        | Type        | Null | Key | Default | Extra |
+--------------+-------------+------+-----+---------+-------+
| cust_id      | int(11)     | YES  |     | NULL    |       |
| cust_name    | varchar(30) | YES  |     | NULL    |       |
| cust_address | varchar(50) | YES  |     | NULL    |       |
| cust_city    | varchar(30) | YES  |     | NULL    |       |
| cust_state   | varchar(50) | YES  |     | NULL    |       |
| cust_email   | varchar(30) | YES  |     | NULL    |       |
| cust_country | varchar(50) | YES  |     | NULL    |       |
+--------------+-------------+------+-----+---------+-------+
7 rows in set (0.36 sec)

mysql> exit
Bye
9.4.3.2 修改node8的MySQL配置文件
[root@node8 ~]# vim /etc/my.cnf
[root@node8 ~]# cat /etc/my.cnf
[client]
port=3306
socket=/data/run/mysql.sock
default-character-set=utf8

[mysqld]
port=3306
socket=/data/run/mysql.sock
pid_file=/data/run/mysql.pid
datadir=/data/data
default_storage_engine=InnoDB
max_allowed_packet=512M
max_connections=2048
open_files_limit=65535

skip-name-resolve
lower_case_table_names=1

character-set-server=utf8mb4
collation-server=utf8mb4_unicode_ci
init_connect='SET NAMES utf8mb4'

innodb_buffer_pool_size=1024M
innodb_log_file_size=2048M
innodb_file_per_table=1
innodb_flush_log_at_trx_commit=0

key_buffer_size=64M

log-error=/data/log/mysql_error.log

slow_query_log=1
slow_query_log_file=/data/log/mysql_slow_query.log
long_query_time=5

tmp_table_size=32M
max_heap_table_size=32M
query_cache_type=0
query_cache_size=0#mysql replication配置server-id=2

[root@node8 ~]# systemctl restart mysqld
[root@node8 ~]# systemctl status mysqld
● mysqld.service - MySQL Server
   Loaded: loaded (/usr/lib/systemd/system/mysqld.service; enabled; vendor preset: disabled)
   Active: active (running) since Thu 2019-12-12 15:02:28 CST; 27s ago
     Docs: man:mysqld(5.7)
           http://dev.mysql.com/doc/refman/en/using-systemd.html
  Process: 24078 ExecStart=/usr/local/mysql/bin/mysqld --daemonize --pid-file=/data/run/mysql.pid $MYSQLD_OPTS (code=exited, status=0/SUCCESS)
 Main PID: 24080 (mysqld)
   CGroup: /system.slice/mysqld.service
           └─24080 /usr/local/mysql/bin/mysqld --daemonize --pid-file=/data/run/mysql.pid

Dec 12 15:02:25 node8 systemd[1]: Starting MySQL Server...
Dec 12 15:02:28 node8 systemd[1]: Started MySQL Server.
9.4.4 配置从数据库服务器node9
9.4.4.1 创建需要同步的数据库及其表
[root@node9 ~]# mysql -uroot -p123456

mysql> create database hotdata;     #创建热点数据库
Query OK, 1 row affected (0.70 sec)

mysql> use hotdata;
Database changed
#创建顾客表
mysql> create table customers(cust_id int,cust_name varchar(30),cust_address varchar(50),cust_city varchar(30),cust_state varchar(50),cust_email varchar(30),cust_country varchar(50));
Query OK, 0 rows affected (0.44 sec)

mysql> desc customers;   #查看表结构
+--------------+-------------+------+-----+---------+-------+
| Field        | Type        | Null | Key | Default | Extra |
+--------------+-------------+------+-----+---------+-------+
| cust_id      | int(11)     | YES  |     | NULL    |       |
| cust_name    | varchar(30) | YES  |     | NULL    |       |
| cust_address | varchar(50) | YES  |     | NULL    |       |
| cust_city    | varchar(30) | YES  |     | NULL    |       |
| cust_state   | varchar(50) | YES  |     | NULL    |       |
| cust_email   | varchar(30) | YES  |     | NULL    |       |
| cust_country | varchar(50) | YES  |     | NULL    |       |
+--------------+-------------+------+-----+---------+-------+
7 rows in set (0.36 sec)

mysql> exit
Bye
9.4.4.2 修改node9的MySQL配置文件
[root@node9 ~]# vim /etc/my.cnf
[root@node9 ~]# cat /etc/my.cnf
[client]
port=3306
socket=/data/run/mysql.sock
default-character-set=utf8

[mysqld]
port=3306
socket=/data/run/mysql.sock
pid_file=/data/run/mysql.pid
datadir=/data/data
default_storage_engine=InnoDB
max_allowed_packet=512M
max_connections=2048
open_files_limit=65535

skip-name-resolve
lower_case_table_names=1

character-set-server=utf8mb4
collation-server=utf8mb4_unicode_ci
init_connect='SET NAMES utf8mb4'

innodb_buffer_pool_size=1024M
innodb_log_file_size=2048M
innodb_file_per_table=1
innodb_flush_log_at_trx_commit=0

key_buffer_size=64M

log-error=/data/log/mysql_error.log

slow_query_log=1
slow_query_log_file=/data/log/mysql_slow_query.log
long_query_time=5

tmp_table_size=32M
max_heap_table_size=32M
query_cache_type=0
query_cache_size=0#mysql replication配置server-id=3

[root@node9 ~]# systemctl restart mysqld
[root@node9 ~]# systemctl status mysqld
● mysqld.service - MySQL Server
   Loaded: loaded (/usr/lib/systemd/system/mysqld.service; enabled; vendor preset: disabled)
   Active: active (running) since Thu 2019-12-12 15:02:27 CST; 28s ago
     Docs: man:mysqld(5.7)
           http://dev.mysql.com/doc/refman/en/using-systemd.html
  Process: 27714 ExecStart=/usr/local/mysql/bin/mysqld --daemonize --pid-file=/data/run/mysql.pid $MYSQLD_OPTS (code=exited, status=0/SUCCESS)
 Main PID: 27716 (mysqld)
   CGroup: /system.slice/mysqld.service
           └─27716 /usr/local/mysql/bin/mysqld --daemonize --pid-file=/data/run/mysql.pid

Dec 12 15:02:25 node9 systemd[1]: Starting MySQL Server...
Dec 12 15:02:27 node9 systemd[1]: Started MySQL Server.
9.4.5 在slave上配置master(所有节点)
四台MySQL都扮演slave的角色,所以所有节点都要配置
#在所有节点的MySQL上执行如下
mysql> stop slave;
Query OK, 0 rows affected, 1 warning (0.00 sec)

mysql> reset slave;
Query OK, 0 rows affected (0.00 sec)

mysql> reset master;
Query OK, 0 rows affected (0.03 sec)

#因为node6和node9是node7的从,node7和node8是node6的从

#所以在node6和node9上执行
mysql> change master to master_host='192.168.110.188',master_user='copy',master_password='123456';
Query OK, 0 rows affected, 2 warnings (0.02 sec)

#在node7和node8上执行
mysql> change master to master_host='192.168.110.185',master_user='copy',master_password='123456';
Query OK, 0 rows affected, 2 warnings (0.04 sec)
9.4.6 启动slave,让四台MySQL进入主从复制状态
#在所有MySQL节点上执行
#mysql> start slave;
#mysql> show master status\G
#mysql> show slave status\G
#如果执行show slave status\G之后,Slave_IO_Running和Slave_SQL_Running均为yes,则说明主从同步成功

#下面以node6为例,其他节点类似
mysql> start slave;
Query OK, 0 rows affected (0.05 sec)

mysql> show master status\G
*************************** 1. row ***************************
             File: mysql-bin.000001
         Position: 154
     Binlog_Do_DB: hotdata
 Binlog_Ignore_DB: mysql
Executed_Gtid_Set:
1 row in set (0.00 sec)

mysql> show slave status\G
*************************** 1. row ***************************
               Slave_IO_State: Waiting for master to send event
                  Master_Host: 192.168.110.188
                  Master_User: copy
                  Master_Port: 3306
                Connect_Retry: 60
              Master_Log_File: mysql-bin.000001
          Read_Master_Log_Pos: 154
               Relay_Log_File: node6-relay-bin.000002
                Relay_Log_Pos: 367
        Relay_Master_Log_File: mysql-bin.000001
             Slave_IO_Running: Yes
            Slave_SQL_Running: Yes
              Replicate_Do_DB:
          Replicate_Ignore_DB:
           Replicate_Do_Table:
       Replicate_Ignore_Table:
      Replicate_Wild_Do_Table:
  Replicate_Wild_Ignore_Table:
                   Last_Errno: 0
                   Last_Error:
                 Skip_Counter: 0
          Exec_Master_Log_Pos: 154
              Relay_Log_Space: 574
              Until_Condition: None
               Until_Log_File:
                Until_Log_Pos: 0
           Master_SSL_Allowed: No
           Master_SSL_CA_File:
           Master_SSL_CA_Path:
              Master_SSL_Cert:
            Master_SSL_Cipher:
               Master_SSL_Key:
        Seconds_Behind_Master: 0
Master_SSL_Verify_Server_Cert: No
                Last_IO_Errno: 0
                Last_IO_Error:
               Last_SQL_Errno: 0
               Last_SQL_Error:
  Replicate_Ignore_Server_Ids:
             Master_Server_Id: 1
                  Master_UUID: a8da7421-157f-11ea-b1bf-000c297c0226
             Master_Info_File: /data/data/master.info
                    SQL_Delay: 0
          SQL_Remaining_Delay: NULL
      Slave_SQL_Running_State: Slave has read all relay log; waiting for more updates
           Master_Retry_Count: 86400
                  Master_Bind:
      Last_IO_Error_Timestamp:
     Last_SQL_Error_Timestamp:
               Master_SSL_Crl:
           Master_SSL_Crlpath:
           Retrieved_Gtid_Set:
            Executed_Gtid_Set:
                Auto_Position: 0
         Replicate_Rewrite_DB:
                 Channel_Name:
           Master_TLS_Version:
1 row in set (0.00 sec)

mysql> exit
Bye
9.4.7 测试验证双主双从
#测试一:在node6上插入一条数据,其他所有mysql都应该同步这条数据
#测试二:在node7上插入一条数据,其他所有mysql都应该同步这条数据
#测试三:停止node6上的MySQL(模拟故障),在node7上插入一条数据,只有node9上同步该数据,重启node6之后(模拟故障恢复),node6和node8也应该同步该数据。

#如果上述测试都通过,则说明MySQL双主双从架构搭建完毕并功能无误。
9.5 总结
MySQL主从同步之多主多从架构可以实现MySQL服务的高可用,即使一个MySQL主数据库宕机,使用另外一个主数据库替代即可,避免了数据的不同步和服务的不可用。

- mysql主从复制(半同步方式)
- mysql 的主从架构,复制,半同步,ssl加密复制的实现
- Mysql主从复制(同步原理及搭建过程)
- 【大型网站技术实践】初级篇:搭建MySQL主从复制经典架构
- MySQL 主从同步架构中你不知道的“坑”(完结篇)
- Mysql主从同步搭建
- MYSQL5.6/5.0管理之主从同步管理 及搭建主从库
- mysql 架构篇系列 4 复制架构一主一从搭建(半同步复制)
- MySQL--------基于GTID半同步搭建主从
- MySQL 主从复制架构之单主模型与半同步复制
- mysql搭建主从同步服务
- MySQL搭建主从同步设置
- MySQL 服务器主从同步架构安装配置学习记录
- 搭建mysql主从数据库实现双机热备架构
- Mysql主从同步架构图和原理
- mysql主从复制,半同步,主主复制架构的实现
- MySQL架构优化实战系列2:主从复制同步与查询性能调优
- 如何使用Docker搭建MySQL主从复制架构
- mysql主从复制,半同步,主主复制架构的实现
- mysql主从同步搭建