【博客大赛】+ 网络编程Netty之ByteBuf详解
Netty中的ByteBuf优势
NIO使用的ByteBuffer有哪些缺点
1: 无法动态扩容,ByteBuffer的长度是固定的,是初始指定的值,不能够再进行扩容了,当写入的内容大于ByteBuffer的容量时,会报越界异常
2.: API使用复杂,当要读取数据时,需要调用buffer.flip()方法,转换为读取模式,如果稍微不注意就可能出现错误,读取不到数据或者读取的数据是错误的
ByteBuf的优势和做了哪些增强
1: API操作起来更加的方便,可以直接写或者直接读
2:支持动态扩容,当写入的数据大于ByteBuf的容量时,会动态扩容,不会报错
3:提供了多种ByteBuf的实现,可以更加灵活的使用
4:提供了高效的零拷贝机制
5:ByteBuf可以内存复用
ByteBuf操作示例
ByteBuf操作
==ByteBuf中有三个重要的属性:==
1:capacity容量,初始指定的ByteBuf的大小
2:readIndex读取位置,顺序读的时候,记录读取数据的索引值
3:writeIndex写入位置,顺序写的时候,记录写入数据的索引值
==ByteBuf常用的方法:==
1:getByte和setByte,获取指定索引处的数据,是随机获取的,不会改变readIndex和writeIndex的值
2:read*,顺序读,会改变readIndex的值
3:write*,顺序写,会改变writeIndex的值
4:discardReadBytes,清除读过的内容
5:clear,清除缓冲区
6:搜索操作
7:标记和重置
8:引用计数和释放
简单的Demo示例
/**
* ByteBuf的使用示例
*/
public class ByteBufDemo {
public static void main(String[] args) {
//分配非池化,10个字节的ByteBuf
ByteBuf buf = Unpooled.buffer(10);
//看下ByteBuf
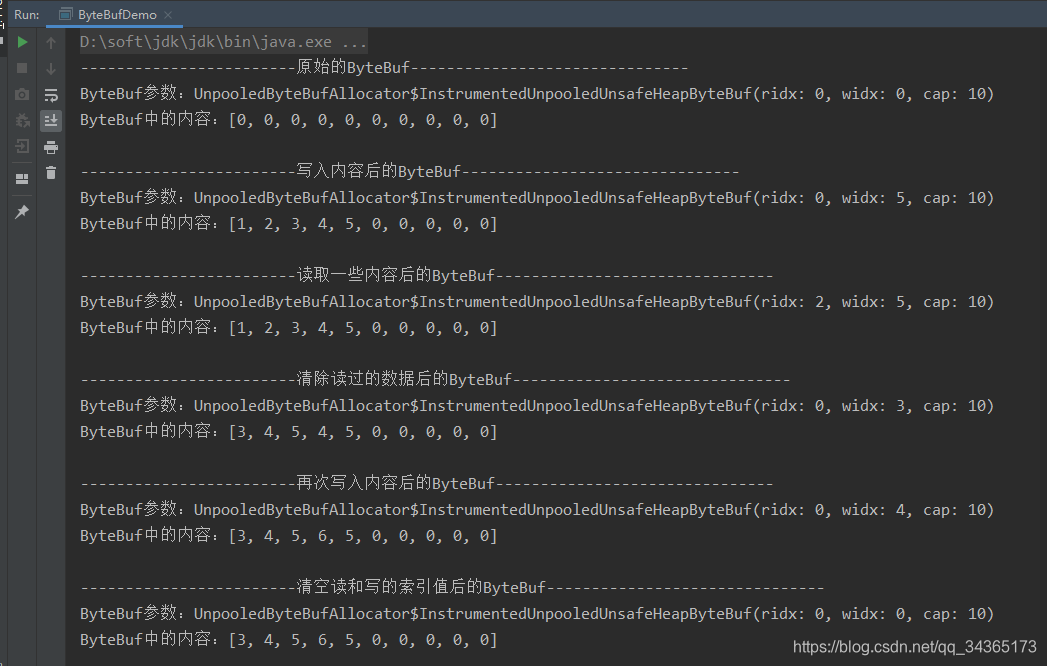
System.out.println("------------------------原始的ByteBuf-------------------------------");
System.out.println("ByteBuf参数:" + buf.toString());
System.out.println("ByteBuf中的内容:" + Arrays.toString(buf.array()) + "\n");
//写入内容到ByteBuf
byte[] bytes = {1, 2, 3, 4, 5};
buf.writeBytes(bytes);
System.out.println("------------------------写入内容后的ByteBuf-------------------------------");
System.out.println("ByteBuf参数:" + buf.toString());
System.out.println("ByteBuf中的内容:" + Arrays.toString(buf.array()) + "\n");
//从ByteBuf中读取内容
buf.readByte();
buf.readByte();
System.out.println("------------------------读取一些内容后的ByteBuf-------------------------------");
System.out.println("ByteBuf参数:" + buf.toString());
System.out.println("ByteBuf中的内容:" + Arrays.toString(buf.array()) + "\n");
//清除读过的内容
//把读过的数据清除后,readIndex变为0,writeIndex变为3
//后面尚未读取的内容,会复制到前面去,把原来的值覆盖掉
//再次写入时,3,4,5后面的4,5会被覆盖掉
buf.discardReadBytes();
System.out.println("------------------------清除读过的数据后的ByteBuf-------------------------------");
System.out.println("ByteBuf参数:" + buf.toString());
System.out.println("ByteBuf中的内容:" + Arrays.toString(buf.array()) + "\n");
//再次写入内容到ByteBuf
byte[] bytesO = {6};
buf.writeBytes(bytesO);
System.out.println("------------------------再次写入内容后的ByteBuf-------------------------------");
System.out.println("ByteBuf参数:" + buf.toString());
System.out.println("ByteBuf中的内容:" + Arrays.toString(buf.array()) + "\n");
//清空读和写的索引值
//readIndex和writeIndex会重置为0,ByteBuf中的内容并不会重置
buf.clear();
System.out.println("------------------------清空读和写的索引值后的ByteBuf-------------------------------");
System.out.println("ByteBuf参数:" + buf.toString());
System.out.println("ByteBuf中的内容:" + Arrays.toString(buf.array()) + "\n");
//再次写入内容到ByteBuf
byte[] bytes2 = {1, 2, 3};
buf.writeBytes(bytes2);
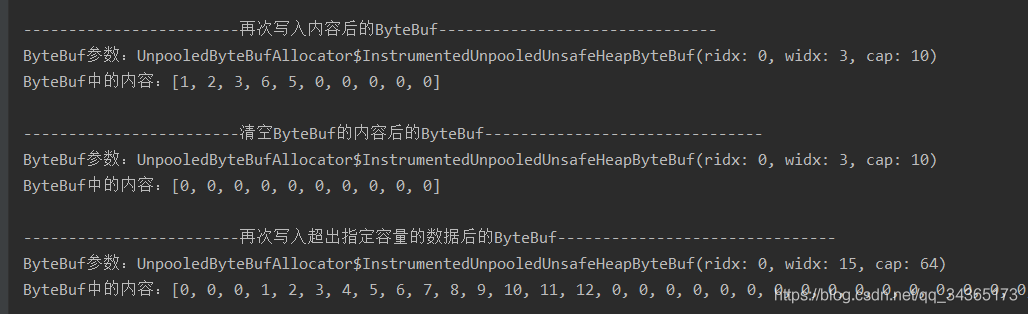
System.out.println("------------------------再次写入内容后的ByteBuf-------------------------------");
System.out.println("ByteBuf参数:" + buf.toString());
System.out.println("ByteBuf中的内容:" + Arrays.toString(buf.array()) + "\n");
//清空ByteBuf的内容
//不会重置readIndex和writeIndex
buf.setZero(0, buf.capacity());
System.out.println("------------------------清空ByteBuf的内容后的ByteBuf-------------------------------");
System.out.println("ByteBuf参数:" + buf.toString());
System.out.println("ByteBuf中的内容:" + Arrays.toString(buf.array()) + "\n");
//再次写入超出指定容量的数据到ByteBuf
//会进行扩容
byte[] bytes3 = {1, 2, 3, 4, 5, 6, 7, 8, 9, 10, 11, 12};
buf.writeBytes(bytes3);
System.out.println("------------------------再次写入超出指定容量的数据后的ByteBuf-------------------------------");
System.out.println("ByteBuf参数:" + buf.toString());
System.out.println("ByteBuf中的内容:" + Arrays.toString(buf.array()) + "\n");
}
}
输出结果:
上面的例子是使用堆内的ByteBuf,下面看下堆外的ByteBuf例子:
//分配非池化,10个字节的directBuffer
ByteBuf buf = Unpooled.directBuffer(10);

//看下ByteBuf
System.out.println("------------------------原始的ByteBuf-------------------------------");
System.out.println("ByteBuf参数:" + buf.toString());
directBuffer不能够使用array方法,否则会报错:java.lang.UnsupportedOperationException: direct buffer;而且使用ByteBuf是用它底层的分配器分配的,不是new一个出来,下面会具体说下。

上图中,可以看到,readIndex和writeIndex把缓冲区分成了三块,readIndex会小于或者等于writeIndex,这个应该好理解,我还没有写到那里,你就去读取了,能读取到什么呢。
堆内和堆外内存
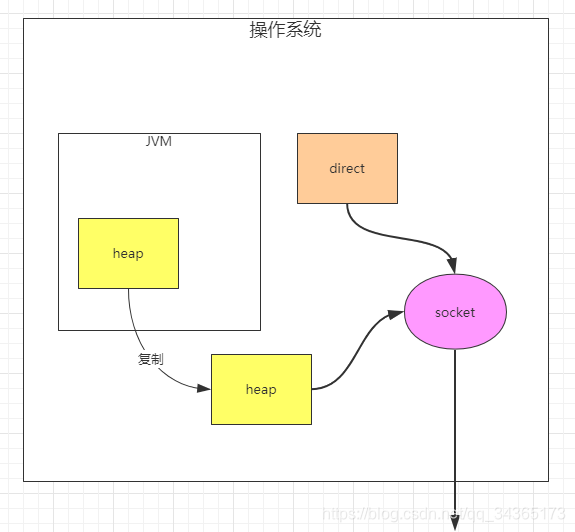
socket是操作系统底层提供给上层应用使用的网络通信API,当要去读取或者写入的数据在JVM的堆中,那么就先需要把JVM堆中需要读取的数据拷贝一份到操作系统中,然后socket再去读取,而直接内存的好处是socket可以直接读取,少了拷贝这一步操作。
ByteBuf动态扩容
下面以堆内的ByteBuf为例,查看源码,分析ByteBuf的动态扩容:
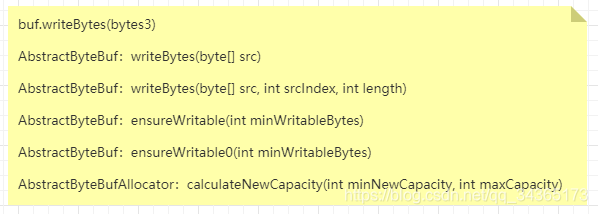
动态扩容肯定是写入数据的时候,ByteBuf的容量不够了,才去扩容的,所以需要跟踪下面的代码:
buf.writeBytes(bytes);
跟踪上面的writeBytes,首先进入了ByteBuf这个抽象类中,进入了下面这个抽象方法:
public abstract ByteBuf writeBytes(byte[] src);
它的实现类如下:
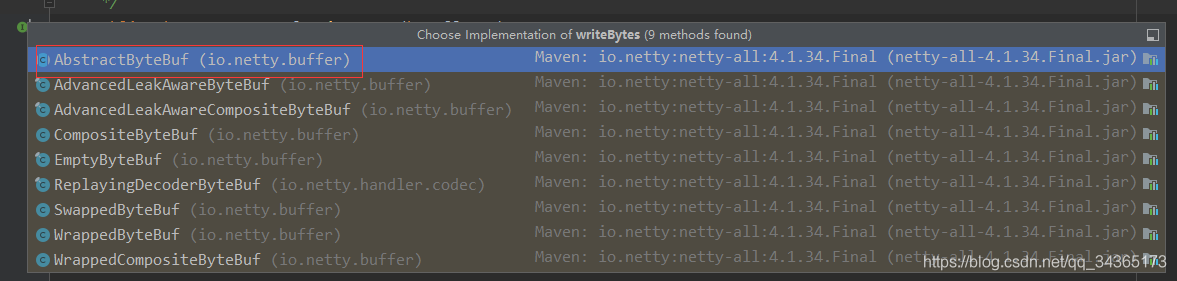
进入第一个AbstractByteBuf的方法:
@Override
public ByteBuf writeBytes(byte[] src) {
writeBytes(src, 0, src.length);
return this;
}
再次调用了下面的方法:
@Override
public ByteBuf writeBytes(byte[] src, int srcIndex, int length) {
//检查是否可以写入
ensureWritable(length);
setBytes(writerIndex, src, srcIndex, length);
//把当前的写入位置加上写入数据的长度
writerIndex += length;
return this;
}
src是需要写入的数据,length是写入数据的长度
然后会进入ensureWritable方法,传入的参数是:写入数据的长度
@Override
public ByteBuf ensureWritable(int minWritableBytes) {
//参数校验
checkPositiveOrZero(minWritableBytes, "minWritableBytes");
//检查容量是否可以写入这么多数据
ensureWritable0(minWritableBytes);
return this;
}
//检查参数是否小于0
public static int checkPositiveOrZero(int i, String name) {
if (i < 0) {
throw new IllegalArgumentException(name + ": " + i + " (expected: >= 0)");
}
return i;
}
参数校验完成后会进入ensureWritable0方法:
final void ensureWritable0(int minWritableBytes) {
//确保缓冲区可以访问
ensureAccessible();
//如果写入的数据长度小于等于剩余可写数据的容量,就直接返回
//就是说,容量足够写入,不需要扩容
if (minWritableBytes <= writableBytes()) {
return;
}
if (checkBounds) {
//maxCapacity是int的最大值
//检查写入的数据长度是否比可以写入的最大容量还要大
//是的话就抛异常
if (minWritableBytes > maxCapacity - writerIndex) {
throw new IndexOutOfBoundsException(String.format(
"writerIndex(%d) + minWritableBytes(%d) exceeds maxCapacity(%d): %s",
writerIndex, minWritableBytes, maxCapacity, this));
}
}

//正式的扩容方法
int newCapacity = alloc().calculateNewCapacity(writerIndex + minWritableBytes, maxCapacity);

//把扩容后的新容量设置进去
capacity(newCapacity);
}
进入AbstractByteBufAllocator类的扩容方法:
//常量 4M
static final int CALCULATE_THRESHOLD = 1048576 * 4; // 4 MiB page

@Override
public int calculateNewCapacity(int minNewCapacity, int maxCapacity) {
//校验参数
checkPositiveOrZero(minNewCapacity, "minNewCapacity");
//minNewCapacity = writerIndex + minWritableBytes
//已经写入的数据索引加上当前写入的数据长度,就是需要的最小的容量
//判断是否比最大容量还大,是的话就抛异常
if (minNewCapacity > maxCapacity) {
throw new IllegalArgumentException(String.format(
"minNewCapacity: %d (expected: not greater than maxCapacity(%d)",
minNewCapacity, maxCapacity));
}
final int threshold = CALCULATE_THRESHOLD; // 4 MiB page
//如果需要的最小容量等于4M,就直接返回4M,作为扩容后的容量
if (minNewCapacity == threshold) {
return threshold;
}

//如果需要的最小容量大于4M,就按照下面的扩容方式扩容
if (minNewCapacity > threshold) {
//newCapacity = 15 / 4194304 * 4194304
int newCapacity = minNewCapacity / threshold * threshold;
//如果计算出的容量大于最大容量减去4M,就把最大容量赋值给新的容量
if (newCapacity > maxCapacity - threshold) {
newCapacity = maxCapacity;
} else {
newCapacity += threshold;
}
return newCapacity;
}

//如果需要的最小容量小于4M,就按照下面的方式扩容
int newCapacity = 64;
while (newCapacity < minNewCapacity) {
newCapacity <<= 1;
}

return Math.min(newCapacity, maxCapacity);
}
再看下capacity方法:
下面的把扩容后的容量放到ByteBuf,就是使用了arraycopy方法
@Override
public ByteBuf capacity(int newCapacity) {
checkNewCapacity(newCapacity);

int oldCapacity = array.length;
byte[] oldArray = array;
if (newCapacity > oldCapacity) {
byte[] newArray = allocateArray(newCapacity);
System.arraycopy(oldArray, 0, newArray, 0, oldArray.length);
setArray(newArray);
freeArray(oldArray);
} else if (newCapacity < oldCapacity) {
byte[] newArray = allocateArray(newCapacity);
int readerIndex = readerIndex();
if (readerIndex < newCapacity) {
int writerIndex = writerIndex();
if (writerIndex > newCapacity) {
writerIndex(writerIndex = newCapacity);
}
System.arraycopy(oldArray, readerIndex, newArray, readerIndex, writerIndex - readerIndex);
} else {
setIndex(newCapacity, newCapacity);
}
setArray(newArray);
freeArray(oldArray);
}
return this;
}
下面是跟踪的代码步骤:
==总结下动态扩容机制:==
1:write*方法调用的时候,会通过ensureWritable0方法检查
2:calculateNewCapacity方法是用来计算容量的方法
==扩容计算方法:==
1:需要的容量没有超过4M,会从64字节开始扩容,每次增加一倍,直到计算出来的容量满足需要的最小容量,假如,当前大小是256,已经写入了200字节,再次写入60字节,需要的最小容量是260字节,那么扩容后的容量是64 2 2 2=512
2:需要的容量超过4M,扩容计算方法为:新容量 = 新容量的最小要求 / 4M 4M + 4M,假如当前大小是3M,已经写了2M,再写入3M,需要的最小容量是5M,那么扩容后的容量是 5 / 4 * 4 + 4 = 8M
图示1:需要的容量小于4M:

图示2:需要的容量大于4M:

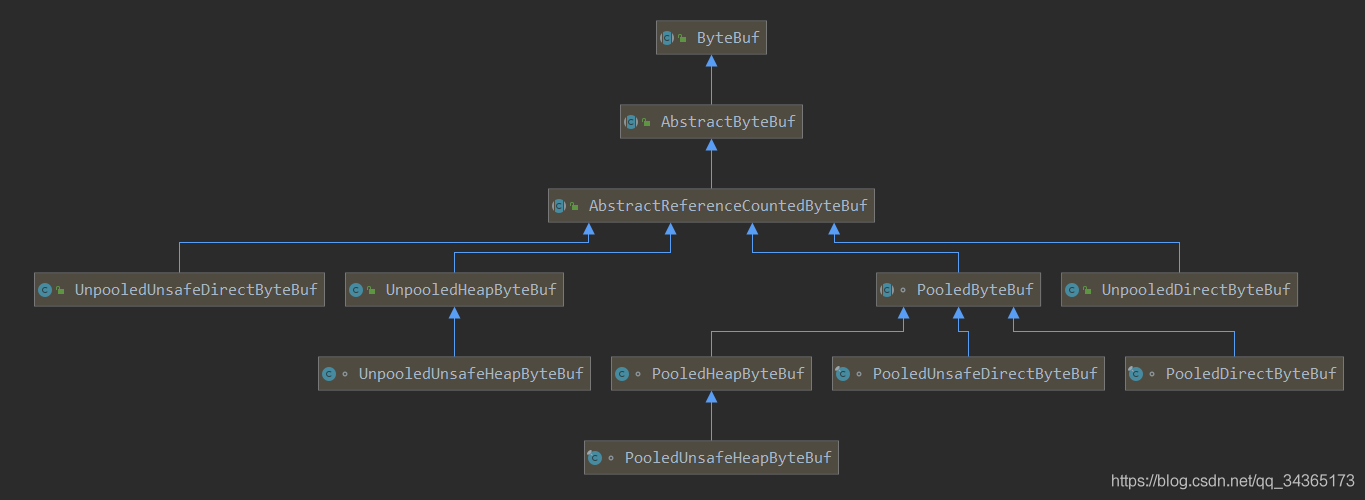
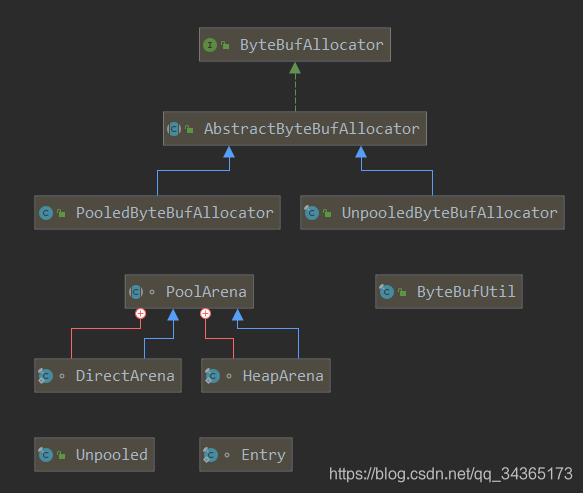
ByteBuf有哪些实现
ByteBuf从3个维度,有8种实现方式:
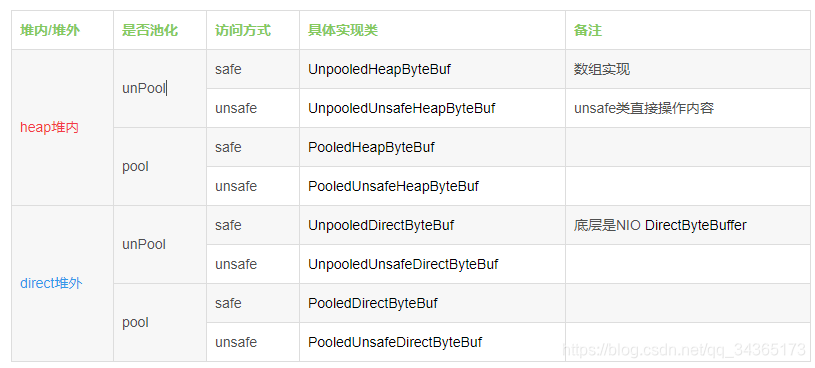
ByteBuf类图
//堆内
ByteBuf buf = Unpooled.buffer(10);
//堆外
ByteBuf buf = Unpooled.directBuffer(10);
ByteBuf提供了Unpooled非池化的类,可以直接使用,没有提供Pool池化的类,下面追踪源码看下ByteBuf是怎样分配的:
Unpooled.buffer分配方式
首先进入Unpooled类:
private static final ByteBufAllocator ALLOC = UnpooledByteBufAllocator.DEFAULT;
//使用默认的分配器分配堆内buffer
public static ByteBuf buffer(int initialCapacity) {
return ALLOC.heapBuffer(initialCapacity);
}
下面会进入接口类ByteBufAllocator:
//分配一个指定容量的堆内buf
ByteBuf heapBuffer(int initialCapacity);
然后进入AbstractByteBufAllocator抽象类:
//如果没有指定初始容量,默认的初始容量大小是256
static final int DEFAULT_INITIAL_CAPACITY = 256;
//最大容量,为int的最大值
static final int DEFAULT_MAX_CAPACITY = Integer.MAX_VALUE;

@Override
public ByteBuf heapBuffer(int initialCapacity) {
return heapBuffer(initialCapacity, DEFAULT_MAX_CAPACITY);
}

@Override
public ByteBuf heapBuffer(int initialCapacity, int maxCapacity) {
//如果初始化的容量是0,最大的容量也是0,就返回一个空的Buf
if (initialCapacity == 0 && maxCapacity == 0) {
return emptyBuf;
}
validate(initialCapacity, maxCapacity);
return newHeapBuffer(initialCapacity, maxCapacity);
}

//校验参数
private static void validate(int initialCapacity, int maxCapacity) {
//检查参数
checkPositiveOrZero(initialCapacity, "initialCapacity");
//如果初始化的容量大于最大容量,就抛异常
if (initialCapacity > maxCapacity) {
throw new IllegalArgumentException(String.format(
"initialCapacity: %d (expected: not greater than maxCapacity(%d)",
initialCapacity, maxCapacity));
}
}
然后是newHeapBuffer抽象方法:
protected abstract ByteBuf newHeapBuffer(int initialCapacity, int maxCapacity);
因为这里初始化的是非池化的,所以会进入UnpooledByteBufAllocator类:
@Override
protected ByteBuf newHeapBuffer(int initialCapacity, int maxCapacity) {
//PlatformDependent.hasUnsafe()是检查当前操作系统是否支持unsafe操作
//根据支持与否,进入不同的类
return PlatformDependent.hasUnsafe() ?
new InstrumentedUnpooledUnsafeHeapByteBuf(this, initialCapacity, maxCapacity) :
new InstrumentedUnpooledHeapByteBuf(this, initialCapacity, maxCapacity);
}
支持Unsafe操作的进入下面:
InstrumentedUnpooledUnsafeHeapByteBuf(UnpooledByteBufAllocator alloc, int initialCapacity, int maxCapacity) {
super(alloc, initialCapacity, maxCapacity);
}
不支持Unsafe的进入下面这个:
InstrumentedUnpooledHeapByteBuf(UnpooledByteBufAllocator alloc, int initialCapacity, int maxCapacity) {
super(alloc, initialCapacity, maxCapacity);
}
现在以支持Unsafe操作往下面走,进入UnpooledUnsafeHeapByteBuf类:
UnpooledUnsafeHeapByteBuf(ByteBufAllocator alloc, int initialCapacity, int maxCapacity) {
super(alloc, initialCapacity, maxCapacity);
}
再次调用了父类UnpooledHeapByteBuf:
//分配器
private final ByteBufAllocator alloc;
//byte数组,ByteBuf数据底层就是使用这个存储
byte[] array;

public UnpooledHeapByteBuf(ByteBufAllocator alloc, int initialCapacity, int maxCapacity) {
super(maxCapacity);

//检查分配器是否为空
checkNotNull(alloc, "alloc");
//如果初始化的容量大于最大容量,就抛异常
if (initialCapacity > maxCapacity) {
throw new IllegalArgumentException(String.format(
"initialCapacity(%d) > maxCapacity(%d)", initialCapacity, maxCapacity));
}

this.alloc = alloc;
//设置当前的数组是分配之后的数组
setArray(allocateArray(initialCapacity));
//初始化readIndex和writeIndex
setIndex(0, 0);
}

//分配数组
protected byte[] allocateArray(int initialCapacity) {
//返回一个具有initialCapacity容量大小的byte数组
return new byte[initialCapacity];
}

//set数组
private void setArray(byte[] initialArray) {
array = initialArray;
tmpNioBuf = null;
}
AbstractByteBuf类下的setIndex方法:
//初始化readerIndex和writerIndex
@Override
public ByteBuf setIndex(int readerIndex, int writerIndex) {
if (checkBounds) {
checkIndexBounds(readerIndex, writerIndex, capacity());
}
setIndex0(readerIndex, writerIndex);
return this;
}

final void setIndex0(int readerIndex, int writerIndex) {
this.readerIndex = readerIndex;
this.writerIndex = writerIndex;
}
上面走到AbstractByteBuf后,就分配完了一个非池化、堆内的ByteBuf,下面是追踪的代码:
==总结:==
可以看到,分配一个非池化、堆内的ByteBuf,它的底层就是byte数组
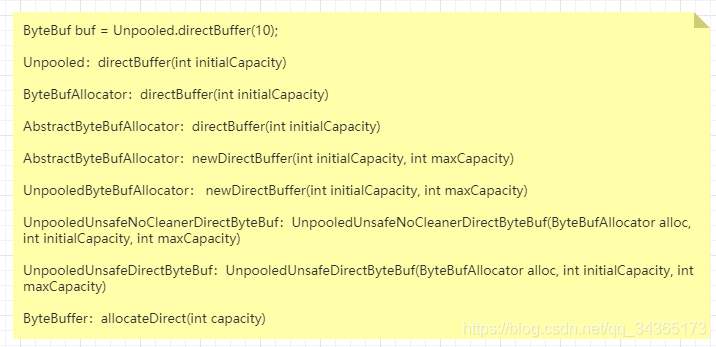
Unpooled.directBuffer分配方式
首先进入的也是Unpooled类:
public static ByteBuf directBuffer(int initialCapacity) {
return ALLOC.directBuffer(initialCapacity);
}
然后进入ByteBufAllocator抽象类:
ByteBuf directBuffer(int initialCapacity);
然后到AbstractByteBufAllocator类:
@Override
public ByteBuf directBuffer(int initialCapacity) {
return directBuffer(initialCapacity, DEFAULT_MAX_CAPACITY);
}

@Override
public ByteBuf directBuffer(int initialCapacity, int maxCapacity) {
//如果初始化的容量和最大容量都是0,就返回一个空的Buf
if (initialCapacity == 0 && maxCapacity == 0) {
return emptyBuf;
}
//校验参数
validate(initialCapacity, maxCapacity);
return newDirectBuffer(initialCapacity, maxCapacity);
}

protected abstract ByteBuf newDirectBuffer(int initialCapacity, int maxCapacity);
由于分配的也是一个非池化的,所以newDirectBuffer会进入UnpooledByteBufAllocator类中的实现类:
@Override
protected ByteBuf newDirectBuffer(int initialCapacity, int maxCapacity) {
final ByteBuf buf;
//同样的,会判断是否支持unsafe操作
if (PlatformDependent.hasUnsafe()) {
buf = noCleaner ? new InstrumentedUnpooledUnsafeNoCleanerDirectByteBuf(this, initialCapacity, maxCapacity) :
new InstrumentedUnpooledUnsafeDirectByteBuf(this, initialCapacity, maxCapacity);
} else {
buf = new InstrumentedUnpooledDirectByteBuf(this, initialCapacity, maxCapacity);
}
return disableLeakDetector ? buf : toLeakAwareBuffer(buf);
}
以InstrumentedUnpooledUnsafeNoCleanerDirectByteBuf为例,后面两个其实也相差不大,进入UnpooledUnsafeNoCleanerDirectByteBuf类的构造方法:
UnpooledUnsafeNoCleanerDirectByteBuf(ByteBufAllocator alloc, int initialCapacity, int maxCapacity) {
super(alloc, initialCapacity, maxCapacity);
}
再次调用的父类UnpooledUnsafeDirectByteBuf:
ByteBuffer buffer;

public UnpooledUnsafeDirectByteBuf(ByteBufAllocator alloc, int initialCapacity, int maxCapacity) {
super(maxCapacity);
if (alloc == null) {
throw new NullPointerException("alloc");
}
//校验参数
checkPositiveOrZero(initialCapacity, "initialCapacity");
checkPositiveOrZero(maxCapacity, "maxCapacity");
if (initialCapacity > maxCapacity) {
throw new IllegalArgumentException(String.format(
"initialCapacity(%d) > maxCapacity(%d)", initialCapacity, maxCapacity));
}

this.alloc = alloc;
setByteBuffer(allocateDirect(initialCapacity), false);
}

//分配的是一个NIO中的ByteBuffer
protected ByteBuffer allocateDirect(int initialCapacity) {
return ByteBuffer.allocateDirect(initialCapacity);
}

final void setByteBuffer(ByteBuffer buffer, boolean tryFree) {
if (tryFree) {
ByteBuffer oldBuffer = this.buffer;
if (oldBuffer != null) {
if (doNotFree) {
doNotFree = false;
} else {
freeDirect(oldBuffer);
}
}
}
this.buffer = buffer;
memoryAddress = PlatformDependent.directBufferAddress(buffer);
tmpNioBuf = null;
capacity = buffer.remaining();
}
ByteBuffer类下面的allocateDirect:
public static ByteBuffer allocateDirect(int capacity) {
return new DirectByteBuffer(capacity);
}
代码跟踪图:
==总结:==
分配非池化、堆外的ByteBuf,可以看到底层是NIO的DirectByteBuffer实现的
ByteBufAllocator类图
ByteBuf内存复用
分配池化内存
在上面根据源码知道了怎么去分配非池化内存,那么池化内存要怎么分配呢?看下面的图示:

上面就是分配池化内存的步骤,接下来会根据源码具体分析
内存缓存池
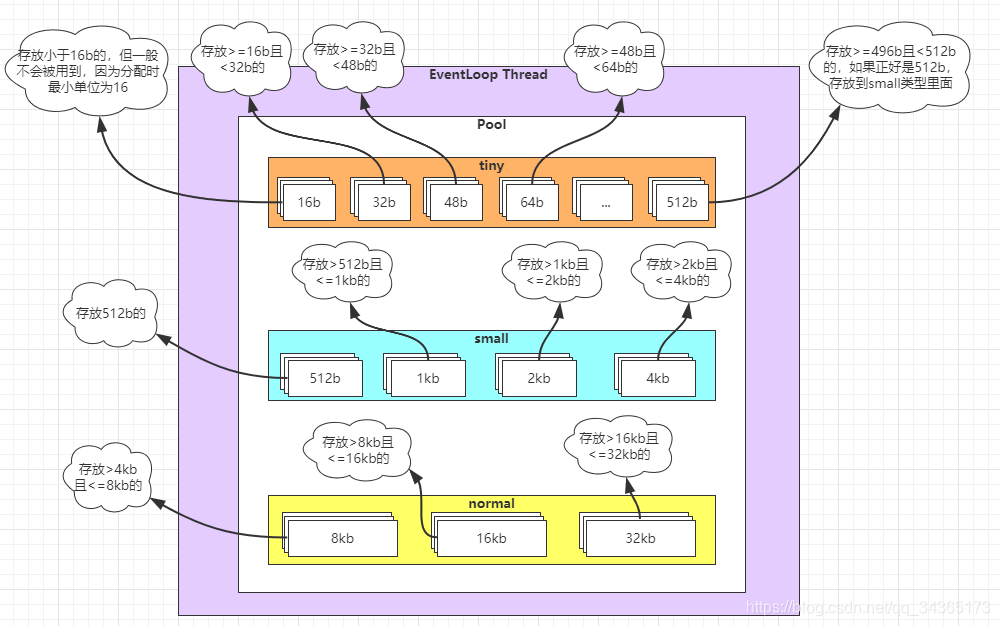
jemalloc内存分配机制
1:内存池中有三大区域,分别是:tiny、small、normal
2:每个区域分了不同大小的格子,每个格子只能缓存对应大小的内存块
3:支持最大的格子内存是32kb,超过这个大小的不能被缓存,只能被释放掉
4:每个类型的格子都有对应的数量:tiny:512个,small:256个,normal:64个,例如tiny区域的每个大小的格子都有512个,如果满了就不会被回收,内存会被释放掉
回收池化内存

分配池化内存的过程
上面分析了分配非池化内存,下面看下怎么分配池化内存:
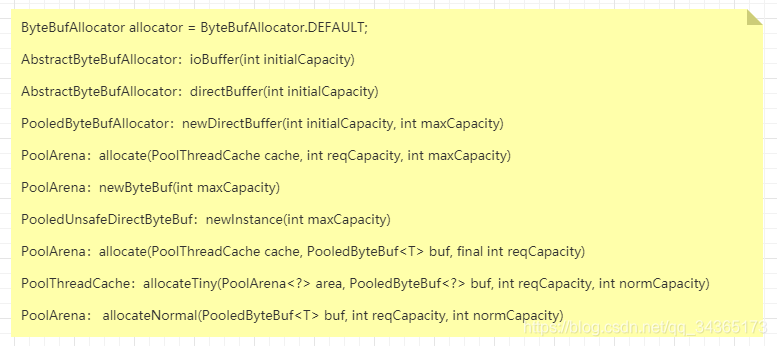
ByteBufAllocator allocator = ByteBufAllocator.DEFAULT;
//分配的内存最大长度为496
ByteBuf buf1 = allocator.ioBuffer(495);
System.out.printf("buf1: 0x%X%n", buf1.memoryAddress());
//此时会被回收到tiny的512b格子中
buf1.release();

//从tiny的512b格子去取
ByteBuf buf2 = allocator.ioBuffer(495);
System.out.printf("buf2: 0x%X%n", buf2.memoryAddress());
buf2.release();
先来看下ByteBufAllocator类:
//默认ByteBuf分配器,在ByteBufUtil中初始化
ByteBufAllocator DEFAULT = ByteBufUtil.DEFAULT_ALLOCATOR;
跟踪第一次的allocator.ioBuffer(495)代码,首先进入AbstractByteBufAllocator类:
@Override
public ByteBuf ioBuffer(int initialCapacity) {
//如果支持Unsafe,就分配堆外内存
if (PlatformDependent.hasUnsafe()) {
return directBuffer(initialCapacity);
}
//不支持Unsafe,就分配堆内内存
return heapBuffer(initialCapacity);
}
然后调用了该类下面的directBuffer方法:
@Override
public ByteBuf directBuffer(int initialCapacity) {
return directBuffer(initialCapacity, DEFAULT_MAX_CAPACITY);
}

@Override
public ByteBuf directBuffer(int initialCapacity, int maxCapacity) {
//如果初始化的容量和最大容量等于0,就返回一个空的ByteBuf
if (initialCapacity == 0 && maxCapacity == 0) {
return emptyBuf;
}
validate(initialCapacity, maxCapacity);
return newDirectBuffer(initialCapacity, maxCapacity);
}
//校验参数
private static void validate(int initialCapacity, int maxCapacity) {
checkPositiveOrZero(initialCapacity, "initialCapacity");
if (initialCapacity > maxCapacity) {
throw new IllegalArgumentException(String.format(
"initialCapacity: %d (expected: not greater than maxCapacity(%d)",
initialCapacity, maxCapacity));
}
}
然后会进入池化的ByteBuf分配器PooledByteBufAllocator类,可以实现内存的复用:
// cache sizes  缓存默认值
DEFAULT_TINY_CACHE_SIZE = SystemPropertyUtil.getInt("io.netty.allocator.tinyCacheSize", 512);
DEFAULT_SMALL_CACHE_SIZE = SystemPropertyUtil.getInt("io.netty.allocator.smallCacheSize", 256);
DEFAULT_NORMAL_CACHE_SIZE = SystemPropertyUtil.getInt("io.netty.allocator.normalCacheSize", 64);
@Override
protected ByteBuf newDirectBuffer(int initialCapacity, int maxCapacity) {
//从当前线程中获取cache对象
PoolThreadCache cache = threadCache.get();
//从cache中获取Arena
//Arena可以理解为一个netty提供的实际进行buf分配和管理的工具
PoolArena<ByteBuffer> directArena = cache.directArena;

final ByteBuf buf;
//如果有directArena就分配池化内存
if (directArena != null) {
buf = directArena.allocate(cache, initialCapacity, maxCapacity);
} else { //如果没有directArena,就使用非池化Unpooled
buf = PlatformDependent.hasUnsafe() ?
UnsafeByteBufUtil.newUnsafeDirectByteBuf(this, initialCapacity, maxCapacity) :
new UnpooledDirectByteBuf(this, initialCapacity, maxCapacity);
}

return toLeakAwareBuffer(buf);
}
再次跟踪后进入PoolArena类:
可以看到下面有三种类型tiny、small、normal
enum SizeClass {
Tiny,
Small,
Normal
}
PooledByteBuf<T> allocate(PoolThreadCache cache, int reqCapacity, int maxCapacity) {
//获取一个ByteBuf对象
PooledByteBuf<T> buf = newByteBuf(maxCapacity);
//分配内存
allocate(cache, buf, reqCapacity);
return buf;
}

@Override
protected PooledByteBuf<ByteBuffer> newByteBuf(int maxCapacity) {
//如果支持Unsafe,就初始化一个PooledUnsafeDirectByteBuf
if (HAS_UNSAFE) {
return PooledUnsafeDirectByteBuf.newInstance(maxCapacity);
} else { //不支持Unsafe,就初始化一个PooledDirectByteBuf
return PooledDirectByteBuf.newInstance(maxCapacity);
}
}
下面进入PooledUnsafeDirectByteBuf类:
从线程回收栈中获取一个buf,如果栈中没有,就会创建一个新的,如果有,就会返回栈中的buf
//调用RECYCLER.get()时,线程栈中没有可以复用的时,会调用newObject方法,此时创建出来的buf是空的
private static final Recycler<PooledUnsafeDirectByteBuf> RECYCLER = new Recycler<PooledUnsafeDirectByteBuf>() {
@Override
protected PooledUnsafeDirectByteBuf newObject(Handle<PooledUnsafeDirectByteBuf> handle) {
return new PooledUnsafeDirectByteBuf(handle, 0);
}
};

static PooledUnsafeDirectByteBuf newInstance(int maxCapacity) {
//RECYCLER,回收机制
PooledUnsafeDirectByteBuf buf = RECYCLER.get();
//取出来的可能是之前的buf,使用之前清理一下
buf.reuse(maxCapacity);
return buf;
}
然后再次回到PoolArena类中的allocate方法,分配内存:
private void allocate(PoolThreadCache cache, PooledByteBuf<T> buf, final int reqCapacity) {
//将需要的内存大小计算为2^n
final int normCapacity = normalizeCapacity(reqCapacity);
//需要分配的内存是否是tiny或者small类型
if (isTinyOrSmall(normCapacity)) { // capacity < pageSize
int tableIdx;
PoolSubpage<T>[] table;
boolean tiny = isTiny(normCapacity);
if (tiny) { // < 512 //分配一个tiny内存
if (cache.allocateTiny(this, buf, reqCapacity, normCapacity)) {
// was able to allocate out of the cache so move on
return;
}
tableIdx = tinyIdx(normCapacity);
table = tinySubpagePools;
} else {
if (cache.allocateSmall(this, buf, reqCapacity, normCapacity)) {
// was able to allocate out of the cache so move on
return;
}
tableIdx = smallIdx(normCapacity);
table = smallSubpagePools;
}

final PoolSubpage<T> head = table[tableIdx];

synchronized (head) {
final PoolSubpage<T> s = head.next;
if (s != head) {
assert s.doNotDestroy && s.elemSize == normCapacity;
long handle = s.allocate();
assert handle >= 0;
s.chunk.initBufWithSubpage(buf, null, handle, reqCapacity);
incTinySmallAllocation(tiny);
return;
}
}
synchronized (this) {
//分配一块新的内存
allocateNormal(buf, reqCapacity, normCapacity);
}

incTinySmallAllocation(tiny);
return;
}
if (normCapacity <= chunkSize) {
if (cache.allocateNormal(this, buf, reqCapacity, normCapacity)) {
// was able to allocate out of the cache so move on
return;
}
synchronized (this) {
allocateNormal(buf, reqCapacity, normCapacity);
++allocationsNormal;
}
} else {
// Huge allocations are never served via the cache so just call allocateHuge
allocateHuge(buf, reqCapacity);
}
}
PoolThreadCache类下的allocateTiny方法:
boolean allocateTiny(PoolArena<?> area, PooledByteBuf<?> buf, int reqCapacity, int normCapacity) {
return allocate(cacheForTiny(area, normCapacity), buf, reqCapacity);
}

//从cache中获取buf
private MemoryRegionCache<?> cacheForTiny(PoolArena<?> area, int normCapacity) {
int idx = PoolArena.tinyIdx(normCapacity);
if (area.isDirect()) {
return cache(tinySubPageDirectCaches, idx);
}
return cache(tinySubPageHeapCaches, idx);
}
根据需要的容量获取对应的格子,走到PoolArena类下面的tinyIdx方法:
static int tinyIdx(int normCapacity) {
return normCapacity >>> 4;
}
PoolThreadCache类下的allocate方法,把缓存格子的内存分配到buf
private boolean allocate(MemoryRegionCache<?> cache, PooledByteBuf buf, int reqCapacity) {
if (cache == null) {
// no cache found so just return false here
return false;
}
boolean allocated = cache.allocate(buf, reqCapacity);
if (++ allocations >= freeSweepAllocationThreshold) {
allocations = 0;
trim();
}
return allocated;
}
下面是具体跟踪代码的步骤图:
上面的源码是以tiny类型为例,其他两种类型类似,当第一次分配创建了一块新的内存,然后被成功回收到内存缓冲池后,再次分配对应大小的内存,会直接从内存缓冲池中取,不会再次分配一块新的内存了
内存回收的过程
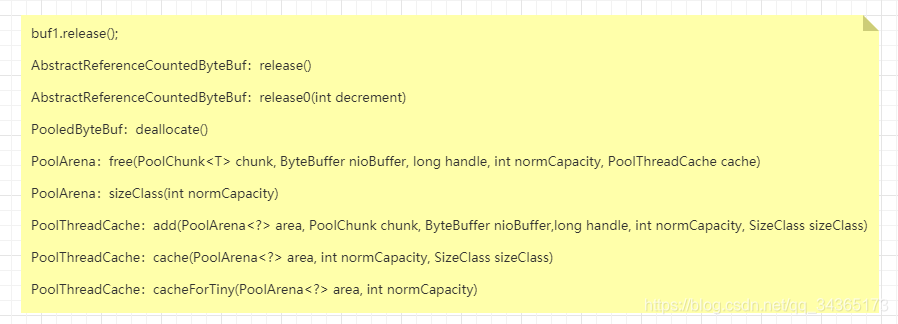
接下来跟踪release()方法,看下内存回收的过程
buf1.release();
第一次进入AbstractReferenceCountedByteBuf类:
Buf的引用计数器,用于内存复用,有一个计数器refCnt,retain()计数器加一,release()计数器减一,
直到计数器为0,才调用deallocate()释放,deallocate()方法由具体的buf自己实现。
@Override
public boolean release() {
return release0(1);
}
private boolean release0(int decrement) {
int rawCnt = nonVolatileRawCnt(), realCnt = toLiveRealCnt(rawCnt, decrement);
//判断当前buf有没有被引用了,没有的话就调用deallocate
if (decrement == realCnt) {
if (refCntUpdater.compareAndSet(this, rawCnt, 1)) {
deallocate();
return true;
}
return retryRelease0(decrement);
}
return releaseNonFinal0(decrement, rawCnt, realCnt);
}
进入PooledByteBuf类:
@Override
protected final void deallocate() {
if (handle >= 0) {
final long handle = this.handle;
//表示当前的buf不在使用任何一块内存区域
this.handle = -1;
//设置memory为null
memory = null;
//释放buf的内存
chunk.arena.free(chunk, tmpNioBuf, handle, maxLength, cache);
tmpNioBuf = null;
chunk = null;
//把buf对象放入对象回收栈
recycle();
}
}
再次进入PoolArena类:
void free(PoolChunk<T> chunk, ByteBuffer nioBuffer, long handle, int normCapacity, PoolThreadCache cache) {
//判断是否是unpooled
if (chunk.unpooled) {
int size = chunk.chunkSize();
destroyChunk(chunk);
activeBytesHuge.add(-size);
deallocationsHuge.increment();
} else {
//判断是哪种类型,tiny、small、normal
SizeClass sizeClass = sizeClass(normCapacity);
//放入缓存
if (cache != null && cache.add(this, chunk, nioBuffer, handle, normCapacity, sizeClass)) {
// cached so not free it.
return;
}

freeChunk(chunk, handle, sizeClass, nioBuffer);
}
}

//计算内存区域是哪种类型
private SizeClass sizeClass(int normCapacity) {
if (!isTinyOrSmall(normCapacity)) {
return SizeClass.Normal;
}
return isTiny(normCapacity) ? SizeClass.Tiny : SizeClass.Small;
}
然后到PoolThreadCache类:
boolean add(PoolArena<?> area, PoolChunk chunk, ByteBuffer nioBuffer,
long handle, int normCapacity, SizeClass sizeClass) {
MemoryRegionCache<?> cache = cache(area, normCapacity, sizeClass);
if (cache == null) {
return false;
}
//加入到缓存队列
return cache.add(chunk, nioBuffer, handle);
}

private MemoryRegionCache<?> cache(PoolArena<?> area, int normCapacity, SizeClass sizeClass) {
//判断是哪种类型,然后把内存回收到哪一块
switch (sizeClass) {
case Normal:
return cacheForNormal(area, normCapacity);
case Small:
return cacheForSmall(area, normCapacity);
case Tiny:
return cacheForTiny(area, normCapacity);
default:
throw new Error();
}
}

private MemoryRegionCache<?> cacheForTiny(PoolArena<?> area, int normCapacity) {
int idx = PoolArena.tinyIdx(normCapacity);
if (area.isDirect()) {
return cache(tinySubPageDirectCaches, idx);
}
return cache(tinySubPageHeapCaches, idx);
}
上述跟踪代码步骤图:
ByteBuf零拷贝机制
Netty的零拷贝机制,是一种应用层的实现,和底层的JVM、操作系统内存机制没有过多的关联
几种示例
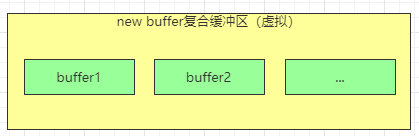
==一:CompositeByteBuf,将多个ByteBuf合并为一个逻辑上的ByteBuf,避免了各个ByteBuf之间的拷贝==
public static void test1() {
ByteBuf buf1 = Unpooled.buffer(4);
ByteBuf buf2 = Unpooled.buffer(3);
byte[] bytes1 = {1,2};
byte[] bytes2 = {3,4,5};
buf1.writeBytes(bytes1);
buf2.writeBytes(bytes2);
CompositeByteBuf byteBuf = Unpooled.compositeBuffer();
byteBuf = byteBuf.addComponents(true, buf1, buf2);
System.out.println("byteBuf: " + byteBuf.toString());
}

上面输出结果,ridx是顺序读的读取位置,widx是顺序写的写入位置,cap是新的ByteBuf的容量,components是指新的ByteBuf是由几个ByteBuf组成
==二:wrappedBuffer()方法,将byte[]数组包装成ByteBuf对象==
public static void test2() {
byte[] bytes = {1,2,3,4,5};
ByteBuf buf = Unpooled.wrappedBuffer(bytes);
System.out.println("buf:" + buf.toString());
}
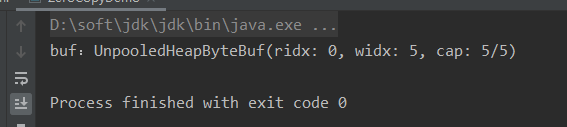
输出结果中:ridx是顺序读的读取位置,widx是顺序写的写入位置,cap是ByteBuf的容量,新的ByteBuf里存的是数组的引用地址,实质操作的还是原来的数组

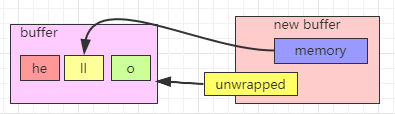
==三:slice()方法,将一个ByteBuf对象切分成多个ByteBuf对象==
public static void test3() {
ByteBuf buf = Unpooled.wrappedBuffer("hello".getBytes());
ByteBuf byteBuf = buf.slice(1,2);
System.out.println("byteBuf:" + byteBuf.toString());
}

输出结果中,可以看到,有两个ByteBuf,其中一个是原有的,新的ByteBuf中存放了原来的ByteBuf的引用地址,另一个是分割后的ByteBuf的引用地址

- Java网络编程 -- Netty中的ByteBuf
- netty源码分析之-ByteBuf详解(8)
- 网络编程中的大小端字节序详解
- android 网络编程 HttpGet类和HttpPost类使用详解
- Java网络编程和NIO详解1:JAVA 中原生的 socket 通信机制
- Netty ByteBuf 零拷贝
- Java网络编程学习笔记(3)ServerSocket用法详解
- iOS 开发 网络编程详解之基本概念
- iOS 开发 网络编程详解之TCP&UDP
- 互联网架构(8):Socket网络通信编程--Netty
- 从零开始学Python第八周:详解网络编程基础(socket)
- iOS网络编程之四——请求类NSURLRequest使用详解
- Netty之实现自定义简单的编解码器二(MessageToMessageEncoder<CharSequence>和MessageToMessageDecoder<ByteBuf>)
- android 网络编程 HttpGet类和HttpPost类使用详解
- Java IO、网络编程、NIO、Netty、Hessian、RPC、RMI的学习路线
- Linux 网络编程—— libpcap 详解
- 详解Python Socket网络编程
- 【Netty源码】ByteBuf源码剖析
- 网络编程复习(六):Netty入门Demo
- android 网络编程 HttpGet类和HttpPost类使用详解