Mysql 高可用 InnoDB Cluster 多节点搭建过程
1. 简介
InnoDB Cluster 的搭建可以分为两种情况:
(1)实验环境
使用 sandbox 沙箱模拟数据库实例,这个非常简单,可以参考之前的一篇文章《体验 MySQL InnoDB Cluster》,也可以看 mysql 的官方文档,其中就是使用 sandbox 来介绍搭建过程的
(2)真实多服务器节点环境
真实环境下的搭建要更复杂一些,过程中我也遇到了一些问题,这方面的资料还很少,花费了不少时间才搭建成功
下面总结了多节点 InnoDB Cluster 搭建的详细过程,供有需要的朋友参考
2. 目标
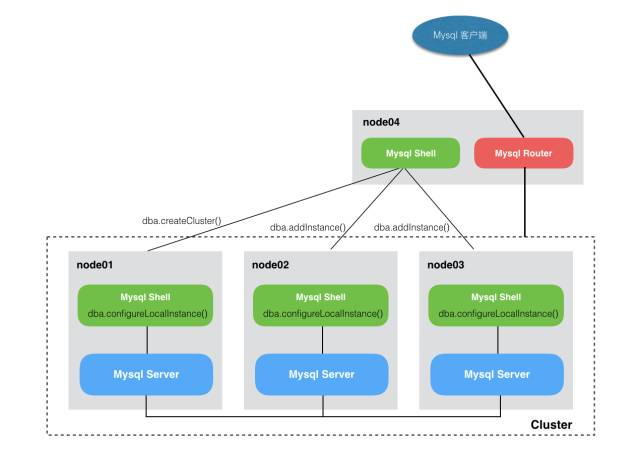
准备4台服务器,node01、node02、node03 作为 cluster 节点,node04 作为管理节点,负责创建 cluster,并作为 cluster 的路由
最后,会搭建出一个高可用集群,通过 router 连接到这个cluster,MySQL客户端通过 router 与 cluster 进行沟通
3. 搭建思路
(1)安装基础环境
node 01、02、03 上安装好
mysql与
mysql-shell
node04 上安装
mysql-shell、
mysql-router
(2)创建集群
在 node01 上创建集群,先配置好其 mysql 并启动,然后通过 node01 上的 shell 连接 node01 的 mysql,执行配置命令
dba.configureLocalInstance();
使其具备创建集群的条件
最后通过 node04 的 shell 连接 node01 的 mysql,执行创建集群的命令
dba.createCluster()
(3)向集群中添加节点
集群创建起来后,接下来就是向其中添加节点
配置 node02、node03 的 mysql 并启动,然后使用各自的 mysql-shell 对其进行配置
最后通过 node04 的 mysql-shell 执行添加实例的命令
dba.addInstance()把 node02,node03 添加到集群中
(4)使用 router 连接集群
集群搭建完成后,把 node04 的 router 启动起来,并连接到集群
client 就可以连接到 router,通过其操作集群了
4. 具体搭建过程
(1)环境安装
在各台服务器中配置好 hosts,如:
192.168.31.13 node03
192.168.31.228 node02
192.168.31.36 node01
需要准备的软件:
mysql-5.7.17-linux-glibc2.5-x86_64.tar.gz
mysql-shell-1.0.9-linux-glibc2.12-x86-64bit.tar.gz
mysql-router-2.1.3-linux-glibc2.12-x86-64bit.tar.gz
根据上面的结构图,在各个服 8000 务器中安装好所需的软件
安装方法:
1. MySQL
# 解压
tar zxf mysql-5.7.17-linux-glibc2.5-x86_64.tar.gz
mv mysql-5.7.17-linux-glibc2.5-x86_64 /usr/local/mysql-5.7
cd /usr/local

# 初始化数据库实例
mkdir data
mysql-5.7/bin/mysqld --initialize-insecure --basedir=$PWD/mysql-5.7 --datadir=$PWD/data

# 创建mysql用户
groupadd mysql5.7
useradd -g mysql5.7 mysql5.7
chown -R mysql5.7:mysql5.7 /usr/local/mysql-5.7
chown -R mysql5.7:mysql5.7 /usr/local/data
2. shell
# 直接解压即可
tar zxf mysql-shell-1.0.9-linux-glibc2.12-x86-64bit.tar.gz mysql-shell
3. router
# 直接解压即可
tar zxf mysql-router-2.1.3-linux-glibc2.12-x86-64bit.tar.gz mysql-router
(2)创建集群
配置 node01 的 mysql 并启动
切换到mysql用户
su mysql5.7
编辑配置文件
vi /user/local/data/my.cnf,内容:
[mysqld]

# server configuration
datadir=/usr/local/data
basedir=/usr/local/mysql-5.7/

port=3306
socket=/usr/local/data/mysql.sock

server_id=1
gtid_mode=ON
enforce_gtid_consistency=ON
master_info_repository=TABLE
relay_log_info_repository=TABLE
binlog_checksum=NONE
log_slave_updates=ON
log_bin=binlog
binlog_format=ROW

transaction_write_set_extraction=XXHASH64
启动
nohup /usr/local/mysql-5.7/bin/mysqld --defaults-file=data/my.cnf >data/nohup.out 2>&1 &

# 退回root用户
exit
登录 MySQL
/usr/local/mysql-5.7/bin/mysql -uroot -h127.0.0.1 --skip-password
修改root默认密码
mysql> ALTER USER 'root'@'localhost' IDENTIFIED BY 'A123456';
通过本机 mysql-shell 对 mysql 进行配置
进到 mysql-shell 的安装目录,登录 shell ,执行配置
bin/mysqlsh
连接到本机MySQL,执行配置命令
# 连接,需要输入密码(A123456)
mysql-js> shell.connect('root@localhost:3306');

# 执行配置命令,也需要密码
# 然后需要输入MySQL配置文件路径,本示例中的路径是 /usr/local/data/s1/s1.cnf
# 接下来需要创建供其他主机访问的用户,这里选择第1项,为root用户授权

mysql-js> dba.configureLocalInstance();
Please provide the password for 'root@localhost:3306':

Detecting the configuration file...
Default file not found at the standard locations.
Please specify the path to the MySQL configuration file: /usr/local/data/s1/s1.cnf
MySQL user 'root' cannot be verified to have access to other hosts in the network.

1) Create root@% with necessary grants
2) Create account with different name
3) Continue without creating account
4) Cancel
Please select an option [1]: 1
Password for new account:
Confirm password:
Validating instance...

The instance 'localhost:3306' is valid for Cluster usage
You can now use it in an InnoDB Cluster.

{
    "status": "ok"
}status为
ok说明配置没问题了,可以用来创建cluster
通过 node04 的 mysql-shell 连接 node01 创建 cluster
进入 node04 上的 mysql-shell 安装目录,登录 shell,连接 node01,创建 cluster
bin/mysqlsh

# 连接01
mysql-js> shell.connect('root@node01:3306');

# 创建一个 cluster,命名为 'myCluster'
mysql-js> var cluster = dba.createCluster('myCluster');

# 创建成功后,查看cluster状态
mysql-js> cluster.status();
(3)添加实例节点 node02
配置 node02 的 mysql 并启动
编辑配置文件
vi /usr/local/data/my.cnf,内容与 node01 上的一样,只有一行不同
server_id=2
通过本机 mysql-shell 对 mysql 进行配置
登录 shell ,执行配置
bin/mysqlsh

mysql-js> shell.connect('root@localhost:3306');
mysql-js> dba.configureLocalInstance();
停掉 mysql,修改 my.cnf,添加配置项
vi data/my.cnf

# 在末尾添加
group_replication_allow_local_disjoint_gtids_join=ON
重启MySQL
通过 node04 的 mysql-shell 添加 node02 到 cluster
# 添加实例
cluster.addInstance('root@node02:3306');

# 创建成功后,查看cluster状态
mysql-js> cluster.status();
(4)添加实例节点 node03
过程与 node02 完全相同,只需要注意 my.cnf 中的 'server_id' 值改为 3,和 addInstance 时改为 node03
(5)安装 router
进入 node04 中 mysql-router 安装目录,启动 router
mysqlrouter --bootstrap root@ic-1:3306 --directory myrouter --name=myrouter
myrouter/start.sh
然后就可以使用MySQL客户端连接router了
5. 小结
mysql 下载地址:
https://dev.mysql.com/downloads/mysql/
mysql-shell 下载地址:
https://dev.mysql.com/downloads/shell/
mysql-router 下载地址:
https://dev.mysql.com/downloads/router/
都选择 Linux Generic 版本即可

- MySQL InnoDB Cluster搭建高可用数据库集群(centos7.x)
- mysql-cluster集群原理介绍和搭建步骤(四个data/sql节点)
- MySQL InnoDB Cluster搭建
- MySQL InnoDB Cluster搭建
- mysql innodb cluster服务器搭建
- mysql-cluster数据节点启动过程中报错
- mysql高可用之PXC(Percona XtraDB Cluster)搭建
- 基于mysql5.7 搭建mysql_InnoDB_cluster
- 从端口的角度来解释MySQL-Cluster7.2.8的启动与各节点的连接过程
- 基于MySQL 5.7多源复制及Keepalived搭建三节点高可用架构
- MYSQL 8 Innodb cluster mysqlsh 安装详细过程及周边
- MySQL高可用架构InnoDB Cluster (和NDB Cluster是两码事)
- mysql-cluster集群原理介绍和搭建步骤(四个data/sql节点)
- mysql-cluster集群原理介绍和搭建步骤(四个data/sql节点) (转)
- Linux下MySQL/MariaDB Galera集群搭建过程
- Memcached集群/分布式/高可用 及 Magent缓存代理搭建过程 详解
- 基于ubuntu搭建Redis(4.0) Cluster 高可用(HA)集群环境
- Haproxy+etcd+confd+Docker搭建节点自动发现的高可用负载均衡框架
- 关系型数据库-MySQL进阶(五)搭建PX 数据库高可用集群与数据库引擎
- MySQL高可用架构之Galera Cluster