基于oauth 2.0 开发第三方开放平台
2021-03-03 22:05
573 查看
什么是开放平台
通过开放自己平台产品服务的各种API接口,让其他第三方开发者在开发应用时根据需求直接调用,例如微信登录、QQ登录、微信支付、微博登录、热门等。
让第三方应用通过开发平台,使得自身海量数据资源得到沉淀(变现)
目前国内主流的网站的的开放平台,都是基于oauth2.0 协议进行做的开放平台
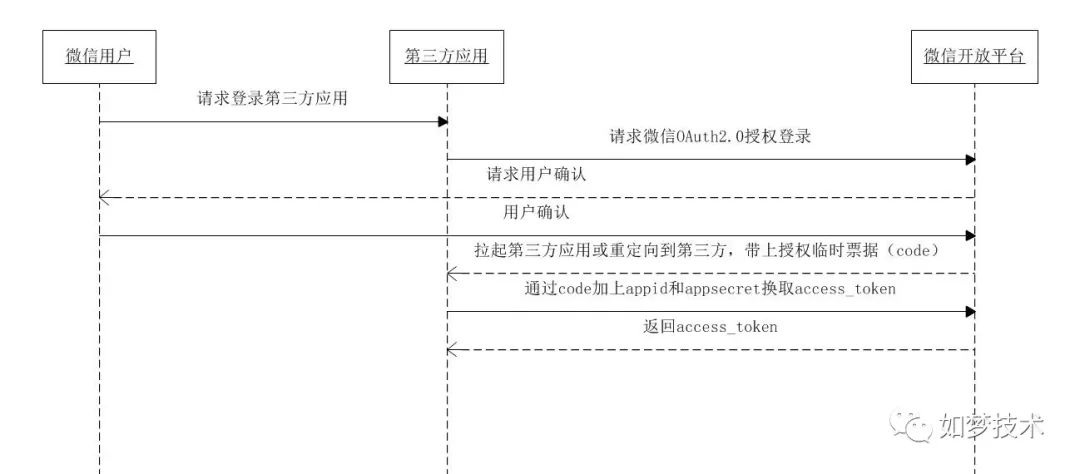
微信开放平台授权机制流程图
微博开放平台授权机制流程图
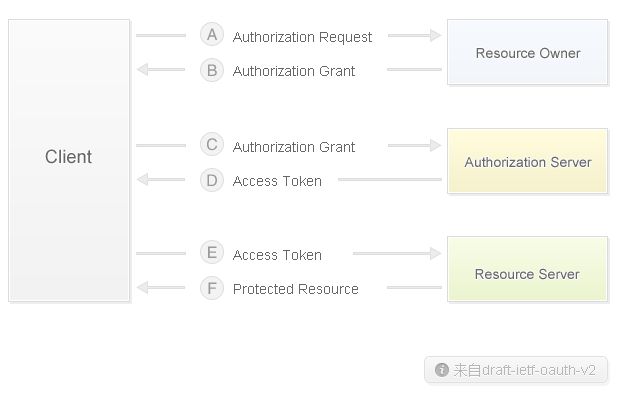
oauth2.0 授权码模式
授权码模式(authorization code)是功能最完整、流程最严密的授权模式。 它的特点就是通过客户端的后台服务器,与"服务提供商"的认证服务器进行互动,能够满足绝大多数开放平台认证授权的需求。
引入相关依赖
<dependency>
         <groupId>org.springframework.cloud</groupId>
         <artifactId>spring-cloud-starter-oauth2</artifactId>
</dependency>

<dependency>
        <groupId>org.springframework.cloud</groupId>
        <artifactId>spring-cloud-starter-security</artifactId>
</dependency>
配置认证服务器
通过内存模式,初始化一个支持授权码模式的客户端
@Configuration
@AllArgsConstructor
@EnableAuthorizationServer
public class AuthorizationServerConfig extends AuthorizationServerConfigurerAdapter {

@Override
@SneakyThrows
	public void configure(ClientDetailsServiceConfigurer clients) {
clients.inMemory()
.withClient("pigx") // client_id
.secret("pigx") // client_secret
.authorizedGrantTypes("authorization_code") // 该client允许的授权类型
.scopes("app"); // 允许的授权范围
	}
}
初步完成,测试一下
注意这里是 /oauth/authorize 不是 /oauth/token 接口,只需要带 client_id 即可。
localhost:9999/oauth/authorize?client_id=pigx&response_type=code&redirect_uri=https://pig4cloud.com
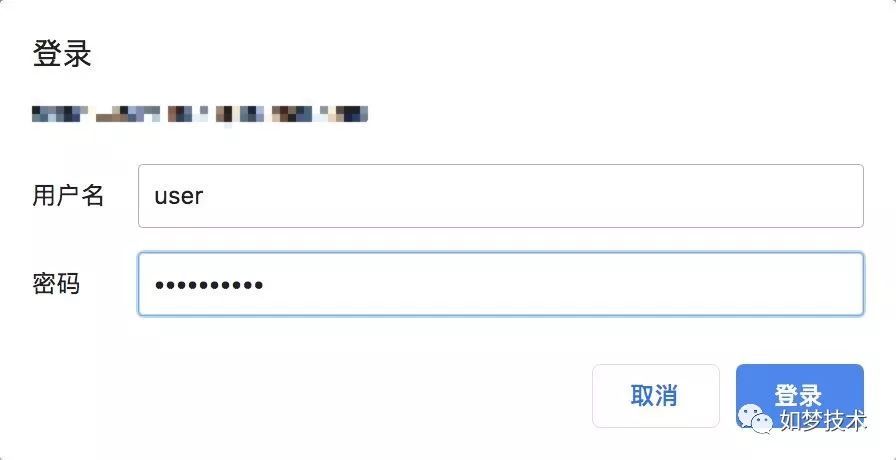
先进行basic 登录,默认用户user,密码已经打在控制台自己查即可
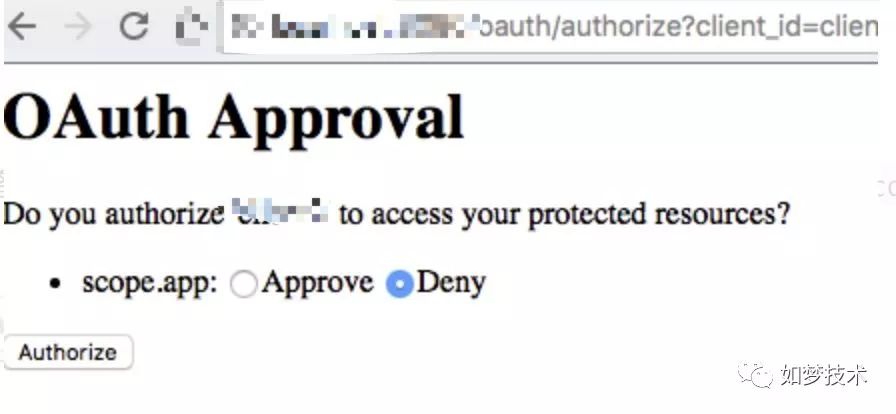
授权确认
登录成功带着code回调到目标接口

通过/oauth/token获取登录令牌
简单的几步就完成上图微信或者其他网站的授权流程,不过目前为止 略显简陋
登录没有界面,用户密码数据库没有保存
确认授权界面太丑,没有个性化
配置安全登录
配置未登录拦截重定向到 loginPage
配置登录完成提交的页面路径 这里会被spring security 接管
@Primary
@Order(90)
@Configuration
public class WebSecurityConfigurer extends WebSecurityConfigurerAdapter {
@Override
@SneakyThrows
	protected void configure(HttpSecurity http) {
http
.formLogin()
.loginPage("/token/login")
.loginProcessingUrl("/token/form")
.and()
.authorizeRequests()
.anyRequest().authenticated();
	}
}
认证服务器配置用户加载规则实现
@Override
public void configure(AuthorizationServerEndpointsConfigurer endpoints) {
	endpoints.userDetailsService(pigxUserDetailsService)
}

// 通过这步去加载数据的用户名密码
public interface UserDetailsService {
    UserDetails loadUserByUsername(String var1) throws UsernameNotFoundException;
}
重写原有认证页面
默认逻辑/oauth/confirm_access,让他重定向到我们自己的路径,然后进行个性哈
@Override
public void configure(AuthorizationServerEndpointsConfigurer endpoints) {
		endpoints
				.userDetailsService(pigxUserDetailsService)
				.pathMapping("/oauth/confirm_access", "/token/confirm_access")
	}
获取上下文中的授权信息,传给前端
/**
	 * 确认授权页面
	 *
	 * @param request
	 * @param session
	 * @param modelAndView
	 * @return
	 */
@GetMapping("/confirm_access")
	public ModelAndView confirm(HttpServletRequest request, HttpSession session, ModelAndView modelAndView) {
Map<String, Object> scopeList = (Map<String, Object>) request.getAttribute("scopes");
		modelAndView.addObject("scopeList", scopeList.keySet());

Object auth = session.getAttribute("authorizationRequest");
if (auth != null) {
			AuthorizationRequest authorizationRequest = (AuthorizationRequest) auth;
			ClientDetails clientDetails = clientDetailsService.loadClientByClientId(authorizationRequest.getClientId());
			modelAndView.addObject("app", clientDetails.getAdditionalInformation());
			modelAndView.addObject("user", SecurityUtils.getUser());
		}

		modelAndView.setViewName("ftl/confirm");
return modelAndView;
	}
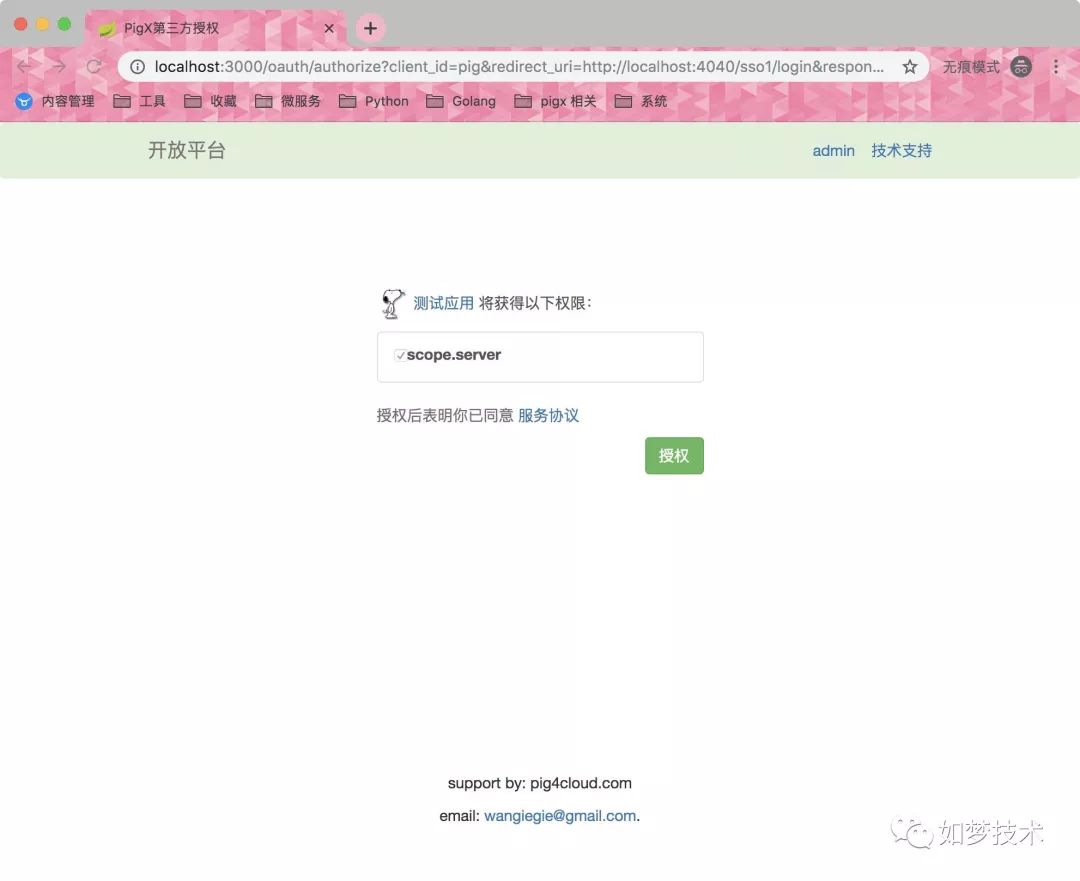
最终效果
把用户头像等信息展示出来就蛮好看了
总结
以上源码参考个人项目 基于Spring Cloud、OAuth2.0开发基于Vue前后分离的开发平台 https://gitee.com/log4j/pig

相关文章推荐
- 开放平台OAuth 2.0授权开发实践
- 开放平台OAuth 2.0授权开发实践
- 微信开放平台 公众号第三方平台开发 教程四 代公众号调用接口的SDK和demo
- 微信开放平台 公众号第三方平台开发 教程一 平台介绍
- 谈谈基于OAuth 2.0的第三方认证 [上篇]
- 谈谈基于OAuth 2.0的第三方认证 [上篇]
- 谈谈基于OAuth 2.0的第三方认证 [中篇]
- 谈谈基于OAuth 2.0的第三方认证 [上篇]
- 基于Web开放平台的应用的开发的一些研究
- 微信第三方开放平台开发
- 微信开放平台 公众号第三方平台开发 教程五 代公众号发起网页授权源码
- 基于PHP构建OAuth 2.0 认证平台
- OAuth 2.0简单实战(以新浪开发平台为例)
- 谈谈基于OAuth 2.0的第三方认证 [中篇]
- 谈谈基于OAuth 2.0的第三方认证 [上篇]
- 谈谈基于OAuth 2.0的第三方认证 [下篇]
- 微信开放平台的第三方平台微信开放平台帐号管理接口开发的两个错误
- 微信开发(4):微信第三方开放平台的搭建(java)
- OAuth 2.0 第三方平台授权及 OAuth scribe 库介绍
- 谈谈基于OAuth 2.0的第三方认证 [下篇]